The best import export plugin for WordPress & WooCommerce.

How to Import WooCommerce Data from CSV, Excel, and XML
To import WooCommerce data from CSV, Excel, or XML, go to All Import › New Import, choose your import file, and select the WooCommerce data to import. Use our Drag & Drop tool to map incoming data elements to their target fields, then run the import.
To demonstrate, we'll show you how to import WooCommerce customers in this guide.
Table of Contents
- Step 1: Create New WooCommerce Import
- Step 2: Review the Import File
- Step 3: Map the Incoming Data
- Step 4: Run the Import
Advanced Topics
- Keeping the Same IDs
- Importing Data in the Correct Order
- How to Filter WooCommerce Data
- Data Not Imported Correctly
Step 1: Create New Import for WooCommerce Data
Navigate to All Import › New Import in the main WordPress menu, select or upload your import file, then pick WooCommerce Customers from the drop-down list.

Click Continue to Step 2.
Step 2: Review the Import File
The Review Import File screen appears, where you can check to ensure that WP All Import has correctly interpreted your file.
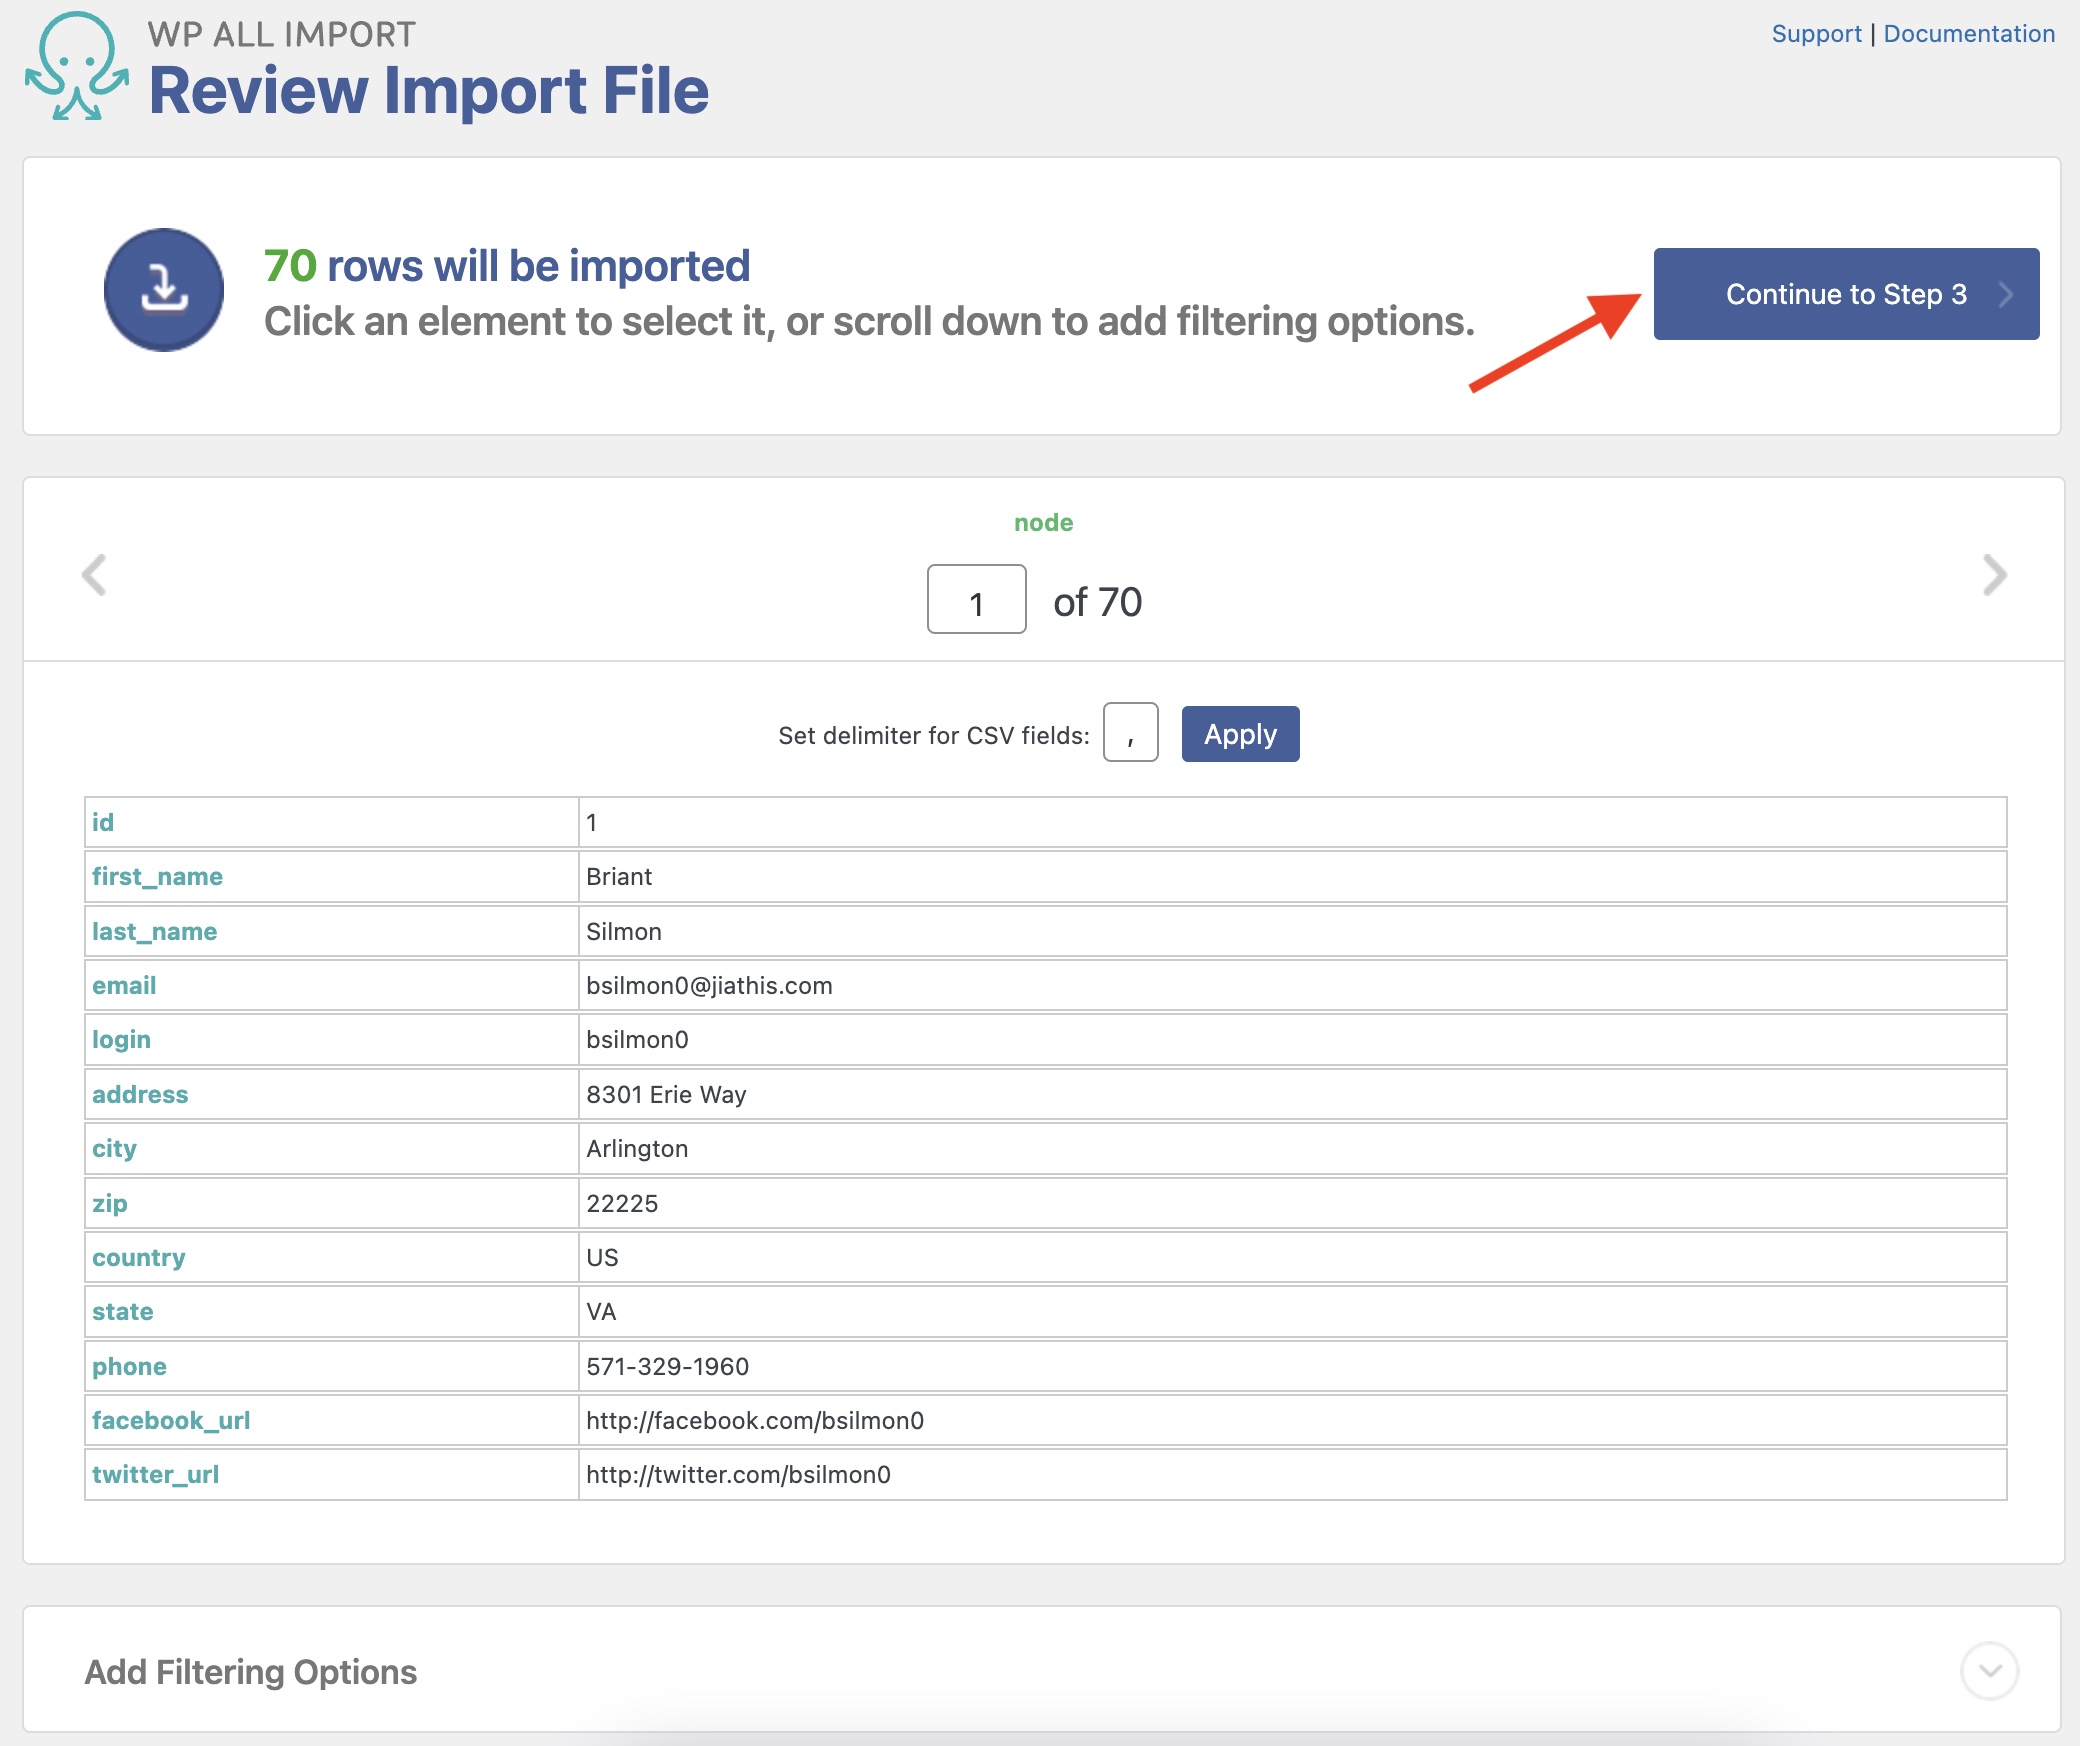
You can also add filtering options in this step if you want to filter the customers to import, this is done under Manage Filtering Options. Once done, click Continue to Step 3 to proceed.
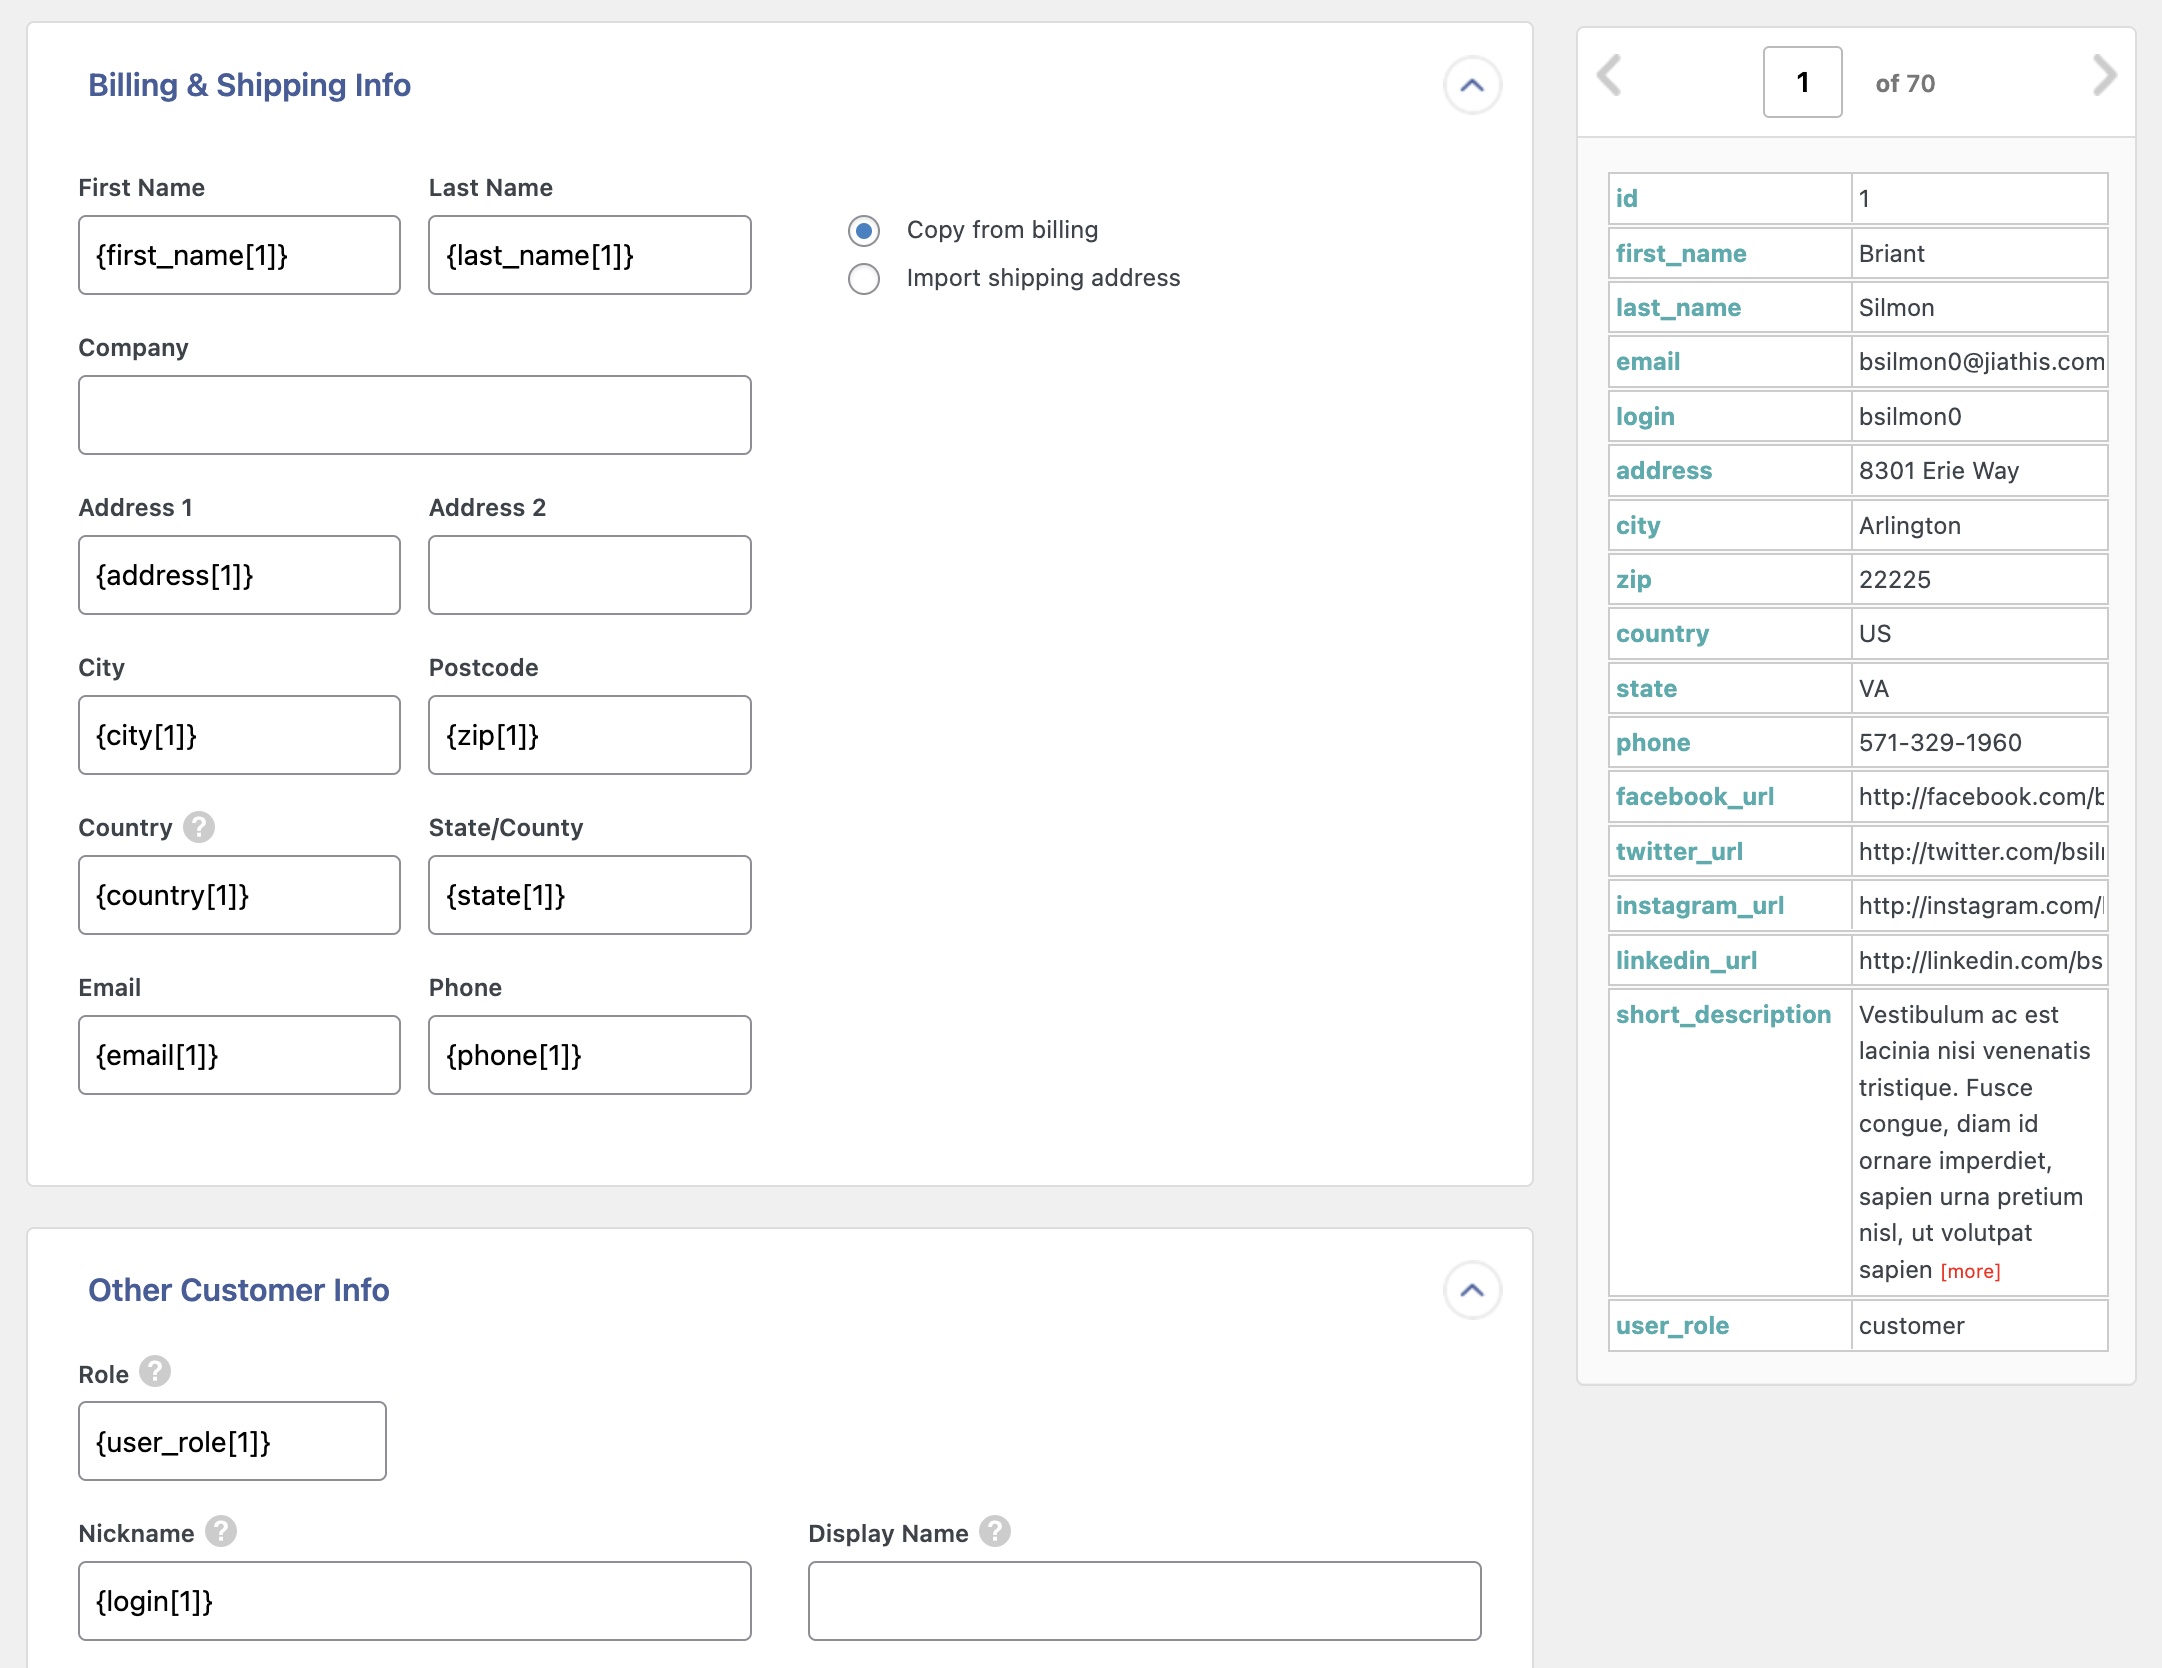
Step 3: Map Incoming Data Elements to Target Fields
You will now see the Drag & Drop screen, where you can map the incoming data elements to their WooCommerce customer fields. Simply drag & drop the data from the panel on the right to the correct fields on the left.
The first section is Customer Account Info, which contains the main customer information:

Further down, the Billing & Shipping Info and Other Customer Info panels let you map the rest of the customer information.
After completing this process, click Continue to Step 4 at the bottom (not shown).
Step 4: Configure Settings and Run the Import
Next up is the Import Settings screen, where you define options and settings for the import. First, click on Auto-detect to define a unique identifier for the import. Below this, you can define how the import behaves when it runs again.

You also have the following panels near the bottom:
- Email Notifications For Imported Customers: Enable the option inside this panel to avoid sending the default WordPress email notification to imported customers.
- Scheduling Options: Lets you set up different ways to schedule the import.
- Configure Advanced Settings: Includes various import settings and options to configure, such as records per iteration or the friendly name for the import.
For this example, leave these panels with their default selections.
Click the Continue button to move to the next step. You'll then see the Confirm & Run screen, where you can review an Import Summary.
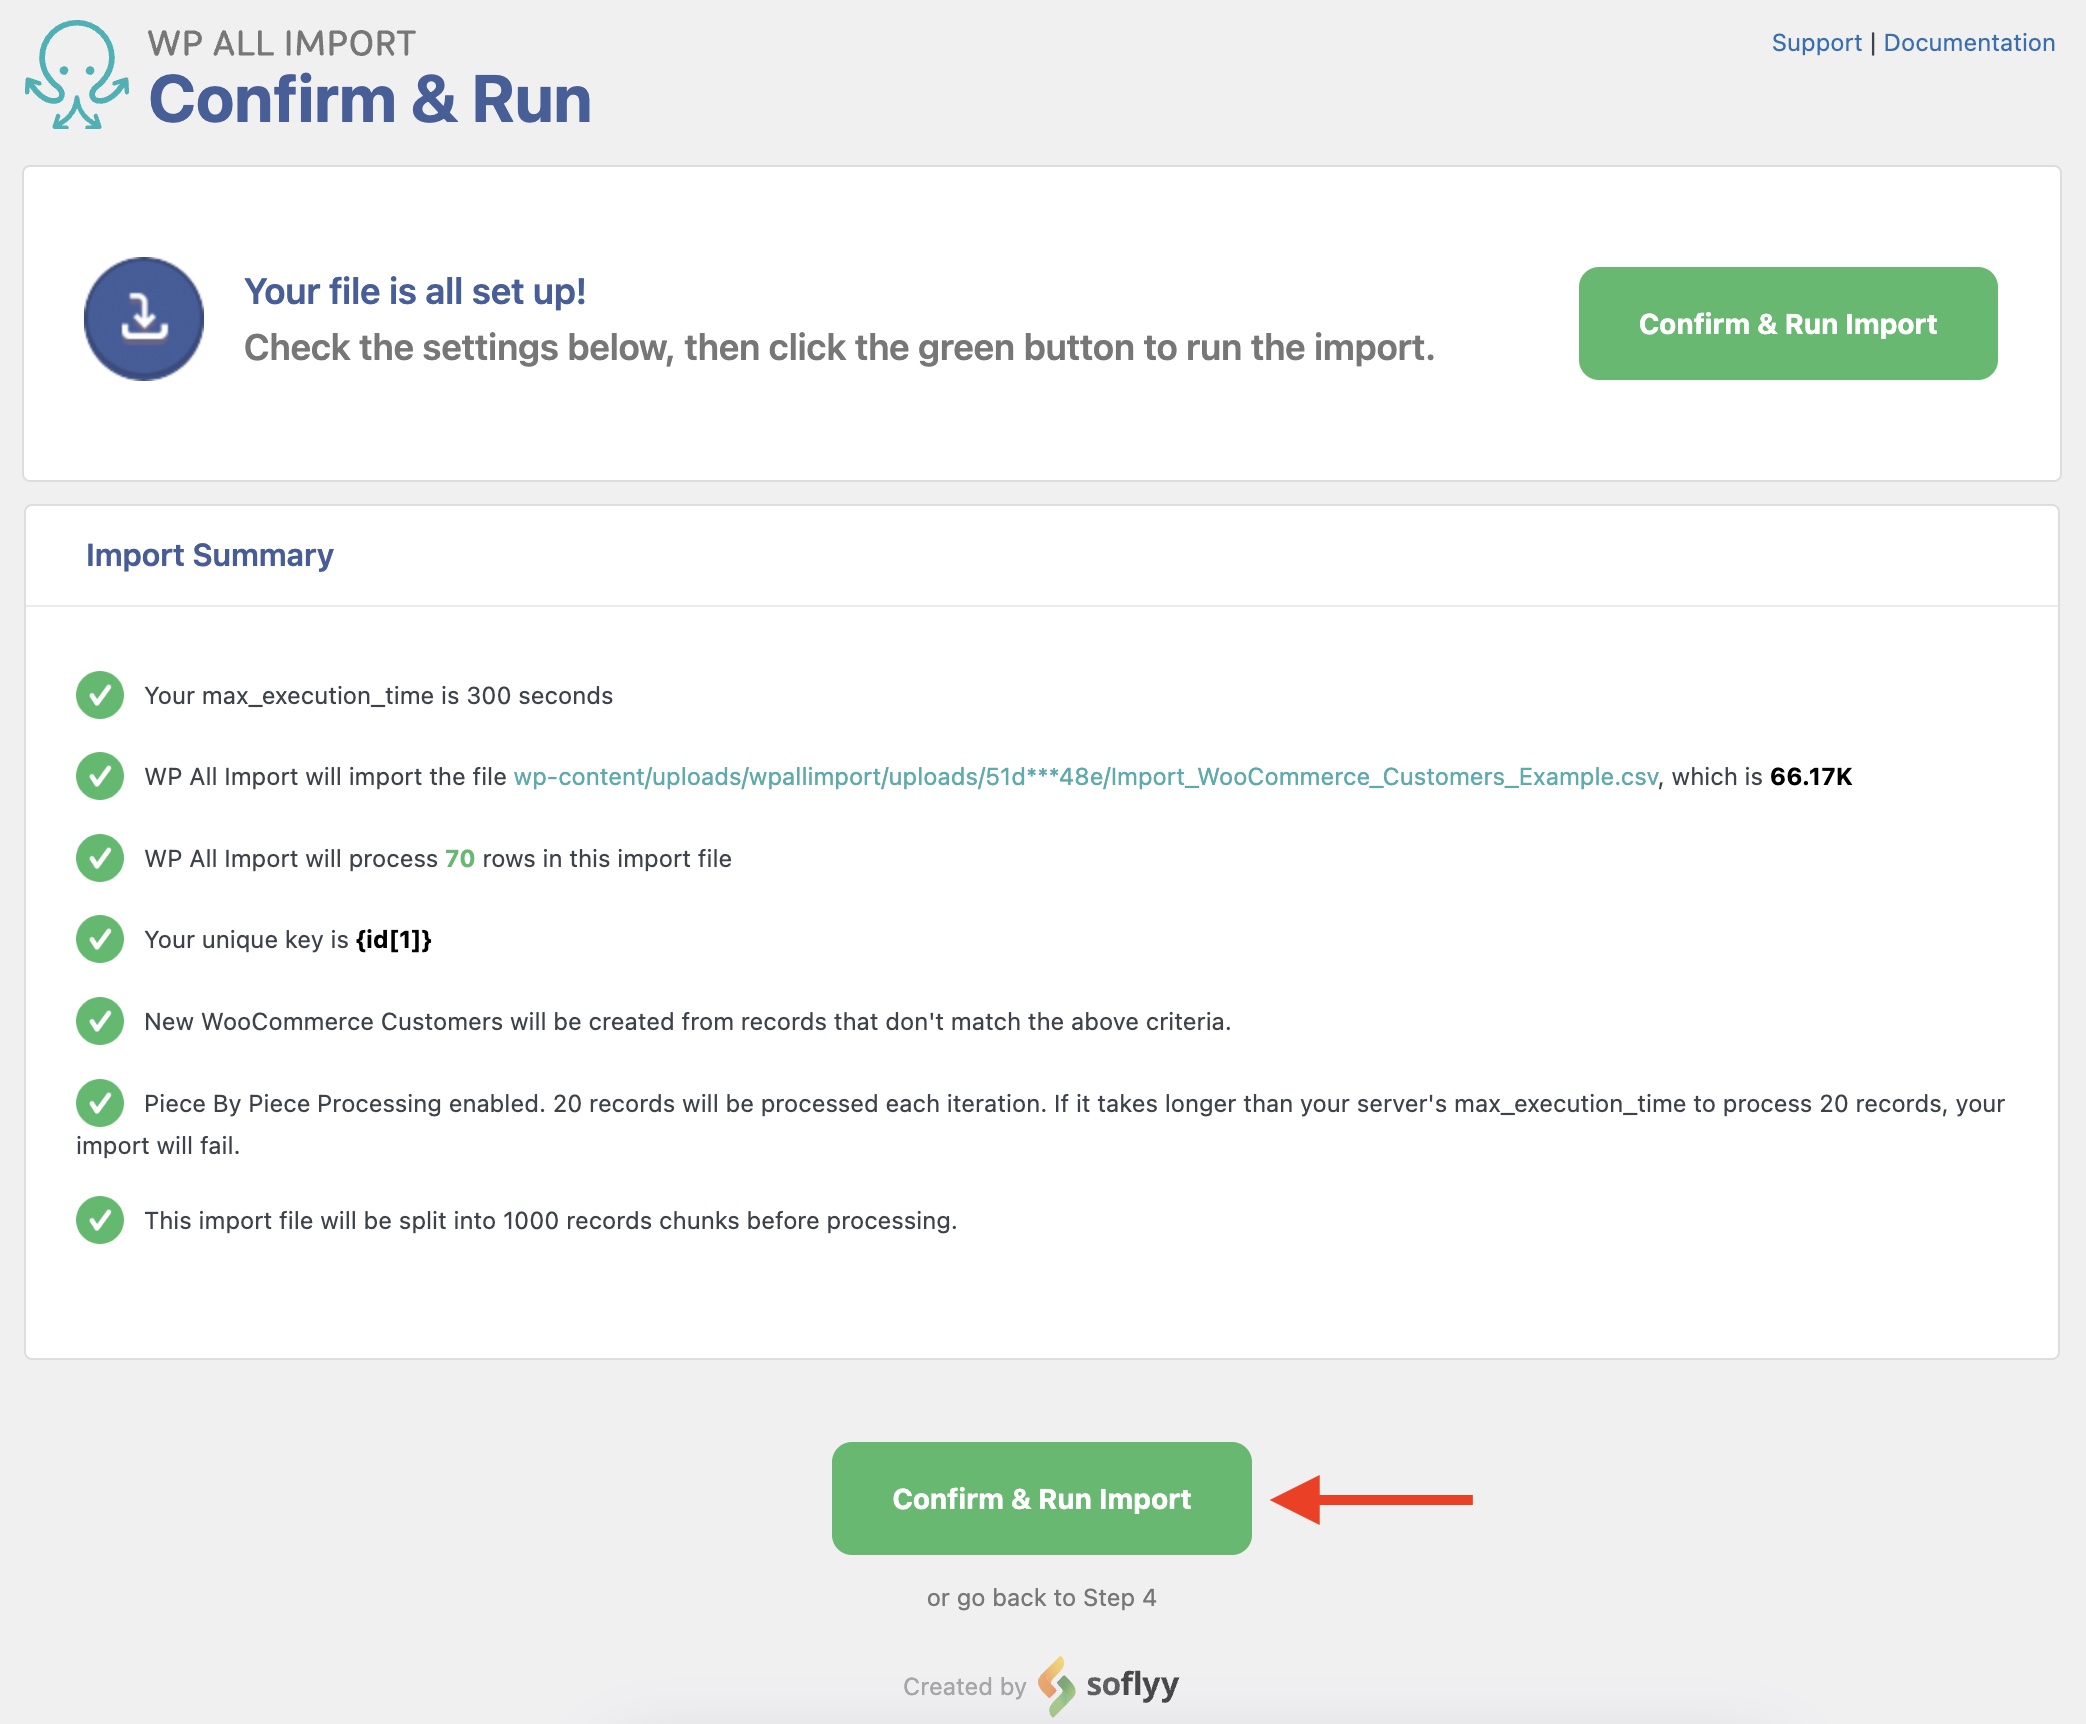
If everything looks okay, click Confirm & Run Import. Once the import completes, the screen will update as follows:

To import other types of WooCommerce data, see the information in the next sections.
Import WooCommerce Products
The steps to import WooCommerce products are essentially the same as importing any other post type. The import fields themselves will be different, but the other parts of the import function the same way, i.e., you upload the import file, map the product fields, then run the import.
The following documentation provides additional instructions:
How to Import WooCommerce Products from CSV and XML
How to Import Variable Products in WooCommerce
Import WooCommerce Products with Images
Import WooCommerce Orders
Again, the process is the same. See:
How to Import WooCommerce Orders
Import WooCommerce Coupons
How to Import WooCommerce Coupons
Import WooCommerce Reviews
How to Import Reviews to WooCommerce
Import WooCommerce Products from CSV, XML, Excel
- Product variations & attributes
- Price & stock
- Images & galleries
- Scheduled imports
Import WooCommerce Data — Advanced Topics
Keeping the Same IDs When Importing WooCommerce Data
When importing WooCommerce data, our plugin will treat each record as new when inserting it into the database, meaning it will be assigned a new ID. However, you can modify this behavior using custom code (see documentation) and our API (see documentation). Here are the available snippets:
- WooCommerce Products or Orders: Keep old IDs when migrating products.
- WooCommerce Customers: Keep Old IDs When Migrating Users or Customers.
- WooCommerce Reviews: Keep Old IDs When Migrating Comments.
Importing Data in the Correct Order
If you wish to import multiple types of WooCommerce data, make sure to import WooCommerce products and customers first, followed by coupons, reviews, and orders. If you adhere to this sequence, WP All Import will help you maintain the relationships between different data types even if you can't preserve the original IDs.
How to Filter WooCommerce Import Data Successfully
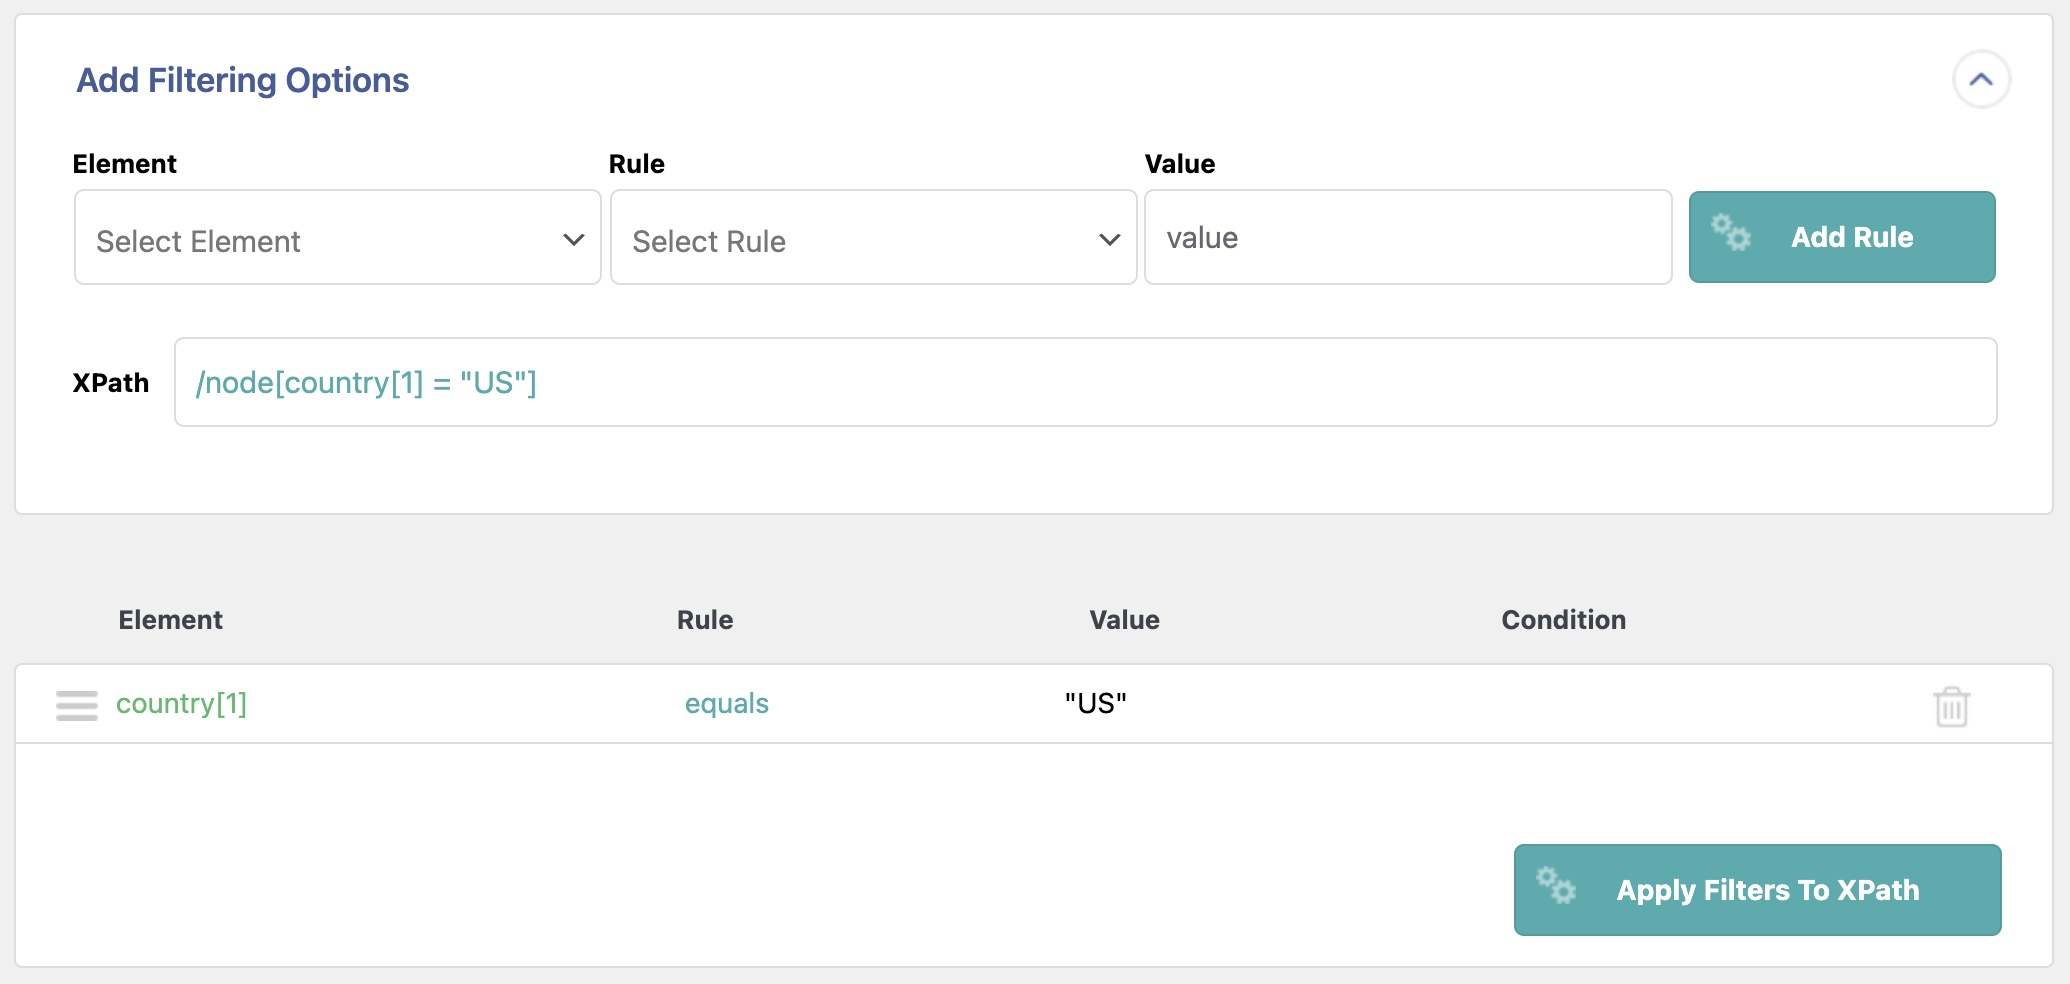
Filters can be added in Step 2 using the Manage Filtering Options panel. These filters let you control which WooCommerce records get imported.
A filter is composed of an Element (from your import file), a Rule (to apply), and a Value to filter. For example, when importing WooCommerce customers, you can choose the country as the element to import customers from the US only.
Once the filter is added, click Add Rule and then click Apply Filters To XPath to apply the newly created filter. This is what the result looks like:
WooCommerce Data Not Imported Correctly
In some cases, you may encounter problems importing your WooCommerce data. For example, when importing WooCommerce variable products, there can be issues with adding the variations correctly. If this happens, double-check our documentation to ensure you're setting up everything as expected.
If you're unable to figure out the issue, try to replicate your import and any problems in our sandbox environment (https://www.wpallimport.com/debug/). Then, just contact our support team and include the sandbox site URL and a brief description of what's wrong. You can contact Support by emailing us at [email protected] or using this form: /support.
Import WooCommerce Data — Frequently Asked Questions
How Do I Import an XML File Into WooCommerce?
- Create a new import via All Import › New Import.
- Upload your XML file with your WooCommerce data.
- Select the correct WooCommerce post type.
- Edit the import template and drag and drop your import fields.
- Run the import and verify your imported WooCommerce data.
The steps to import an XML file into WooCommerce are essentially the same as described in the guide above.
How Do I Import a CSV Attribute into WooCommerce?
- Go to All Import › New Import and upload your CSV with attributes.
- Choose Taxonomies from the drop-down list.
- Locate your desired attribute and continue.
- Drag and drop the import fields to map the term's information.
- Run the import and verify the newly imported attribute.
We explain more about importing taxonomy data here: How to Import WordPress Categories and Tags.
How Do I Schedule WooCommerce Data Imports?
Assuming that you obtain your WooCommerce data from a URL or from an S/FTP source, you can schedule the imports using our available options to automate them. The following methods are available:
- Automatic Scheduling Service. This is an optional and paid monthly subscription that allows you to schedule imports from within WP All Import's interface. See Automatic Scheduling.
- Manual cron jobs. These are configured via your web host in cPanel or Plesk. See Manual Scheduling.
What Add-Ons Do I Need to Import WooCommerce Customers?
To import WooCommerce customers, you need to have both the WooCommerce Import Add-On and the User Import Add-On active on your site, along with WP All Import.
Import WooCommerce Data — Related Docs
Explains how to import WordPress posts.
An overview that leads to documents on all types of image imports.
Describes how to import Advanced Custom Fields (ACF), including all of their field types.
Explains how to import Gravity Forms entries.
Shows how to import WordPress users, including how to handle encrypted password data.
An overview of how to configure recurring imports.
