How to Migrate WordPress Users from One Website to Another
To migrate your WordPress users, navigate to All Export › New Export on the export site, select Users as the export post type, and download the bundle file. On the import site, go to All Import › New Import and import that bundle file.
Table of Contents
- Step 1: Create a New Users Export
- Step 2: Understand the Bundle File
- Step 3: Import the Bundle File
- Step 4: Verify the Migrated Users
Advanced Topics
Step 1: Create a New Export for WordPress Users
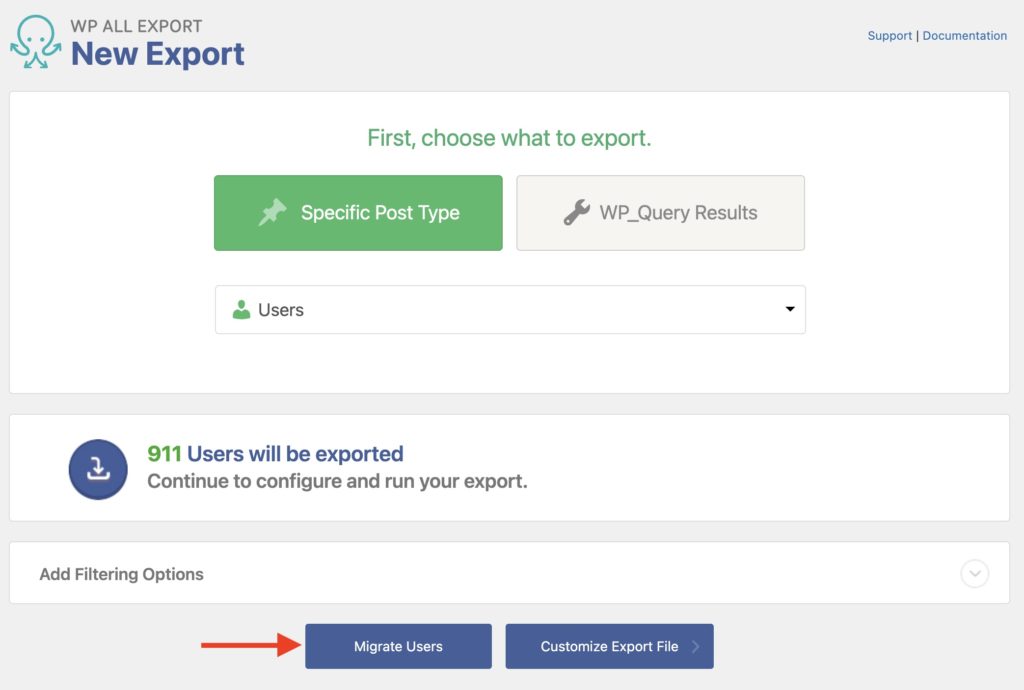
On the export site, go to All Export › New Export and choose to export Users.
The screen will update to show you how many users will be exported. If needed, use Manage Filtering Options to limit the users migrated in this step.
Once done, click on Migrate Users to continue.
In the next screen, you can add Scheduling Options if you need to run this migration regularly. You can also configure Advanced Options such as exporting users only once or creating a new export file every time that the export is run.
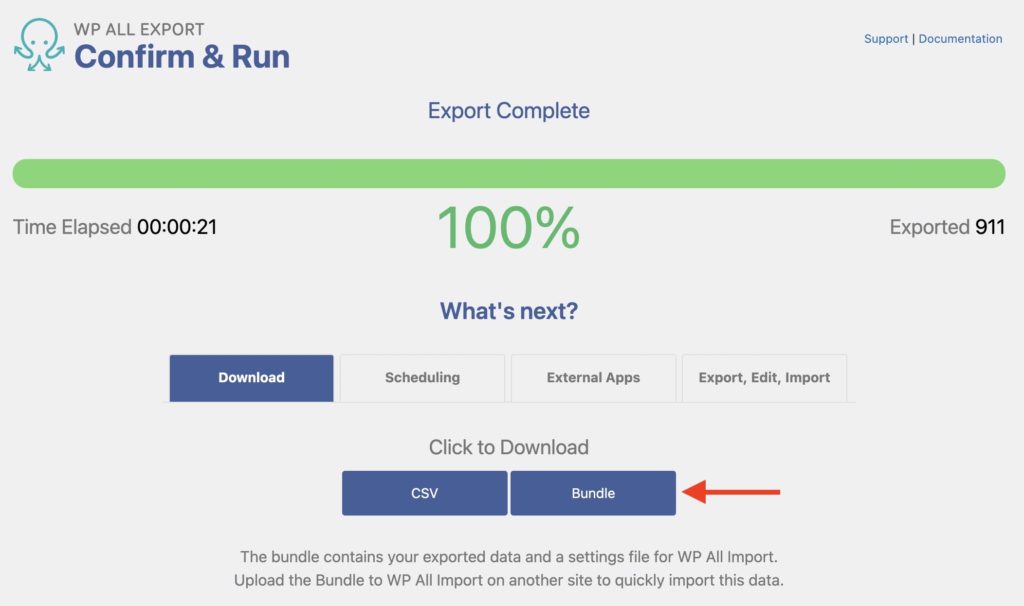
Click on Confirm & Run Export to execute the export.
Once the export is complete, click the Bundle blue button to download a zip file containing your exported WordPress Users and a settings file to configure the import:
Step 2: Understand the Bundle File
With the bundle file, you'll obtain a compressed ZIP file with both the exported users and a settings file for WP All Import.
By using this bundle file, the import settings will be automatically configured when you migrate these users to a new/different site.
If you don't use the bundle file and instead download the CSV or XML file, you will need to configure the import yourself.
To learn more about keeping the same user IDs when performing a migration, please review the Advanced Topics section below.
Step 3: Import the User Bundle File on the Destination Site
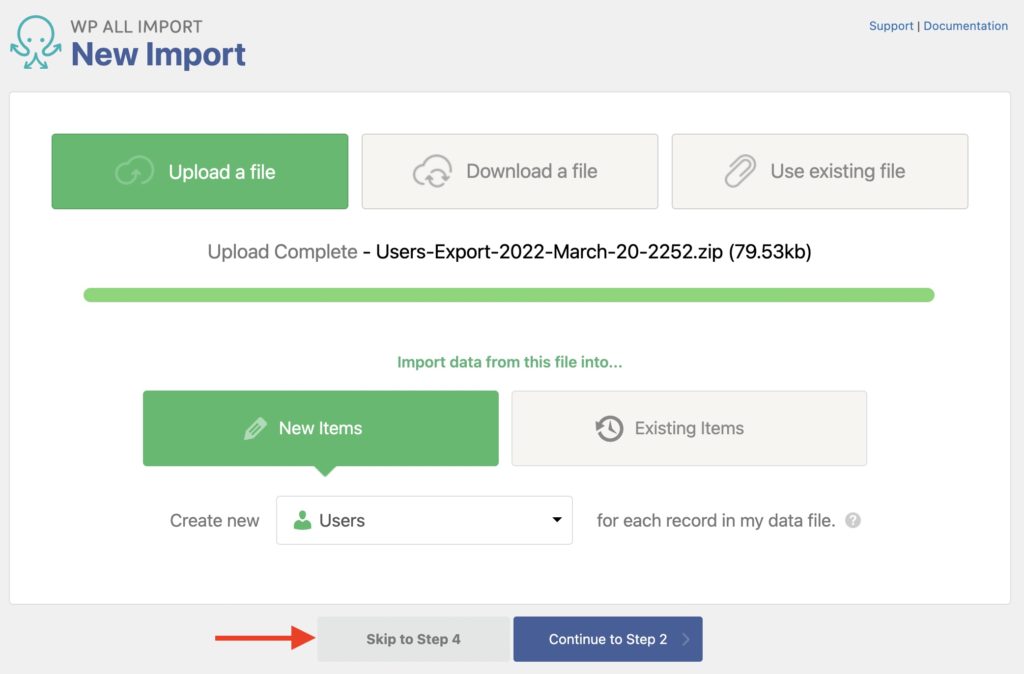
On the destination site, go to All Import › New Import and upload the bundle zip file that you exported with the WordPress users.
In this screen, click Continue to Step 2 if you wish to modify the import template and settings.
Otherwise, click on Skip to Step 4 to let the bundle file take care of the import mappings for you.
In the next screen, all import fields and settings will be automatically mapped for you. However, you can modify the default settings if required.
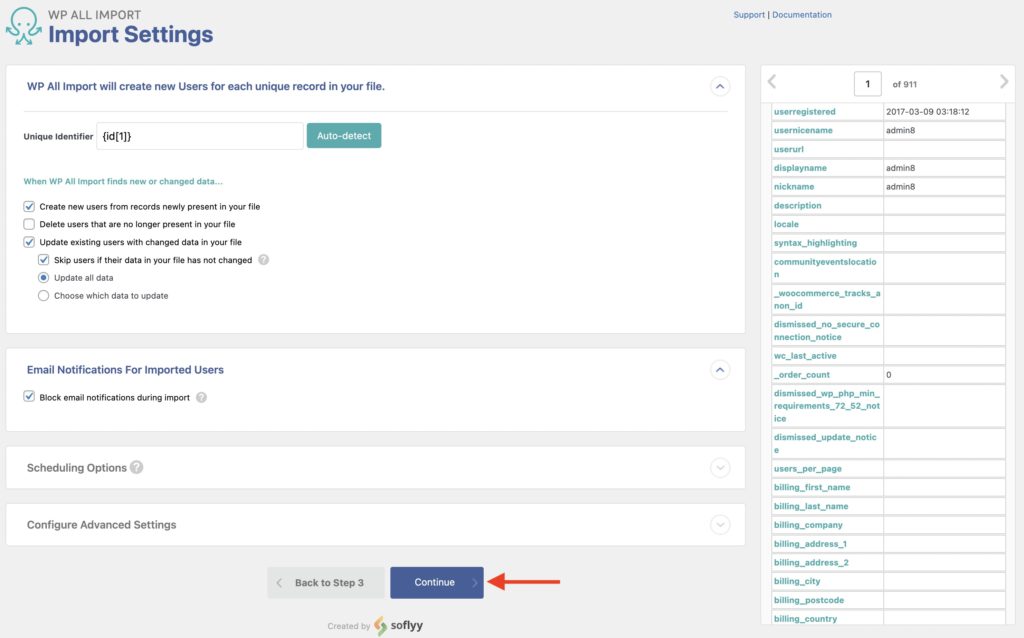
By default, the Block email notifications during import setting will be enabled, thus preventing any email notifications from being sent to the imported users. Disable this checkbox if you want WordPress to send regular email notifications.
You can also define Scheduling Options to schedule this import regularly, and Configure Advanced Settings, such as only importing specific user records or modifying the number of records imported per iteration.
To finish the import process, click Continue and then click Confirm & Run Import on the next screen.
Once the import finishes, the migration has been successful, and all users will appear on the new site.
Step 4: Verify That the User Migration Worked
After the WordPress users migration is complete, go to Users › All Users on the import site to browse and verify that all the users were imported correctly. You should see something like this:
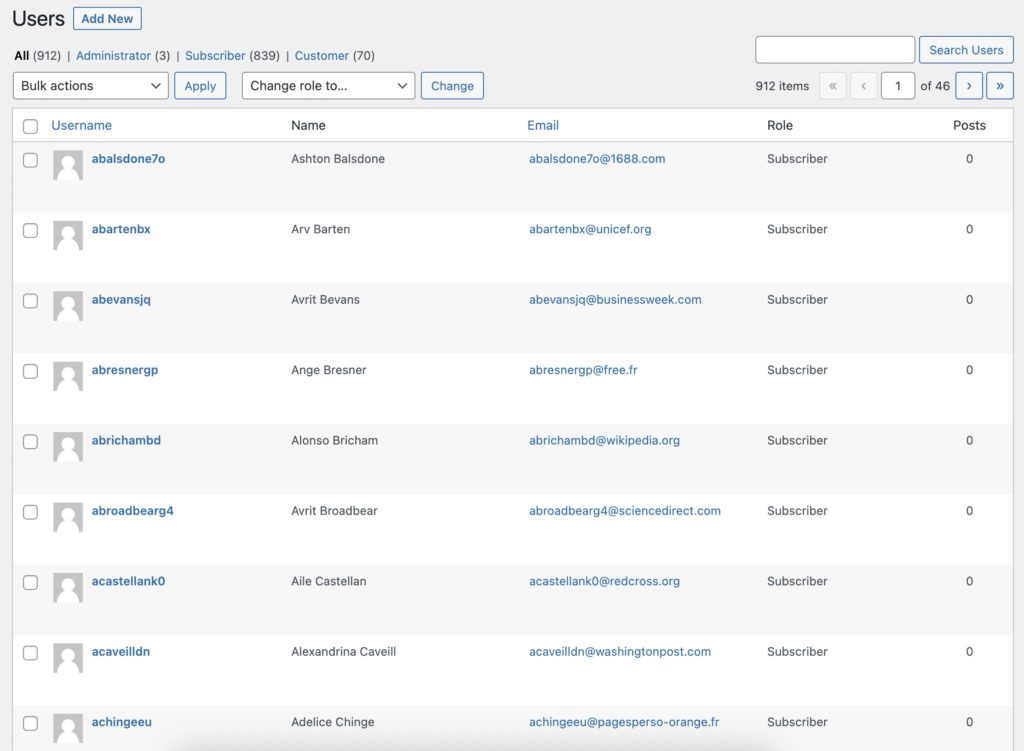
If the migration did not go as expected, it could be either due to the export or the import site. The best practices are as follows:
First, review the export site:
- On the export site, check that you followed the directions from Step 1 correctly.
- Fix whatever problem you find.
- Repeat the migration.
However, If there's no clear issue with the export site, you can also review the import site:
- Verify that you followed the directions from Step 3 correctly.
- Verify the import template using Manage Imports › Edit.
- Fix whatever problems you find.
- If needed, delete any users imported in error by using Manage Imports › Delete.
- Repeat the migration.
If repeating the migration doesn't help, you can also erase everything and then re-start the migration from scratch.

Easily Migrate WordPress Users
- No configuration necessary
- Custom user meta
- Passwords and all details
- Woo, ACF, Meta Box, JetEngine
Migrate WordPress Users — Advanced Topics
Keep the Same IDs when Migrating Users
When you migrate WordPress users from one site to another, each user is treated as a new record and assigned a new ID during the import process.
It's possible to change this behavior and keep the old ID by using custom code and our API. Please see Keep old IDs when migrating users or customers. This is only an attempt, and if the ID is already used, a new user ID will be generated instead.
Scheduling a WordPress Users Migration
You can set up both the export and import processes to occur regularly at a scheduled time. Since you're scheduling the whole migration, you should set it up so that the export finishes before the import starts. The following scheduling options are available:
- Cron jobs. See Manual Scheduling.
- Our optional and paid Automatic Scheduling Service, which can be configured directly from the plugin's interface. See Automatic Scheduling.
To schedule this migration, instead of uploading the Bundle file, you should use the Bundle URL:
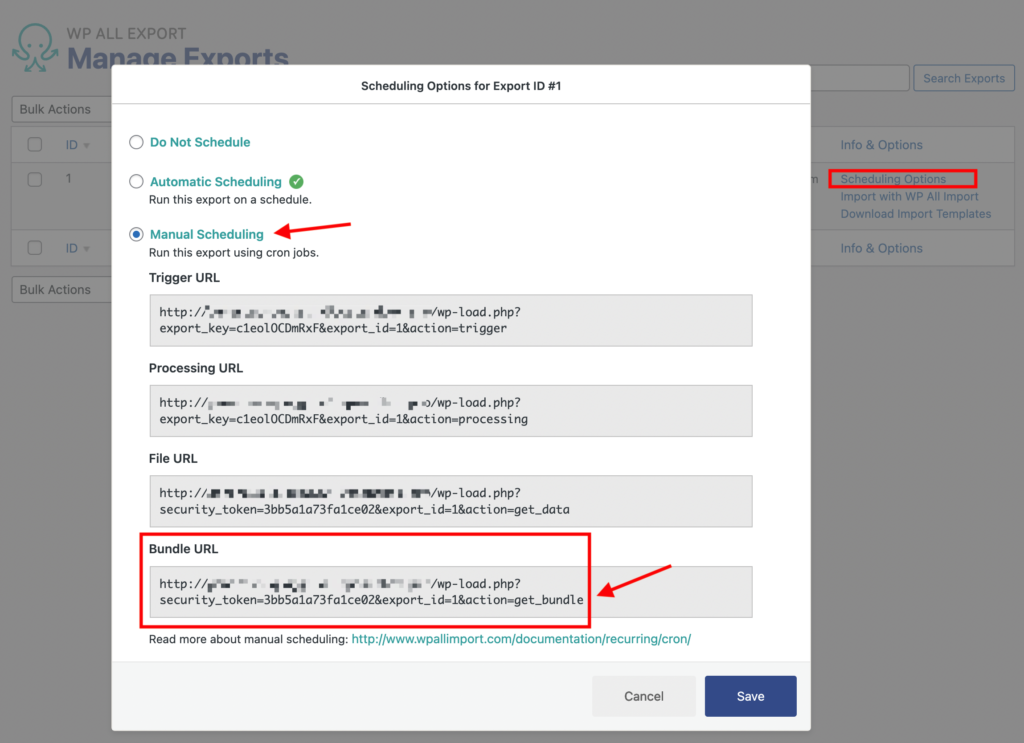
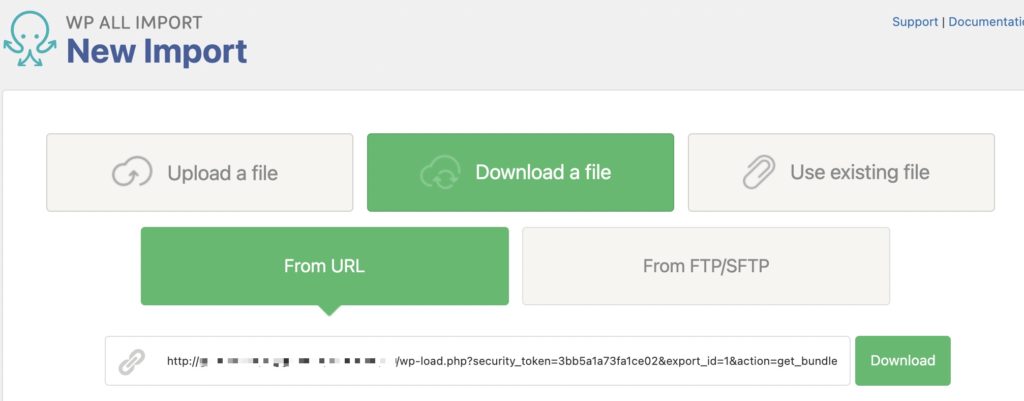
That Bundle URL is used in the Download a file › From URL option. See:
Difference Between WordPress Users and WooCommerce Customers
The main difference is that WordPress users haven't made a purchase on your site using WooCommerce.
Once a user makes a purchase on your site, WooCommerce assigns the role of customer to that user along with a set of WooCommerce-specific data such as billing and shipping address custom fields. This means that all customers are migrated when migrating WordPress users because a customer is a type of user.
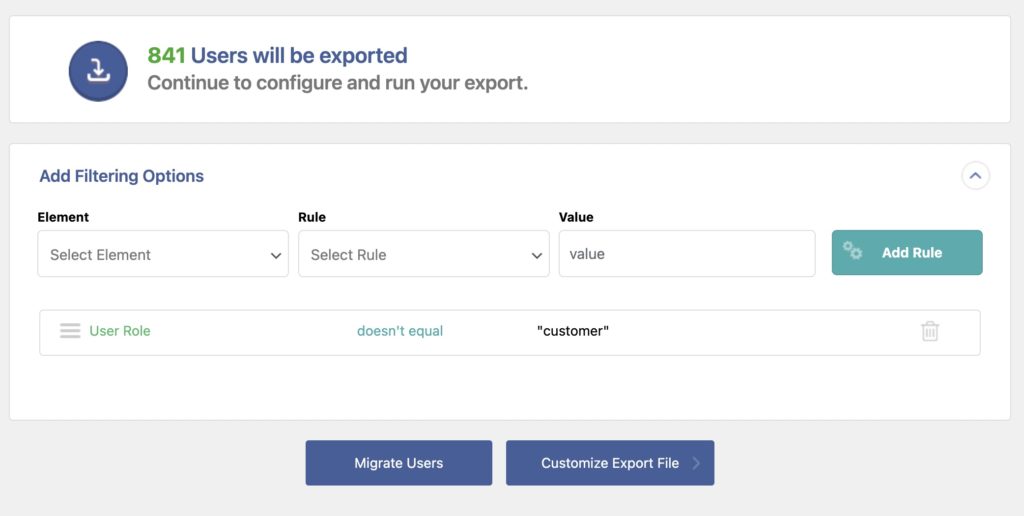
If you want to migrate WordPress users without migrating customers, you need to add an export filter to only export users when their User Role doesn't equal customer:
Migrate WordPress Users — Frequently Asked Questions
Can I Migrate All WordPress User Data, Even Custom Fields Added by Other Plugins?
Yes. Our software automatically recognizes the custom data fields added by most plugins and extensions. If the plugin stores its data in a non-standard way, this can be a bit more difficult, but our support staff will be glad to help.
What Happens With Passwords in a WordPress User Migration?
If you follow the instructions from this guide, the user passwords will remain the same. When migrating WordPress users, WP All Export uses a hashed version of the password so that it remains secure. To learn more, see Understanding WordPress User Passwords.
If you need to perform changes to all the user passwords from the same site, you may want to look into the bulk editing process described in one of the questions/answers below.
How Do I Migrate WooCommerce Customers?
The process is essentially the same as migrating WordPress users. You just choose an export post type of WooCommerce Customers instead of Users. This makes sense when you consider that WooCommerce customers are, in fact, WordPress users.
To learn more, see How to Migrate WooCommerce Customers to a Different Site.
How Do I Bulk Edit WordPress Users?
The main focus of this guide is on migrating WordPress users from one site to a different one. However, if you want to perform specific changes to the WordPress users contained on the same site, you can use the bulk edit process, which allows you to modify the information from all user records in bulk.
Here is the basic process:
- Export the users that you want to modify.
- Open the exported file in a spreadsheet such as Numbers, Microsoft Excel, or Google Sheets (where it's easy to perform bulk changes using copy and paste, search-and-replace functions, etc.)
- Once you've made the changes to the export file, re-import it back into WordPress.
For more information on how to do this, see our bulk editing overview.
How Do I Export WordPress Users?
- Navigate to All Export › New Export and select Users as the export post type.
- Use our Drag & Drop interface to configure your export columns.
- Run the export.
- Download your export file.
- Check the exported data.
See How to Export WordPress Users to CSV, Excel, or XML for a more detailed explanation.
How Do I Import WordPress Users?
- Go to All Import > New Import.
- Select the method for loading your data (i.e., upload a file, use a URL, etc.).
- Choose your import file and your import target (i.e., Users).
- Map the incoming data elements to your WordPress user fields using our Drag & Drop interface.
- Run the import.
- Verify the imported data.
To learn more, see How to Import WordPress Users from CSV, Excel, or XML.
What Add-Ons Do I Need to Migrate WordPress Users?
To migrate WordPress users, you need to have both the User Import Add-On and User Export Add-On active on your site, along with WP All Import and WP All Export.
Migrate WordPress Users — Related Docs
Learn how to export WordPress users to CSV, Excel, or XML.
Learn how to import WordPress users from CSV, Excel, or XML.
Describes how to export WooCommerce customers to CSV, Excel, or XML.
Learn how to import WooCommerce customers from CSV, Excel, or XML.
Describes how to migrate WooCommerce customers from one website to another.
Execute custom code to modify import user data on the fly.