The best import export plugin for WordPress & WooCommerce.

How to Import WordPress Posts
To import WordPress posts, go to All Import › New Import, provide your import file, and choose Posts from the dropdown list. Use our Drag & Drop interface to map incoming data elements to their target post fields, then run the import.
Table of Contents
- Step 1: Create a New Posts Import
- Step 2: Review the Import File
- Step 3: Map the Incoming Data
- Step 4: Configure the Import Settings
- Step 5: Run the Import
Advanced Topics
- Import WordPress Posts Using Filters
- Import Posts from Different File Types
- Schedule WordPress Posts Import
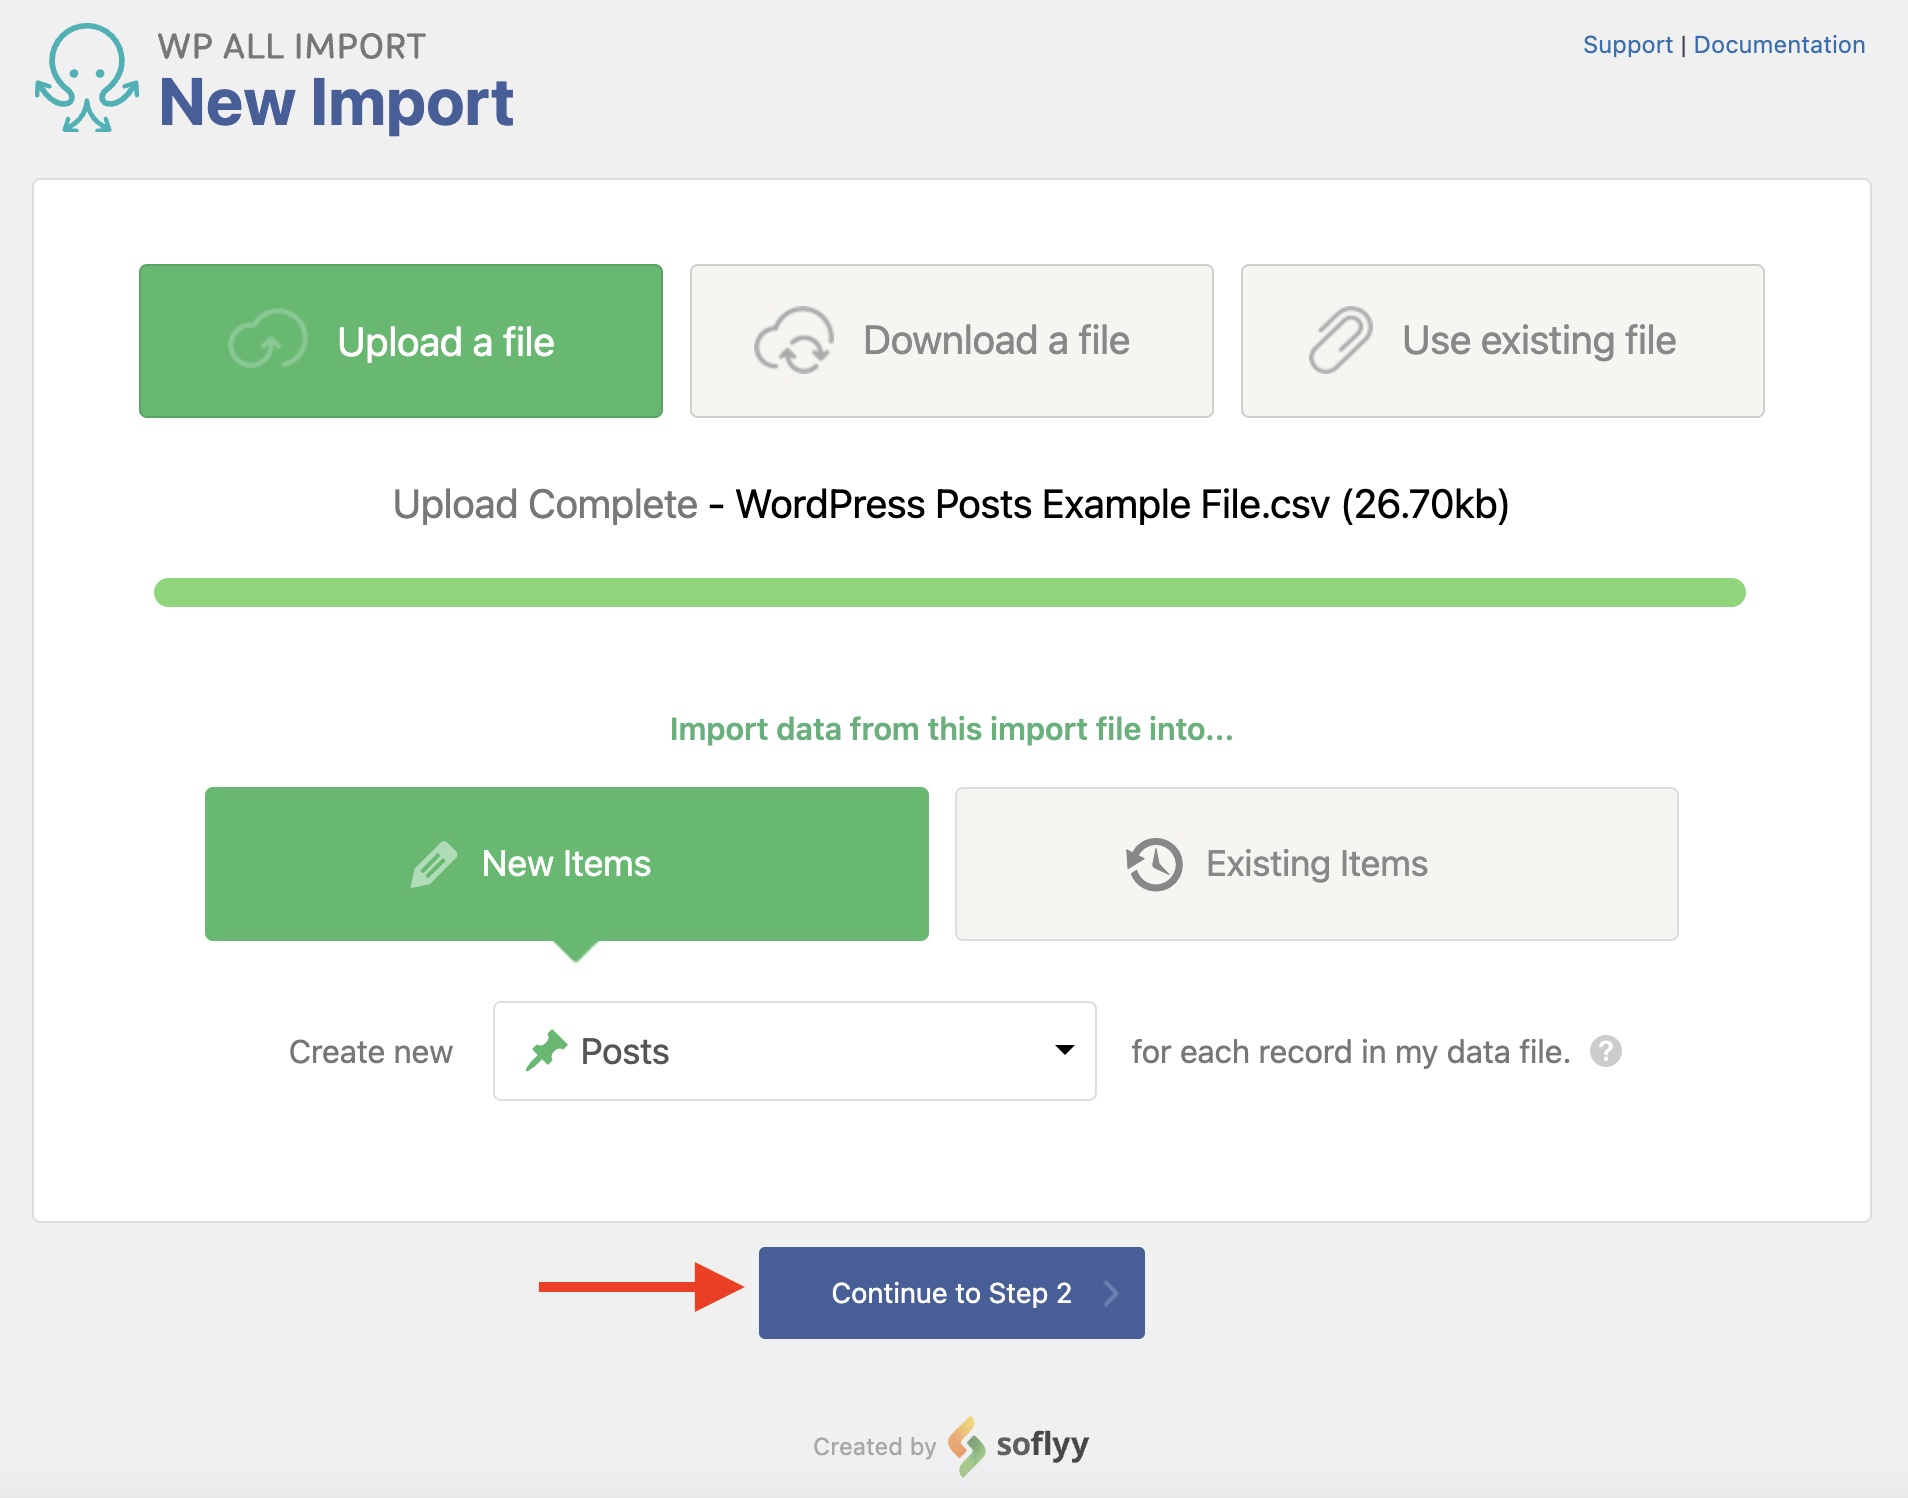
Step 1: Create a New Import for WordPress Posts
Navigate to All Import › New Import and select your import file. Choose to import Posts in the dropdown list, then click Continue to Step 2.
Step 2: Review the Import File
Next, you will see the Review Import File screen, which allows you to check on the data that will be imported as WordPress posts. If you spot a problem, edit your import file and try again.
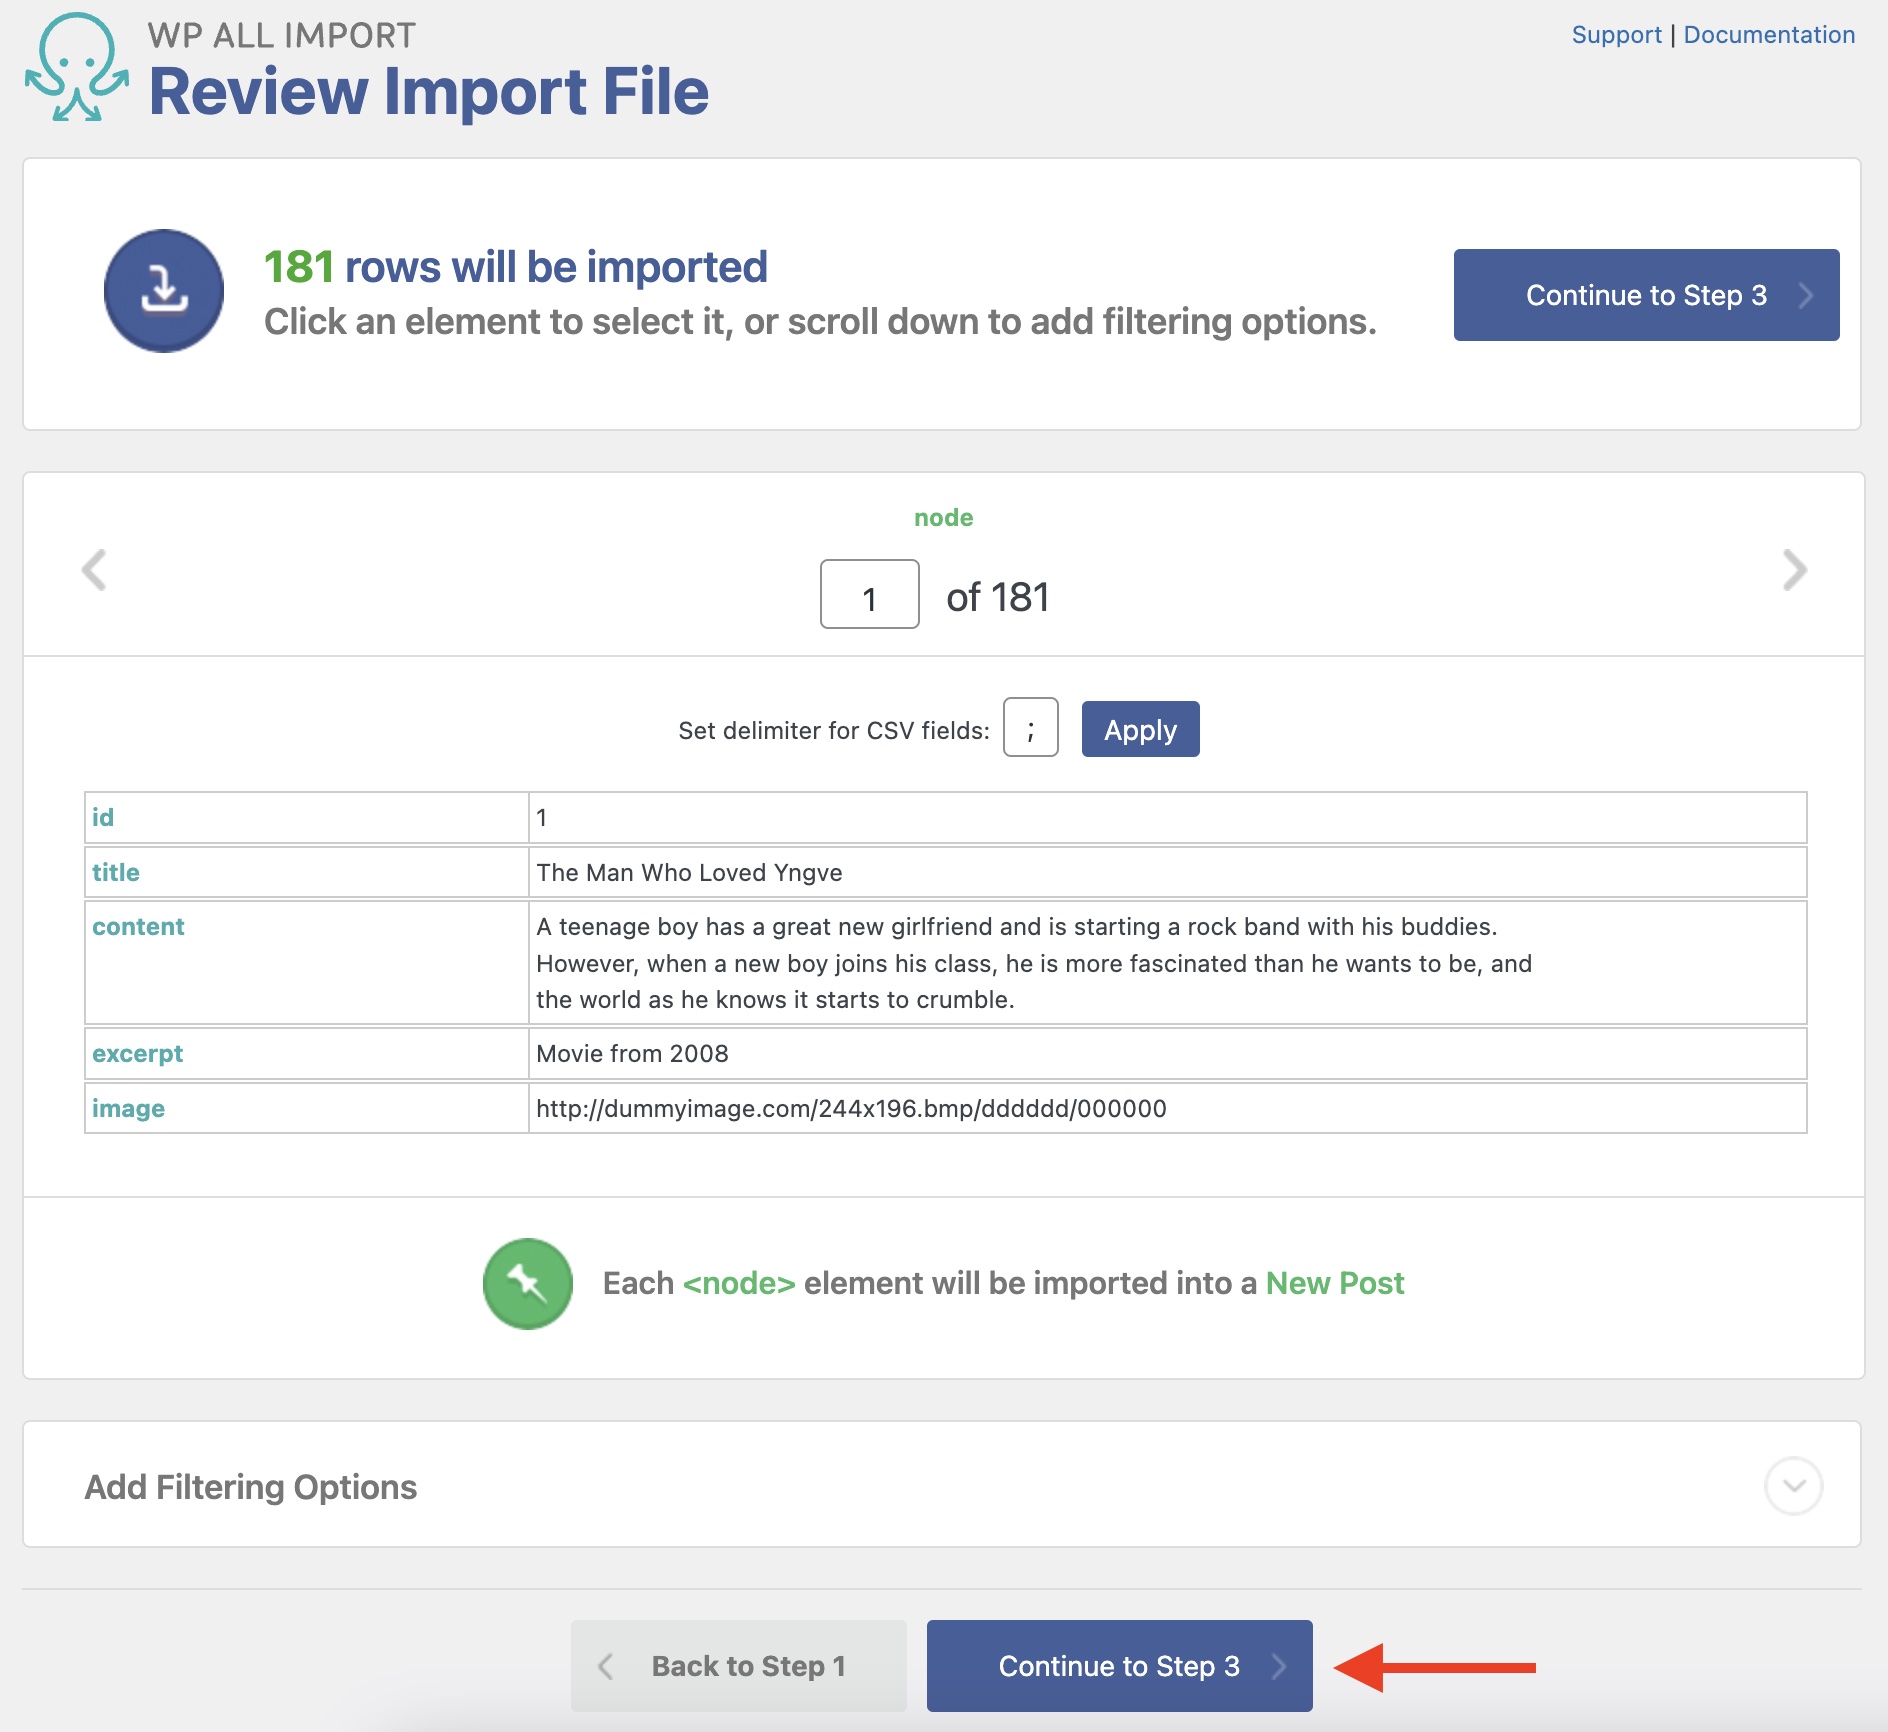
Near the bottom of this screen, you can add filters using the Manage Filtering Options section. Filters allow you to selectively decide which posts get imported.
Once you're done, click Continue to Step 3.
Step 3: Map the Incoming Data Elements to the Correct Post Fields
This brings you to the Drag & Drop interface, which helps you build the import template. Here, you drag the import fields from the panel on the right to the appropriate target field on the left. You can use this technique to map all of the required fields.
Title & Content
First, map the post title and its content:
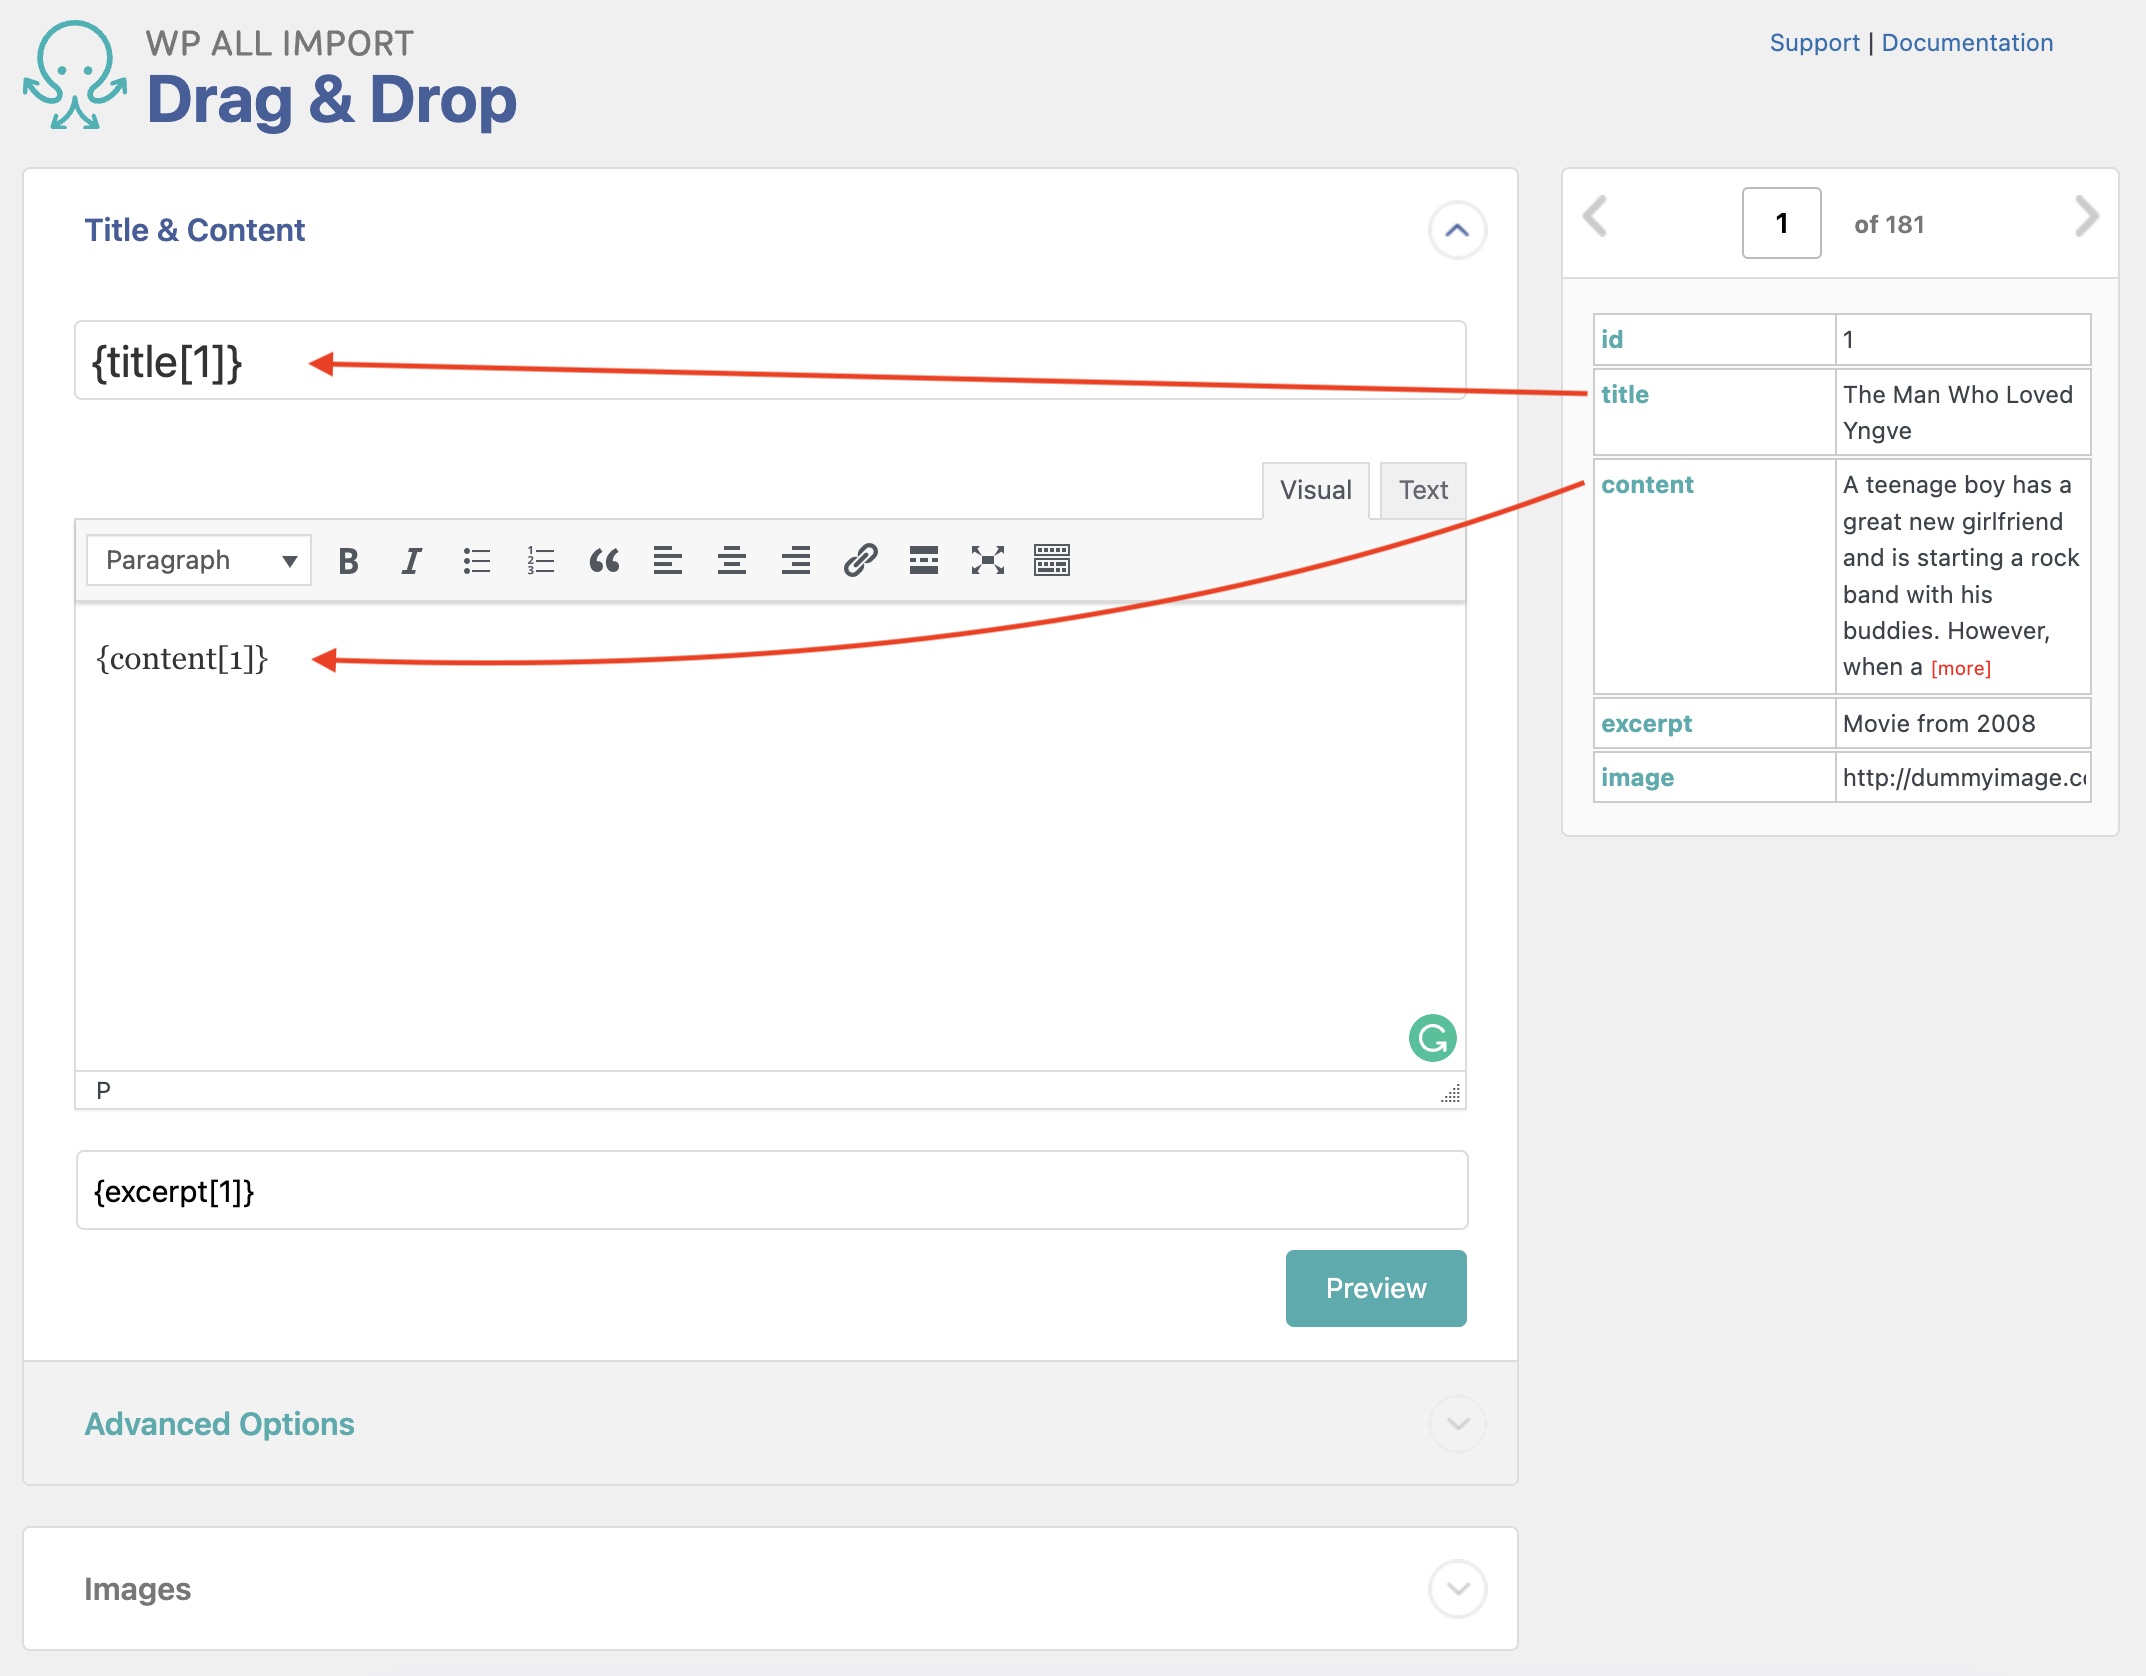
You can also map the short description or excerpt.
WordPress Post Images
In the Images section, map all images associated with the post, including the featured image:

There are different options in this section, allowing you to import images via different methods.
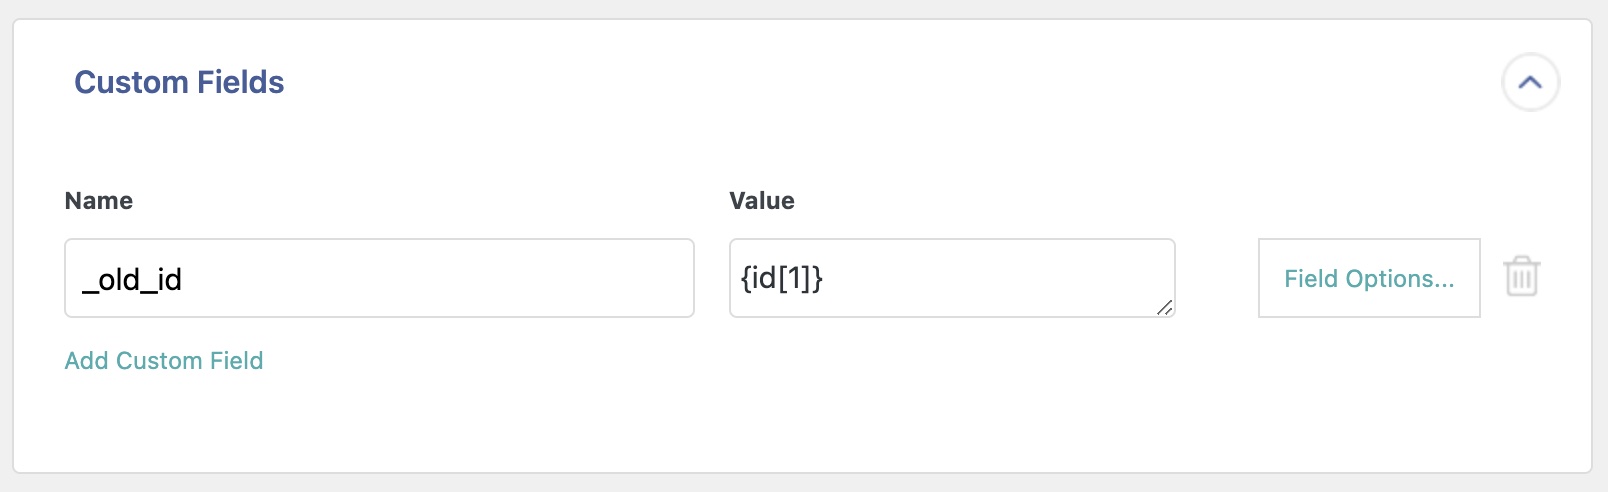
WordPress Post Custom Fields
In the Custom Fields section, set up any custom fields that should be imported to the WordPress post:
Other Post Options
This section allows you to define other post data, such as post status, dates, slug, author, attachments, menu order, etc.
Once you've mapped all the post import elements, click on the Continue to Step 4 button at the bottom (not shown).
Step 4: Configure the Import Settings
The Import Settings interface is next. Here, you can modify the import configuration and other settings. First of all, click Auto-detect to generate a unique identifier. As the name implies, this identifies unique posts, which helps our plugin to avoid creating duplicates and also update existing posts.
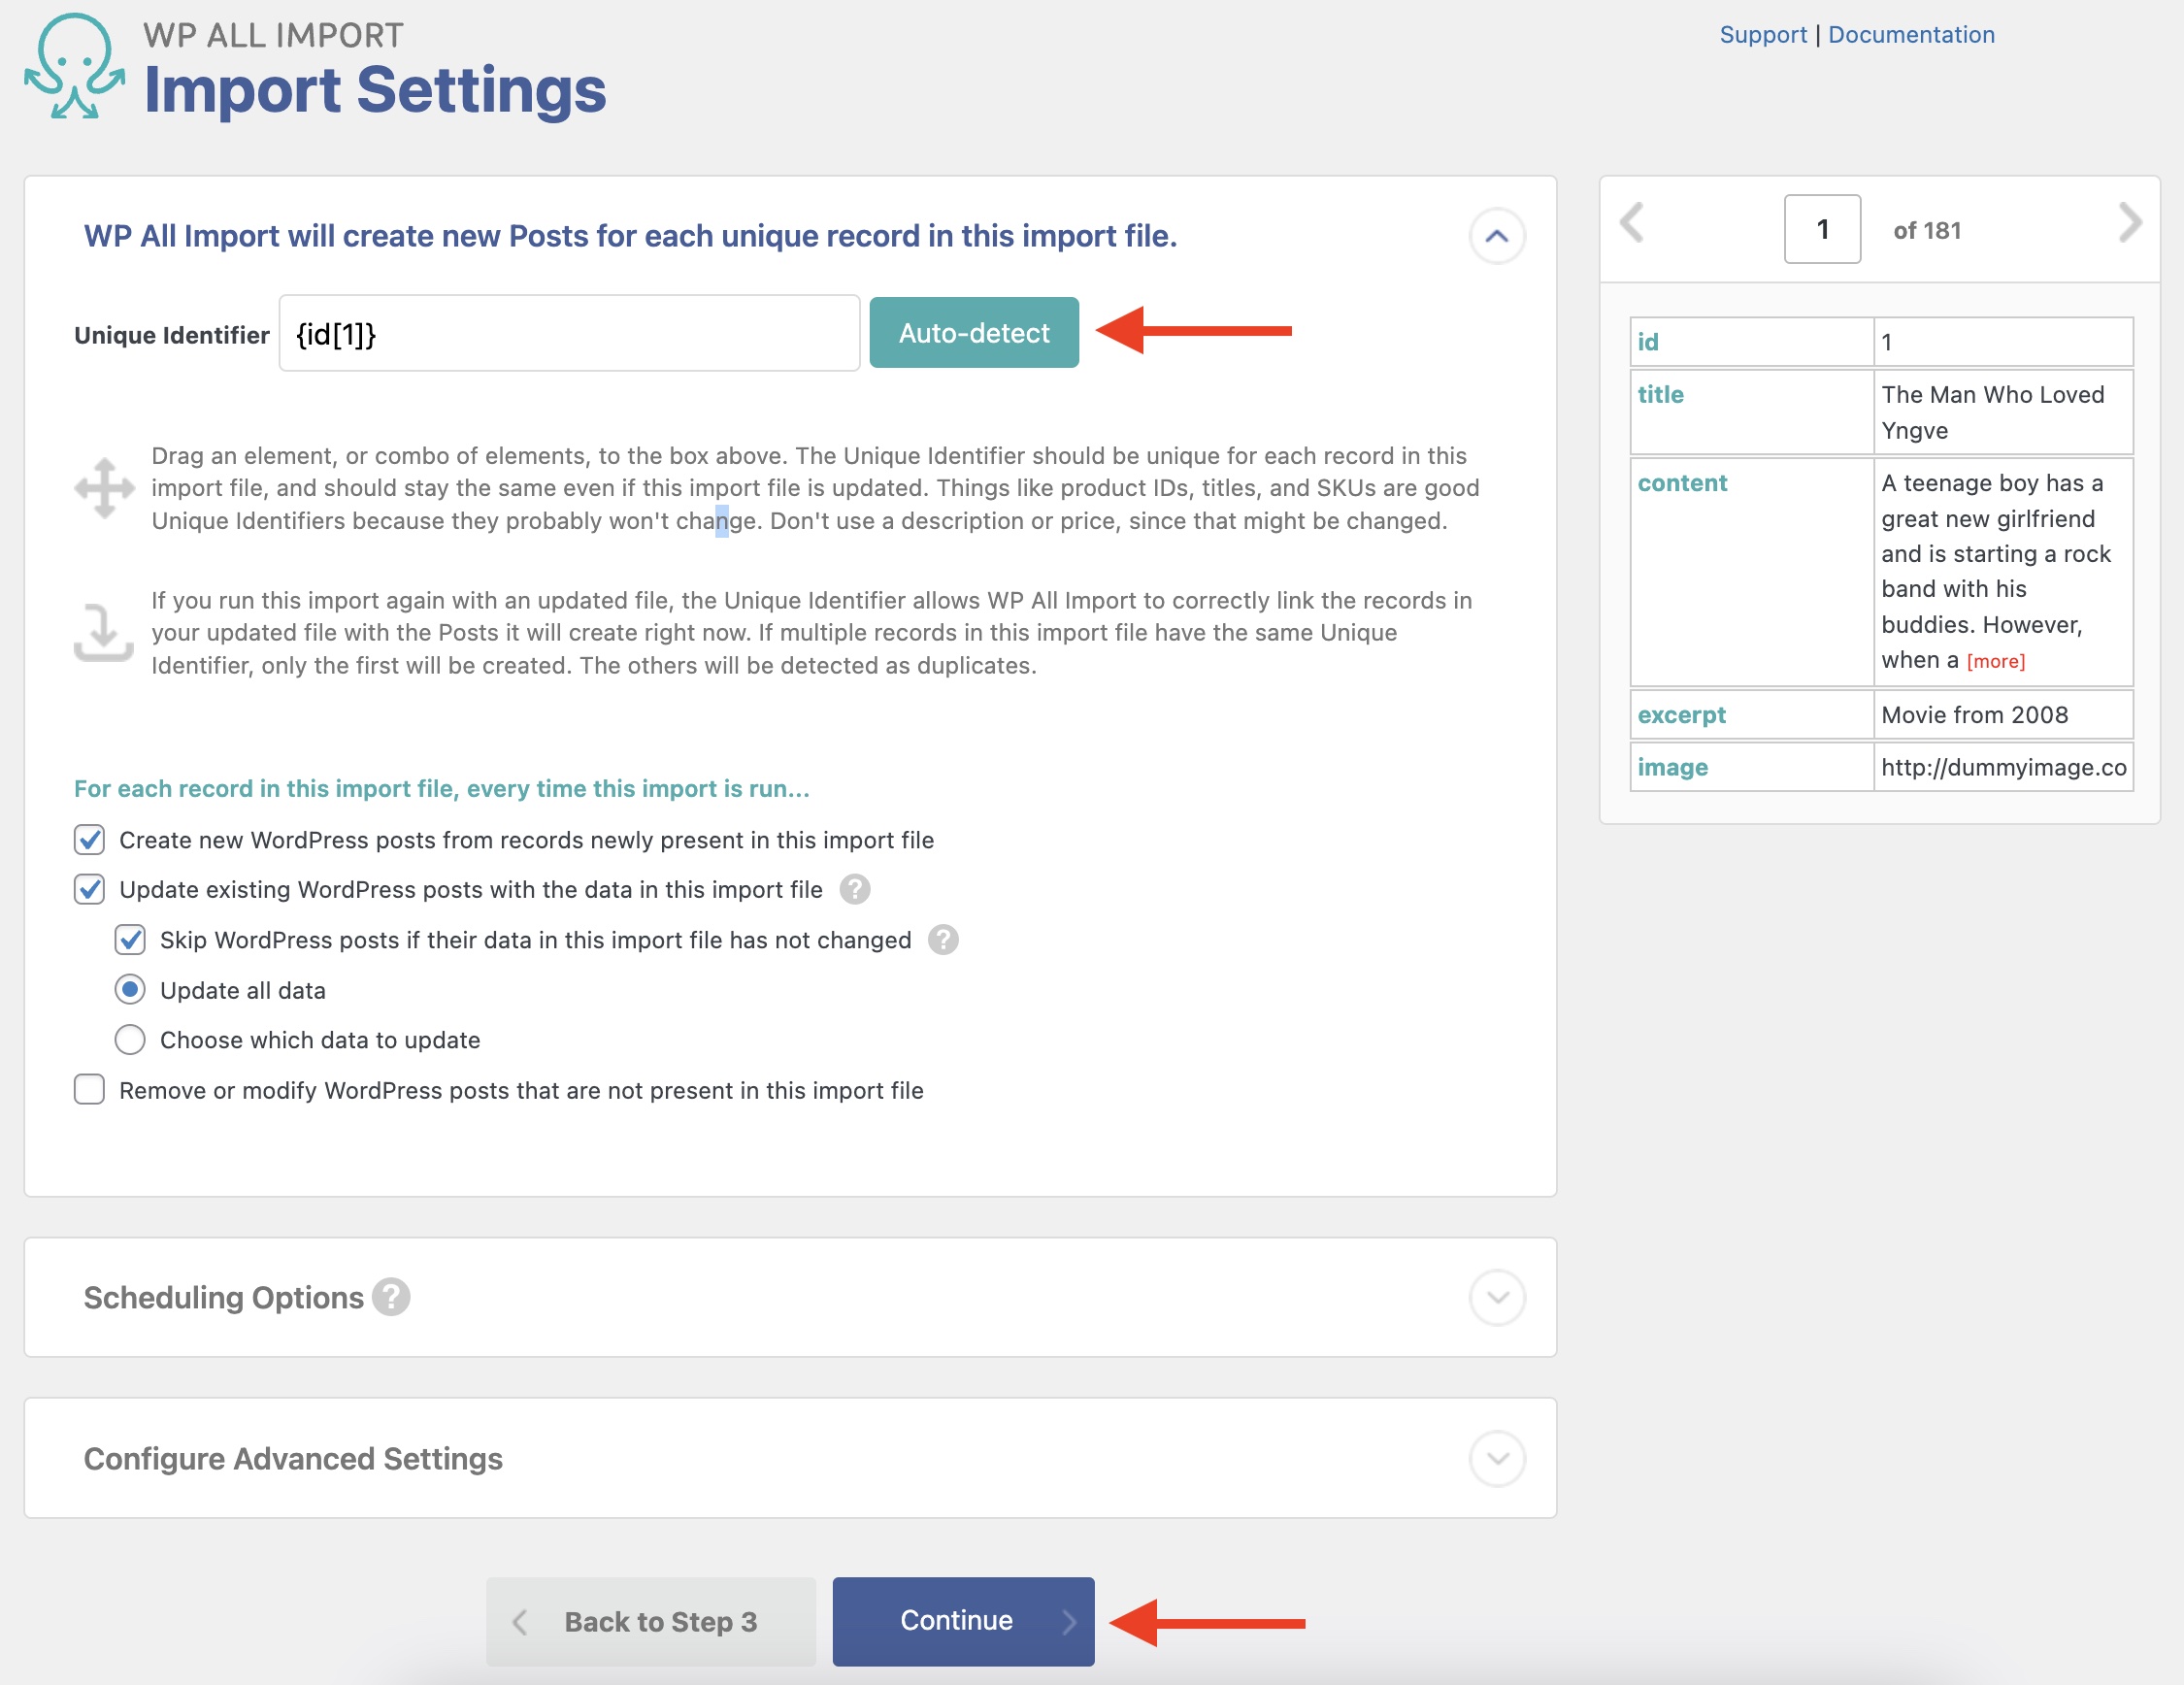
Speaking of updating existing posts, this panel lets you define how an import should behave if it is run again. For example, you can instruct it to remove posts if they are no longer in the import file.
Below this, two other panels allow you to define Scheduling Options and Configure Advanced Settings. You can leave these alone for now.
To go to the next step, click Continue at the bottom.
Step 5: Run the Import and Check the Imported Posts
Next up is the Confirm & Run screen, where you'll see an import summary:
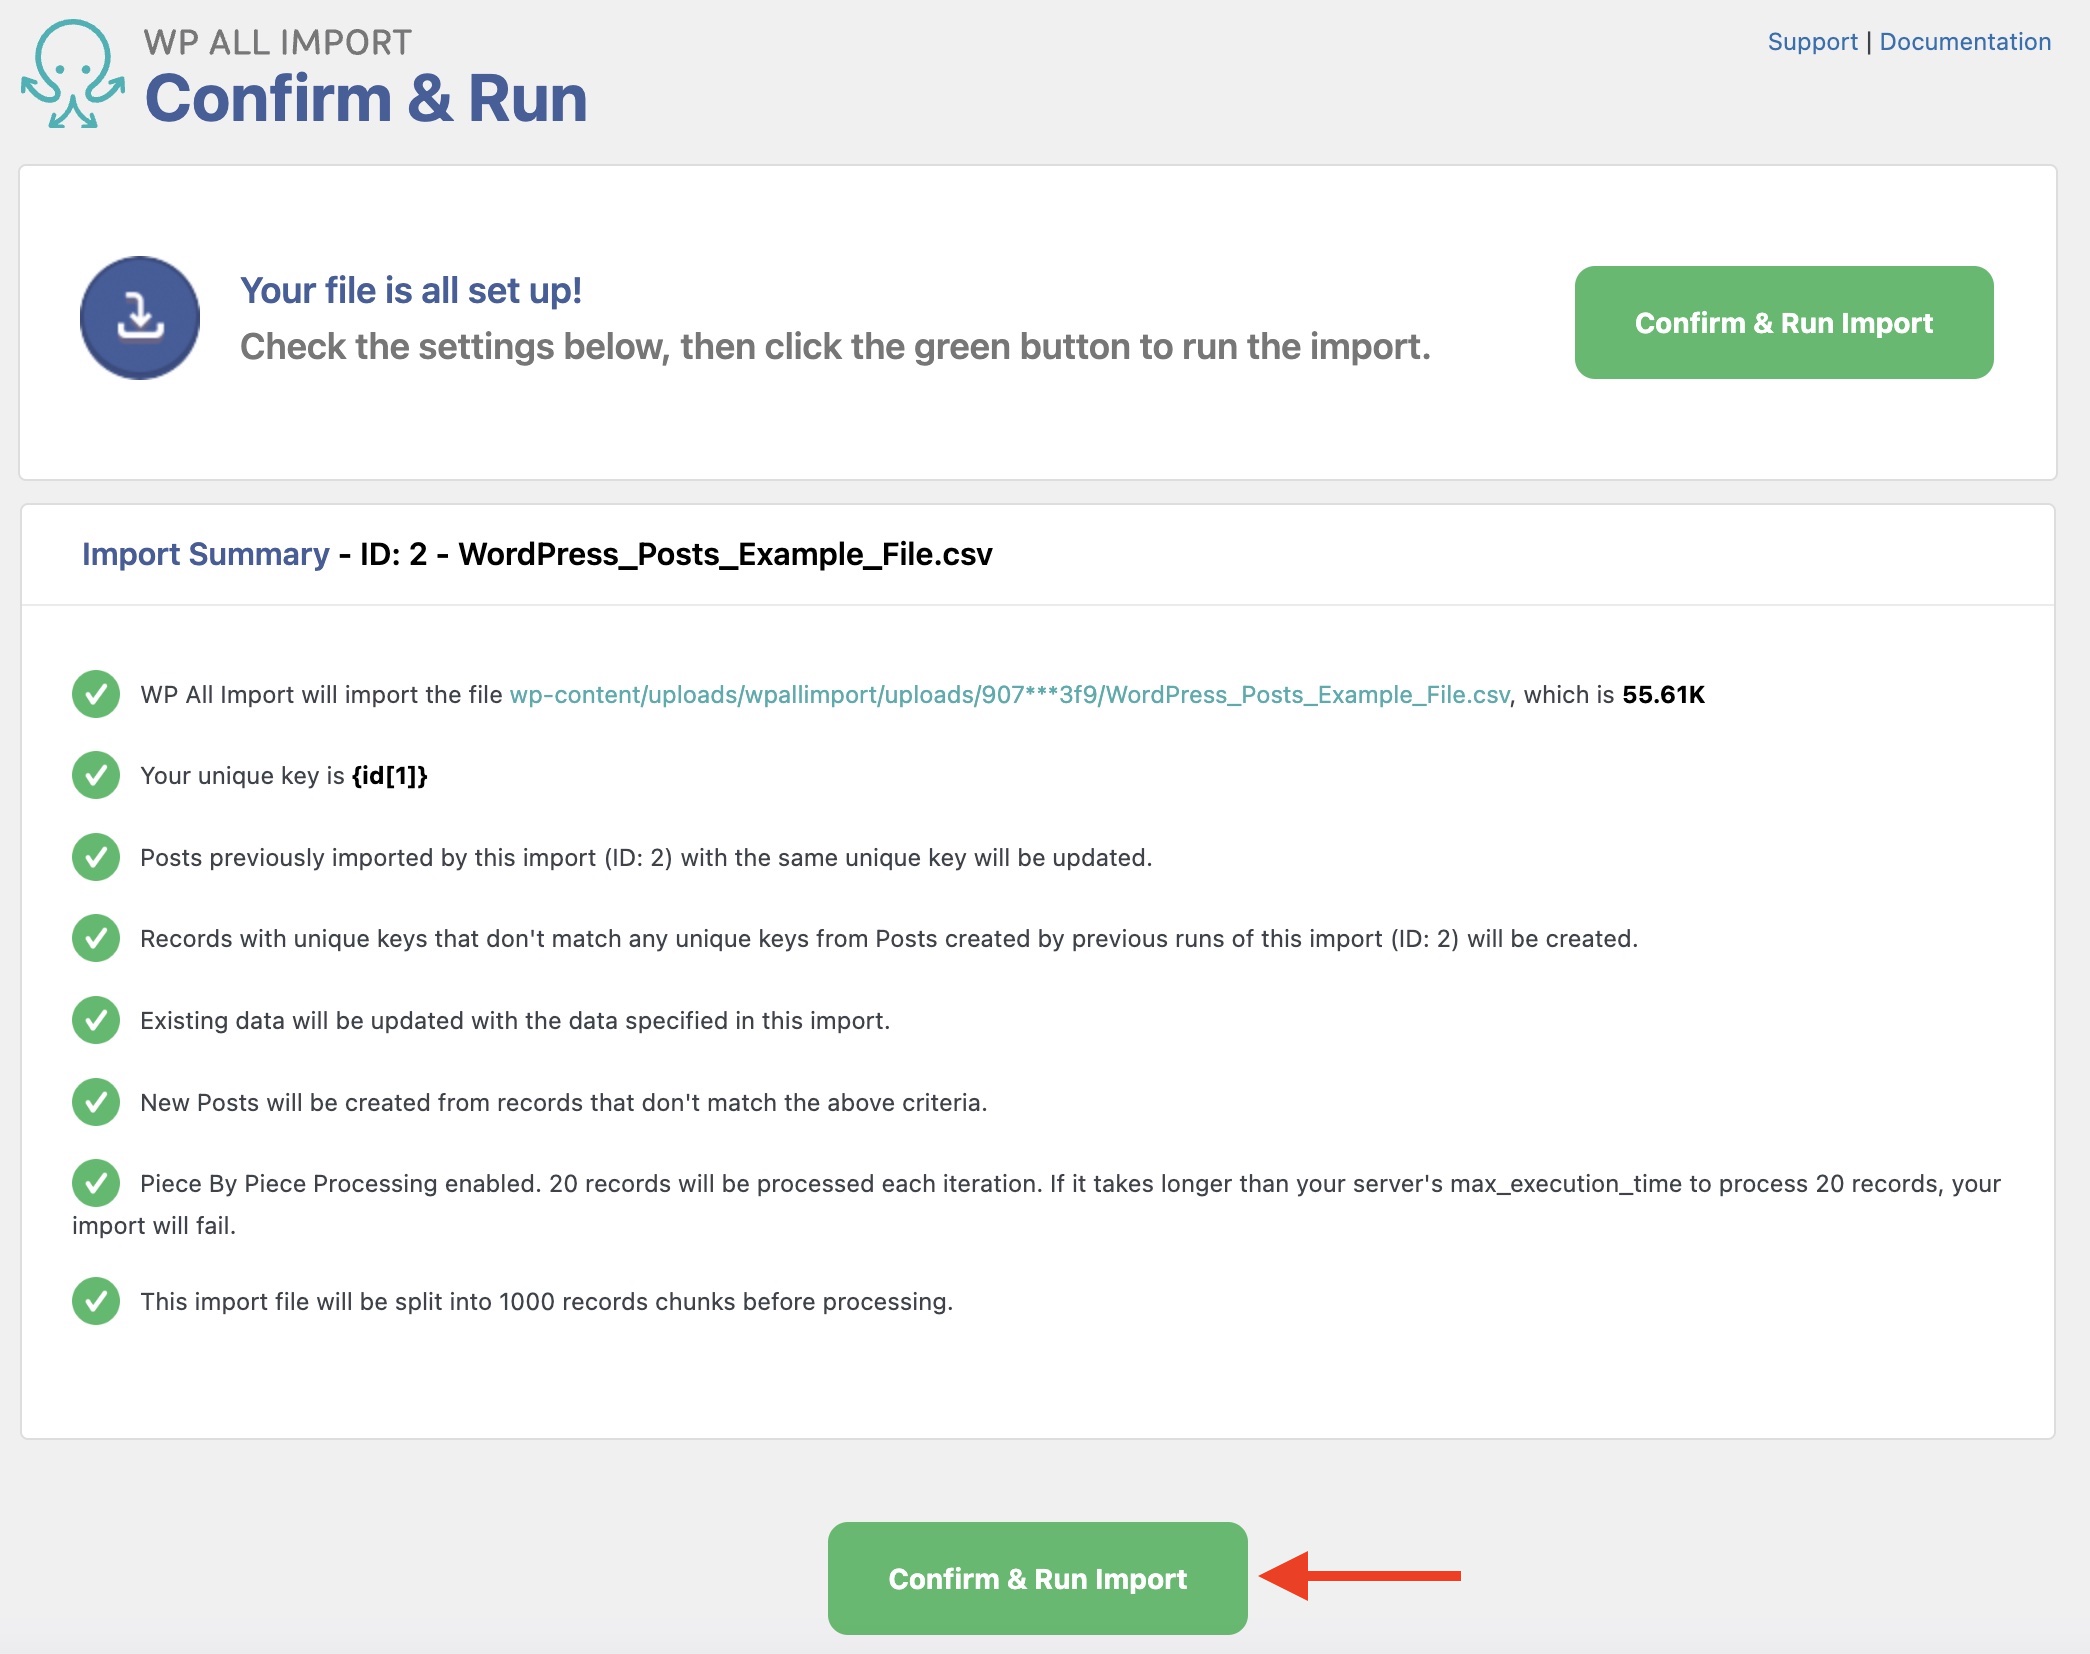
So long as everything looks correct, click on Confirm & Run Import to run the import. You'll see the following screen once the import completes:
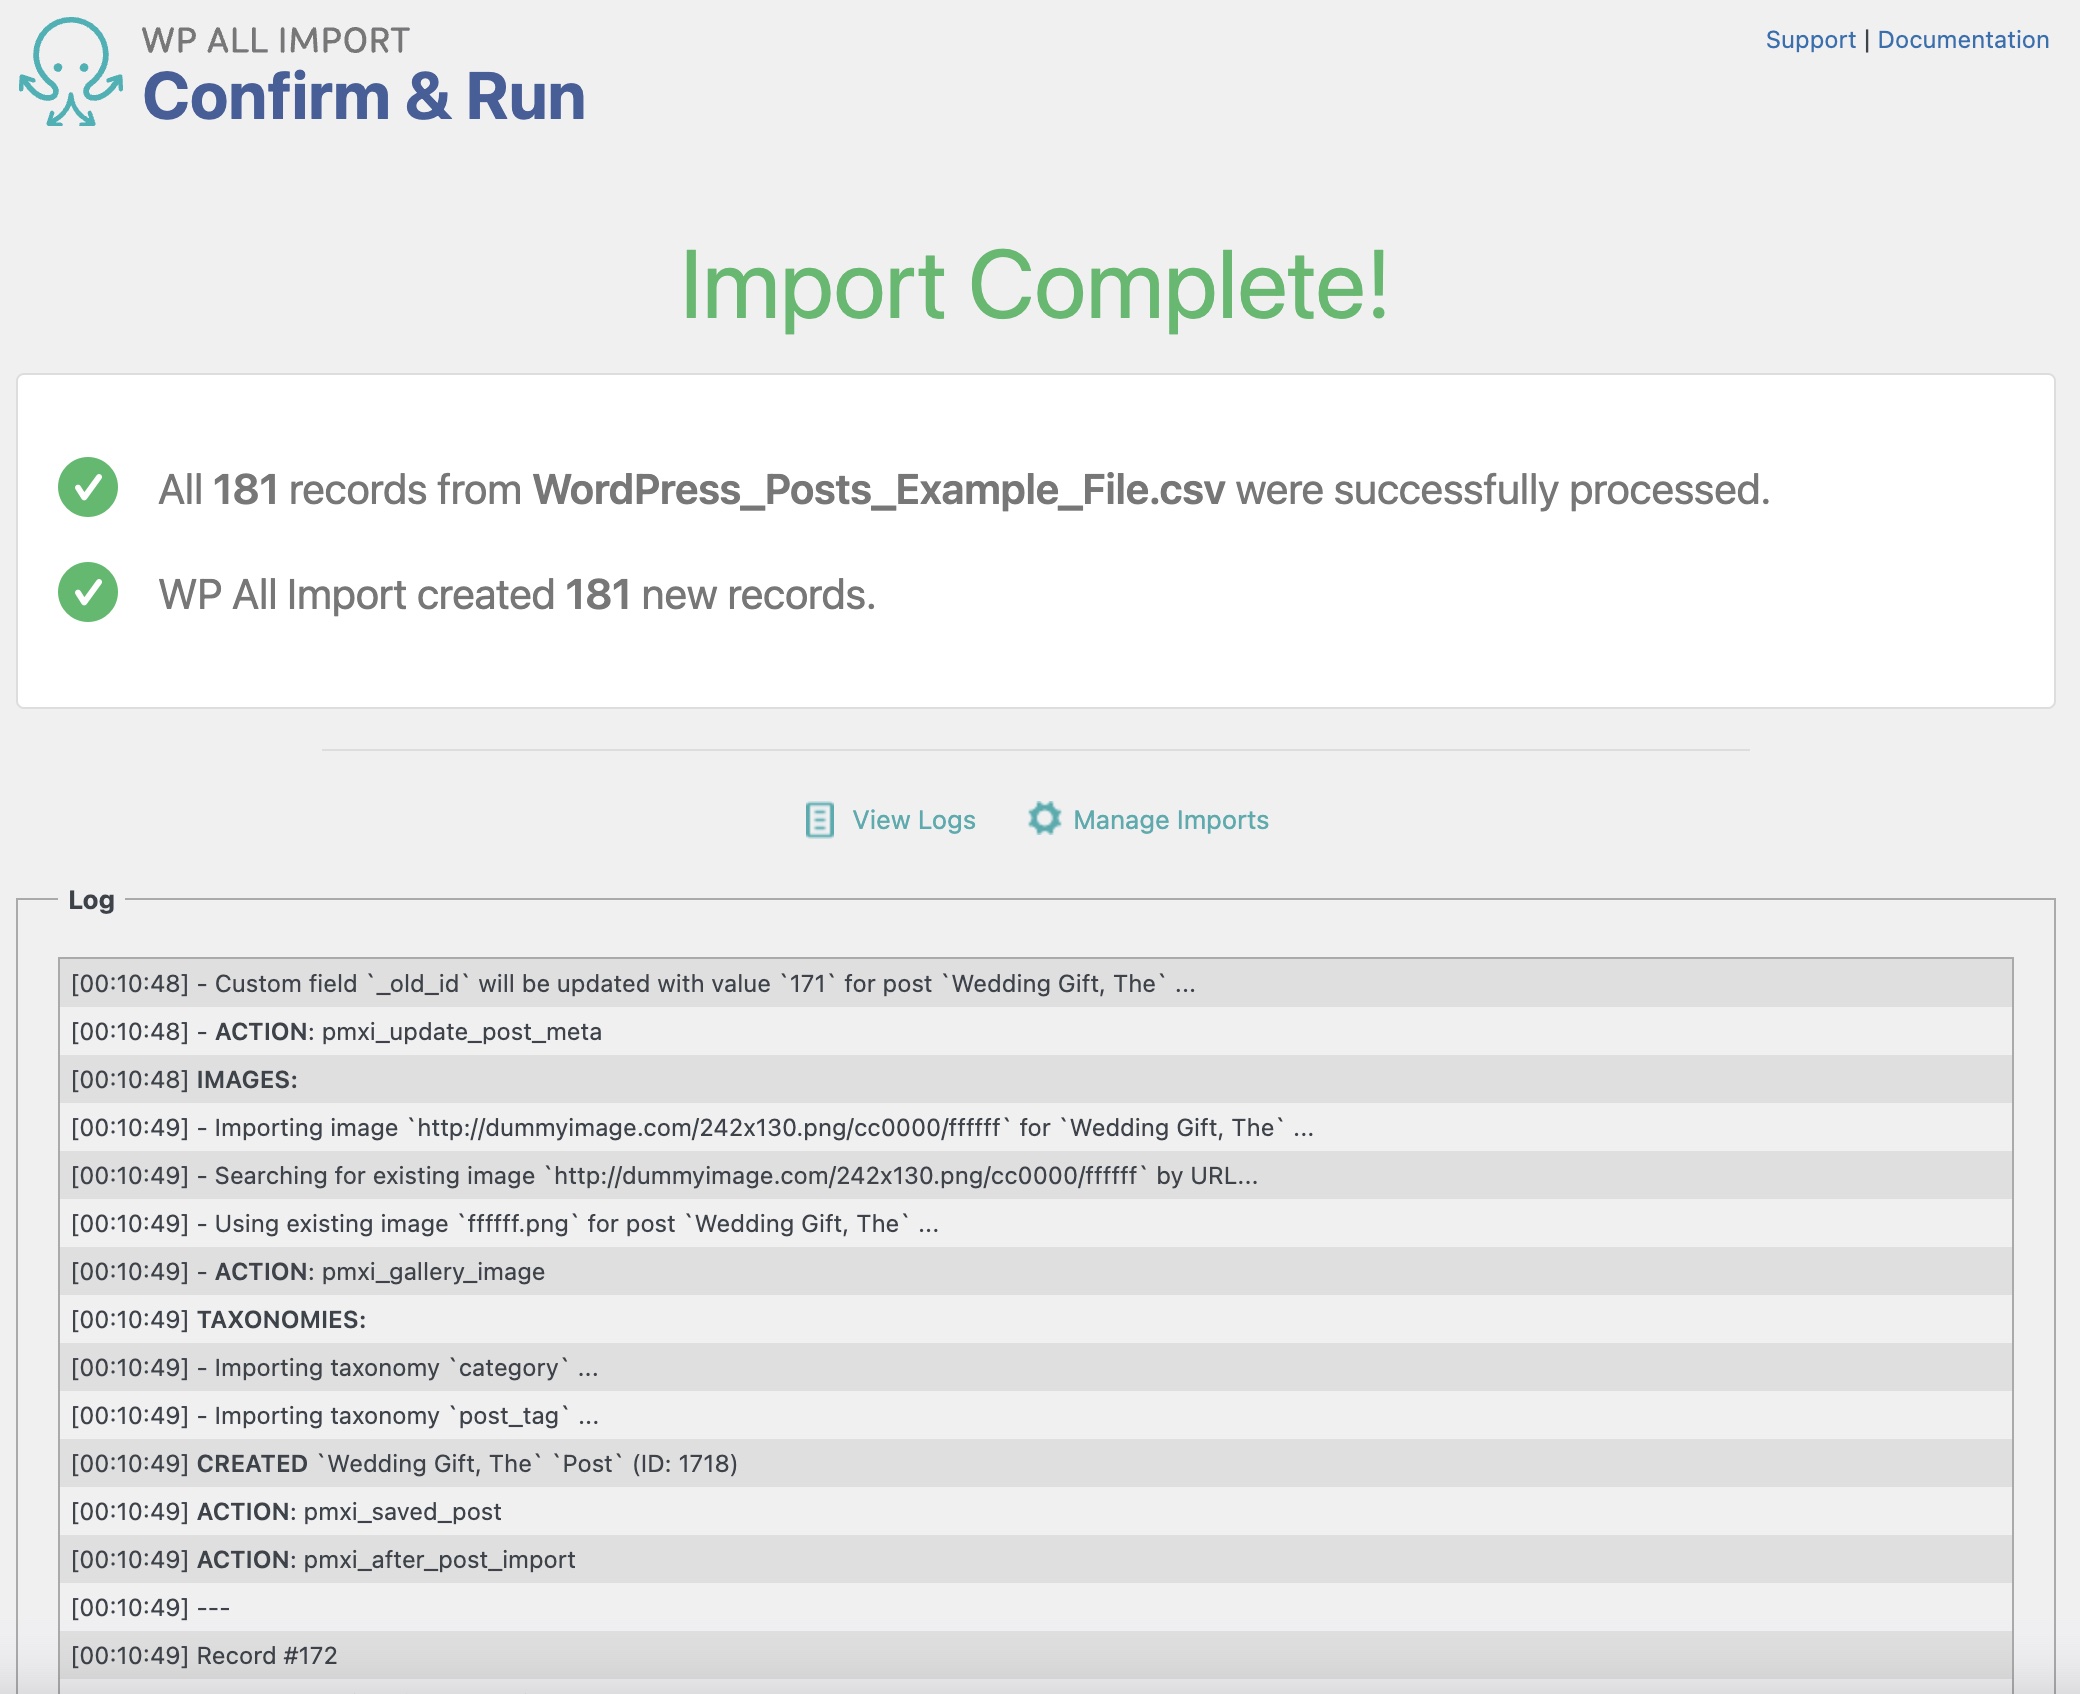
To verify that your import succeeded, review the new posts at Posts › All Posts.
Import Any CSV, XML, or Excel to WordPress
- Any theme or plugin
- Images & galleries
- Custom fields
- Categories & tags
- Woo, ACF, Meta Box, JetEngine
Import WordPress Posts – Advanced Topics
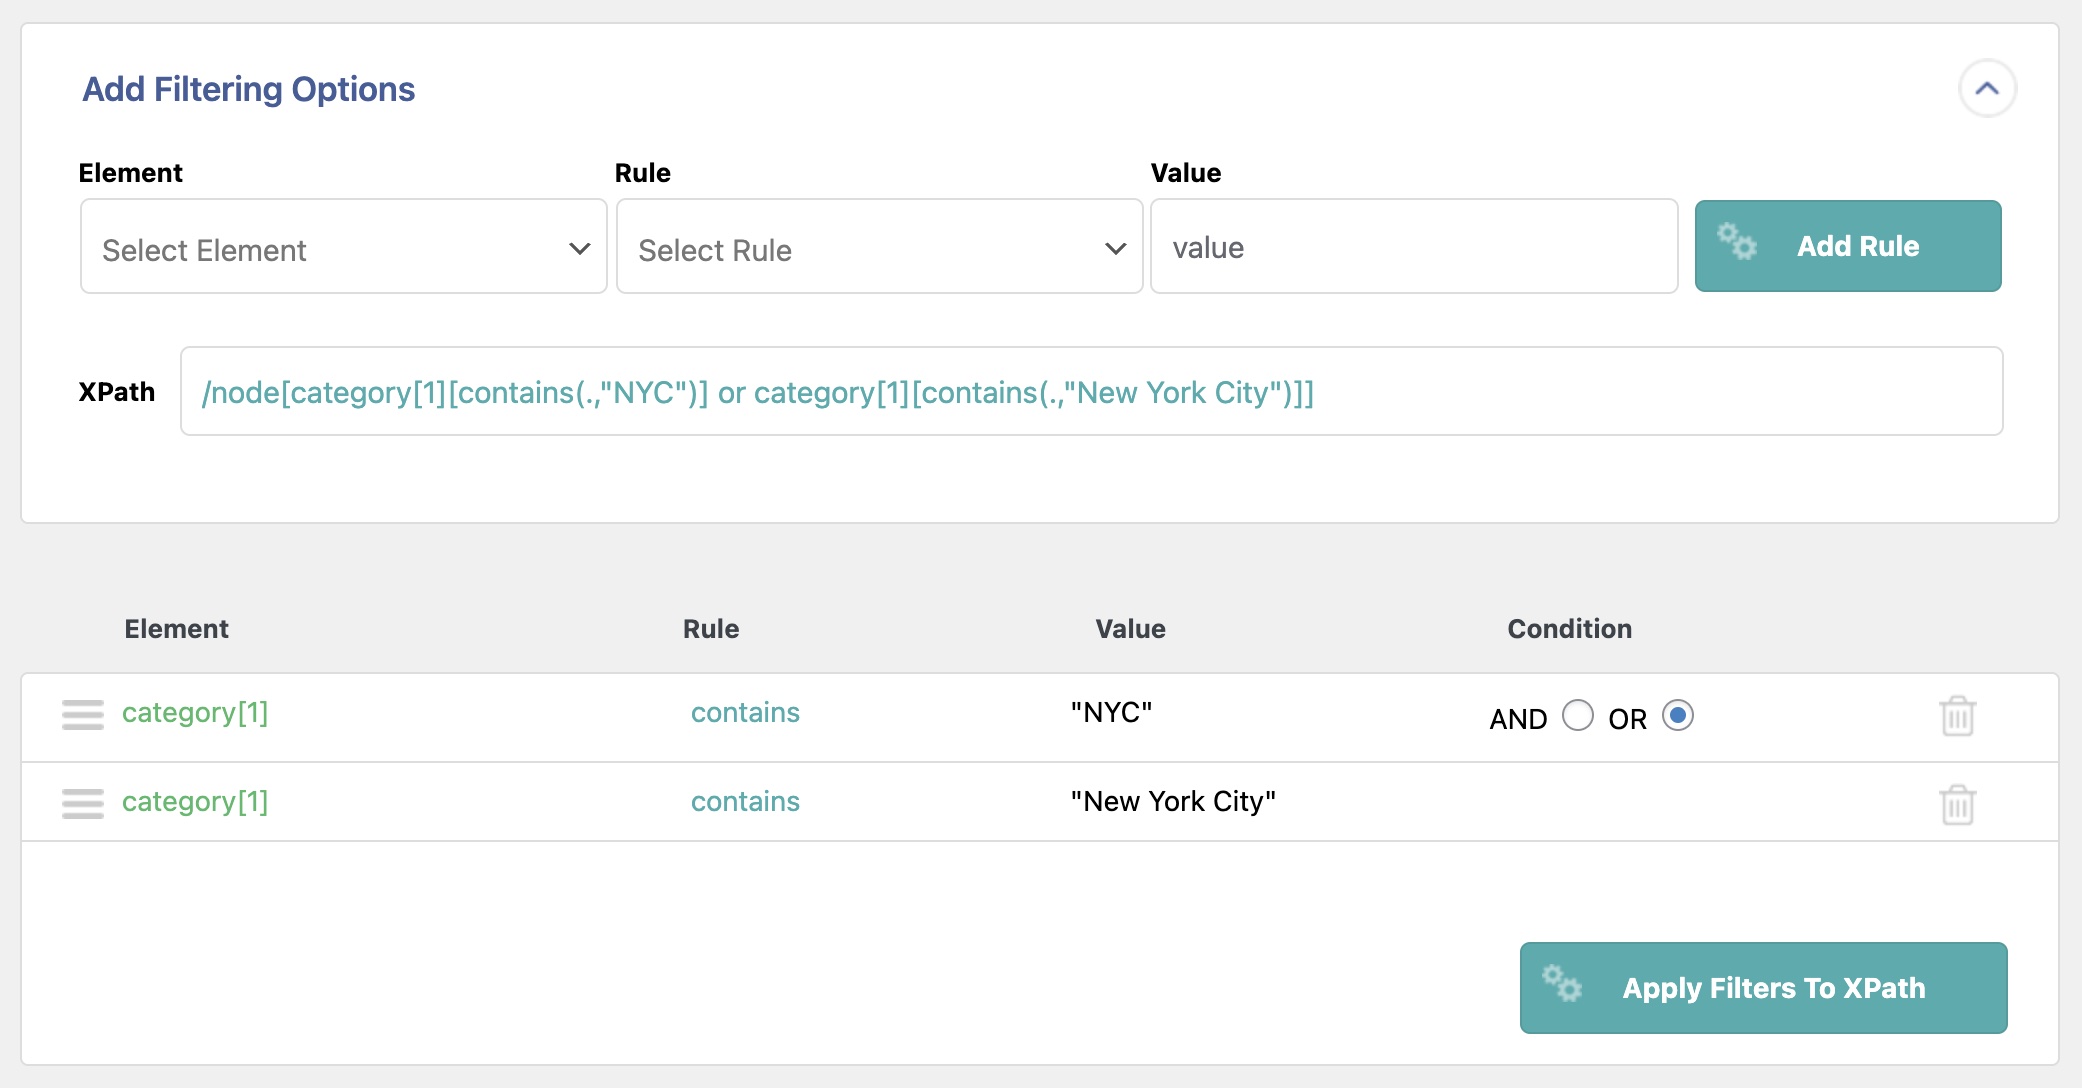
Import WordPress Posts Using Filters
While setting up the import process in Step 2, use the Manage Filtering Options section in the Review Import File screen to add filters that selectively choose which WordPress posts to import. You need to add a target Element, a Rule to apply, and a Value to filter by.
For example, if you want to import only posts related to New York City, you can add a filter containing "New York City" or "NYC" in the category import field:
Import Posts from Different File Types
WP All Import allows you to import from many different file types, so you can import your WordPress posts regardless of how they are stored. Here are the supported file types: XML, CSV, ZIP, GZIP, GZ, JSON, SQL, TXT, DAT, and PSV.
If you need to change the import file after you've run the import, you can do so via All Import › Manage Imports › Settings.
For more information, see Available Import Types.
Schedule WordPress Posts Import
You can schedule your WordPress posts import to run automatically using either of these options:
- Manual cron jobs: included at no extra cost and can be set up in your web hosting. Learn more about this option here: Scheduling Imports Using Cron Jobs.
- Automatic Scheduling Service: a monthly and optional paid service that allows you to set up cron jobs directly from within our plugin's interface. For more information, see Automatic Scheduling.
Import WordPress Posts – Frequently Asked Questions
How Do I Bulk Import Posts into WordPress?
To bulk import posts into WordPress, just follow the steps in this guide. Any import of posts involving more than one post is considered a bulk import, and most imports fall into this category.
How Do I Import WordPress Posts as a Draft?
In Step 3 of the import process, under Other Post Options, change the Post Status to Draft. This way, all imported WordPress posts will be created as drafts.
How Do I Import Blog Posts to WordPress?
If you distinguish blog posts from other posts in some way, such as by attaching a Blog category to them, just set a filter that restricts your import by that requirement. If you are importing a set of posts and want to attach all of them to your blog, you can manually define the appropriate category in the Taxonomies, Categories, Tags section of the Drag & Drop screen.
Read here more information about setting a filter.
Can I Import WordPress Pages?
Yes. There are no major differences between importing WordPress pages versus importing posts. Just select Pages instead of Posts as the import type, and WP All Import will adjust accordingly.
How Do I Import Custom Post Types in WordPress?
WP All Import automatically recognizes many custom post types. For example, it recognizes all of the main WooCommerce post types, such as WooCommerce Orders, WooCommerce Products, etc. In such cases, all you have to do is select the custom post type in the New Import screen, and the rest of the import process will remain the same.
If you encounter a custom post type that isn't recognized by our plugin, just contact our support team, and they'll provide further guidance.
How Do I Export WordPress Posts?
- Go to All Export › New Export.
- Choose Posts from the dropdown list.
- Select the desired export fields and run the export.
- Download the export file.
- Review the exported data.
Learn more here: Exporting WordPress Posts.
How Do I Transfer WordPress Posts to Another Website?
- Go to All Export > New Export and create a new export for Posts.
- Choose to Migrate Posts and download the bundle file.
- Upload the bundle file on the destination site.
- WP All Import will automatically configure itself based on the bundle file's contents.
- Use the Skip to Step 4 button to finish the migration.
Learn more here: Migrating WooCommerce and WordPress Data.
How to Bulk Edit WordPress Posts from My Site?
- Export your WordPress posts.
- Download the exported file.
- Perform the bulk edits in your favorite spreadsheet.
- Re-import the modified file back using the Import with WP All Import option.
- Verify that the changes were properly applied.
We explain more on how to perform a bulk edit process here: How to Bulk Edit WooCommerce and WordPress Data.
Import WordPress Posts – Related Docs
Learn how to import a variable number of images per post.
Shows how to remove or modify data missing from an import file.
Explains how to use PHP code to modify imported data on-the-fly.
Demonstrates how to set up and use recurring import processes.
