How to Migrate Gravity Forms Entries from One WordPress Site to Another
On the export site, go to All Export › New Export and create an export bundle file with the desired Gravity Forms entries. Then, on the import site, go to All Import › New Import and upload that bundle file to import your entries.
Table of Contents
- Step 1: Create an Export Bundle
- Step 2: Create the Target Form
- Step 3: Import the Bundle File
- Step 4: Verify the Migrated Entries
Advanced Topics
Step 1: Create an Export Bundle for the Gravity Forms Entries
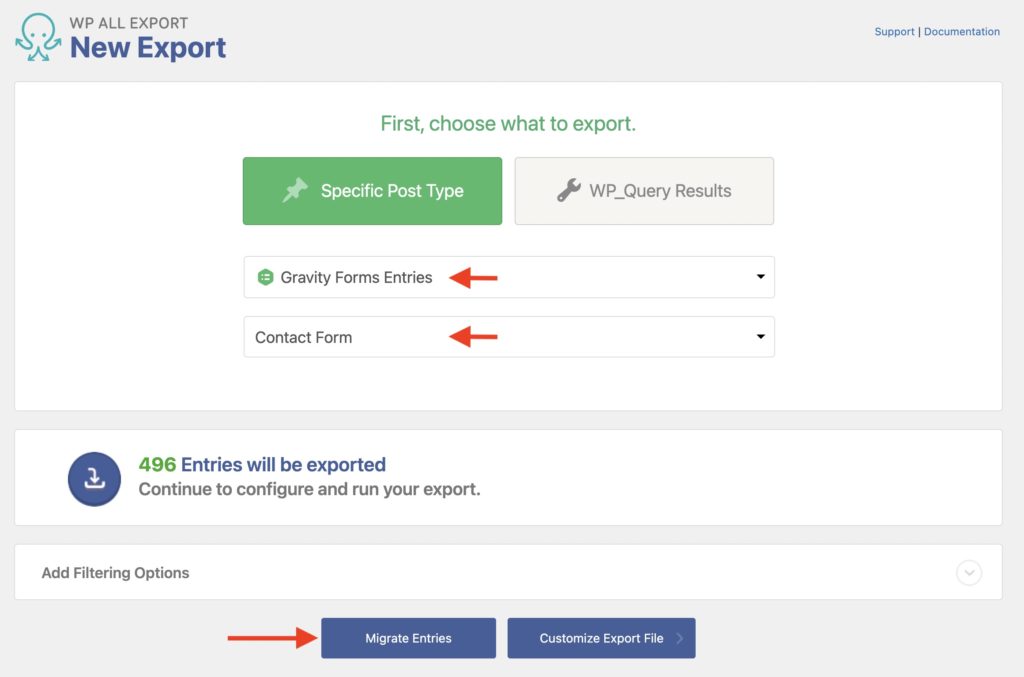
On the export site, go to All Export › New Export and choose to export Gravity Forms Entries. Then, select the target form and click Migrate Entries to continue.
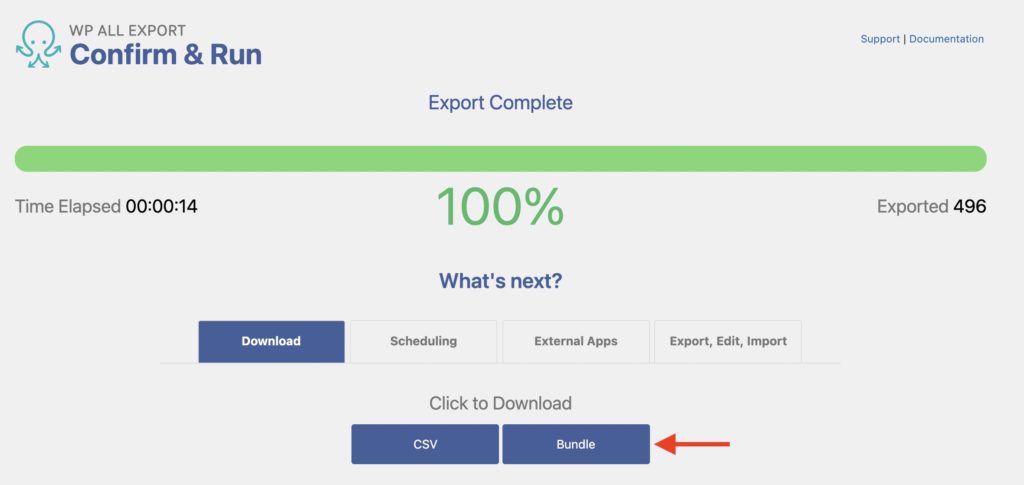
In the next screen, click Confirm & Run Export to execute the export. Once the export is complete, click Bundle to download a zip file containing your exported entries and a settings file for WP All Import:
Step 2: Create the Target Form on the Destination Site
The Gravity Forms plugin allows you to create multiple forms in WordPress. As such, it can store different types of forms. In this example, we're migrating a Contact Form.
When importing Gravity Forms entries, you can select any form to import the entries into. Since we're migrating the entries from one site to another, you can manually create the same form on the import site to ensure that entries are imported correctly.
If the form on the import site doesn't match the exported form, the entry data may not be imported completely because it may not match the data fields defined for the target form.
By exporting and importing into the same form with the bundle file that WP All Export generates, all of the import fields will be automatically mapped.
To avoid creating the form manually, you can export and import the form as explained in the Gravity Forms documentation:
Exporting a Form: https://docs.gravityforms.com/exporting-a-form-from-gravity-forms/.
Importing a Form: https://docs.gravityforms.com/importing-a-form-into-gravity-forms/.
Step 3: Import the Bundle File
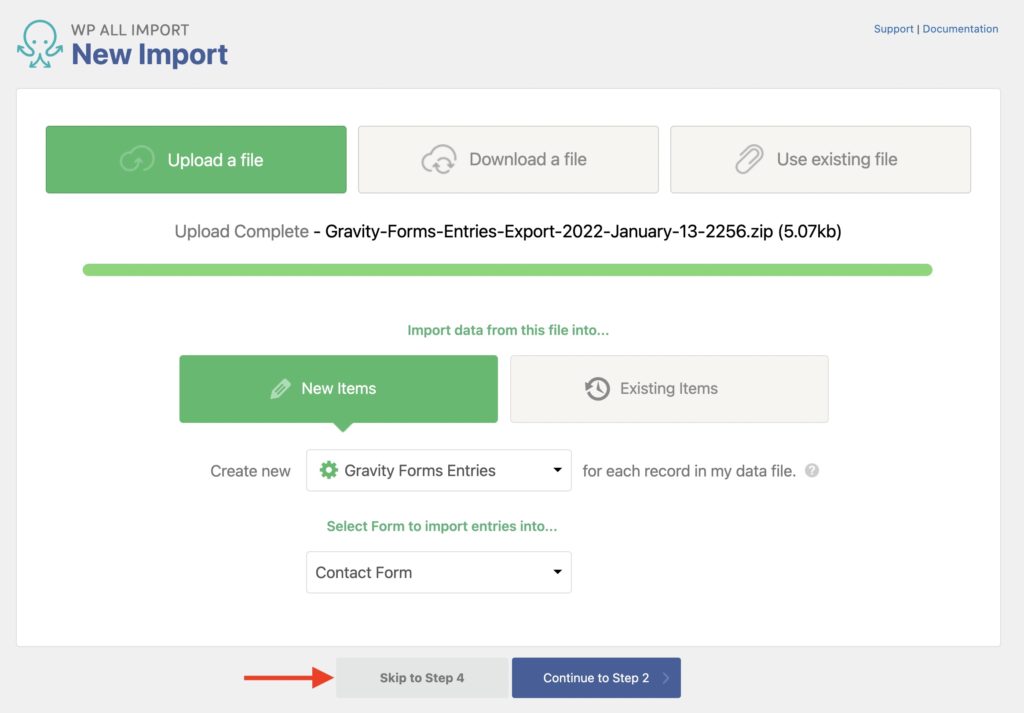
On the import site, go to All Import › New Import and upload the Bundle zip file that you exported. By using the bundle file, all form fields and settings will be automatically mapped.
In this screen, you may Continue to Step 2 to modify the import template and settings. Otherwise, click on Skip to Step 4 to let the bundle configure everything:
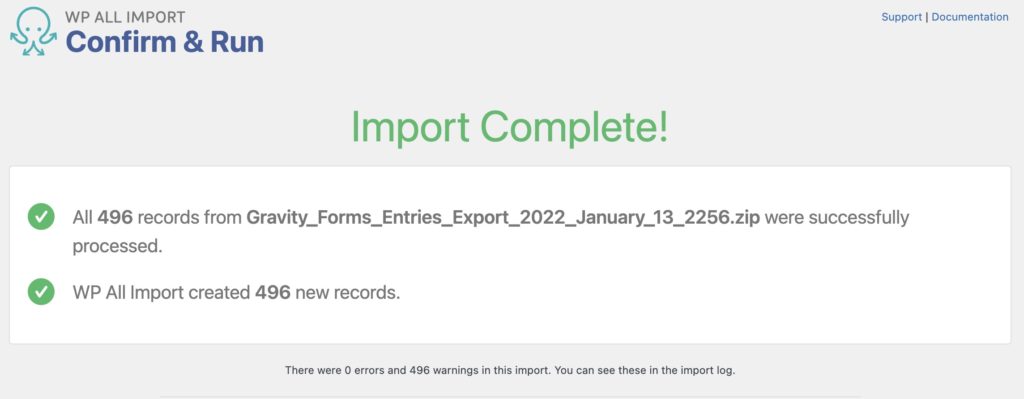
In the next screen, click Continue and then click Confirm & Run Import to finish the import process. Once the import completes, the migration has been successful and all entries will appear on the new site.
Step 4: Verify That the Gravity Forms Entries Were Migrated
After the migration, you can open the target form on the import site to browse the entries and verify that everything went as expected.
If the migration did not go as expected, it could be due to the export or the import site. The best practices are as follows:
First, review the export site:
- On the export site, verify that you followed the instructions from Step 1.
- Fix whatever problem you detect.
- Repeat the migration.
If there's no clear issue with the export site, then proceed to review the import site:
- On the import site, verify the target form (see Step 2)
- Also, verify the import template (Manage Imports › Edit)
- Fix whatever problem you detect.
- If needed, delete the wrong entries (Manage Imports › Delete)
- Repeat the migration.
If repeating the migration doesn't help, you can erase everything and start the migration from scratch.
Because this type of situation generally arises because you are moving Gravity Forms entries to a website that uses a different version of the form, see the next section.

Easily Migrate Gravity Forms Entries
- One-click setup
- Advanced filters
- All data
- Woo, ACF, Meta Box, JetEngine
How to Handle a Gravity Form Entries Migration Where the Export Form and the Import Form Do Not Match
To handle this scenario, do everything the same up to the point in Step 3 where you click the Skip to Step 4 button. Instead, click the blue Continue to Step 2 button:
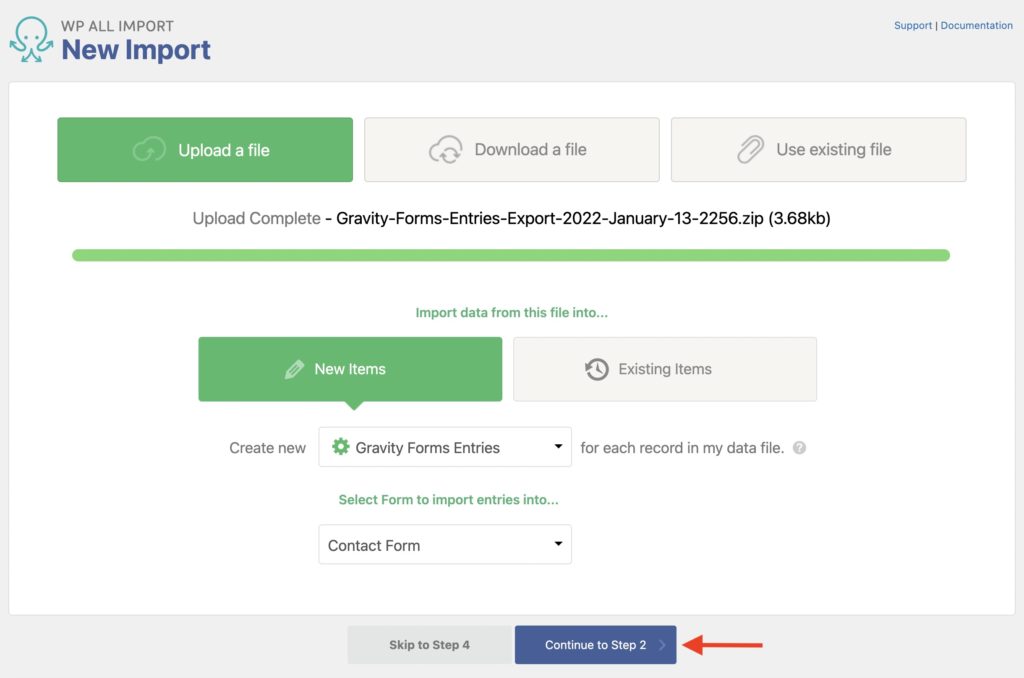
This will bring up the Review Import File screen:
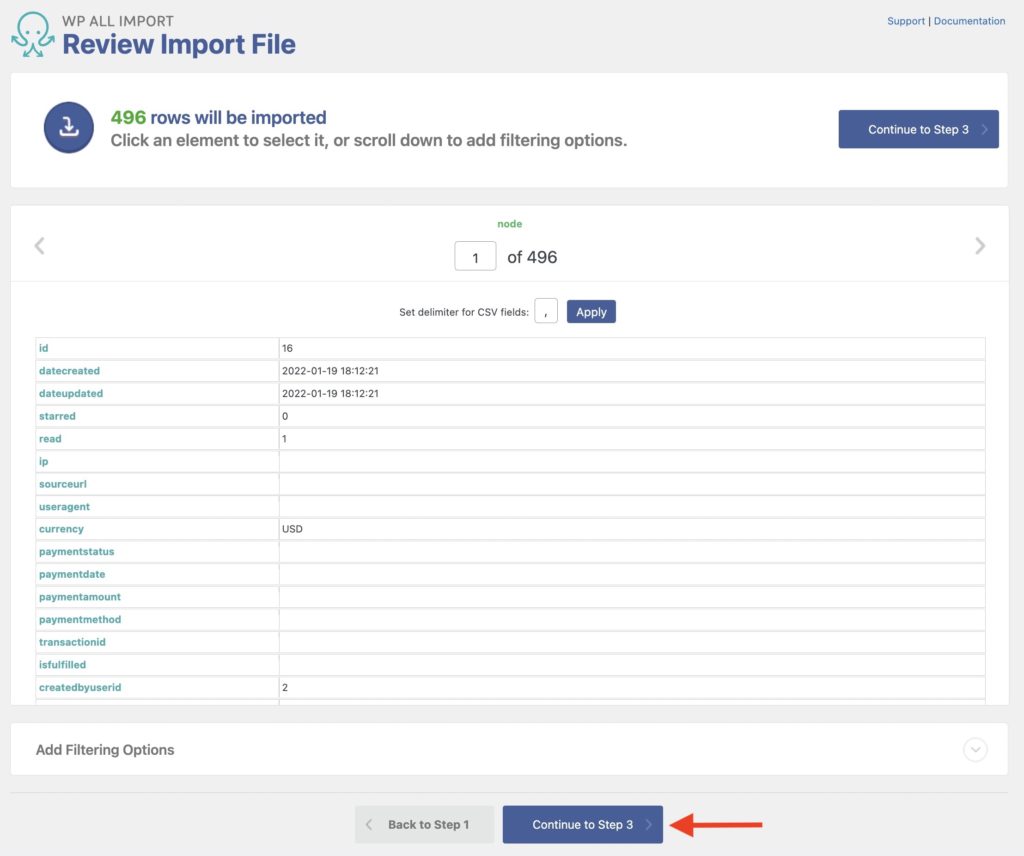
Click Continue to Step 3. This will bring up the Drag & Drop screen:
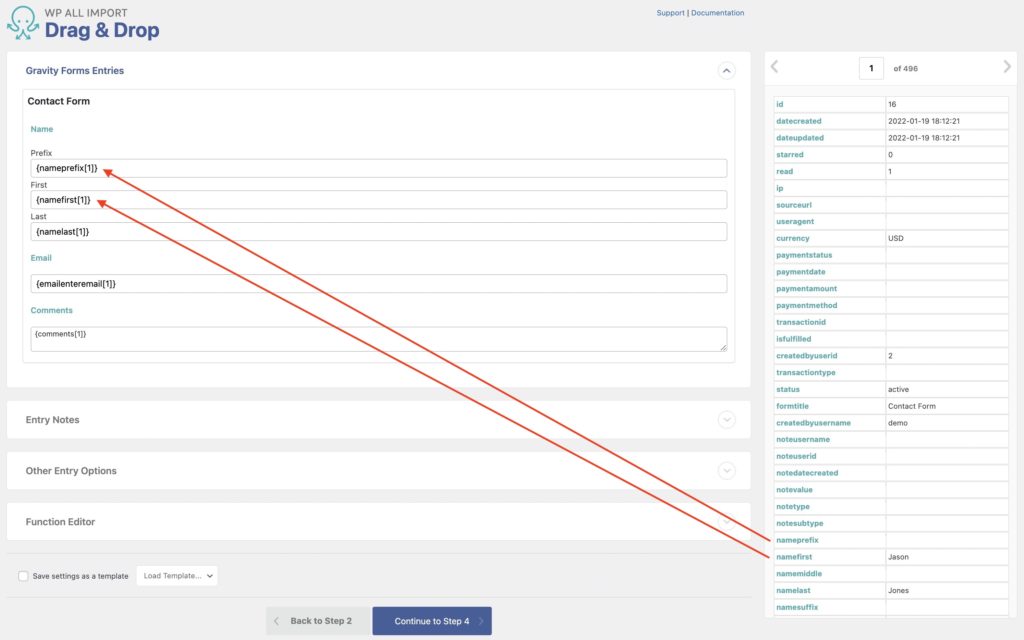
In this screen, the import form target fields are on the left side of the screen, while the incoming data fields are on the right.
To configure your import, drag the incoming fields to their corresponding form target fields.
If you're attempting to replace a mapping that was set by the bundle file, first delete the existing mapping before creating a new one.
This addresses simple mapping adjustments. However, more complex data modifications can also be achieved using custom PHP code. Once everything is mapped, click Continue to Step 4 to navigate to the Import Settings screen:
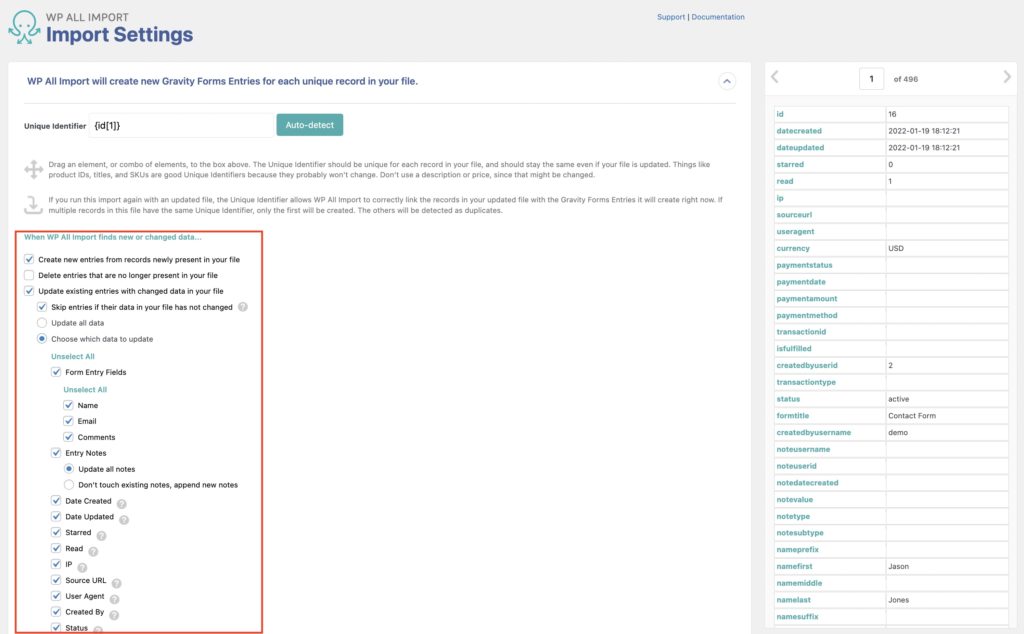
Note the options outlined by the red rectangle, which all specify what WP All Import should do when it finds new or changed data in the import file. These options include:
- Create new entries from records newly present in your file
- Delete entries that are no longer present in your file
- Update existing entries with changed data in your file
In the case of the last option, i.e. to update existing entries, there are three sub-options:
- Skip entries if their data in your file has not changed
- Update all data
- Choose which data to update
By selecting Choose which data to update, you can instruct WP All Import how to update the Gravity Forms entries that were previously imported by that same import.
We won't describe these tasks here because this subject is covered in detail in the How to Import Gravity Forms Entries documentation page.
But the combination of WP All Export and WP All Import can handle every form of migration from the simple use of a Bundle zip file with just a few clicks, up to the most complicated data surgery necessary if you are migrating entries to an existing website with different form definitions.
Migrate Gravity Forms Entries — Frequently Asked Questions
How Do I Schedule Gravity Forms Migrations?
You can schedule Gravity Forms migrations either by creating cron jobs on your server or by using our automatic scheduling service. If you use our scheduling service, you can schedule everything directly from our interface. For a migration, just make sure to set things up so that your export finishes before your import starts.
For more information, see How to Schedule WordPress Exports and Run WordPress Import on a Schedule.
How Do I Export Gravity Forms Entries?
- Go to All Export > New Export.
- Select Gravity Forms Entries as the export post type.
- Select the specific form that you want to export.
- Customize your export columns using our Drag & Drop interface.
- Run the export and review your export file.
To learn more, see How to Export Gravity Forms Entries to CSV, Excel, or XML.
How Do I Import Gravity Forms Entries?
- Navigate to All Import -> New Import.
- Select the method to load your import data (i.e. upload a file, use a URL, or use an existing file).
- Choose your import file and select Gravity Forms Entries as your import type.
- Select your target form.
- Use our Drag & Drop interface to map incoming data elements to your target form fields.
- Run the import and review your imported entries.
See How to Import Gravity Forms Entries for additional details.
What Happens When Gravity Forms Adds a Field?
We work closely with the Rocketgenius team to stay on top of any new Gravity Forms fields. If they add a new field, our plugins should recognize it soon after. If you do notice a new field that we haven't yet added, just contact our support team and we'll get right on it.
What Add-Ons Do I Need to Migrate Gravity Forms Entries?
To migrate Gravity Forms entries, you need to have both the Gravity Forms Import Add-On and Gravity Forms Export Add-On active on your site, along with WP All Import and WP All Export.
Migrate Gravity Forms Entries — Related Docs
Learn the general concepts of migrating data.
Learn how to export Gravity Forms entries to CSV, Excel, or XML.