The best import export plugin for WordPress & WooCommerce.

How to Migrate WooCommerce Products to a Different Website
On the source site, go to All Export › New Export, select WooCommerce Products from the dropdown list, then download the exported bundle file with all products. On the destination site, go to All Import › New Import and upload the bundle file.
Table of Contents
- Step 1: Understand How Product Migration Works
- Step 2: Create an Export Bundle
- Step 3: Import the Bundle File on the Destination Site
- Step 4: Confirm That the Products Migrated
Advanced Topics
- Variable Products Created as Simple Products
- Keep Same Product ID When Migrating Products
- Scheduling a WooCommerce Products Migration
Step 1: Understand How Product Migration Works
To migrate WooCommerce products, you need both of our core plugins, WP All Import Pro and WP All Export Pro, along with the WooCommerce Import and Export Add-Ons.
You can migrate simple, variable, grouped, and external/affiliate products. You can also migrate physical or virtual/downloadable products. By using the bundle ZIP file, all import settings are configured automatically when you migrate these WooCommerce products to the new site.
The migration process moves everything contained in the products, such as title, description, custom fields, taxonomies, images, galleries, etc. If you don't want to migrate certain pieces of data, you can remove them from either the export template while exporting in Step 2 or in Manage Exports › Edit, or from the import template while importing in Step 3 or in Manage Imports › Edit.
When you migrate WooCommerce products, keep in mind that new product IDs are generated upon import. This is out-of-the-box behavior with our import plugin and WordPress.
That said, you can use custom code along with our API to attempt to use an old ID instead of generating a new one. See Keeping the Same Product ID When Migrating WooCommerce Products. Just keep in mind that this is only an attempt to use the old ID because if the requested ID is used, a new product ID gets generated.
Step 2: Create an Export Bundle
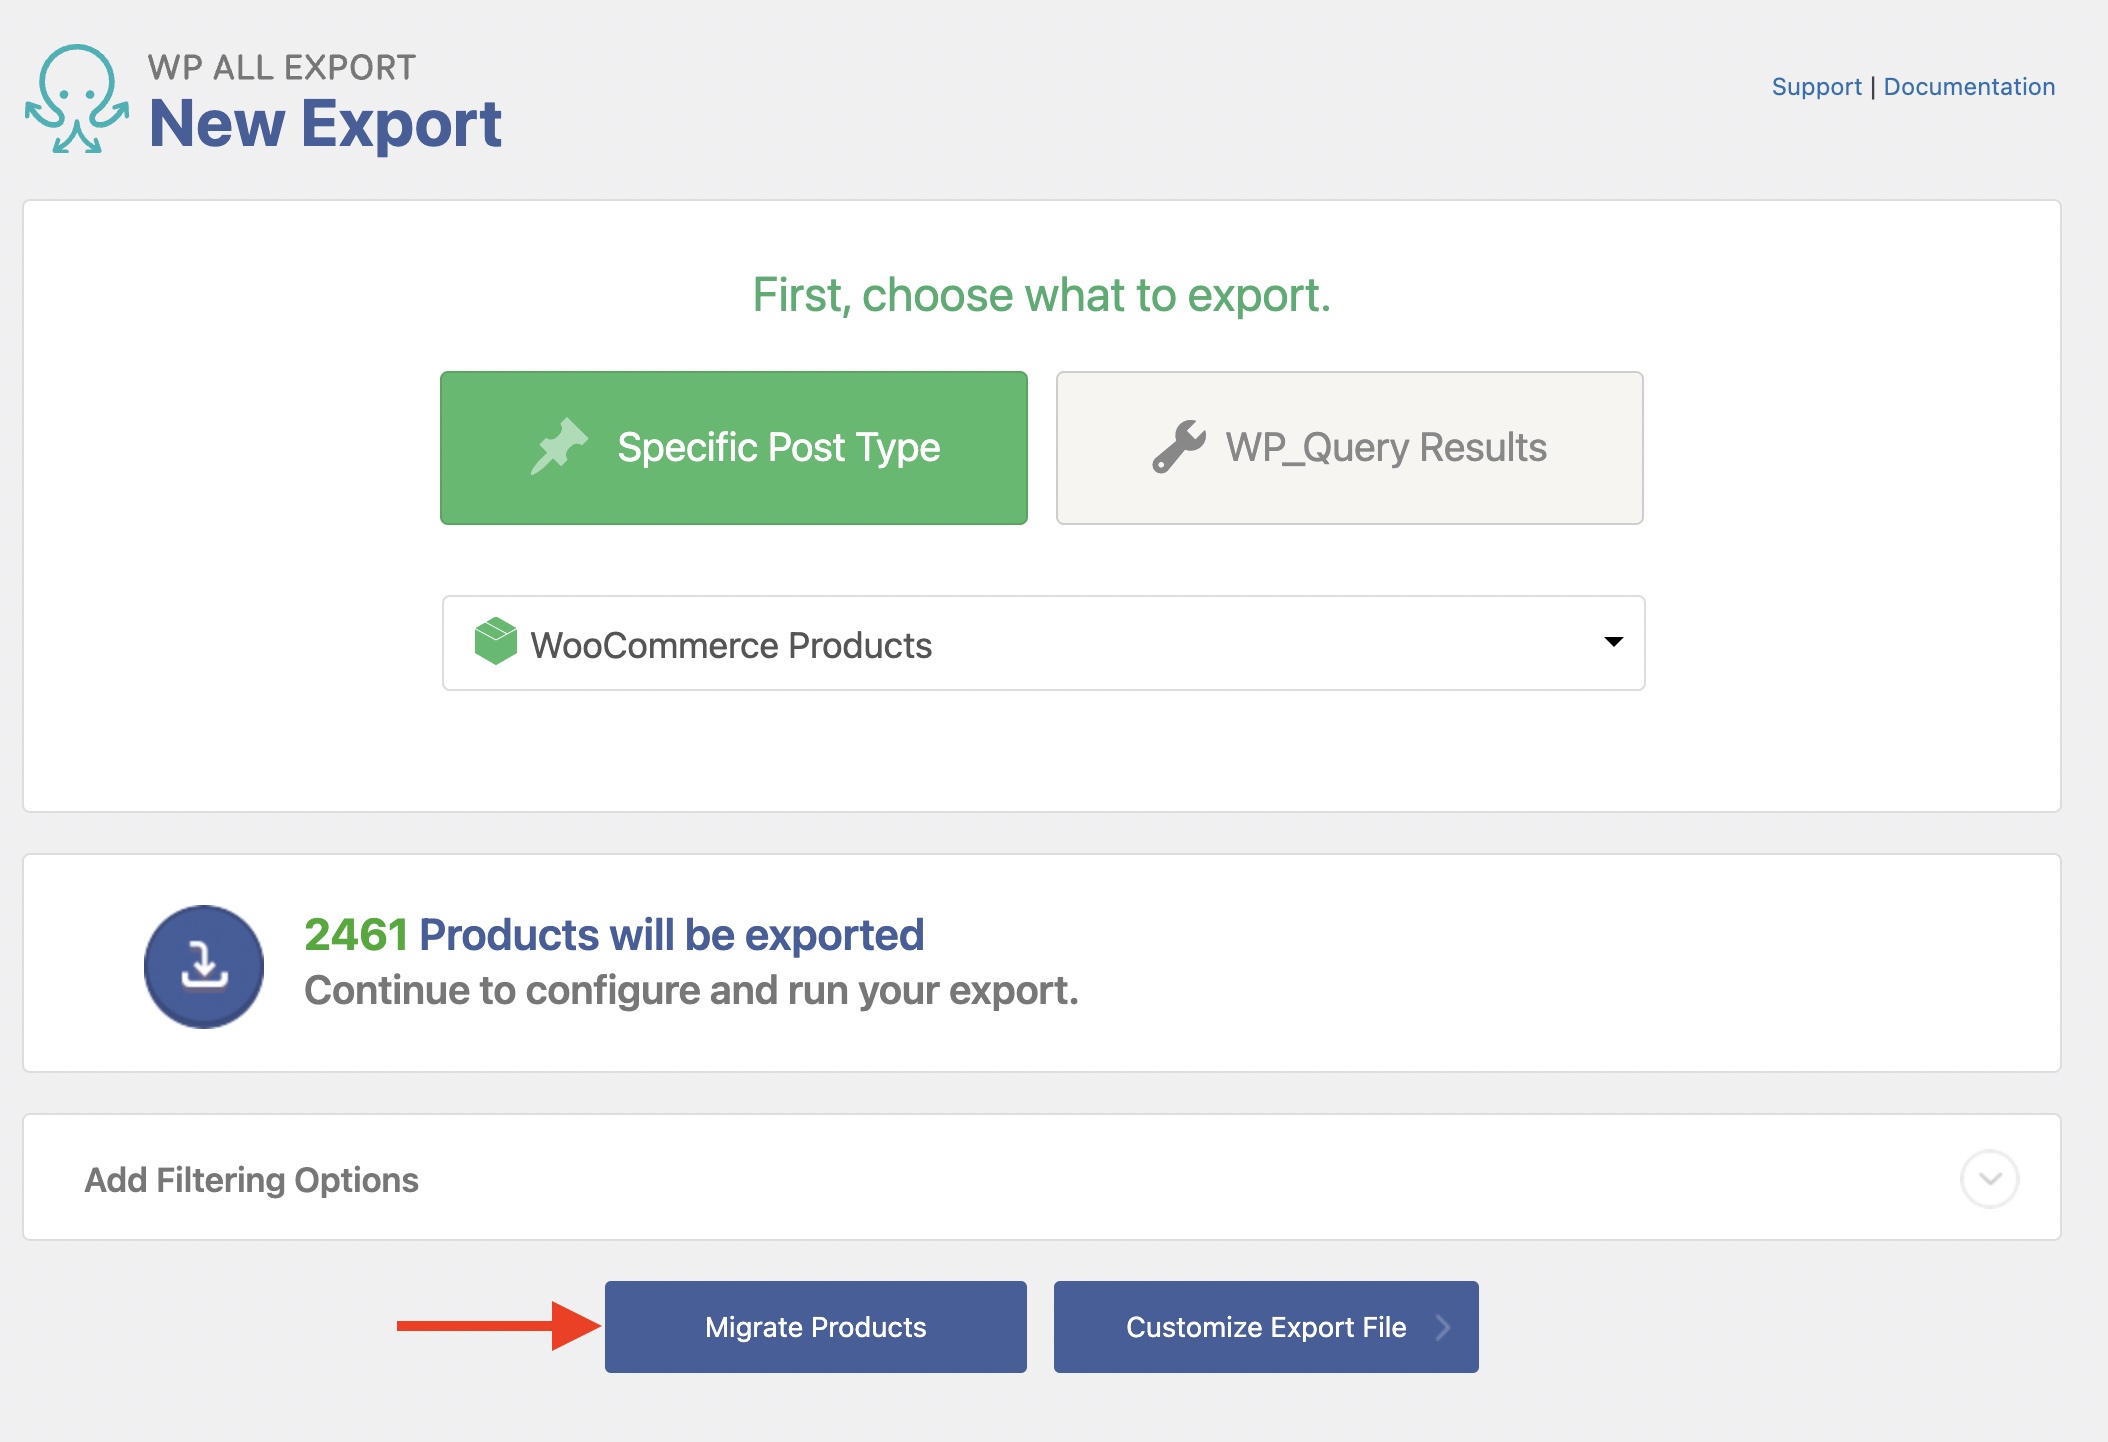
Go to the export site, navigate to All Export › New Export, and choose to export WooCommerce Products. You can Add Filtering Options here to control which products to migrate.
You can also customize and select which data fields to migrate. To do so, choose Customize Export File. Otherwise, click Migrate Products to continue.
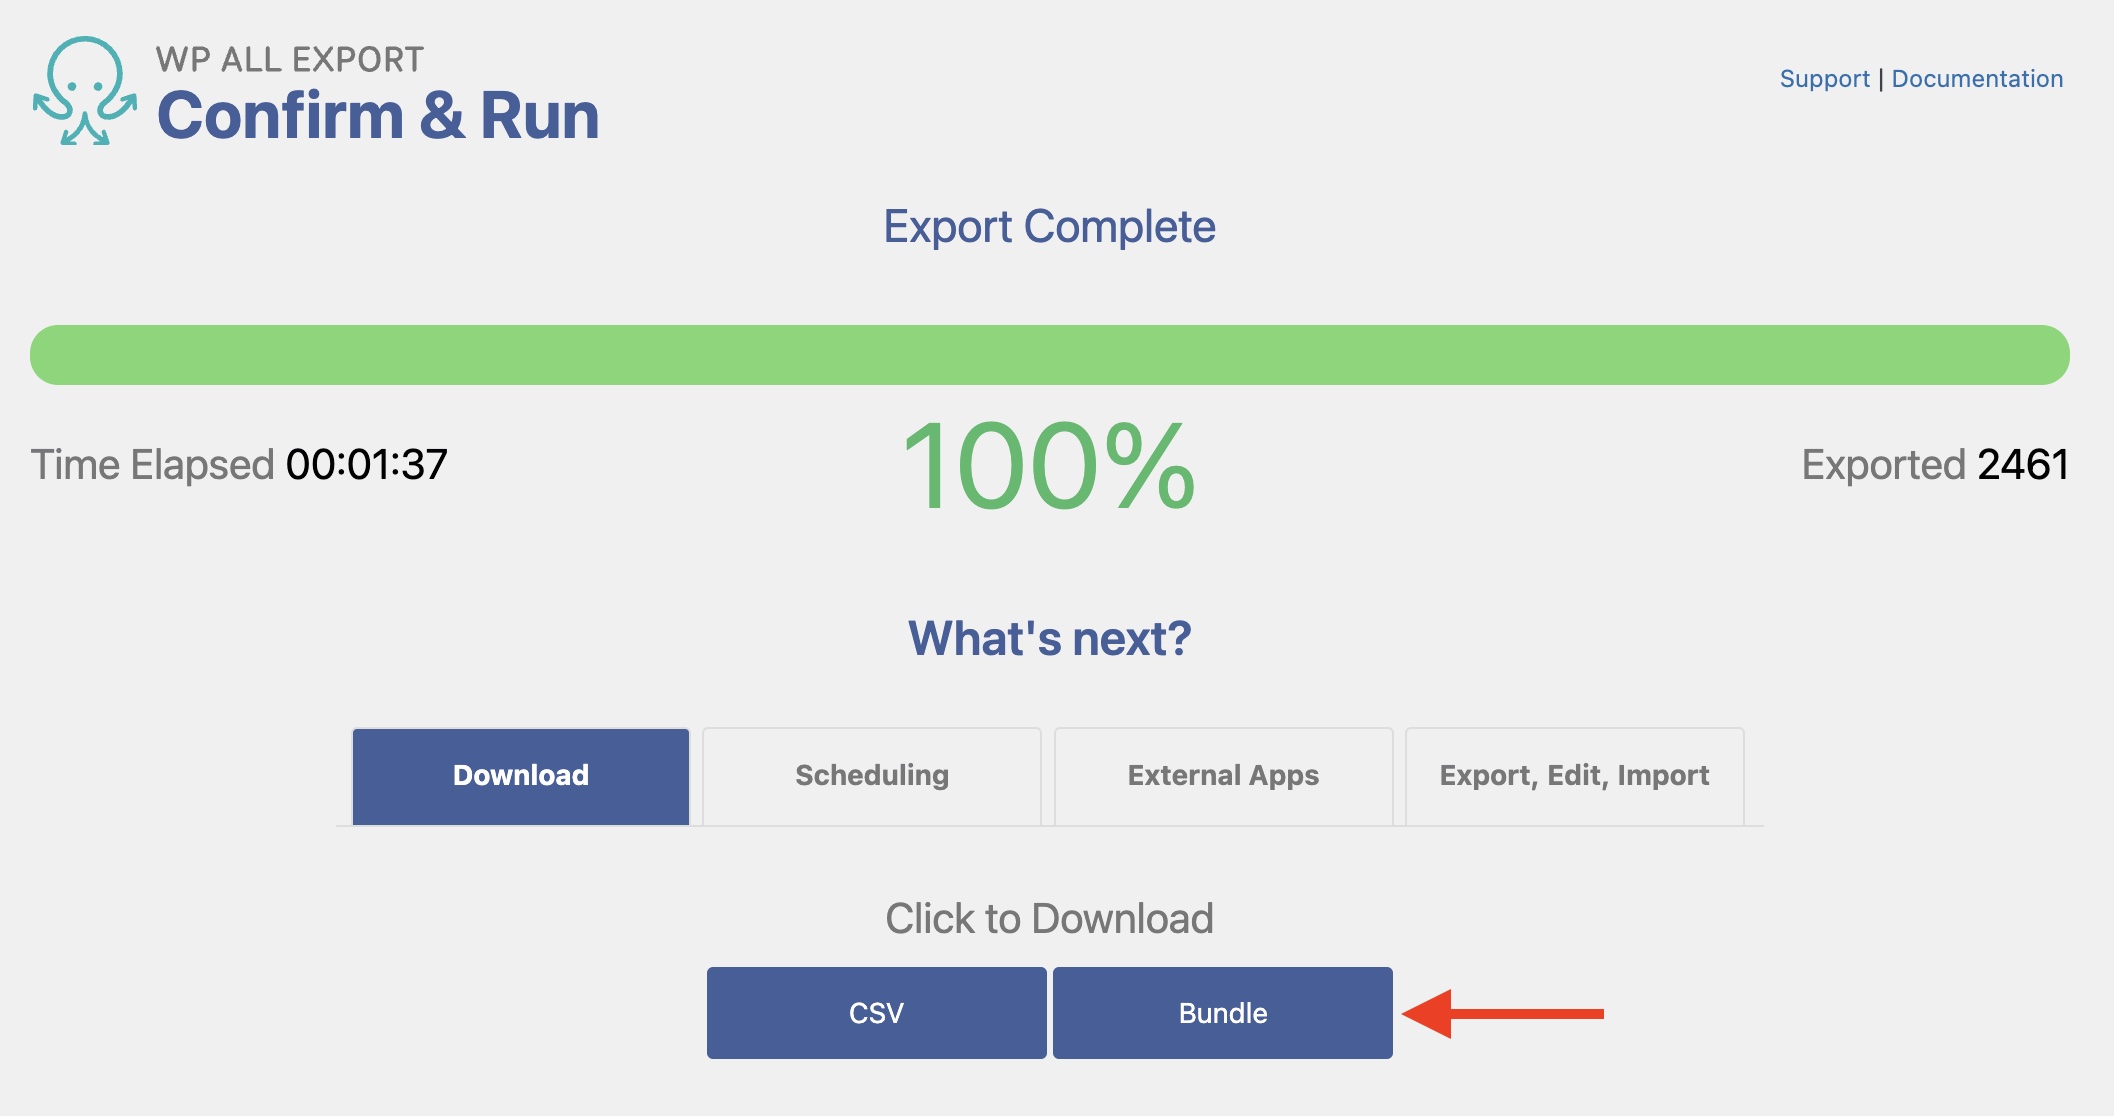
On the next screen, click either of the Confirm & Run Export buttons to export all of your WooCommerce products.
After the export is complete, click the Bundle blue button to download a compressed ZIP file that contains all products, along with a settings file used for the import process.
Step 3: Import the Bundle File on the Destination Site
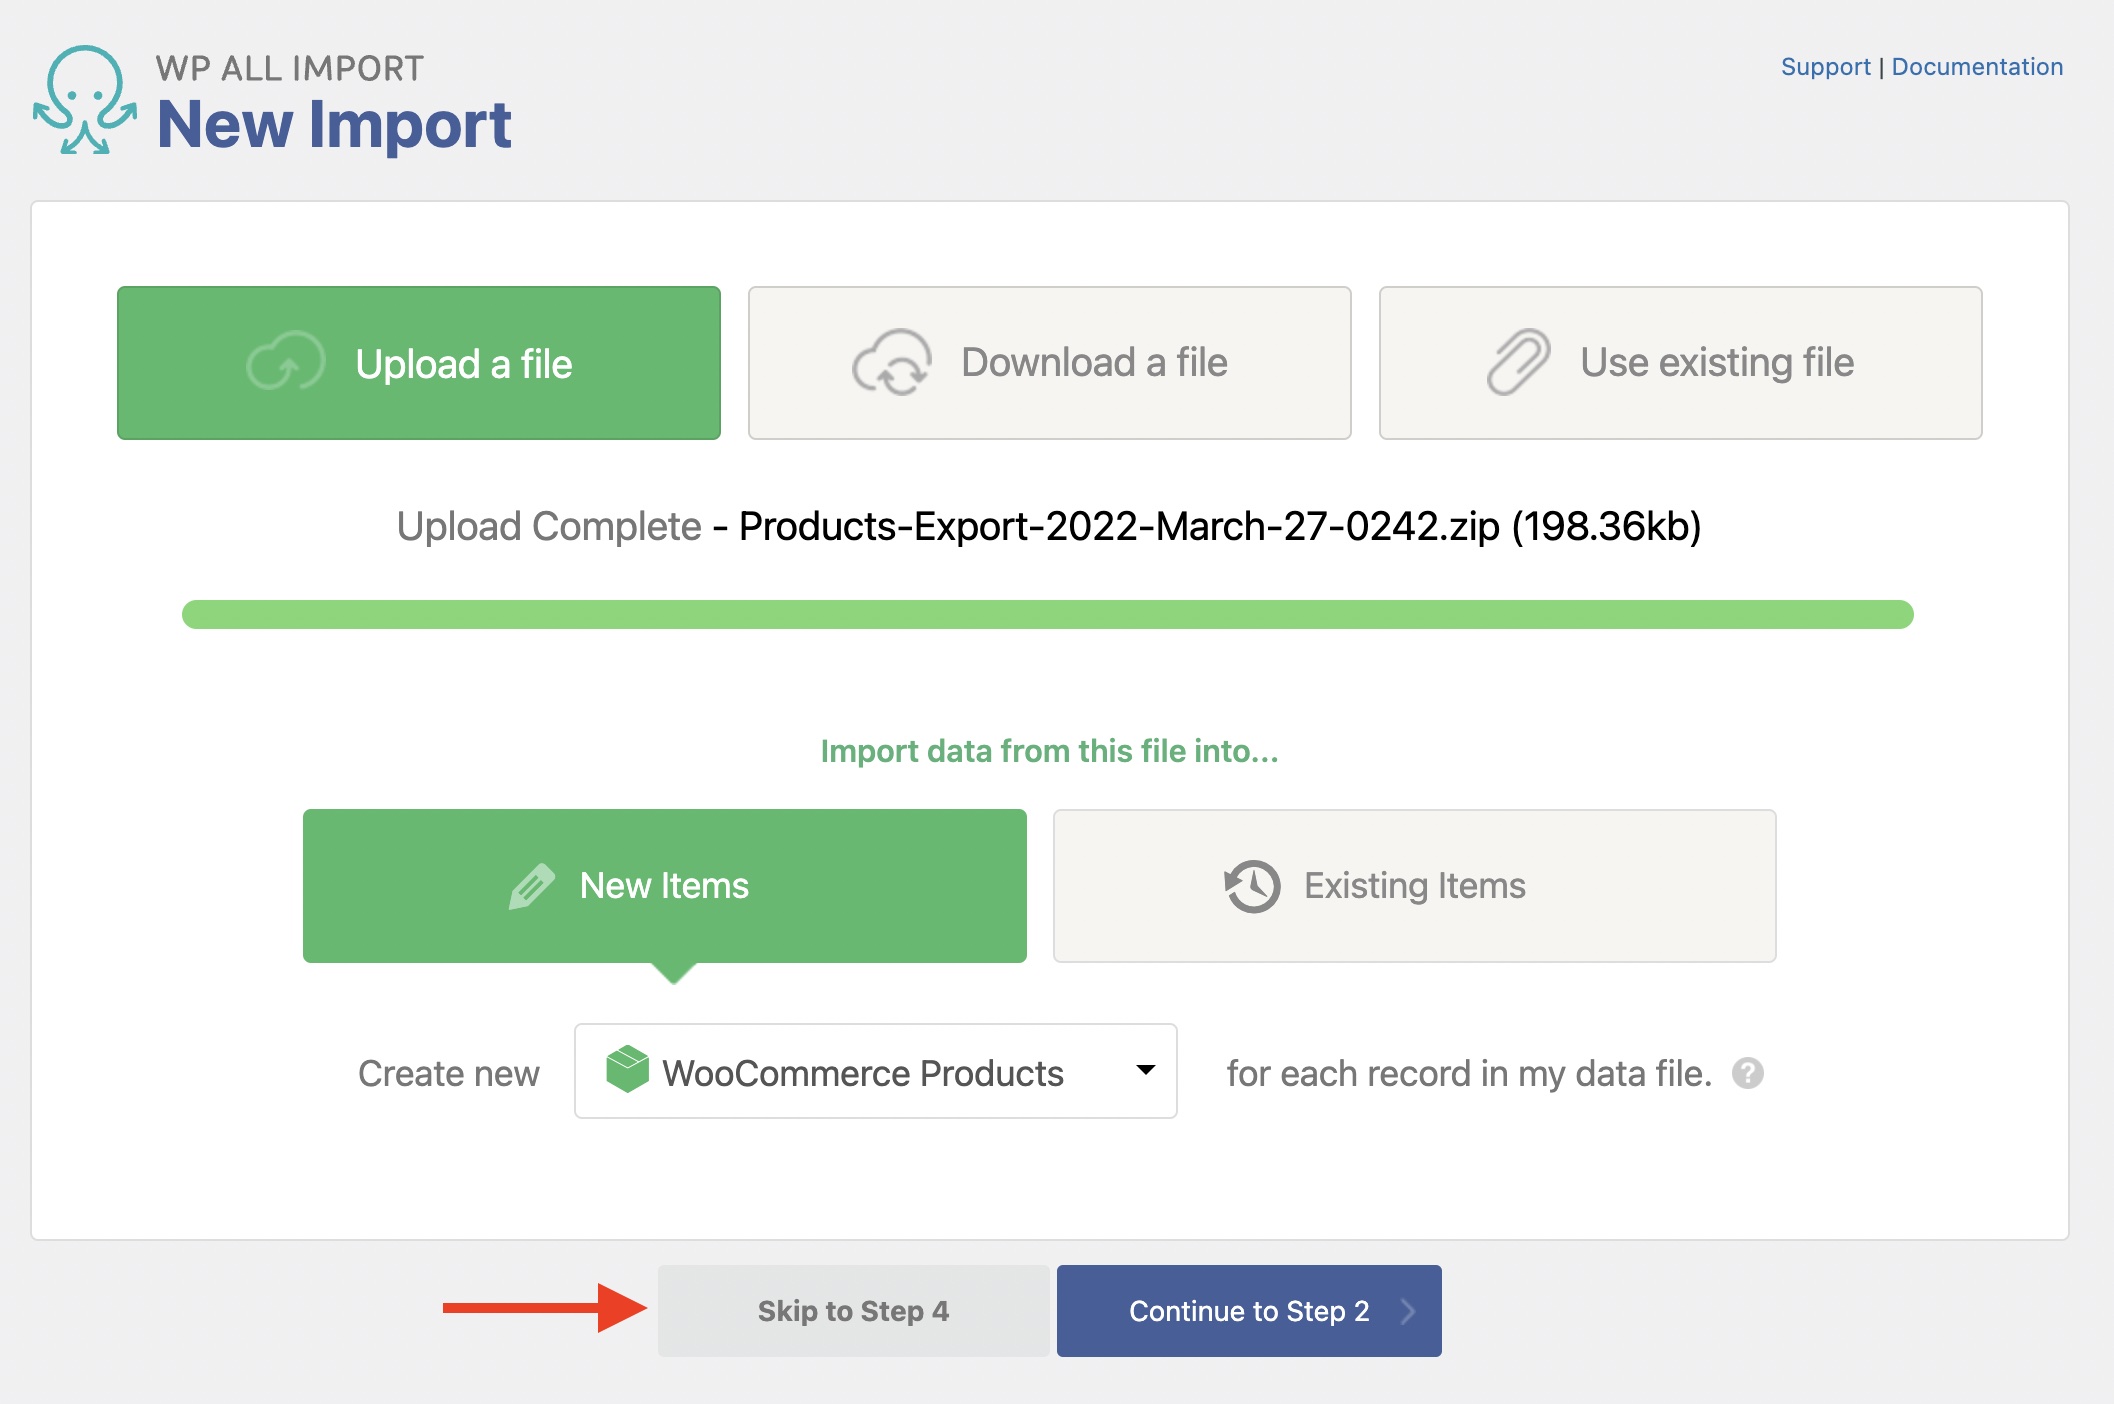
On the import site, go to All Import › New Import and upload the bundle ZIP file that you exported in Step 2.
You can modify the import template (to make any changes) by clicking on Continue to Step 2.
However, in most migrations, changes are unnecessary, so click Skip to Step 4 to let the bundle file configure everything for you.
Next, the Import Settings screen appears. Here you can Configure Advanced Settings (such as changing the import name or the number of records processed per iteration) or set Scheduling Options.
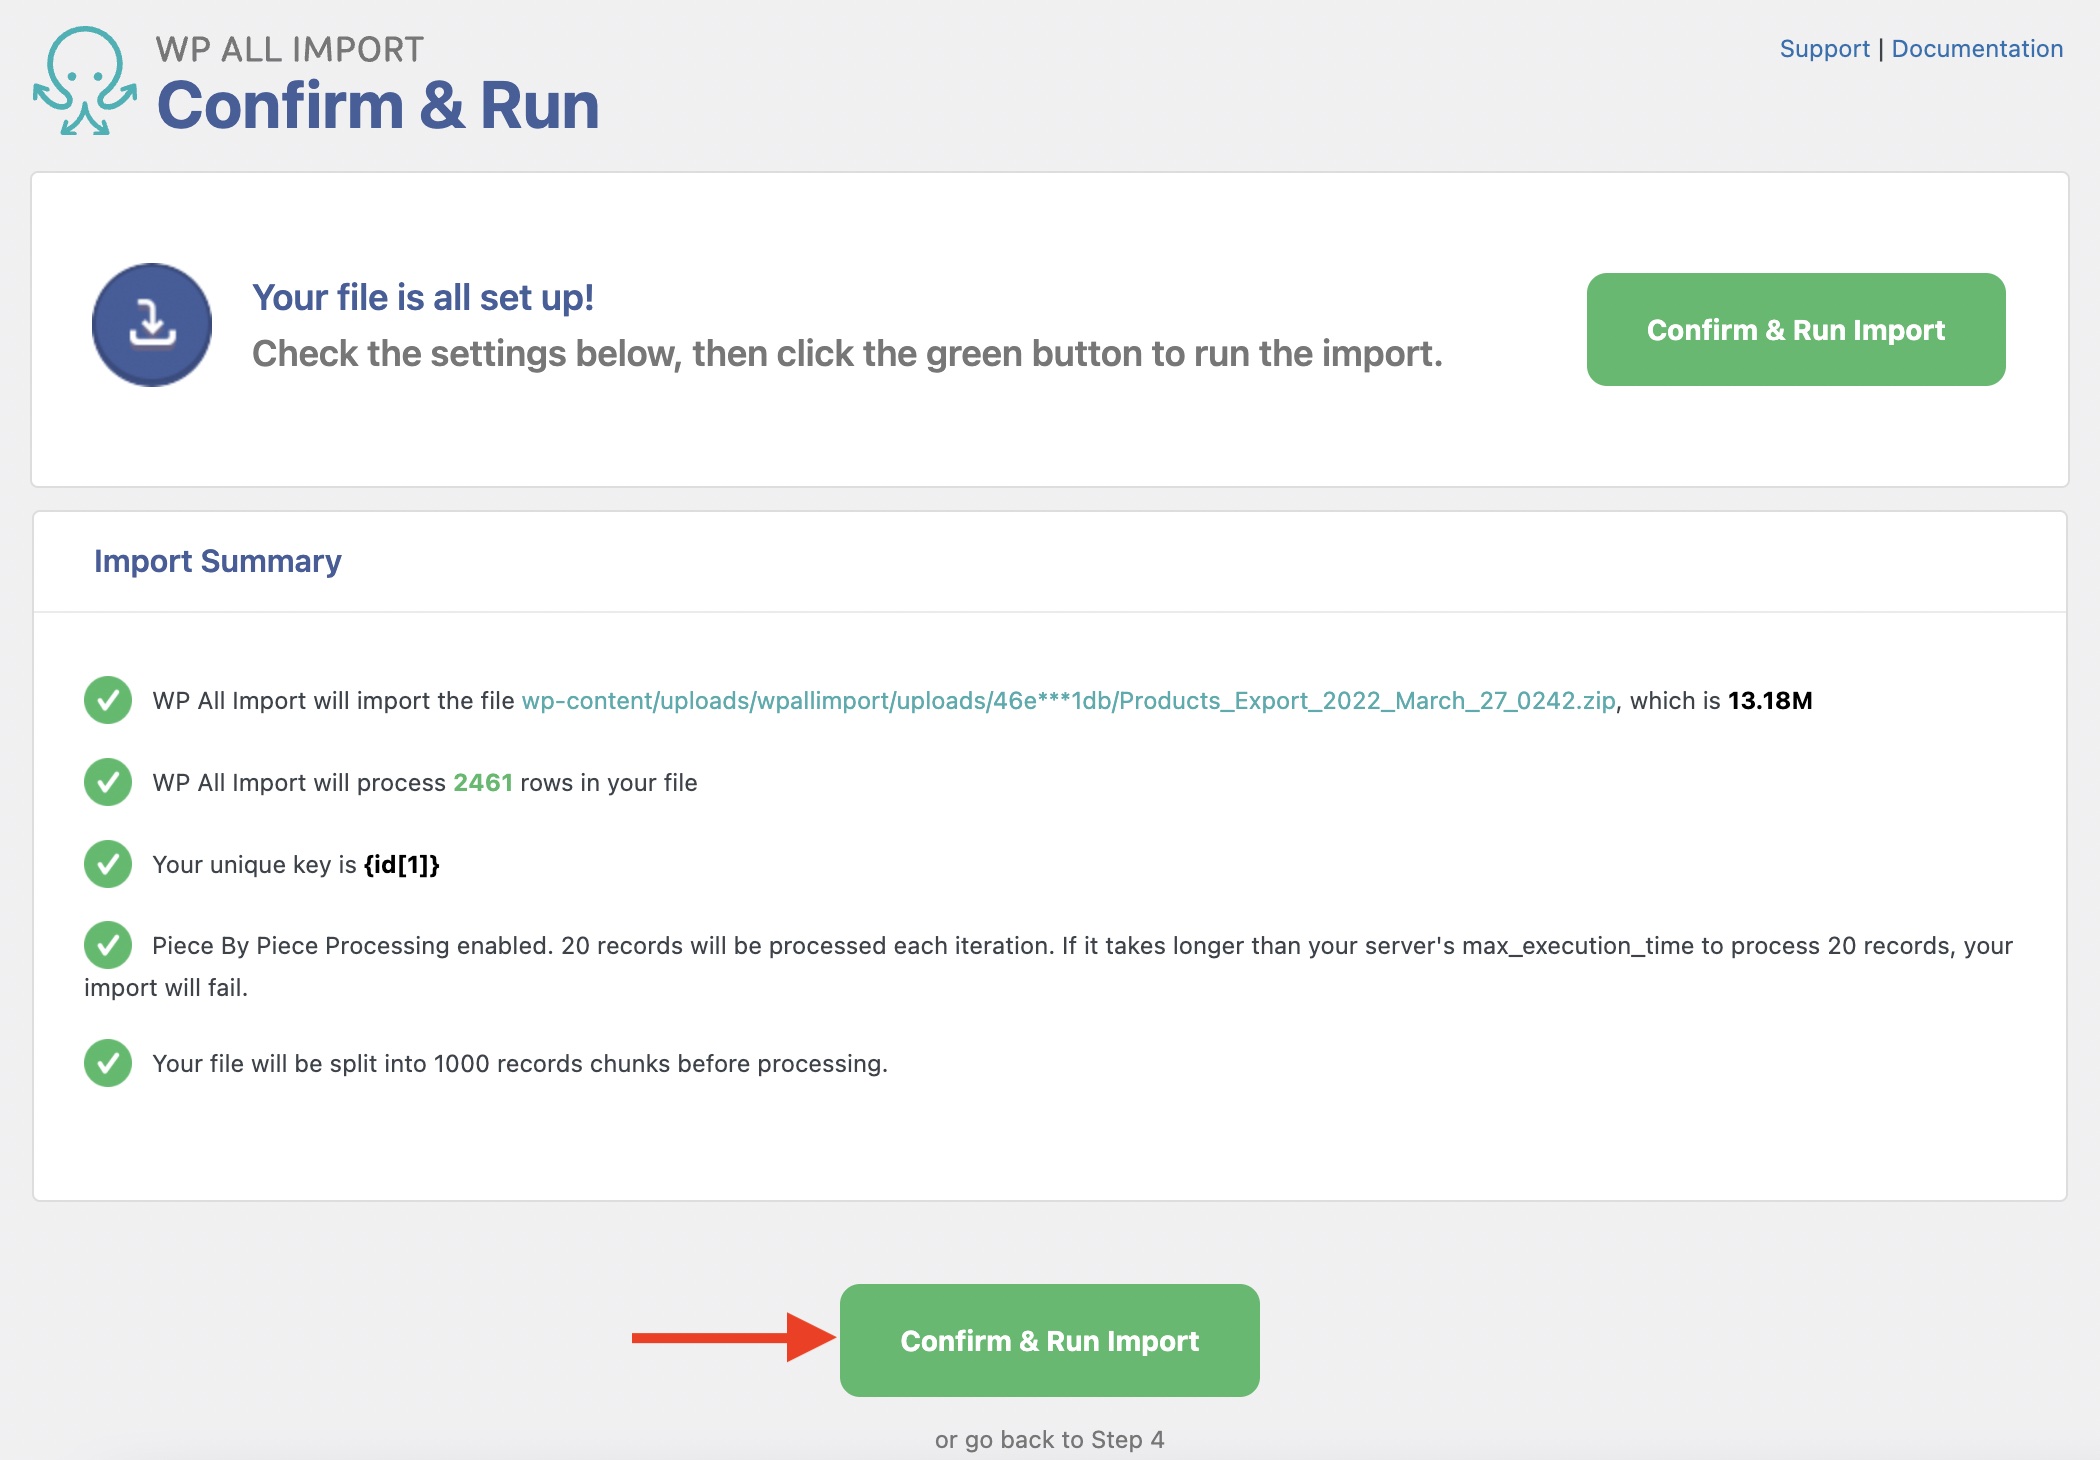
To continue and finish the migration, click Continue, then click Confirm & Run Import on the following screen.
Step 4: Confirm That the Products Migrated Successfully
Once you finish migrating your WooCommerce Products, you can verify and review the results via Products › All Products.
If some of your products didn't migrate correctly, it could be due to either the export or the import site. Below are the best practices:
Review the export site first:
- Confirm that you followed the instructions from Step 2.
- Check the export template via Manage Exports › Edit.
- Solve whatever problems you find.
- Repeat the migration.
If the issue is not on the export site, review the import site:
- Confirm that you followed the instructions from Step 3.
- Check the import template via Manage Imports › Edit.
- Solve whatever problems you find.
- Repeat the migration.
You may need to delete the wrongly migrated products. To do so, use Manage Imports › Delete.
In some cases, it works to erase everything and perform the migration again from scratch, as that can solve any outstanding issues.
However, if the steps above don't help, you can message us via our Support form or by emailing us at [email protected]. Make sure to replicate the problem on a debug site (www.wpallimport.com/debug/) and include that site's URL along with a brief description of what's wrong.
Easily Migrate WooCommerce Products
- One-click setup
- Advanced filters
- Custom fields
- Variations
- Attributes
- Images, galleries
- Stock
Migrate WooCommerce Products — Advanced Topics
Variable Products Created as Simple Products
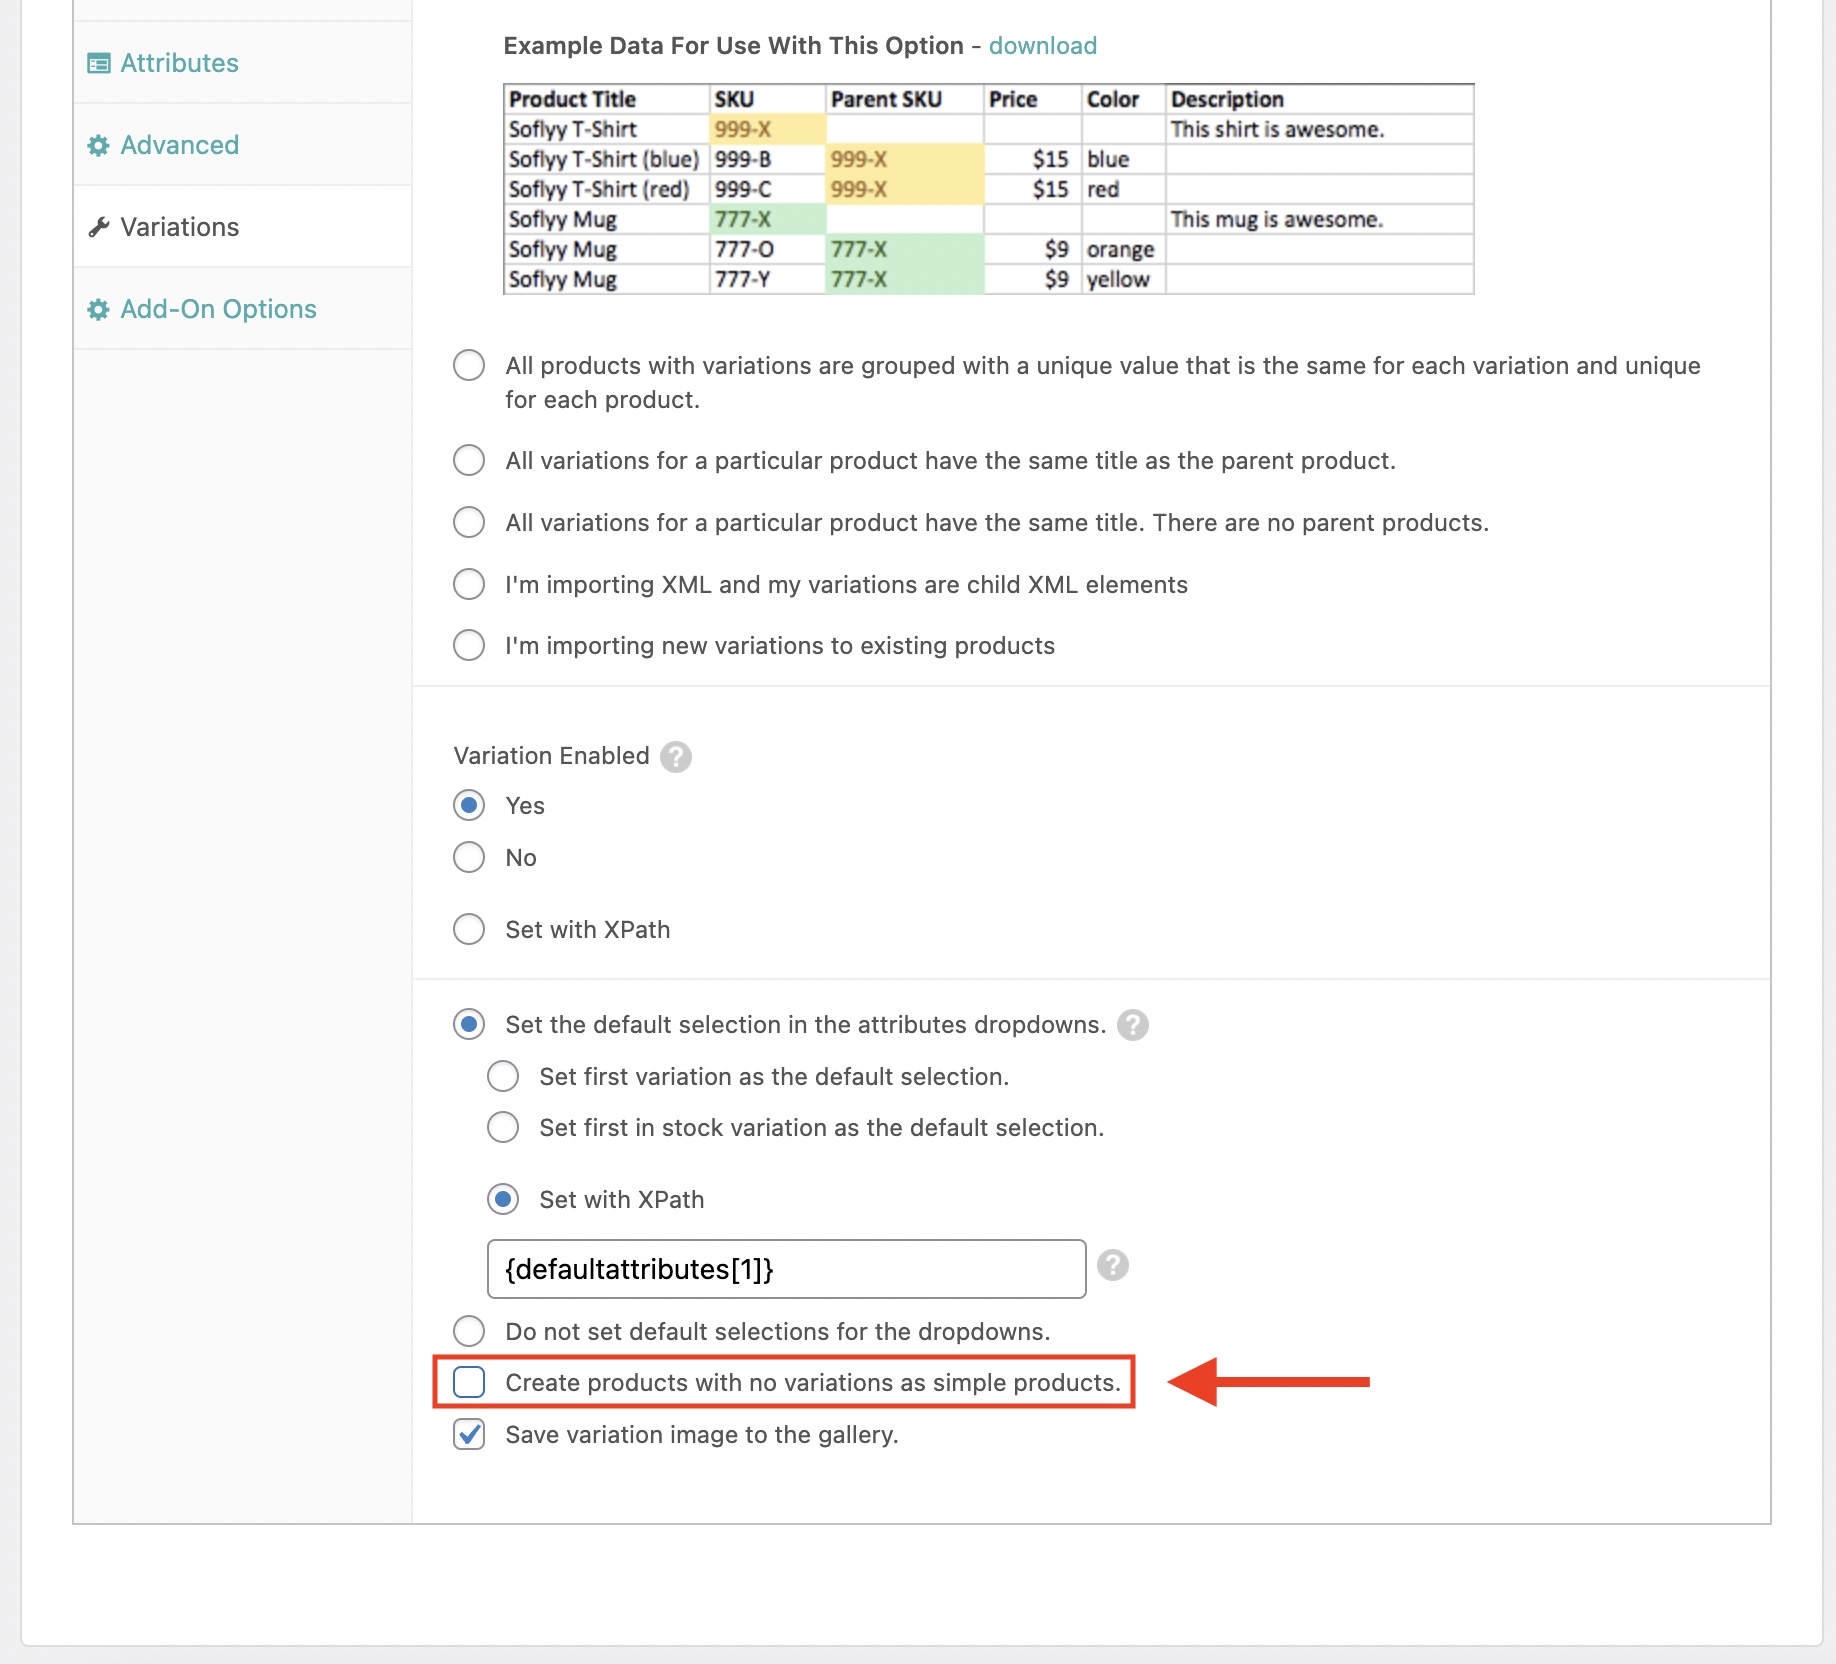
In some stores, there are variable products that contain only one variation. While those products don't have issues during the migration, the bundle file has an option enabled by default that turns any variable products without variations (or only one variation) into a simple product.
To avoid this (and ensure that these products get processed as variable products), navigate to the Variations tab in the WooCommerce Add-On section and disable the option Create products with no variations as simple products.
Keeping the Same Product ID When Migrating WooCommerce Products
Out of the box, new product IDs are assigned when importing the products to the destination site.
To change that behavior, you can use custom code (see Custom Code in the Function Editor) along with our API (see Action Reference).
For a working example, see Keep old IDs when migrating products or posts. Keep in mind that this is only an attempt. That is, if the requested ID is already used, a new product ID gets generated instead upon import.
Scheduling a WooCommerce Products Migration
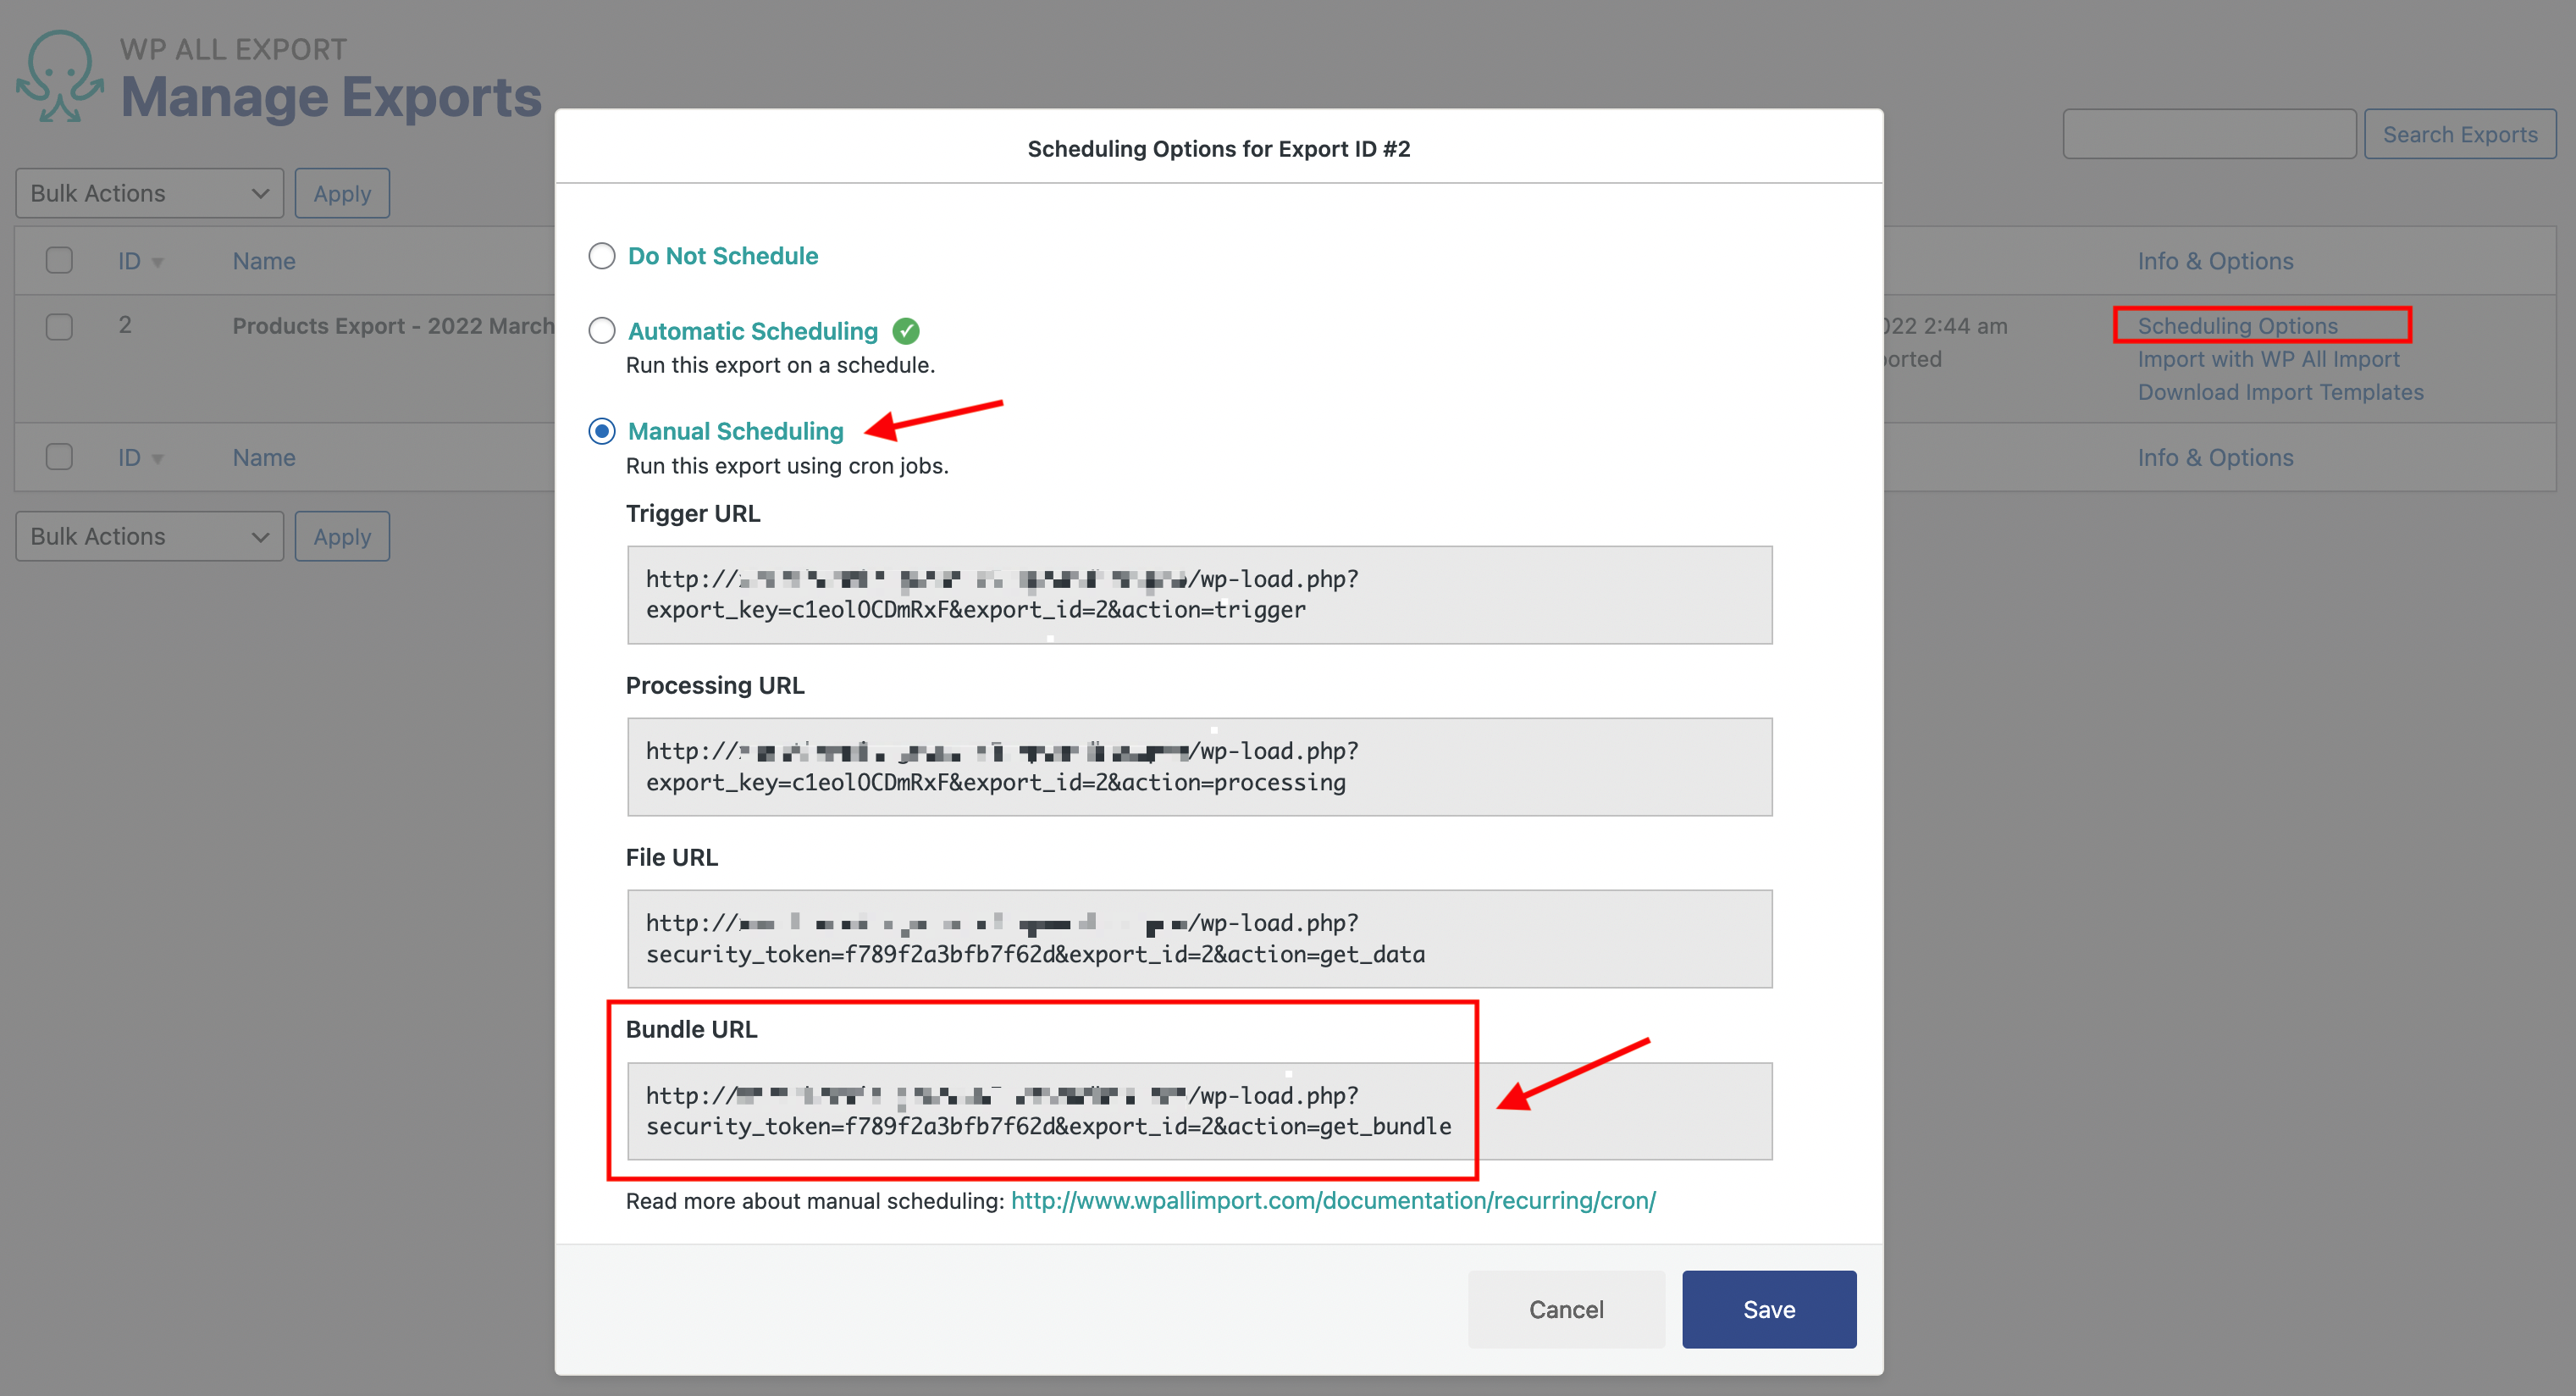
With both export and import plugins, you can set up Step 2 and Step 3 from this guide to occur regularly at a scheduled time. To schedule the whole migration, make sure to set it up so that the export finishes before the import starts. These are the available scheduling options:
- Cron jobs. See Manual Scheduling.
- Our optional and paid Automatic Scheduling Service (which can be set up directly from the plugin's interface). See Automatic Scheduling.
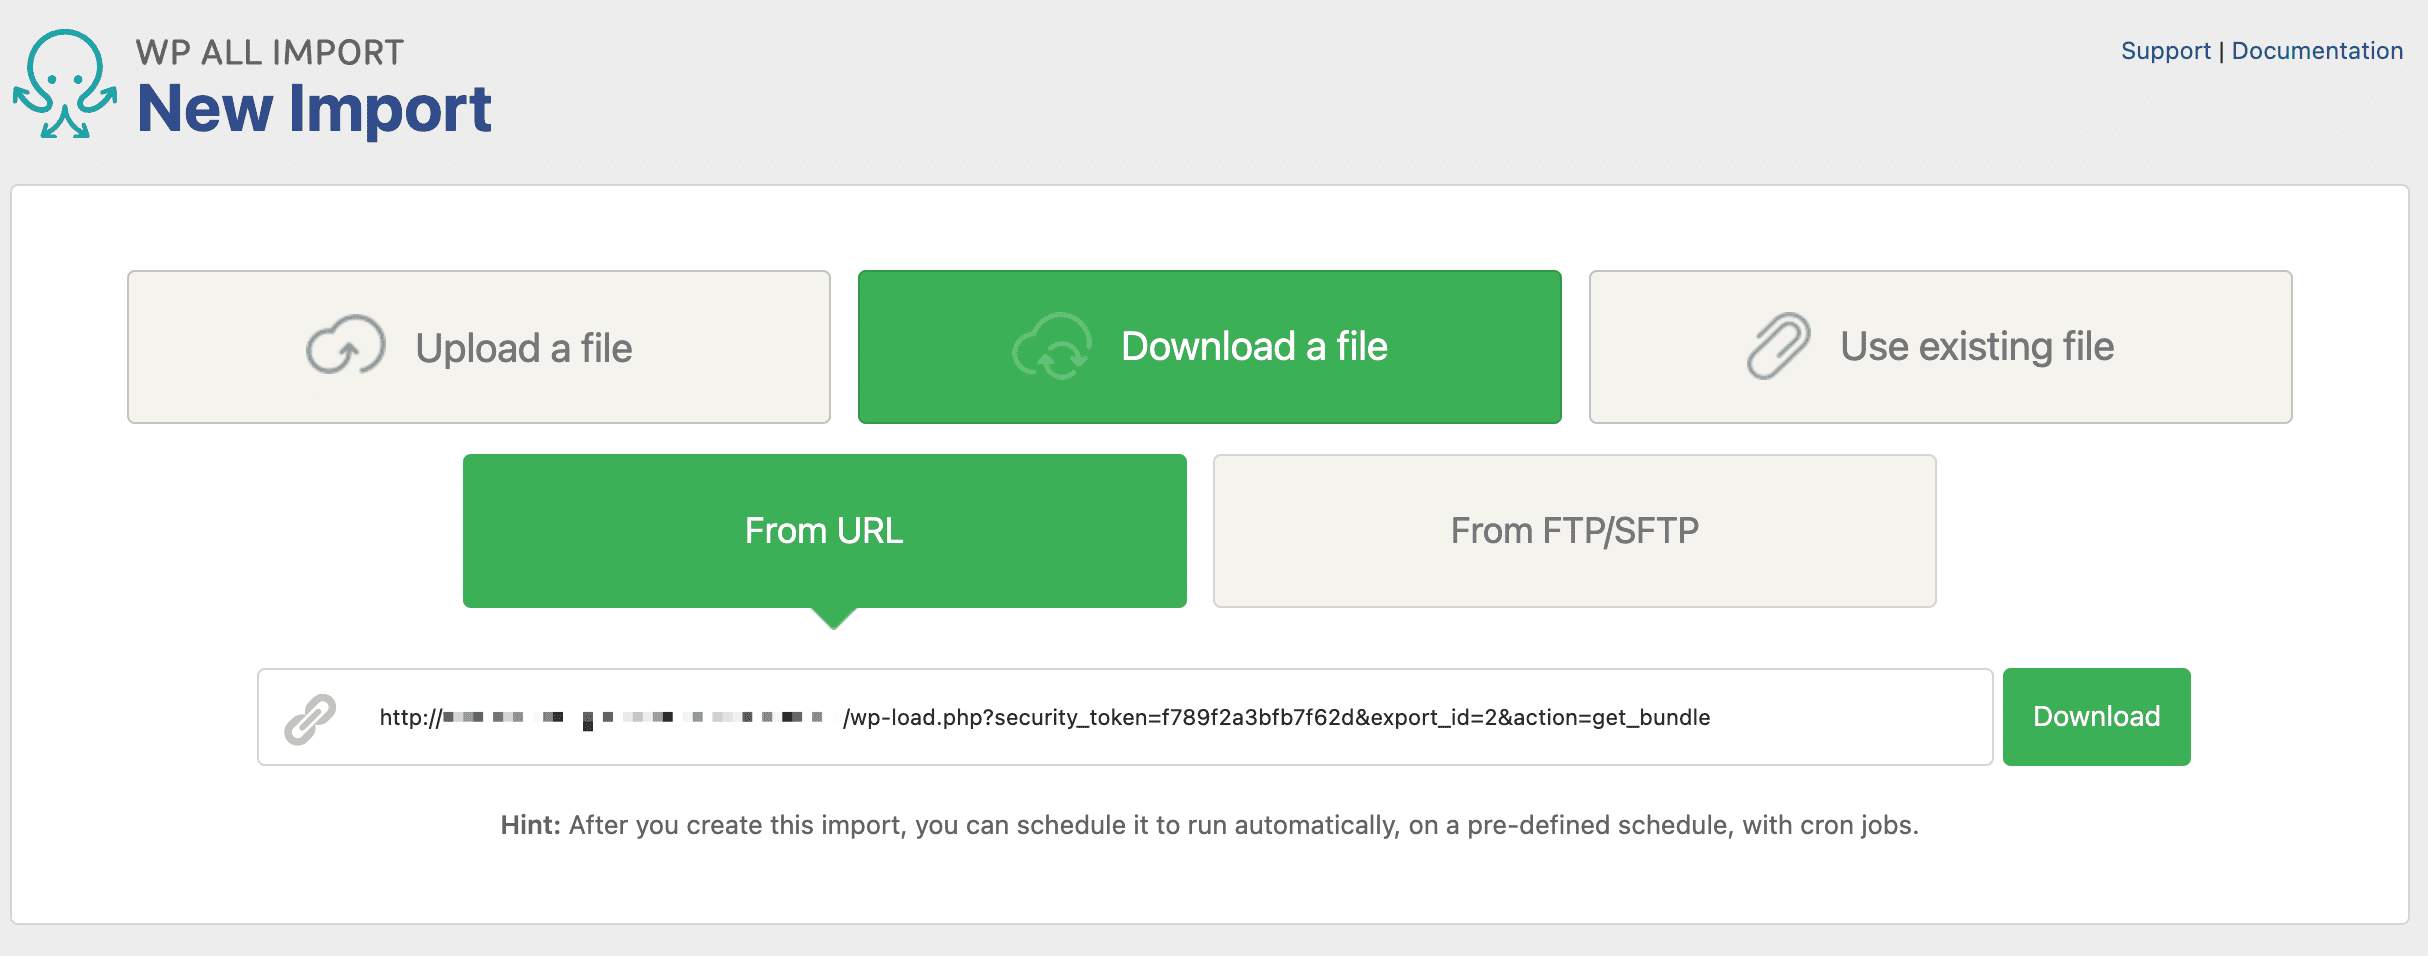
Note, instead of uploading the Bundle file in Step 3, use the Bundle URL:
In the Download a file › From URL option:
Migrate WooCommerce Products — Frequently Asked Questions
How Do I Transfer Products from WooCommerce to WooCommerce?
To transfer products from WooCommerce to WooCommerce, just follow the steps in this guide, i.e., the word "transfer" means "migrate" in this instance.
Can I Migrate WooCommerce Product Categories?
Yes. All taxonomies, including categories, tags, brands, etc., are automatically migrated when you migrate your WooCommerce products. They are also all automatically linked so that your products end up exactly as they were on the export site.
Can I Link My Migrated Products to My Orders, and My Orders to My Customers?
Absolutely, but you have to do this in the proper sequence. Customers and products should always be migrated first. That way, when you migrate your orders, you can use WP All Import's advanced toolset to link your products and customers to your orders.
How is Your Plugin Different Than the Other Plugins That Migrate WooCommerce Products?
Granularity and control. Other plugins migrate your database and overwrite the data on your import site. Our plugin is far more surgical. If needed, it allows you to overwrite only the data that you want to overwrite and even allows you to modify that data when processing it.
Can I Migrate All WordPress Product Data, Even Custom Fields Added by Other Plugins?
Yes. Our plugins recognize the custom data fields added by most plugins and extensions. There may be some plugins that handle their custom data in a non-standard way that interferes with this. In this case, just contact our support staff for guidance.
Can I Convert Simple Products into Variable Products?
Yes, you can convert any simple product into a variable product by adding new variations to it:
- Create a New Import via All Import › New Import and select New Items as the import type.
- Upload the import file with the new variations to add.
- Choose Variable product as the product type and use the I'm importing new variations to existing products option in the Variations tab.
- Target your existing simple product using either SKU or title.
- Process the import and review that your simple product was converted as desired.
The import has to be set up correctly for your new variations. We explain more about importing variable products here: How to Import Variable Products into WooCommerce.
For a related topic, see How Do I Bulk Edit WooCommerce Simple Products into Variable Products?
How Do I Bulk Edit WooCommerce Products?
- Export the WooCommerce products that you want to modify.
- Modify the exported data in your favorite spreadsheet.
- Import the modified data back into WooCommerce to apply your changes.
- Verify the changes.
To learn more, please see How to Bulk Edit WooCommerce Products in Simple Steps.
How Do I Export All WooCommerce Products?
- Go to All Export › New Export.
- Select WooCommerce Products. Do NOT set any filters.
- Select your export columns using our Drag & Drop interface.
- Run the export and download your product file.
For more information, see How to Export WooCommerce Products to CSV, Excel, and XML.
How Do I Import WooCommerce Products?
- Navigate to All Import › New Import.
- Select the method to import your data (i.e., upload a file, download a file from a URL, etc.).
- Choose your import file and your import target (i.e., WooCommerce Products).
- Map the incoming data elements to your WooCommerce target fields using drag & drop.
- Run the import.
See How to Import WooCommerce Products from CSV and XML for additional details.
What Add-Ons Do I Need to Migrate WooCommerce Products?
To migrate WooCommerce products, you need to have both the WooCommerce Import Add-On and WooCommerce Export Add-On active on your site, along with WP All Import and WP All Export.
Migrate WooCommerce Products — Related Docs
Learn how to export WooCommerce products.
Learn how to import WooCommerce products.
Describes how to export WooCommerce variable products.
Describes how to import WooCommerce variable products.
Learn how to export WooCommerce products with images.
Learn how to import WooCommerce products with images.
Describes how to bulk edit WooCommerce products.
Execute custom code to modify WooCommerce product data on the fly.
