The best import export plugin for WordPress & WooCommerce.

How to Export WooCommerce Products to CSV, Excel, and XML
To export your products, navigate to All Export › New Export and choose WooCommerce Products. Use our drag & drop tool to configure your export column layout, then run the export and download your file.
Table of Contents
- Step 1: Create a New Product Export
- Step 2: Customize the Export File
- Step 3: Configure Your Export Settings
- Step 4: Download Your Product Export File
Advanced Topics
- Filtering WooCommerce Product Exports
- Default Export File Format: CSV
- Export WooCommerce Products to Excel
- Export WooCommerce Products to XML
- Google Merchant Center Product Feed
- Product Export Advanced Options
Step 1: Create a New WooCommerce Product Export
Navigate to All Export › New Export and choose a post type of WooCommerce Products. To continue, click the Customize Export File button.
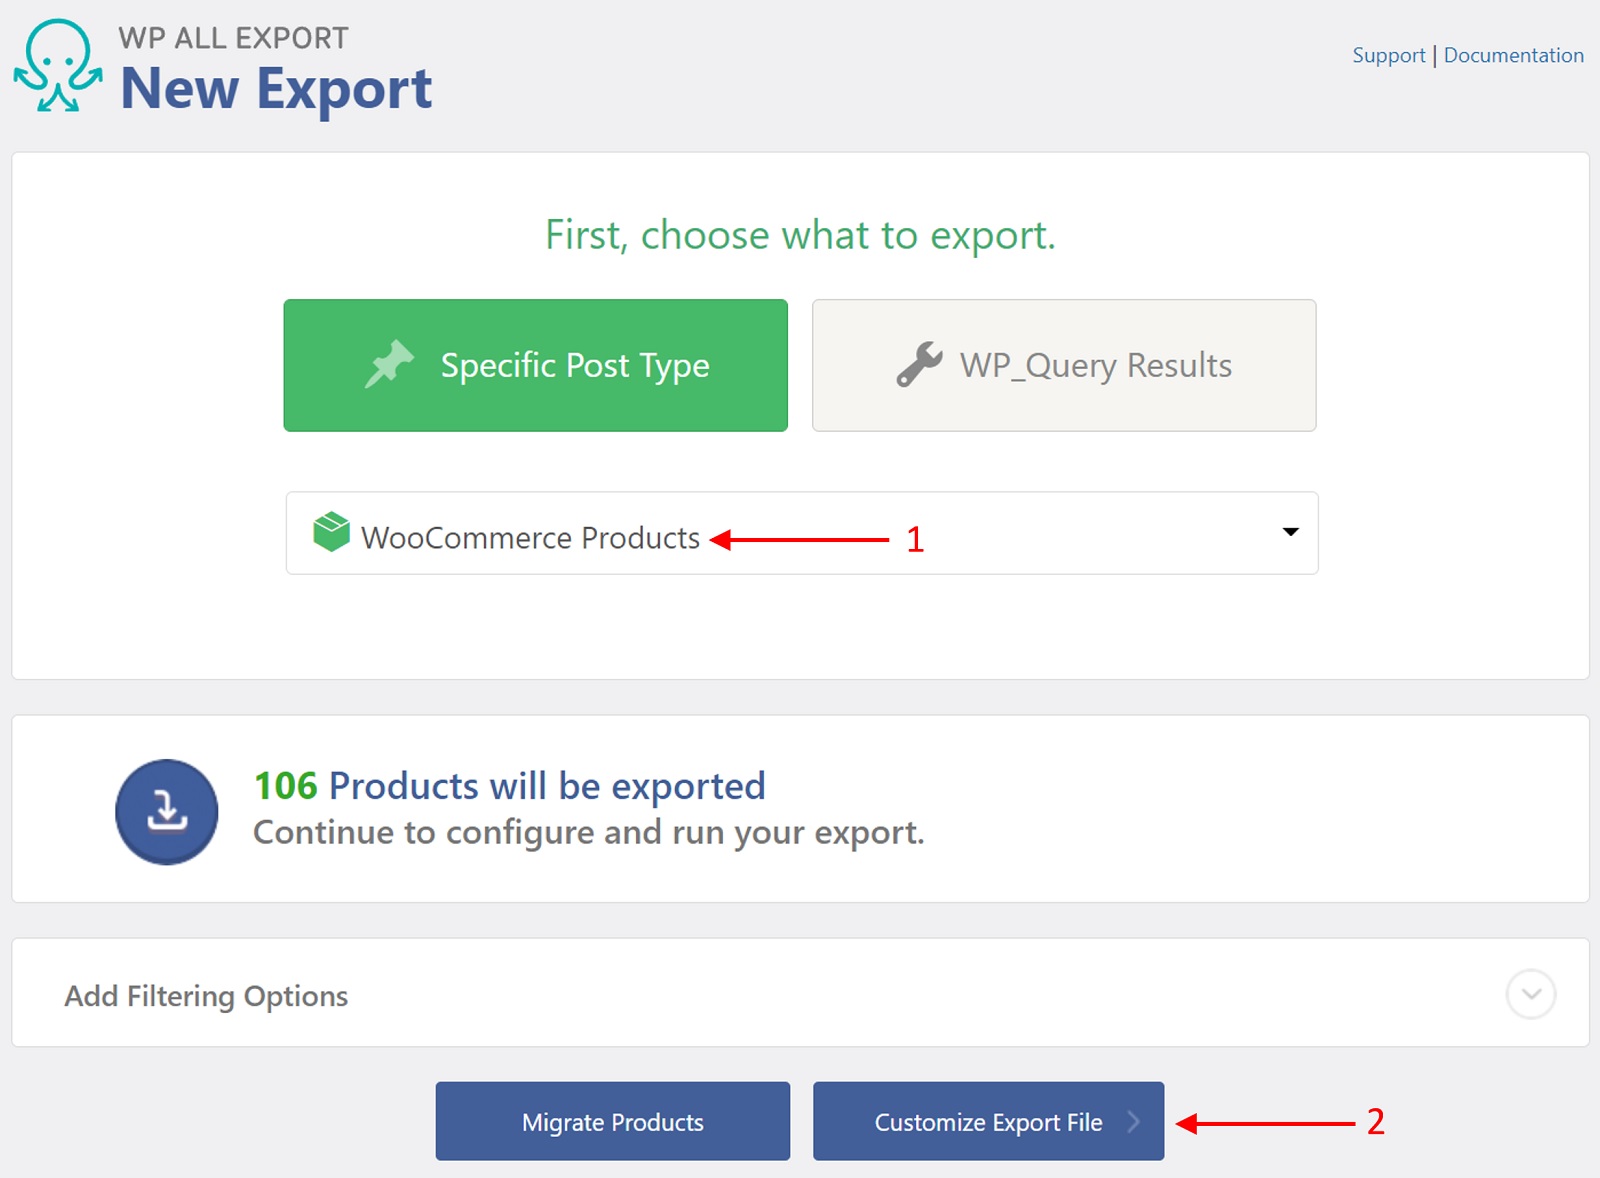
If you need to export only some products, you can add filters in this step. For more information, see the section Filtering WooCommerce Product Exports later in this document.
Step 2: Customize the Export File
In most cases, you don't need to export all of your product fields. Our simple Drag & Drop interface allows you to select the exact fields that you want.
To add a field to your product export, simply drag it from the Available Data section on the right to the column selection area:
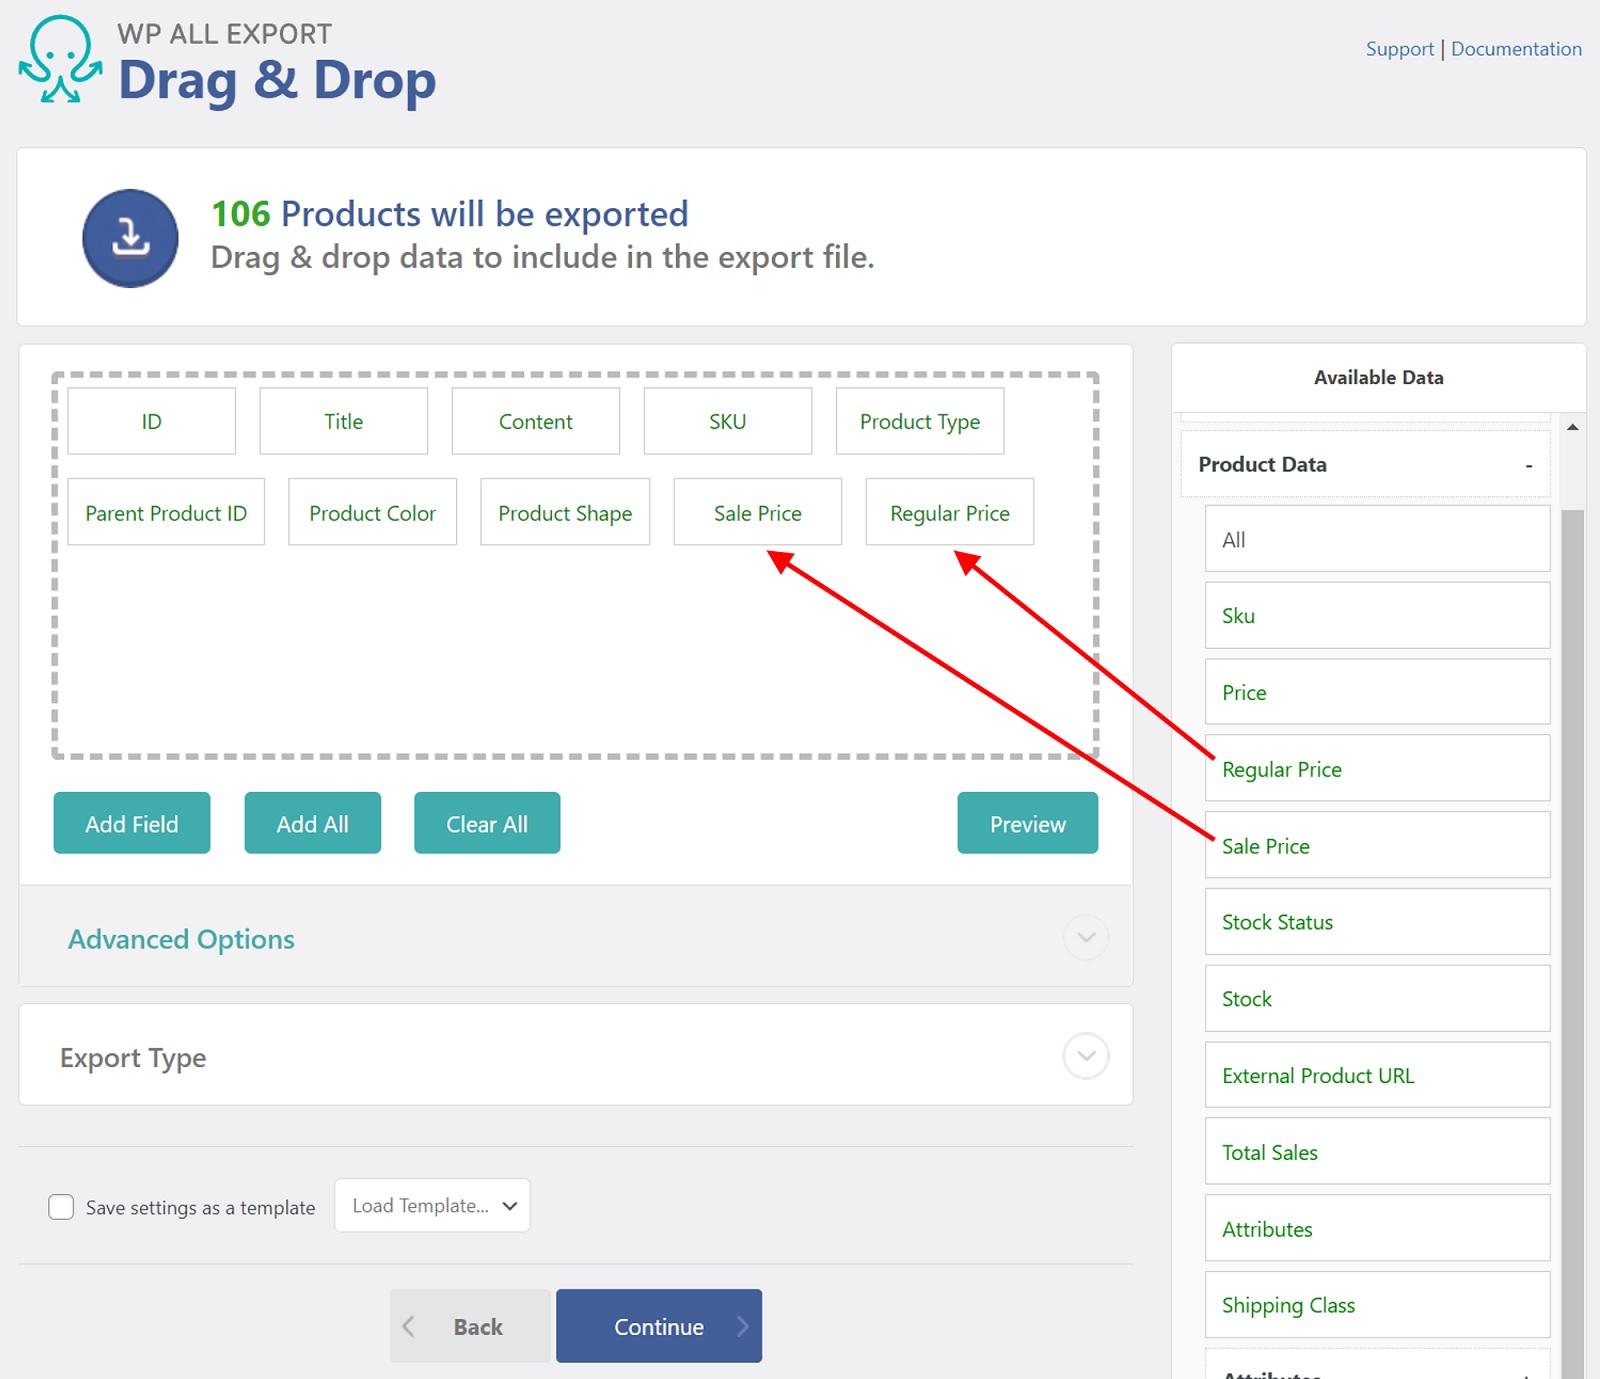
Dragging a column out of the selection area and dropping it on another part of the interface removes the column from the export.
You can also use the green buttons at the bottom of the column selection area to Add Field, Add All (fields), or Clear All (fields). There's also a Preview button to see an example of the first ten products that will be exported.
Understanding Product Export Fields
The available export fields are divided into the following sections: Standard, Product Data, Media, Taxonomies, Custom Fields, and Other.
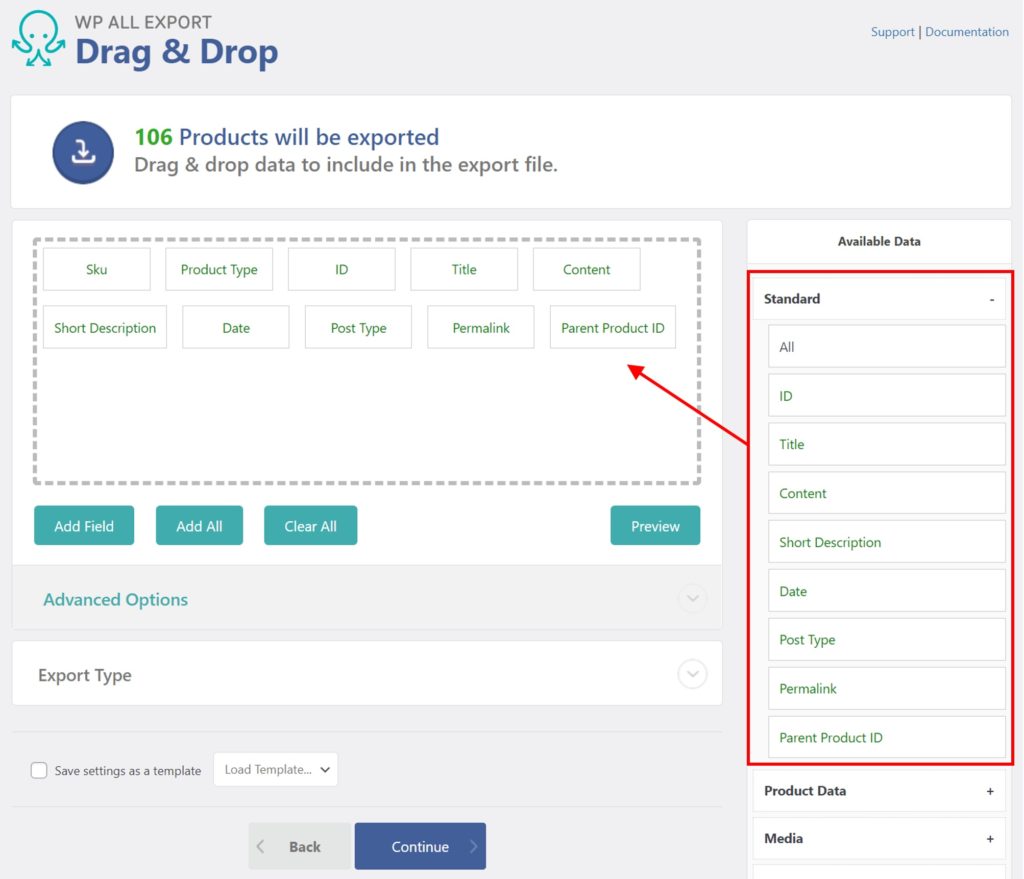
WooCommerce Standard Data
WooCommerce standard data is found under Available Data › Standard.
- ID: The post ID, a unique number given to every post in WordPress.
- Title: The title or name of the WooCommerce product.
- Content: A description of the product.
- Short Description: Similar to the excerpt for posts, usually a summary of the content section.
- Date: The date the product was published, in y-m-d format.
- Post Type: The post type being exported, which is
productin this case. - Permalink: The URL of the product.
- Parent Product ID: WooCommerce variable products are attached to a parent product, and this exports the post ID of that parent product (a
0is exported for products without a parent).
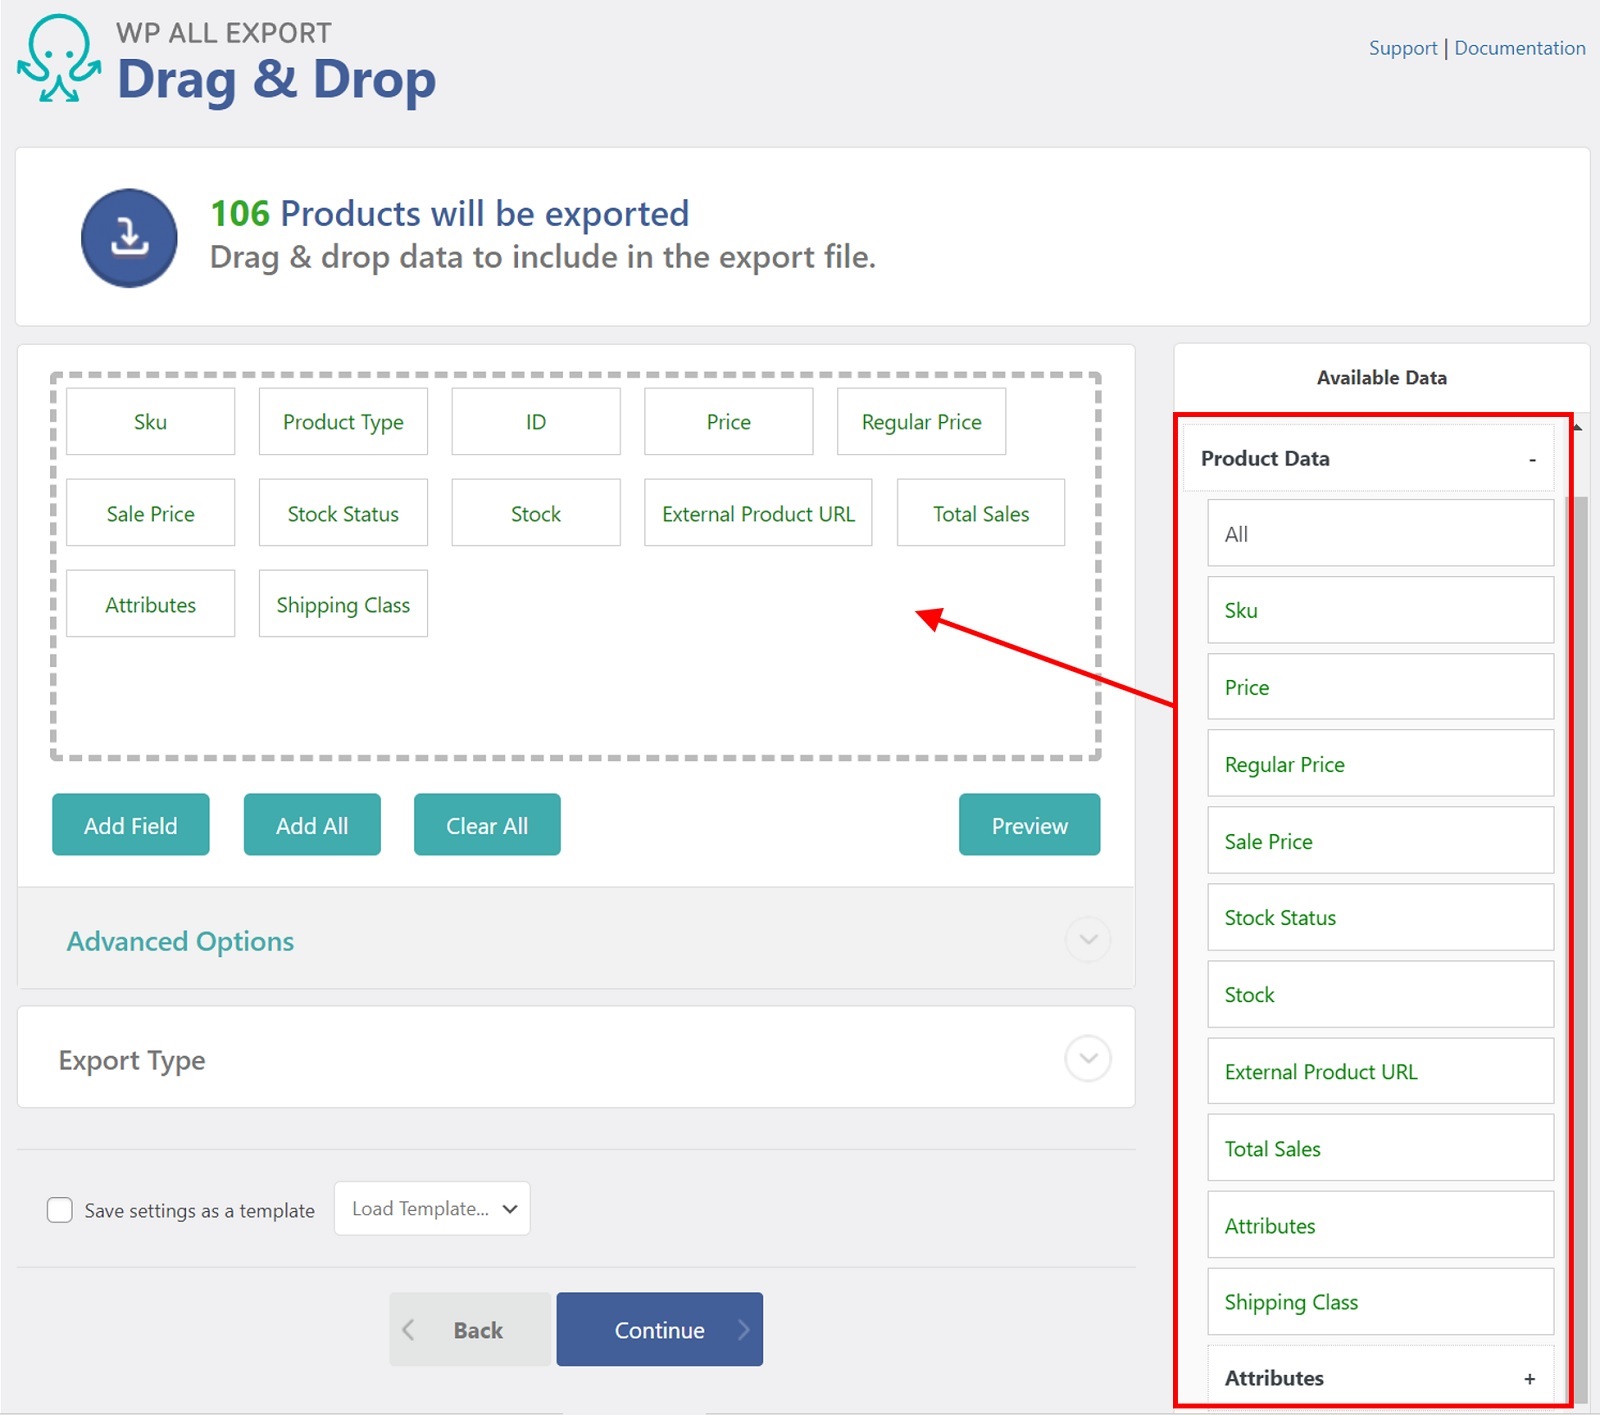
WooCommerce Product Data
More detailed product data is in Available Data › Product Data:
- Sku: A product code used to reference and differentiate products.
- Price: The product's current price, which is the regular price, unless the sale price is active and lower.
- Regular Price: The regular, full price of the product.
- Sale Price: The sale price of the product.
- Stock Status: One of several preset values. The default WooCommerce stock statuses are
instock,outofstock, andonbackorder. - Stock: The number of products currently in stock and available for sale.
- External Product URL: The affiliate link for external products.
- Total Sales: Number of times the product has been sold.
- Attributes: This will export the attribute's name, value, whether it's used in variations, is visible, and is a taxonomy. This data is more easily exported in the Attributes section.
- Shipping Class: If configured, it exports the name of the product's shipping class.
If your product has attributes like size or color, they will automatically be detected and added to the Attributes section at the bottom of Product Data.
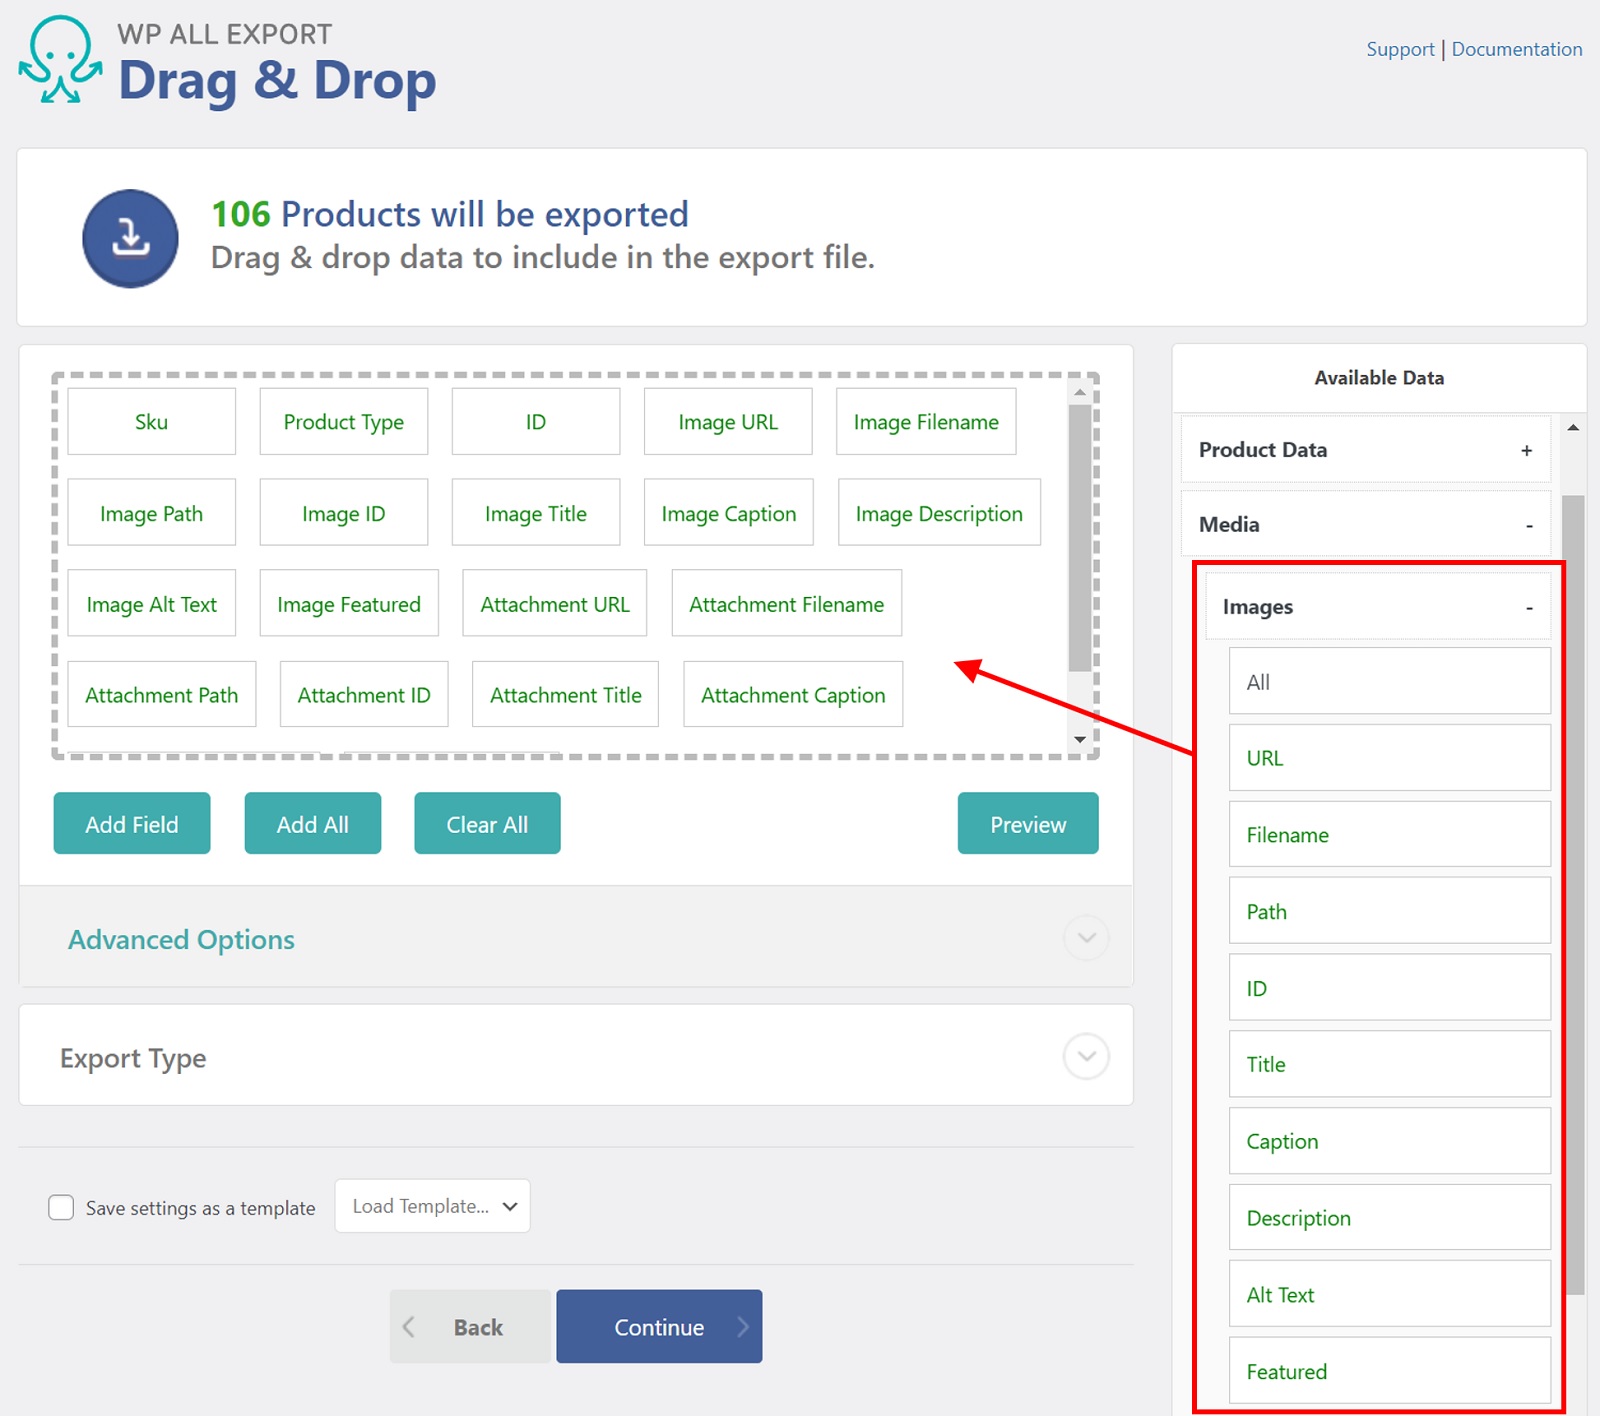
Media
Images and file attachments associated with your WooCommerce products are in Available Data › Media. Images and files are treated the same by WordPress. There are two sections inside the Media section: Images and Attachments (not shown in the image below due to a lack of space). Both contain the same types of fields:
- URL: The URL of the file or image.
- Filename: The filename of the file or full-size image.
- Path: The path or location on the server of the file or image.
- ID: The attachment ID of the file or image, similar to a post ID.
- Title: The file or image title.
- Caption: The file or image caption.
- Description: The file or image description.
- Alt Text: The file or image alternative text.
- Featured: The URL of the featured image.
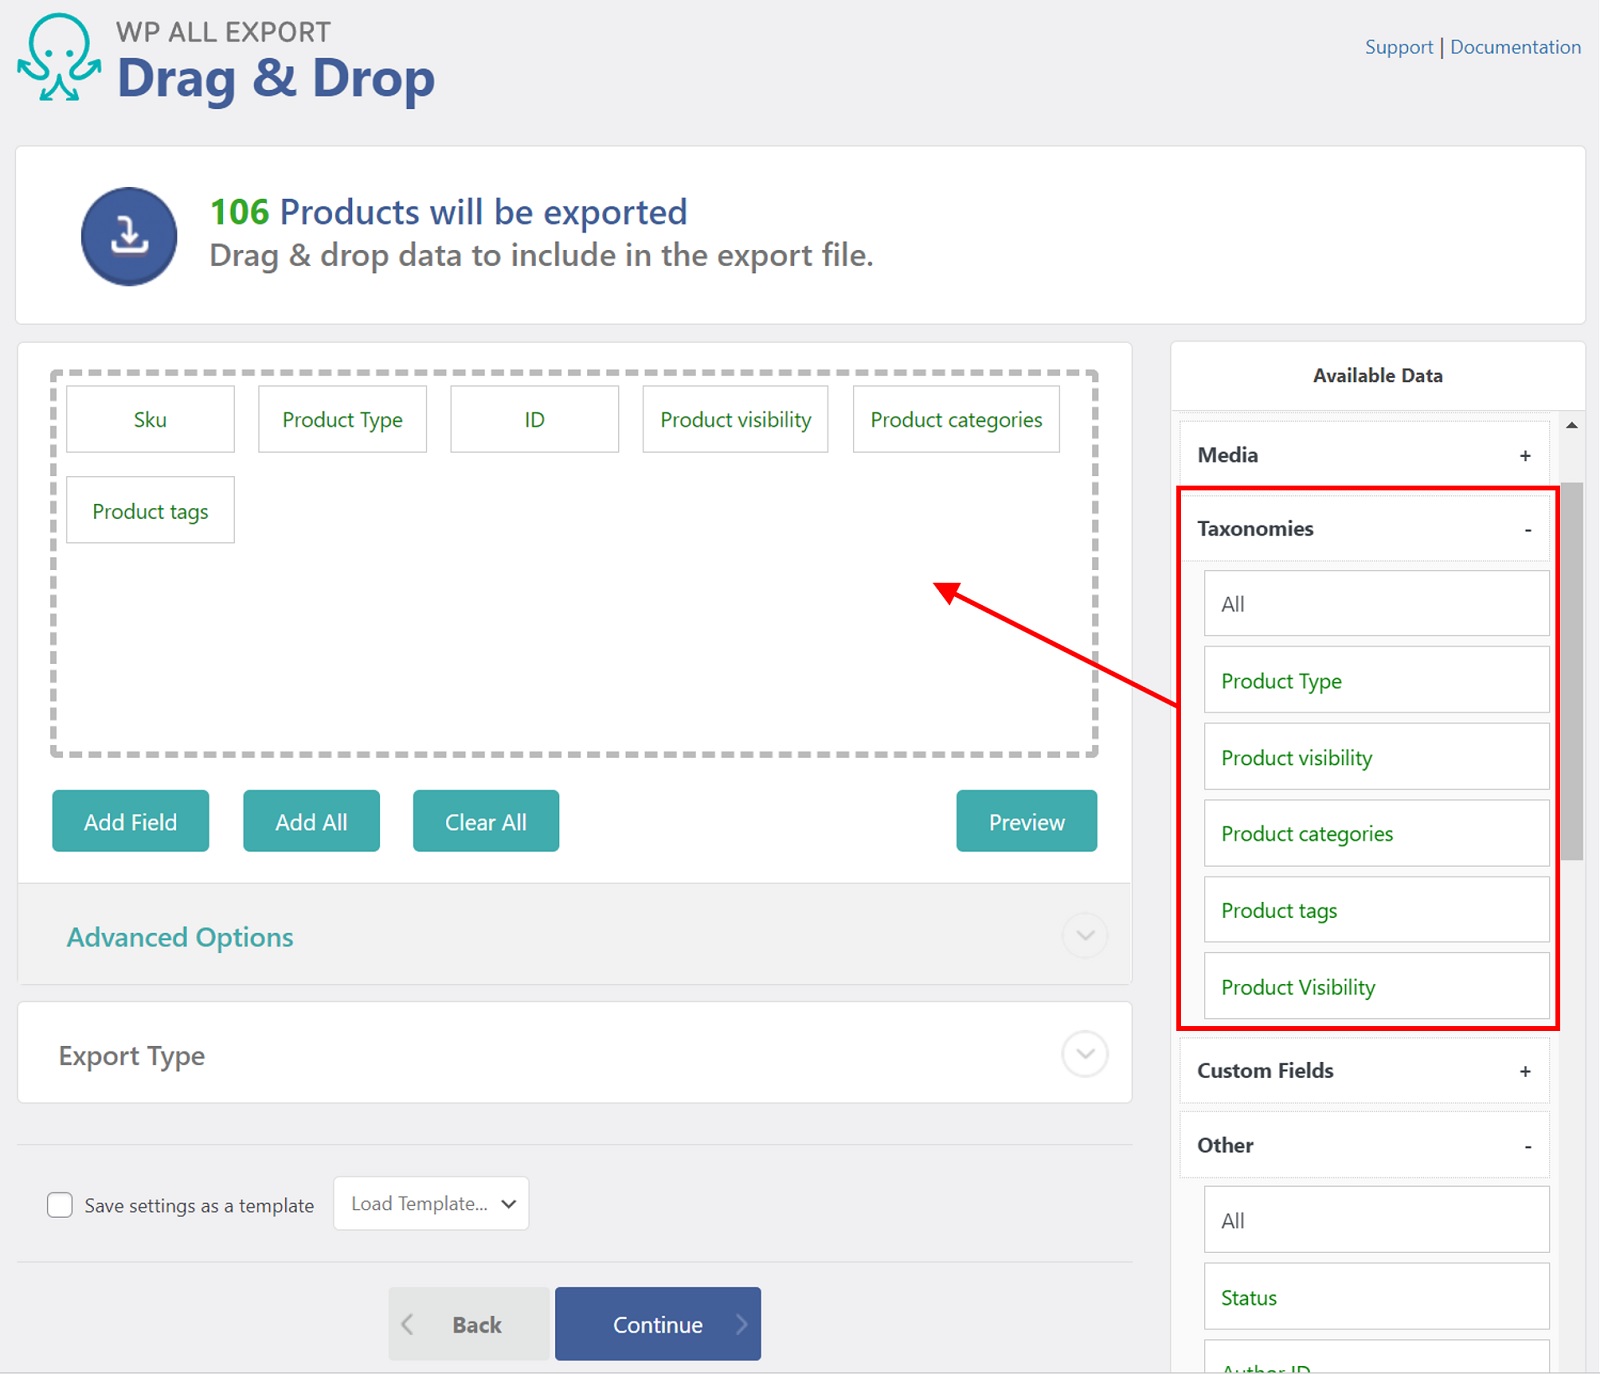
Product Taxonomies
The categories and tags attached to the products are in Available Data › Taxonomies. By default, there are only two, but all custom taxonomies will be automatically detected and available here.
- Product categories
- Product tags
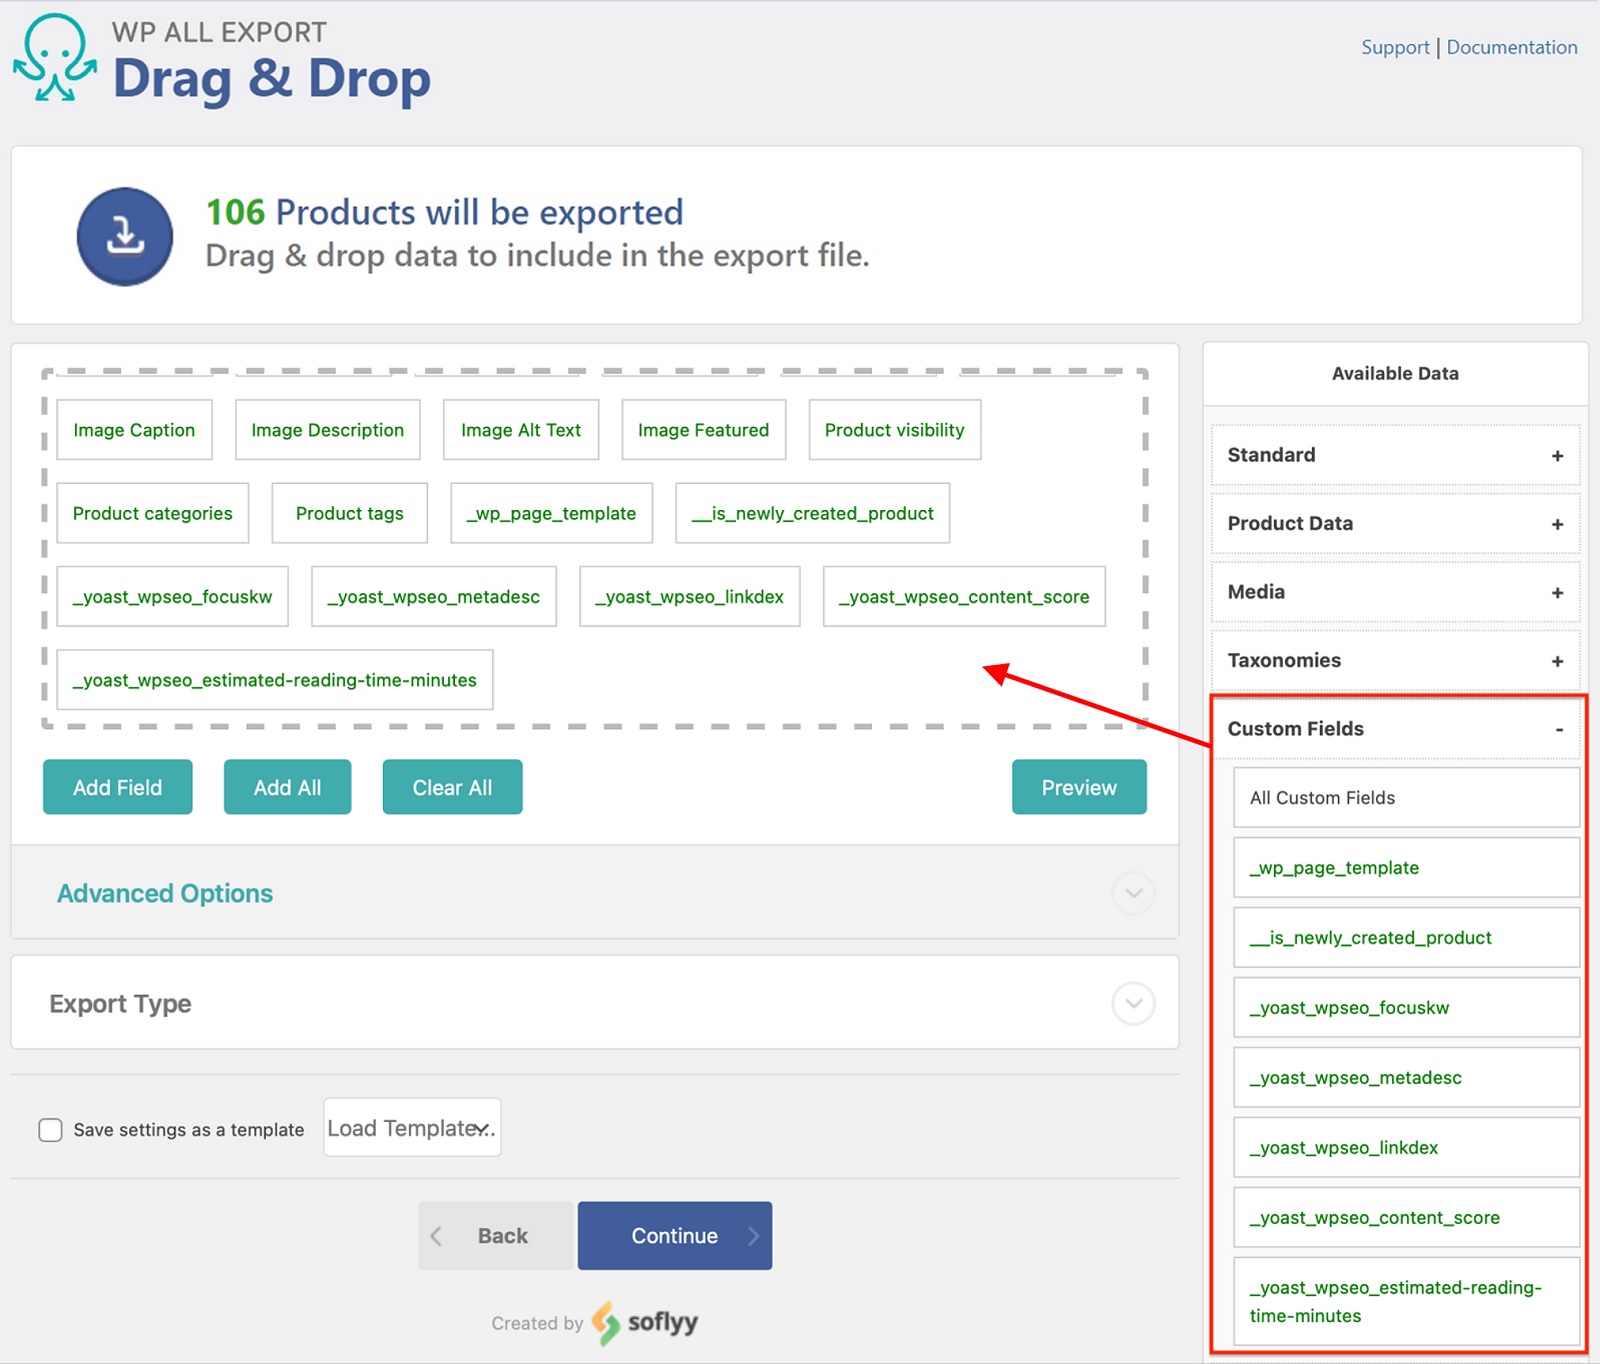
WooCommerce Custom Fields
Custom fields are in Available Data › Custom Fields. The custom fields are data added by custom code or third-party plugins. For example, fields added by Yoast SEO would appear here.
Other WooCommerce Product Fields
Other, less-used product data is in Available Data › Other. This is an incomplete list with only the more important export fields:
- Status: Similar to the post status. The default product statuses are
publish,draft, andprivate. - Slug: The database-friendly name of the WooCommerce product, used in the product URL.
- Downloadable: Whether the product is downloadable or not.
- Downloadable Files: This contains the files for that product if the product is downloadable.
- Sale Price Dates From: When the sale date starts.
- Sale Price Dates To: When the sale date ends.
- Manage Stock: If the WooCommerce product handles stock or not, exports
yesorno. - Up-Sells: SKU list of up-sell products. Multiple products are separated by a pipe ( | ) character.
- Cross-Sells: SKU list of cross-sell products. Multiple products are separated by a pipe ( | ) character.
- Tax Status: Exports the product's current tax status. Default is none. It can also export as taxable or shipping (used for Shipping only).
- Tax Class: This is the tax class selected for the product. The defaults are standard, zero-rate, and reduced-rate.
- Weight: Product's weight.
- Length: Product's length.
- Width: Product's width.
- Height: Product's Height.

After you've completed your export column, click Continue to configure your export settings.
Step 3: Configure Your Export Settings
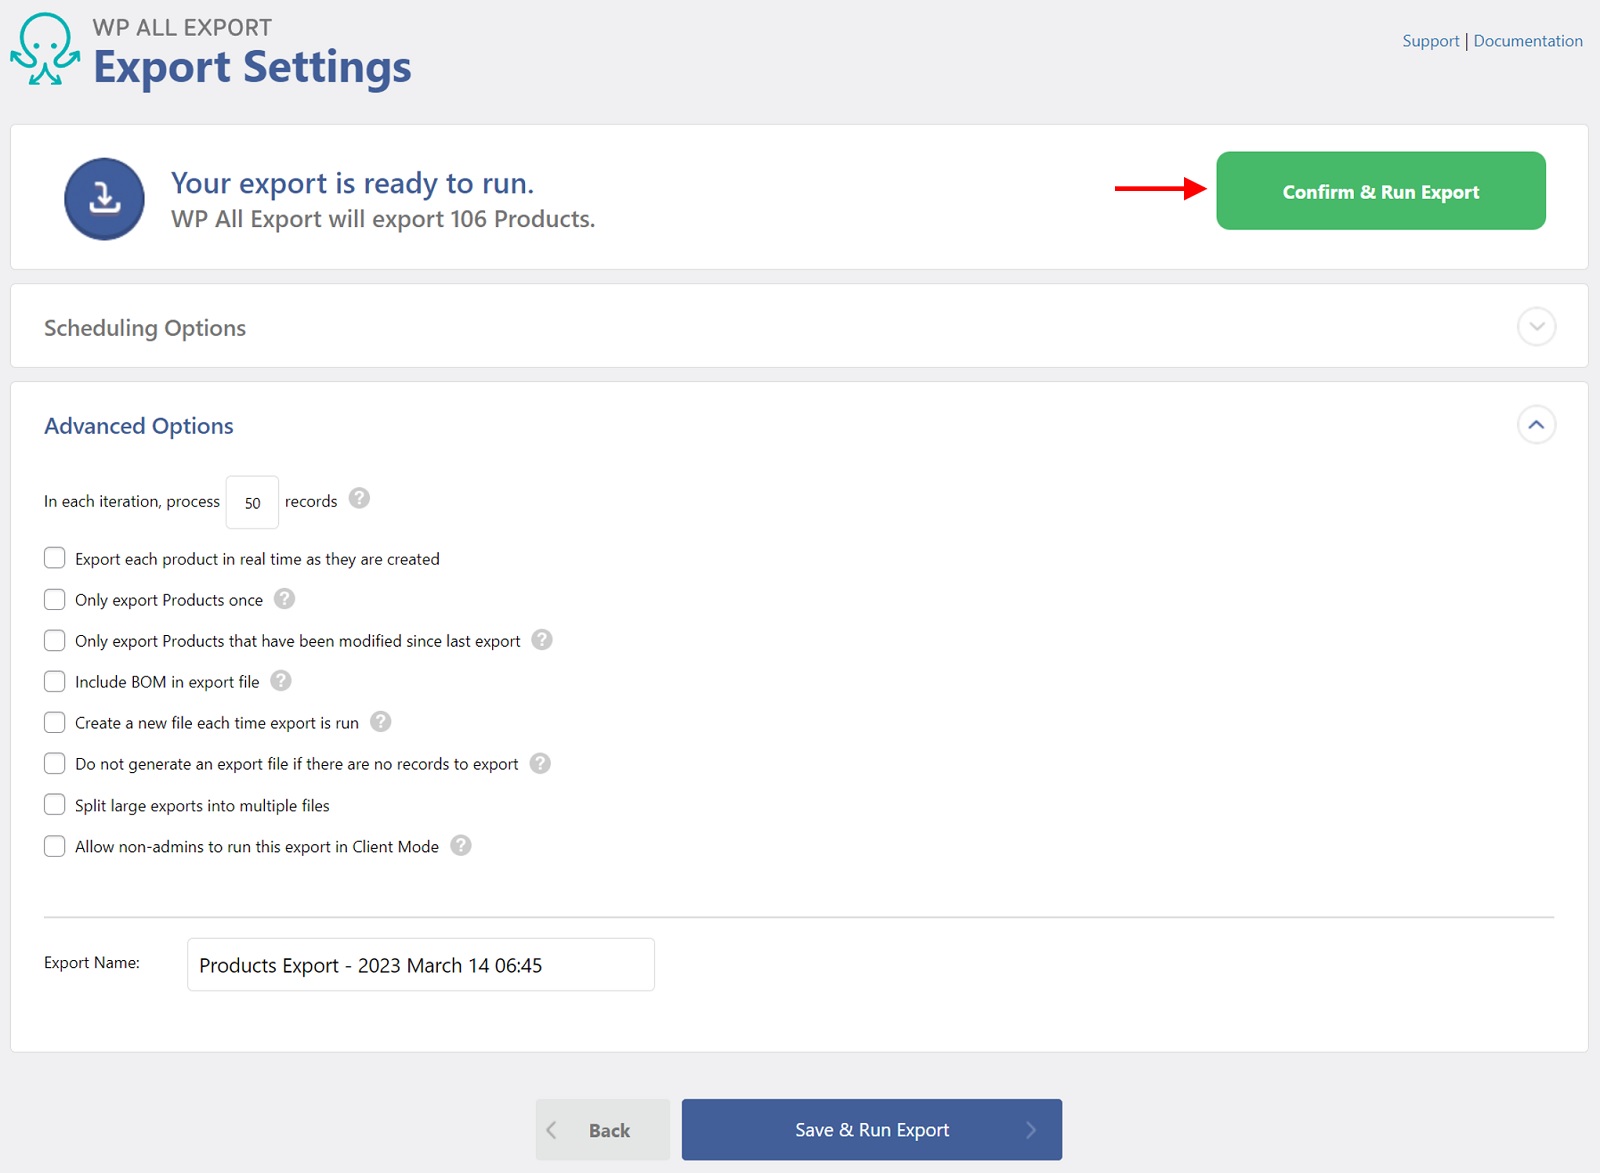
In this screen, you can set the following types of options:
- Schedule your product export to run every week or month by expanding the Scheduling Options section;
- Set whether each subsequent run of the export should only export products that were added or modified since the previous export;
- Change the batch processing size for the export (affects performance);
- Split large exports into multiple files to avoid exceeding server file limit sizes;
For this example, just leave everything at its default setting, but don't forget this screen. It is full of powerful settings.
Click the Confirm & Run Export button to start the export.
Step 4: Download Your Product Export File
Once the export is complete, you will have two options to download your export file, both shown in the Click to Download section. One is the selected file type for your export (in this case, the default file type of CSV). The other is the Bundle option, which downloads a zip file that contains the export file and an import template. You can use the import template to migrate WooCommerce products to another site using WP All Import.

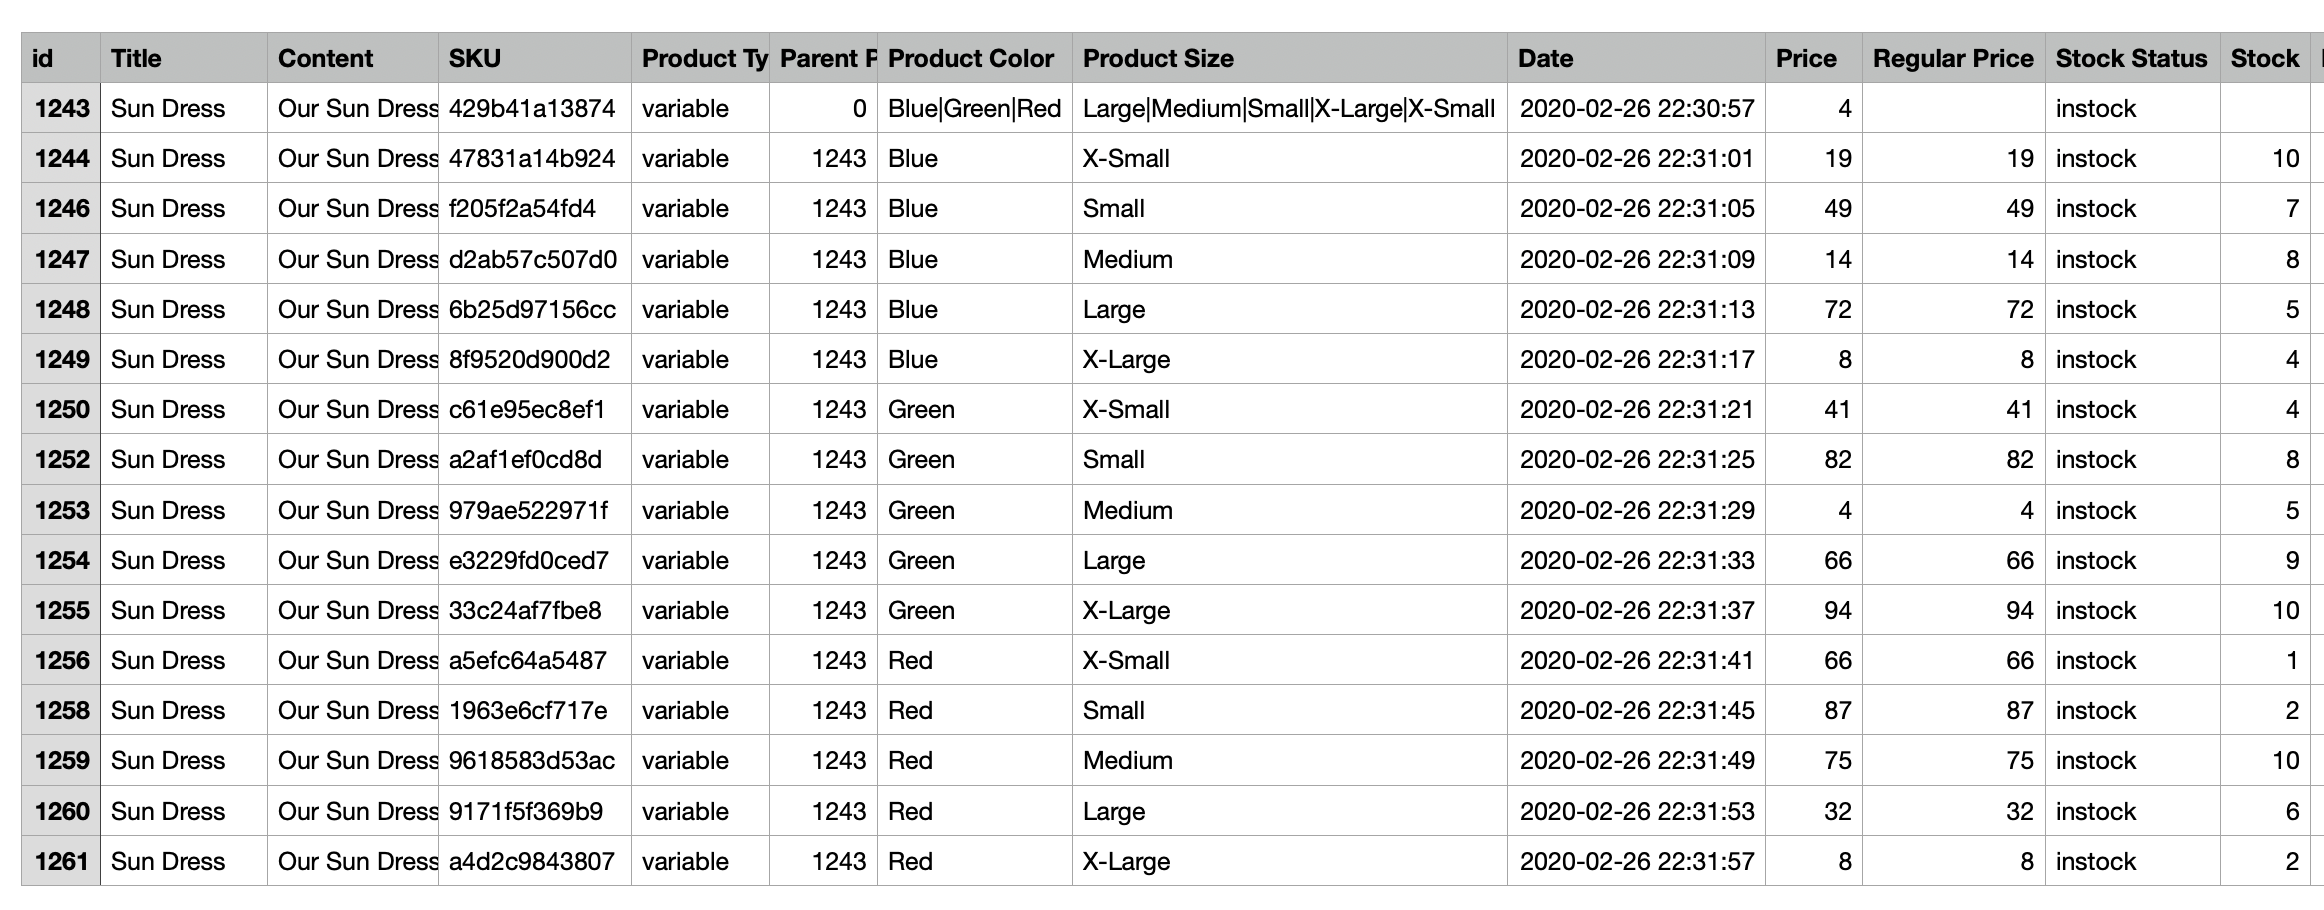
Here's a quick look at an example product export:
Export WooCommerce Products to CSV, XML, or Excel
- Simple & variable products
- Price & stock
- Custom fields
- Zapier integration
- Real-time exports
Export WooCommerce Products — Advanced Topics
Filtering WooCommerce Product Exports
Often, a user wishes to export only a subset of products. This subset can be based on product categories, stock availability, or any of the export fields described in the previous sections of this tutorial.
To filter your products, expand the Add Filtering Options panel near the bottom of the New Export screen (step 1 in the above guide), then select an Element, Rule, and Value:
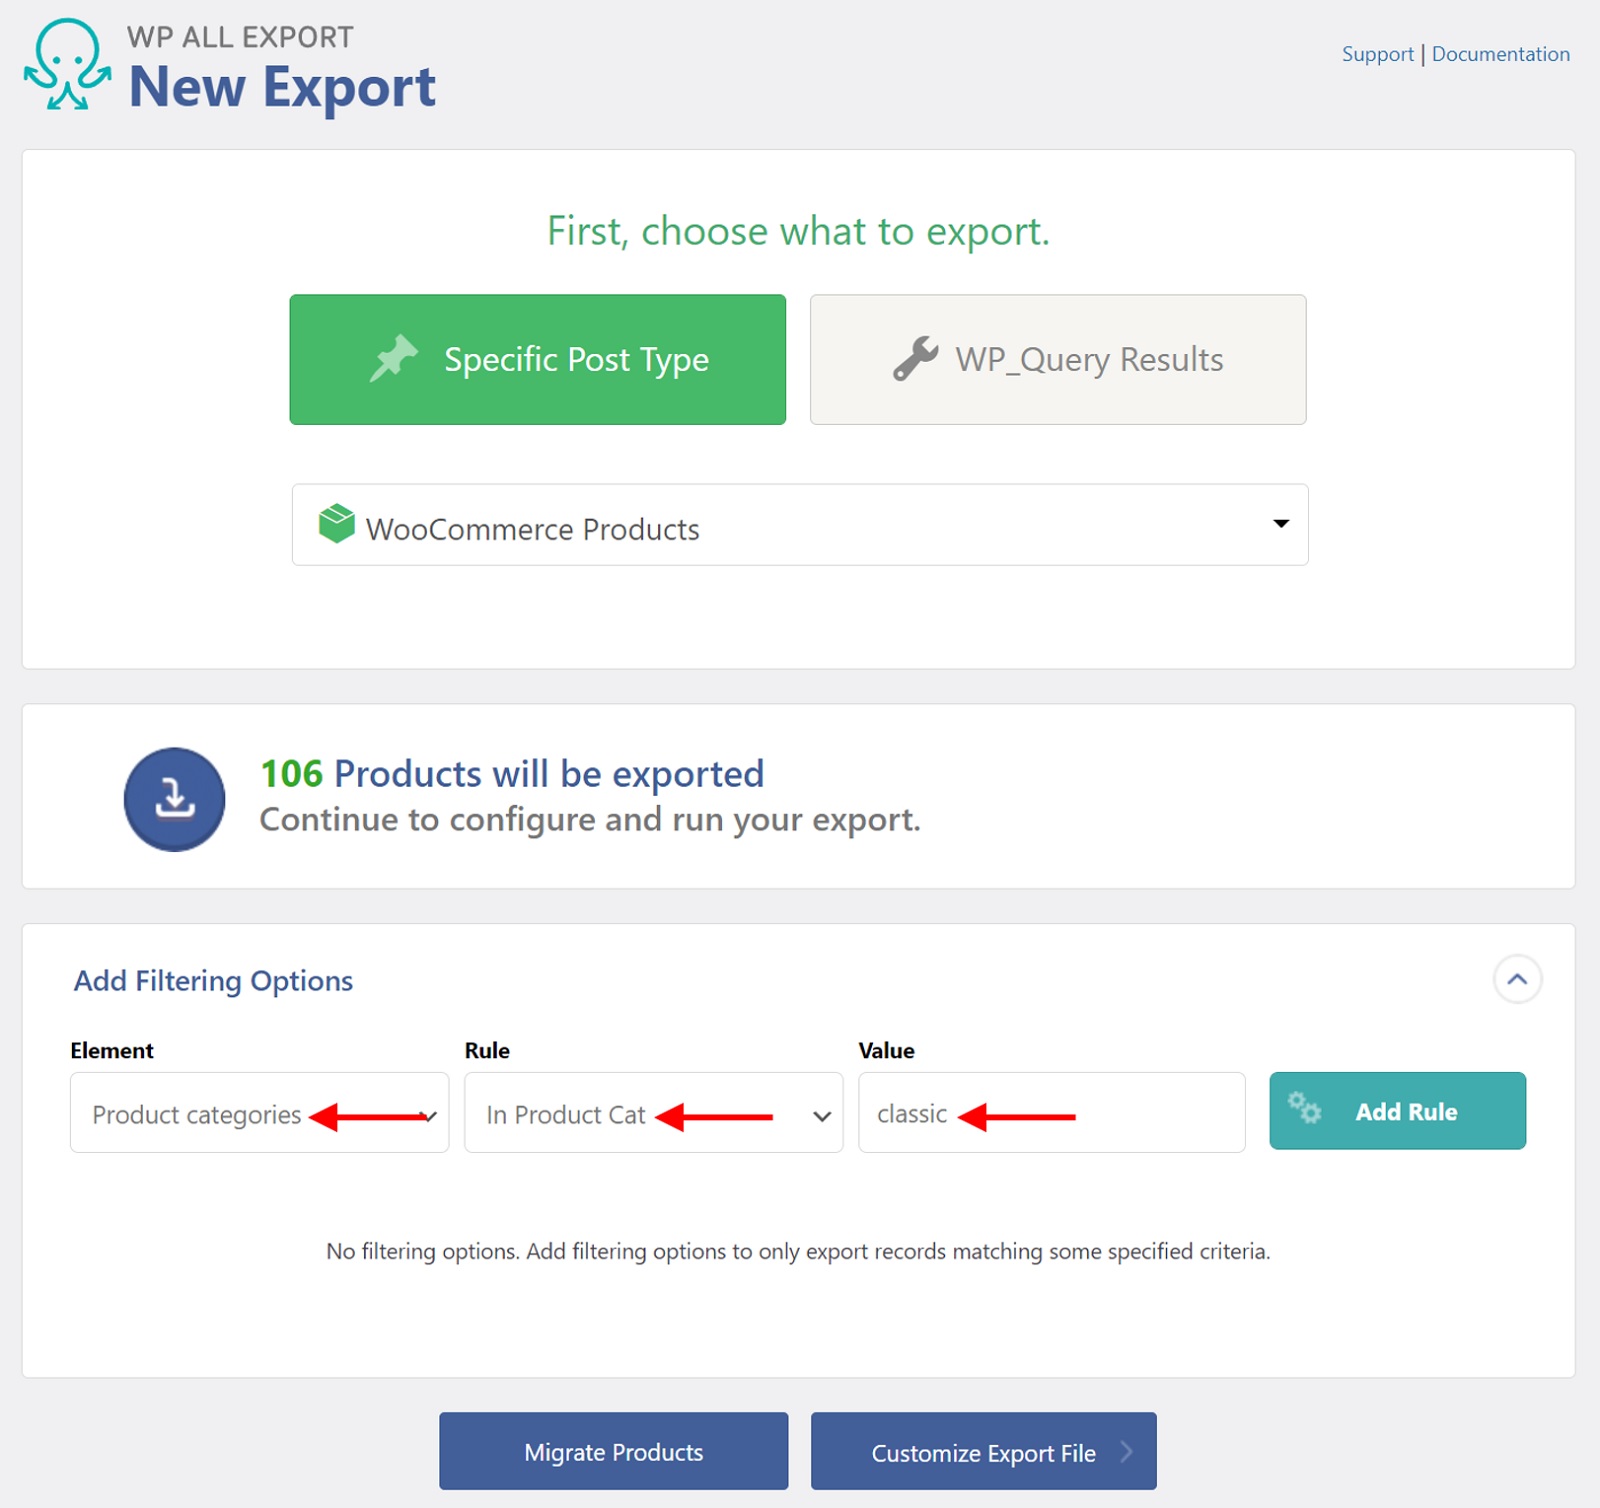
In this example, you are setting:
Element = Product categories
Rule = In Product Cat
Value = classic
This is the same as saying, “Export products with a product category of 'classic'."
If required, you can also combine multiple filters. For example, to export products with a product category of "classic" that are currently in stock, set your filters like this:
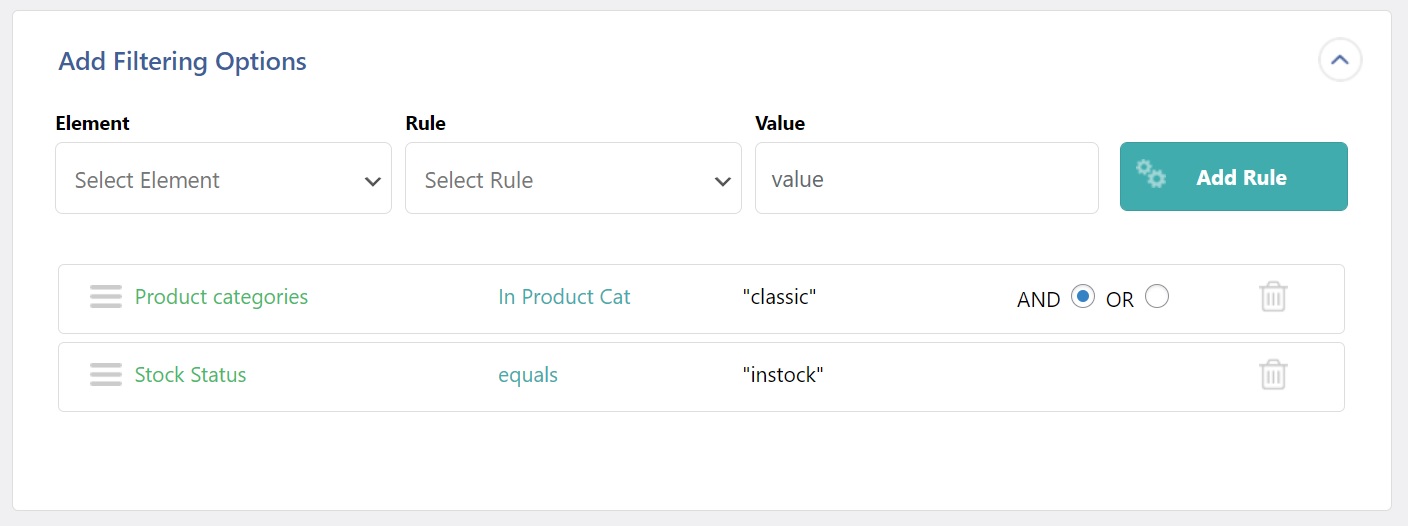
Product filters can be as complex as you need them. You can also modify existing export filters via All Export › Manage Exports › Settings using the same Filtering Options section.
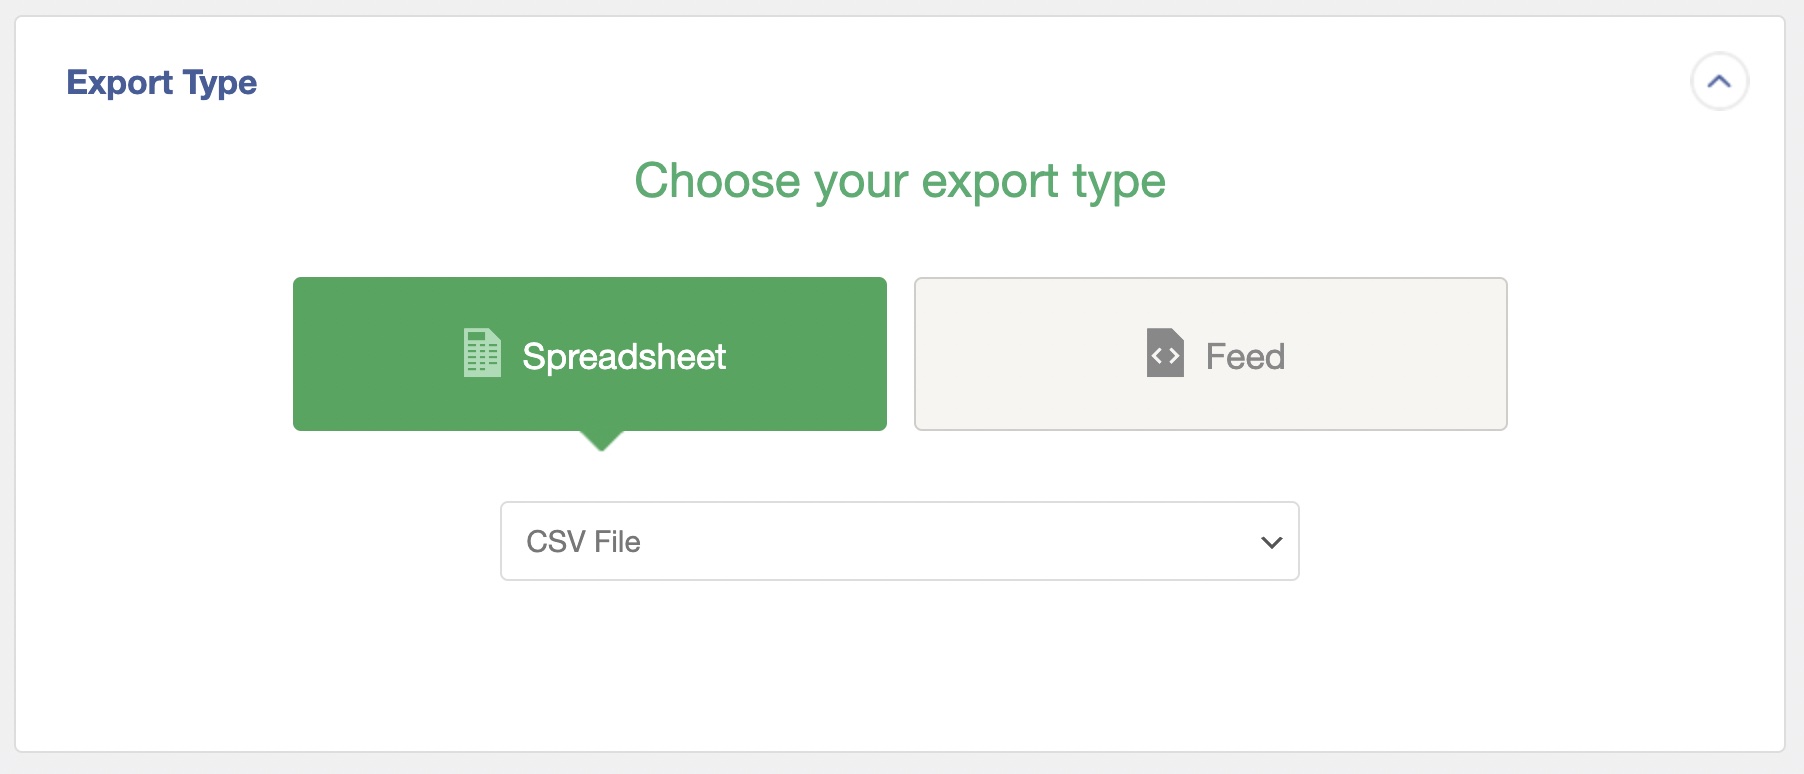
Default Export File Format: CSV
By default, the export file type is CSV. This means that all new exports will automatically have CSV File selected as the Export Type:
CSV stands for comma-separated values, which is a delimited text file that uses commas to separate values. This format can be opened with spreadsheet software or with most text editors.
How to Export to WooCommerce Products to Excel
To export to Excel, do the following in the Drag & Drop interface (step 2 in the guide above):
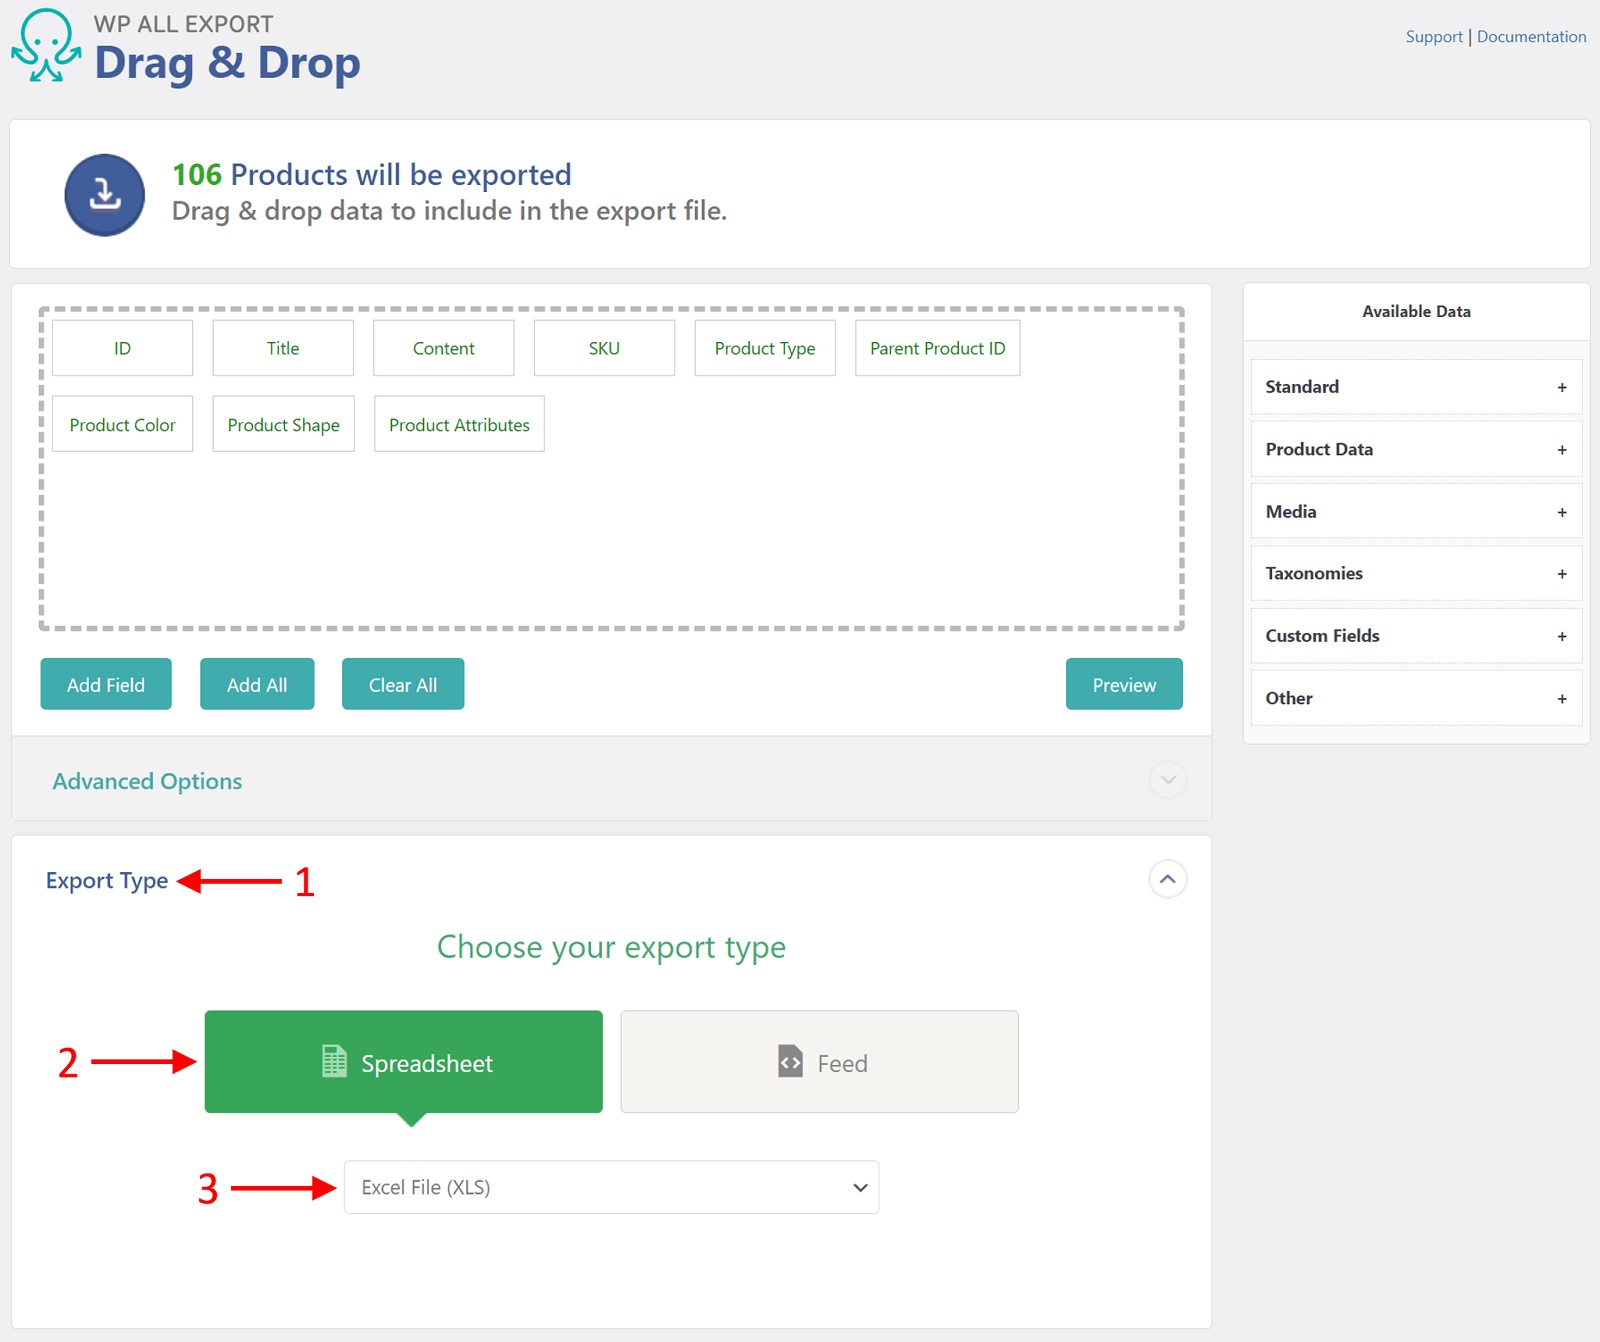
- Expand the Export Type panel just below the Advanced Options panel.
- Select Spreadsheet as your principal export type.
- Select either Excel File XLS or Excel File XLSX as your specific file format.
Excel files, either XLS or XLSX, can be opened using Microsoft Excel or other spreadsheet software that supports it.
How to Export WooCommerce Products to XML
Prefer exporting an XML file? See below:

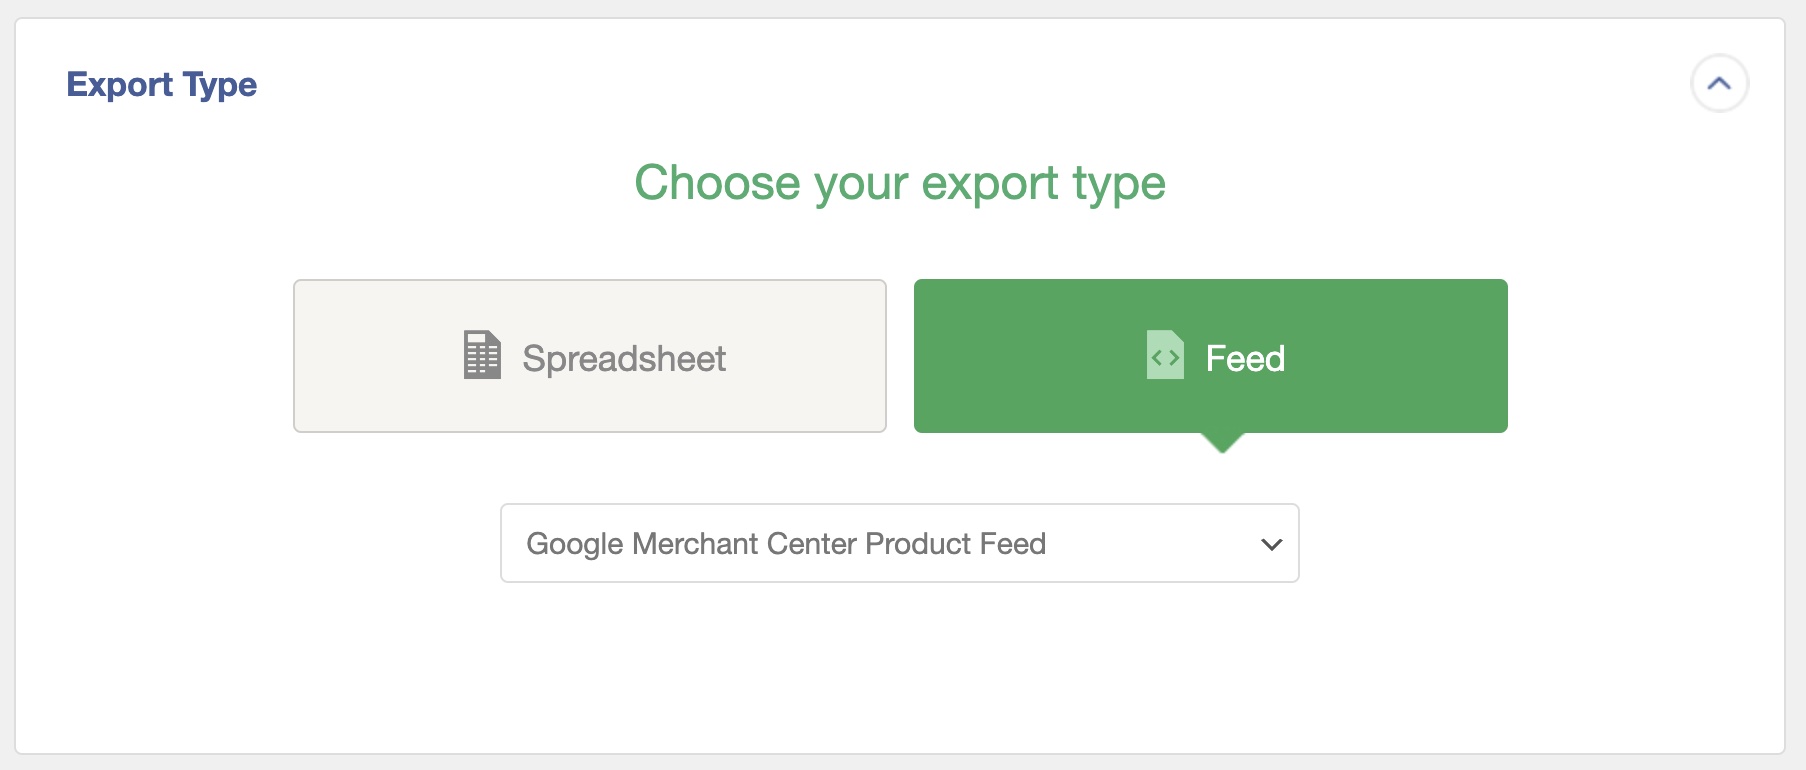
- Expand the Export Type panel.
- Choose Feed.
- Select either Simple XML Feed or Custom XML Feed.
XML stands for Extensible Markup Language, which is a markup language that doesn't have predefined tags to use. Instead, you define your own tags.
Note that the Simple XML Feed creates a simple, single-level XML feed of your product data that will work for most cases. If you need something more sophisticated, the Custom XML Feed option lets you fully customize the structure of your XML file (including nested elements), control the names and order of the XML elements, and easily add static data to the feed. For more information on exporting to XML, see Export WordPress data to XML.
Google Merchant Center Product Feed Export
There is also a Google Merchant Center Product Feed option (under Export Type) that lets you easily upload WooCommerce Products to the Google Merchant Center. WP All Export extracts all of the necessary information from your WooCommerce products to satisfy this feed format, with options to map categories and configure other options that are specific to the Google Merchant Center. This option generates a .TXT file out of the box.
Advanced Options Available When Exporting Products
You can see the Advanced Options panel just above the Export Type section:
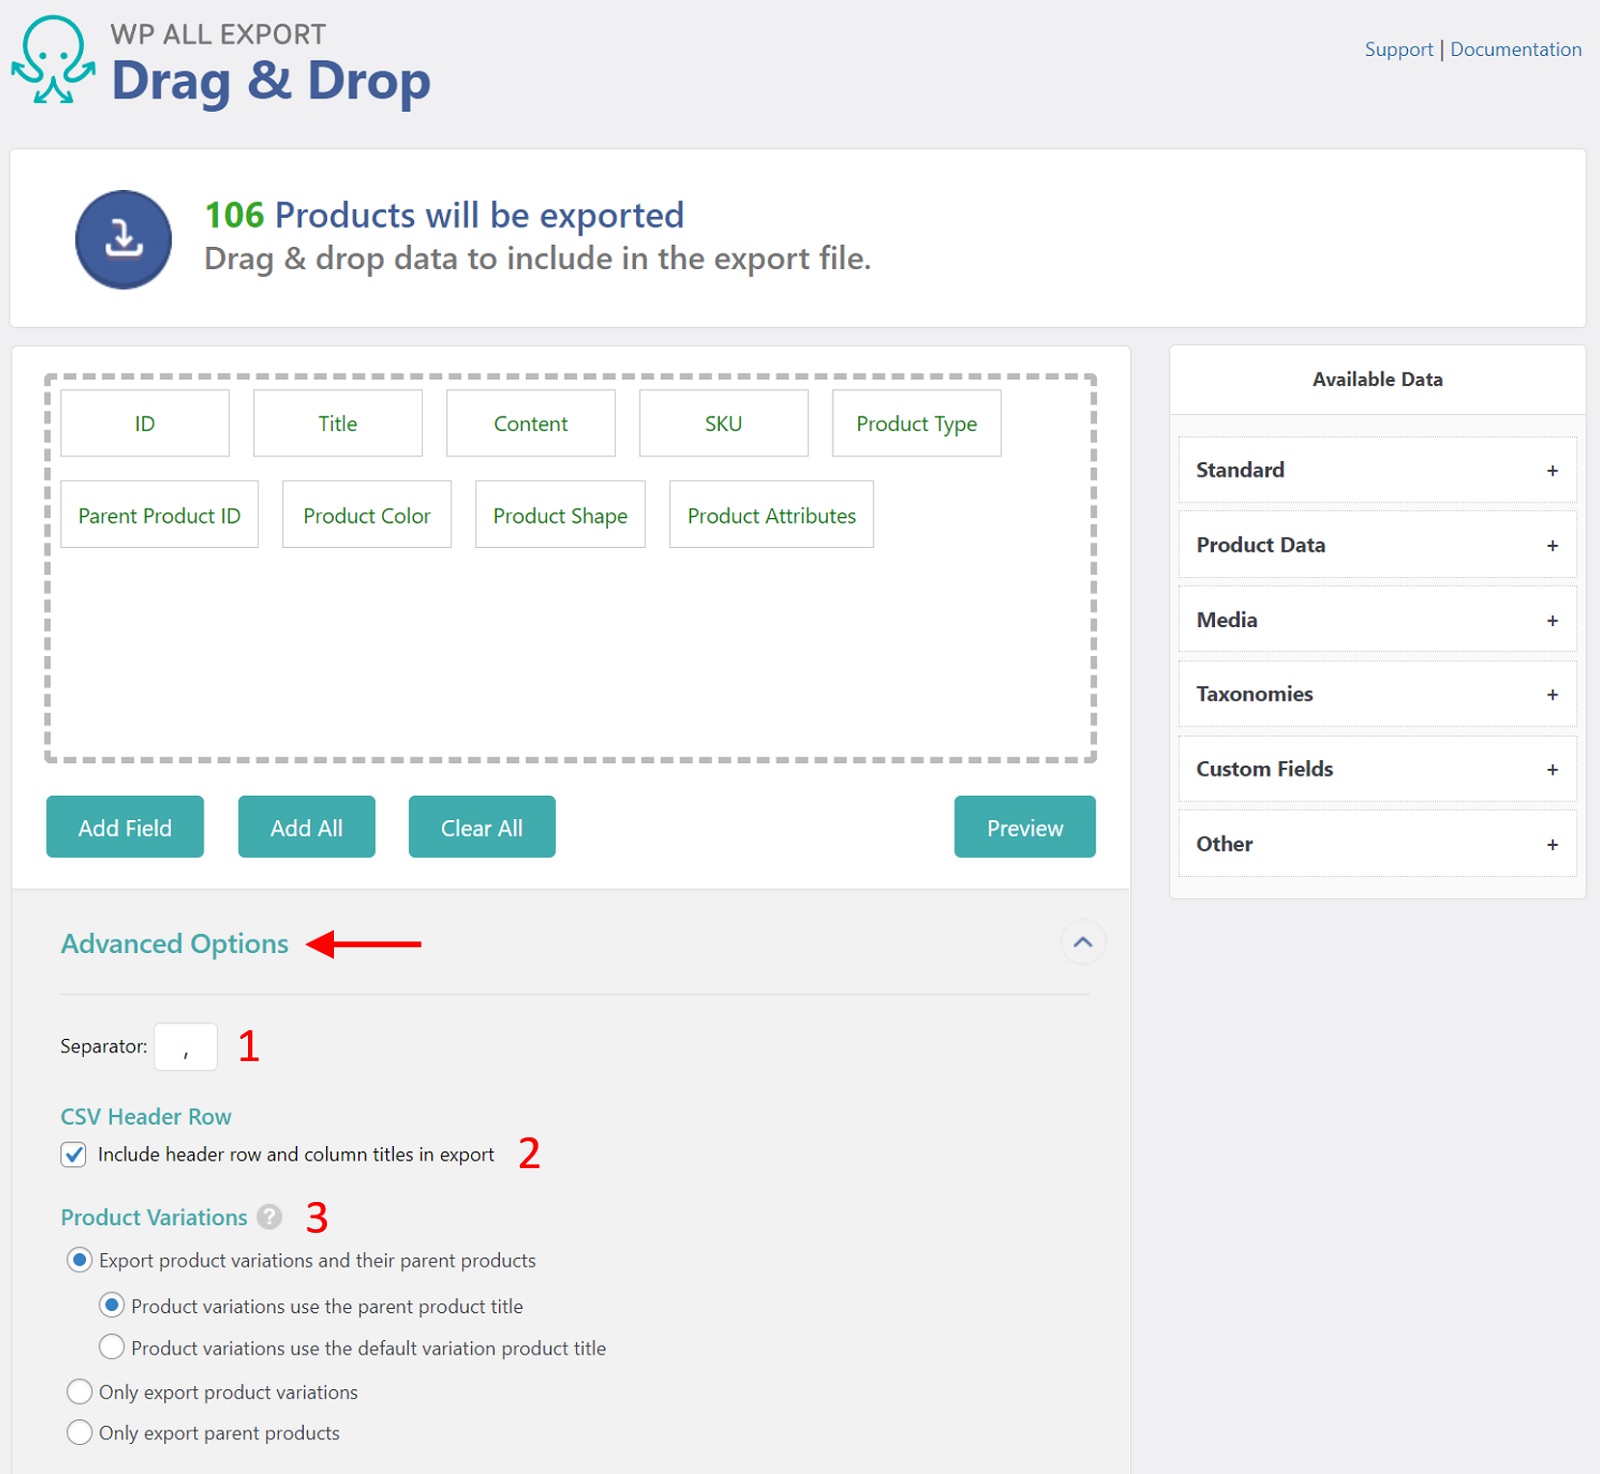
Use this panel to control various settings for the export file. For CSV files, these include:
- The field separator. The most common choices here are either the comma or the pipe (I) separator.
- Whether to include header row and column titles in the export.
- Settings for exporting product variations, all of which are self-explanatory.
Excel files only allow the product variations options, while XML files support both product variations options and CData tags.
Export WooCommerce Products — Frequently Asked Questions
If you are looking for information on our product export add-on, see Export WooCommerce Products.
How Do I Export Selected Products From WooCommerce?
- Create a new export in All Export > New Export.
- Select WooCommerce Products from the dropdown list.
- Click on Add Filtering Options and add a rule to target the desired products.
- Run the export and download the exported products.
How Do I Export All WooCommerce Products?
- Navigate to All Export > New Export.
- Select to export WooCommerce Products from the available post types.
- Do NOT apply any filters.
- Complete the export and download the exported products.
How Do I Export WooCommerce Products to CSV?
To export WooCommerce products to CSV, just follow the steps in this guide, as CSV is WP All Export's default file format.
Export WooCommerce Products to CSV, XML, or Excel
- Simple & variable products
- Price & stock
- Custom fields
- Zapier integration
- Real-time exports
How Do I Export WooCommerce Products to Excel?
- Create a new export in All Export > New Export.
- Select WooCommerce Products from the available post types.
- Customize the export file.
- Select Export Type > Spreadsheet > Excel File.
- Complete the export and download your file.
How Do I Export All Products From WooCommerce with Images?
- Create a new export for WooCommerce products but do not set any filters. This will ensure that you export all products.
- Add the images and attachments to the export as per the Media section of Step 2 in this guide.
- Run the export and download your exported file.
- Check the contents of the export file to verify that the image data is correct.
For more information, see Export WooCommerce Products with Images.
How Do I Export Products and Categories in WooCommerce?
- Set up a new export via All Export > New Export.
- Choose WooCommerce Products from the dropdown list.
- When building your export template, include the Product categories field from Available Data > Taxonomies.
- Complete the export and download your exported file.
You can also export WooCommerce product categories on their own.
How Do I Export Product Attributes in WooCommerce?
- Create a new export via All Export > New Export.
- Select to export WooCommerce Products from the dropdown list.
- Drag and drop the desired attributes from Available Data > Product Data > Attributes.
- Run the export and download the exported file.
To learn more, see How Do I Get a List of WooCommerce Product Attributes.
How Do I Set Up a Google Shopping Product Feed for WooCommerce?
- Go to All Export > New Export and select WooCommerce Products.
- Change the Export Type to Feed > Google Merchant Center Product Feed.
- Configure the export as required.
- Upload to Google.
- You can also create a custom WooCommerce product feed.
See Export WooCommerce Products to Google Shopping for more information.
How Do I Schedule WooCommerce Product Exports?
You can schedule your WooCommerce product exports to run on any schedule. You can do this using either cron jobs manually via your server or by using our automatic scheduling service to set your product export schedule directly from our interface.
To learn more, please see How to Schedule WordPress Exports.
How Do I Import Products into WooCommerce?
- In the WordPress main menu, navigate to All Import › New Import.
- Choose how you want to import your data (i.e., upload a file, download a file from a URL, etc.).
- Select your import file.
- Choose your import target (i.e., WooCommmerce Products).
- Map the incoming fields to your WooCommerce target fields using drag & drop.
- Run the import.
For a full list of import features, see Import WooCommerce Products.
How Do I Migrate Products to a Different Website?
- Export a set of WooCommerce products.
- When downloading your export file, choose the Bundle option. In addition to the exported products, the bundle contains an import template.
- To migrate the products to the other site, upload the bundle file.
- WP All Import will automatically import the WooCommerce products from the bundle file based on its import template.
- Check your imported products.
For additional information, see Migrate WooCommerce Products.
How Do I Bulk Edit WooCommerce Products?
- Export the products that you wish to edit.
- Edit the export file in your favorite spreadsheet app.
- Reimport the edited file back into WooCommerce.
- Verify your results.
To learn more, please see Easily Bulk Edit WooCommerce Products.
How Do I Print a WooCommerce Product List?
The quickest way to print a WooCommerce product list is to go to Products > All Products and click Control+P from your browser. Just click the Print button to print your WooCommerce product list. If you want to control layout, styling, or manipulate the list data in any way, export your products to a spreadsheet and print from there.
How Do I Export Sales from WooCommerce?
- Navigate to All Export > New Export.
- Choose to export WooCommerce Orders in the dropdown list.
- Define the export template with all of your orders.
- Run the export.
- Download the exported file with all of your sales.
For additional details, see WooCommerce Order Export.
How to Export WooCommerce Attributes in a Multilingual Environment Using Cron Jobs?
If you're exporting WooCommerce attributes in a multilingual environment and want to use cron jobs or Automatic Scheduling to automate the export, you should configure the export template while logged into a WordPress user account that uses the site's default language. This is necessary because WooCommerce adds the word "Product" to the attribute elements based on the language of the current user. Since automatic exports use the site's default language, configuring the export with a user that does not use the site's default language will result in the attribute elements being blank.
What Add-Ons Do I Need to Export WooCommerce Products?
To export WooCommerce products, you need to have the WooCommerce Export Add-On active on your site, along with WP All Export.
Export WooCommerce Products — Related Docs
Learn how to import WooCommerce products.
Describes how to export WooCommerce variable products.
Describes how to import WooCommerce variable products.
Learn how to export WooCommerce products with images.
Learn how to import WooCommerce products with images.
Describes how to bulk edit WooCommerce products.
Describes how to migrate WooCommerce products from one website to another.
Oxygen article on the 5 best plugins for WooCommerce product exports.
