How to Import WooCommerce Coupons
To import WooCommerce coupons, go to All Import › New Import, select your import file, and then pick WooCommerce Coupons from the dropdown list. Use our Drag & Drop interface to map your import fields, then run your import.
Table of Contents
- Step 1: Create a New Coupons Import
- Step 2: Check the Import File Data
- Step 3: Map the Incoming Data
- Step 4: Configure the Import Settings
- Step 5: Run the Coupon Import
Advanced Topics
Step 1: Create a New Import for WooCommerce Coupons
Navigate to All Import › New Import, upload your import file, and select WooCommerce Coupons from the list of available post types.
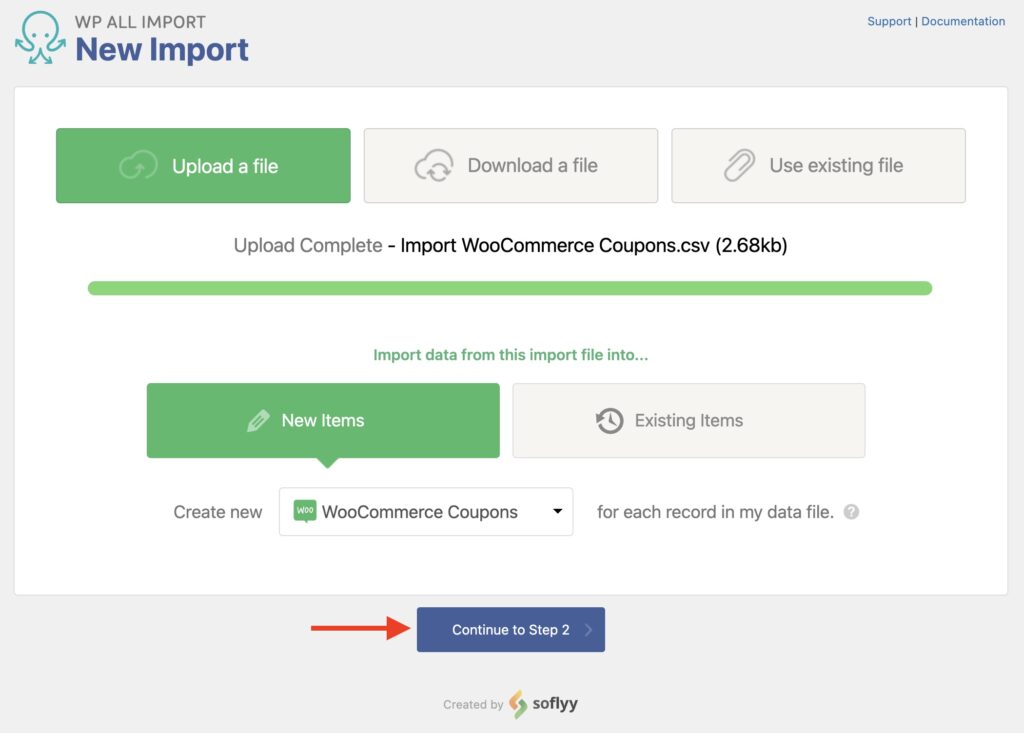
Click Continue to Step 2 to move to the next step.
Step 2: Check the Import File Data
You now see the Review Import File screen, which lets you check the coupon data to import. If you see any problem with the data, fix the import file and start the import process again.
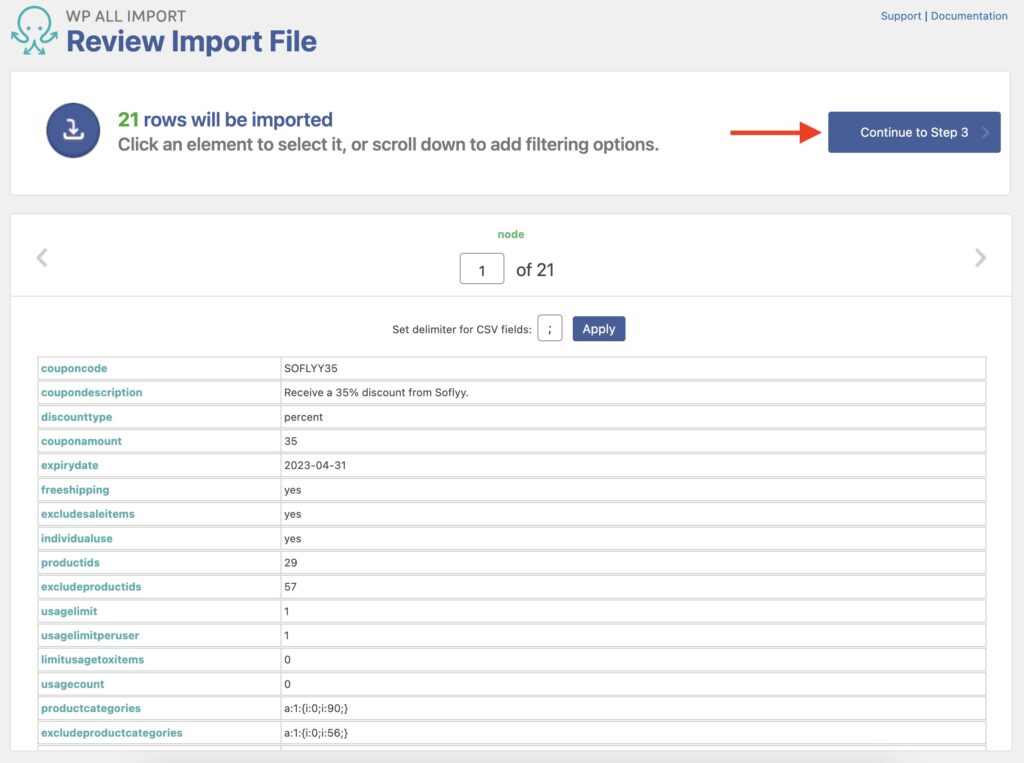
Below is a section called Manage Filtering Options (not shown), where you can define which coupons to import using filters.
Once done with this step, click Continue to Step 3.
Step 3: Map the Incoming Data Elements to the Coupon Fields
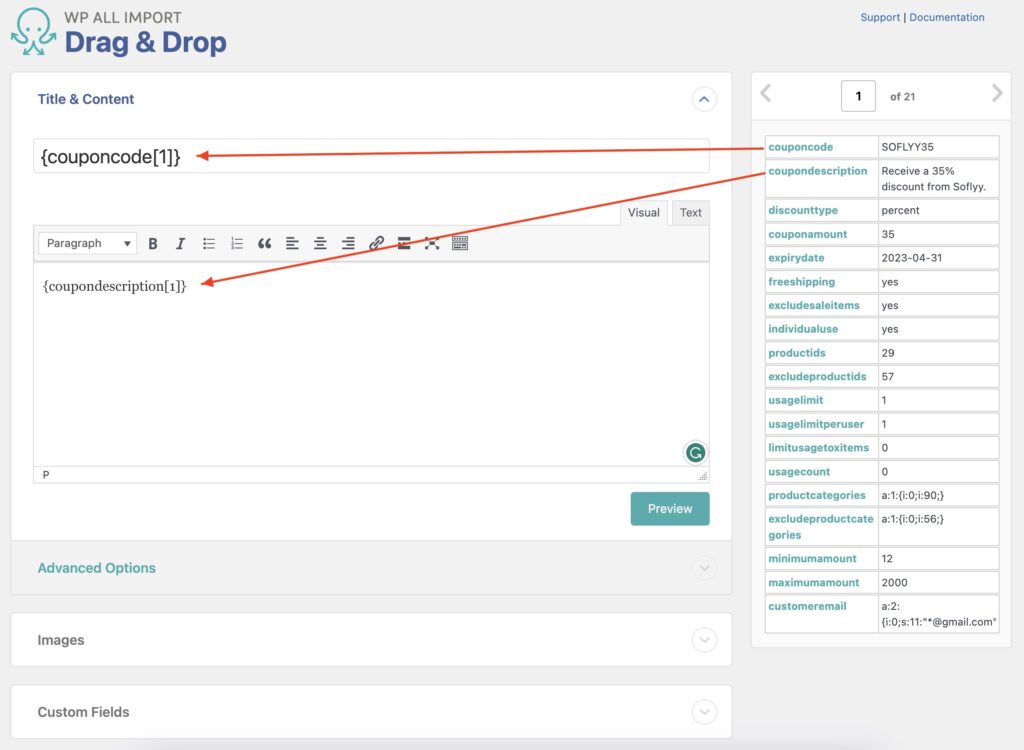
The Drag & Drop interface allows you to map the data elements from your import file into the relevant WooCommerce coupon fields. Just drag the data elements from the right panel and drop them on their corresponding field on the left.
Title & Content Section
First, map the title and the content. In this case, the title is the coupon code itself, and the content is the coupon's description:
Custom Fields Section
You need to import all other WooCommerce coupon information into the Custom Fields section. Here's a list of each custom field, what it's for, and what data it expects:
- discount_type: This is the type of discount to import. Accepted values:
percent,fixed_cart,fixed_product. - coupon_amount: The value of the coupon. Accepts a numeric value.
- expiry_date: The date when the coupon will expire. Accepted format: YYYY-MM-DD. The coupon will expire at 00:00:00 on this date.
- free_shipping: Whether your coupon grants free shipping or not. Accepted values:
yesorno. - exclude_sale_items: Enable this if the coupon should not apply to items on sale. Accepted values:
yesorno. - individual_use: Enable this if the coupon cannot be used in conjunction with other coupons. Accepted values:
yesorno. - usage_limit: Defines how many times this coupon can be used before it's void. Accepts numeric values. Input
0for unlimited. - usage_limit_per_user: Defines how many times this coupon can be used by an individual user. Accepts numeric values. Input
0for unlimited. - limit_usage_to_x_items: Defines the maximum number of individual items this coupon can apply to when using product discounts. Accepts numeric values. Input
0for unlimited. - product_ids: IDs of products that the coupon will apply to or that need to be in the cart in order for the "Fixed cart discount" to be applied. Accepts a comma-separated list of product IDs.
- exclude_product_ids: IDs of products that the coupon will not be applied to or that cannot be in the cart in order for the "Fixed cart discount" to be applied. Accepts a comma-separated list of product IDs.
- product_categories: A serialized array with the ID of product categories that the coupon will be applied to or that need to be in the cart in order for the "Fixed cart discount" to be applied. Expects a serialized array with the product category IDs.
- exclude_product_categories: A serialized array with the ID of product categories that the coupon will not be applied to or that cannot be in the cart in order for the "Fixed cart discount" to be applied. Expects a serialized array with the product category IDs.
- minimum_amount: Minimum spend amount allowed to use the coupon.
- maximum_amount: Maximum spend amount allowed when using the coupon.
- customer_email: A serialized array with a list of allowed billing emails to check against when an order is placed. You can use an asterisk (*) to match parts of an email. For example, "*@hotmail.com" would match all Hotmail addresses. Expects a serialized array with those emails.
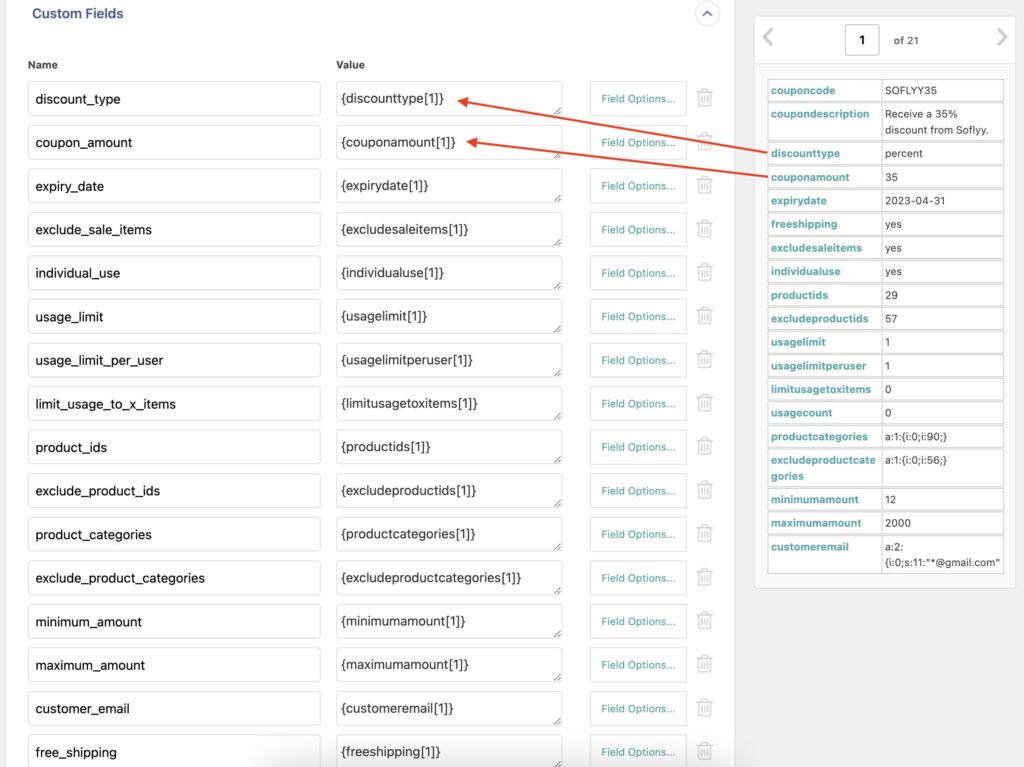
There are other import sections available, but these can be left alone for this example.
Once you've finished mapping the import template, click the Continue to Step 4 button at the bottom (not shown).
Step 4: Configure the Import Settings
You now see the Import Settings screen. Here, you can configure many import settings. First, click Auto-detect to generate a unique identifier for each imported WooCommerce coupon. This identifier is used internally by WP All Import to keep track of the imported coupons.
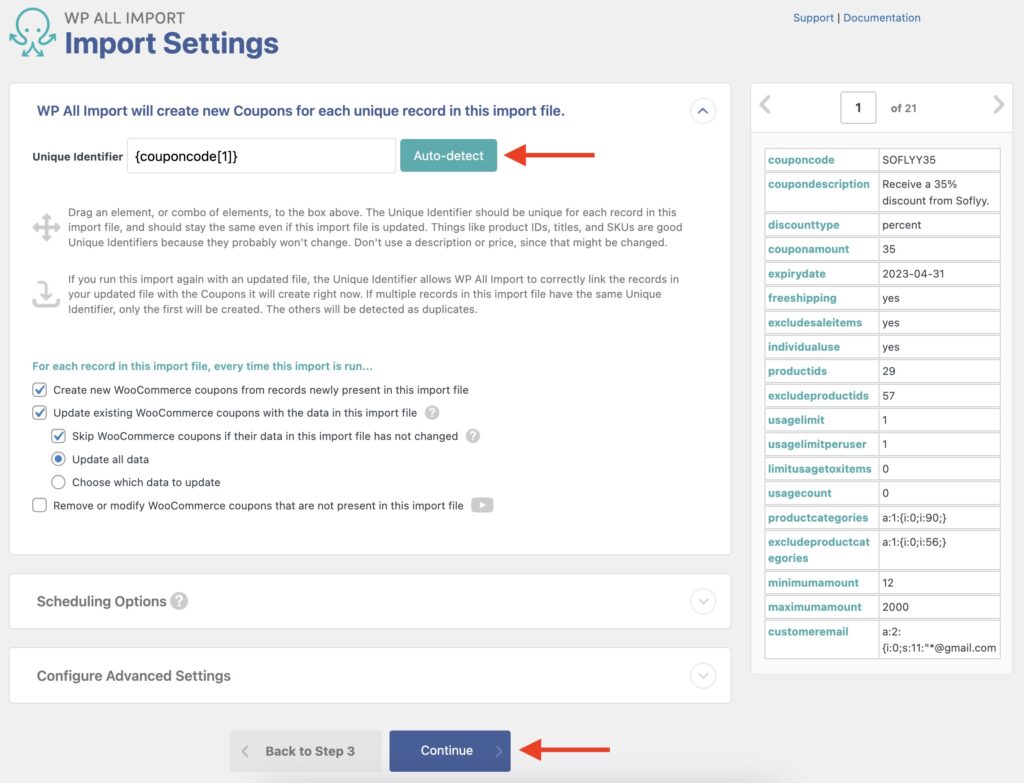
You can also change how the import process will behave when this import process runs again, including whether to create, update, or delete records.
Near the bottom, you will find panels to set up Scheduling Options and Configure Advanced Settings, though you can ignore these for now.
Click Continue at the bottom.
Step 5: Run the Import and Check The Coupons
The Confirm & Run screen now appears. This screen lets you review everything the import will do before you run it:
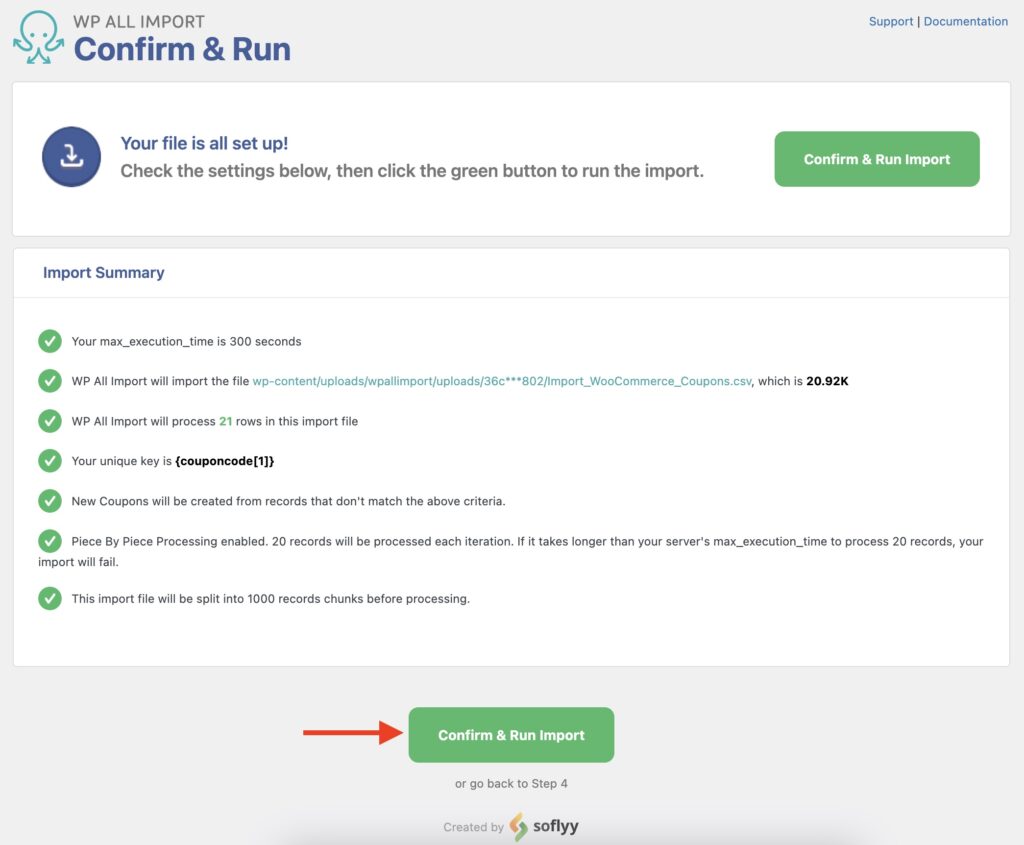
If it looks correct, click Confirm & Run Import. When the import finishes, you'll see the Import Complete! screen:
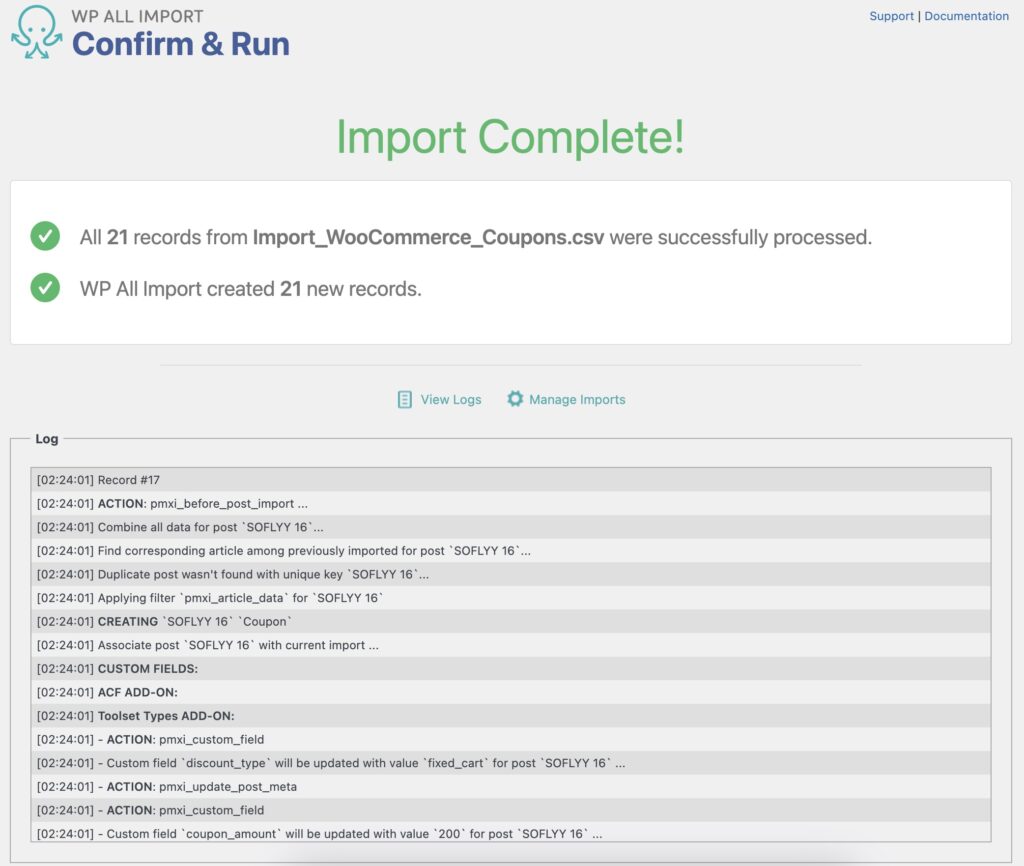
You can now go to Marketing › Coupons to review and confirm that all the coupons were imported correctly.

Import WooCommerce Coupons into WordPress
- All coupon data
- Custom fields
- Bulk edit & migrate
- Scheduled imports
Import WooCommerce Coupons – Advanced Topics
Use Filters To Control Which Coupons To Import
Using the Manage Filtering Options section of the Review Import File screen, you can add import filters when setting up the import process. These filters let you control which coupons to import based on your import data and fields.
A filter needs an Element, a Rule to apply (such as equals), and a Value to filter. In this example, our Element is discounttype, our rule is equals, and our value is "fixed_cart".
After adding the filter values, click on Add Rule, and then click on Apply Filters To XPath to apply the filter you just created. Here is what the screen will look after you complete these steps:
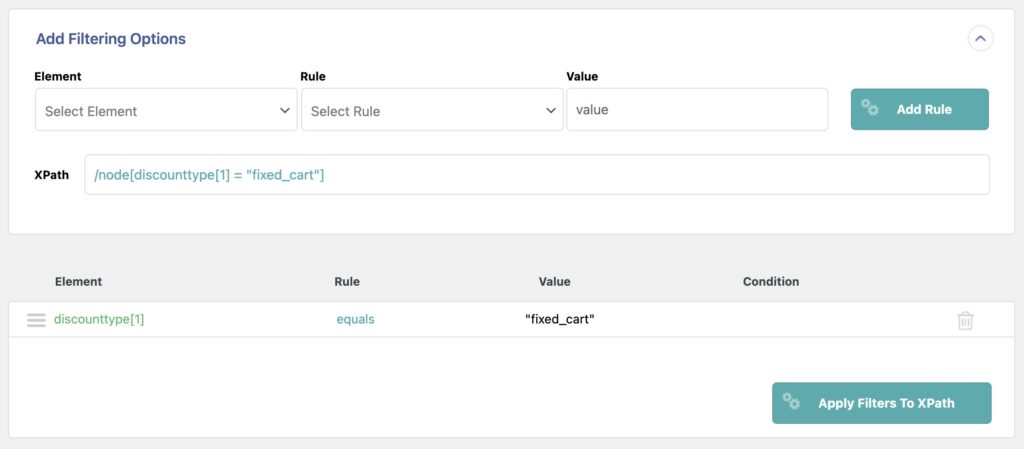
If you want to modify the filter for an existing import, you would simply need to locate that import in All Import › Manage Imports, go into Edit Template, and proceed to edit the filters under Manage Filtering Options (found at the top of the screen).
Import Coupons From A Feed URL Or FTP Source
In Step 1, we uploaded an import file to import WooCommerce coupons. However, you can also use a feed URL with the Download a file › From URL option:
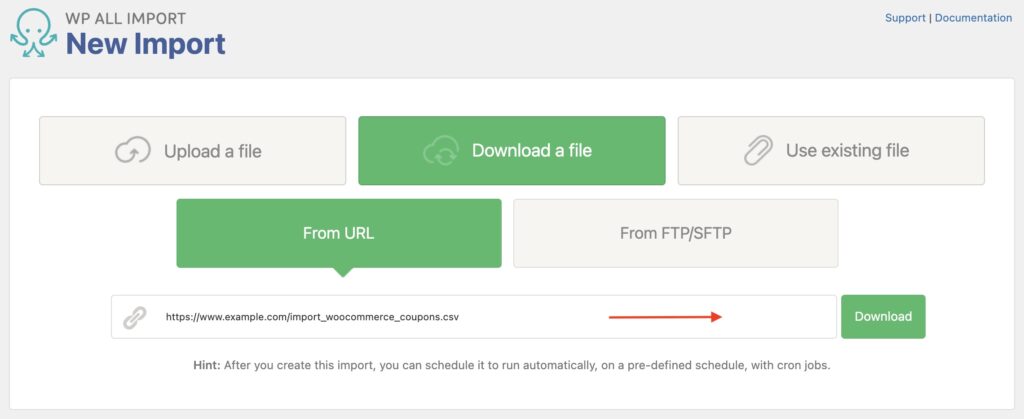
Alternatively, you can provide the file from an FTP source by selecting Download a file › From FTP/SFTP and inputting your FTP/SFTP details there.
Schedule To Import WooCommerce Coupons Automatically
You can schedule your coupon import to run automatically using either of our available options:
- Automatic Scheduling Service: This optional and paid service lets you set up imports directly from WP All Import's interface. It costs USD 9 per month and allows you to set up unlimited schedules. You can learn more here: Run WordPress Import on a Schedule.
- Manual Scheduling: You can also set up manual cron jobs, which are included at no extra cost. These cron jobs can be set up in your server or host. You can learn more here: Scheduling Imports Using Cron Jobs.
Import WooCommerce Coupons – Frequently Asked Questions
How Do I Bulk Add Coupons in WooCommerce?
To bulk add coupons in WooCommerce, just follow this tutorial. "Bulk add" and "import" mean the same thing when referencing WooCommerce coupons.
How Do I Export WooCommerce Coupons?
- Go to All Export › New Export.
- Choose WooCommerce Coupons as the post type to export.
- Click Customize Export File and build your export template.
- Run the export and download the exported coupons.
You can learn more about this process in the following documentation: How to Export WooCommerce Coupons.
How Do I Export Store Data From WooCommerce?
- Got to All Export › New Export.
- Choose the WooCommerce data you want to export from the dropdown list.
- Configure the export template and run the export.
- Download the exported store data from your WooCommerce site.
You can learn more about the export process in depth here: How to Export WordPress to CSV, Excel, and XML.
What Add-Ons Do I Need to Import WooCommerce Coupons?
To import WooCommerce coupons, you need to have the WooCommerce Import Add-On active on your site, along with WP All Import.
Import WooCommerce Coupons – Related Docs
See step-by-step instructions on exporting WooCommerce coupons.
Learn how to import WooCommerce products using WP All Import.
Shows you how to migrate WooCommerce data from one site to another.