How to Import WordPress Users from CSV, Excel, or XML
To import your WordPress users, navigate to All Import › New Import, upload your import file, and select Users as the import type. Use our Drag & Drop tool to map the incoming data elements to their target fields, then run the import.
Table of Contents
- Step 1: Create a New Users Import
- Step 2: Review the Import File
- Step 3: Map Data to the User Fields
- Step 4: Configure the Import Settings
- Step 5: Run the User Import
Advanced Topics
Step 1: Create a New Import for WordPress Users
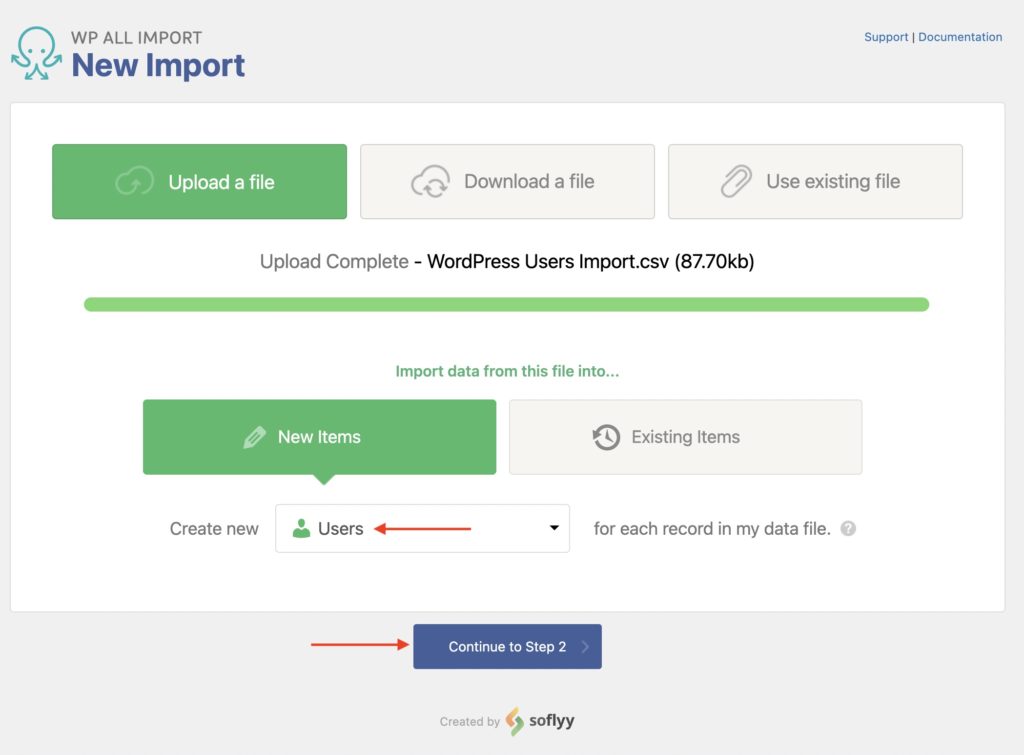
Go to All Import › New Import and upload your file. Choose to import Users, then click Continue to Step 2.
Step 2: Review the Import File
The Review Import File interface allows you to confirm whether the incoming data has been correctly interpreted:
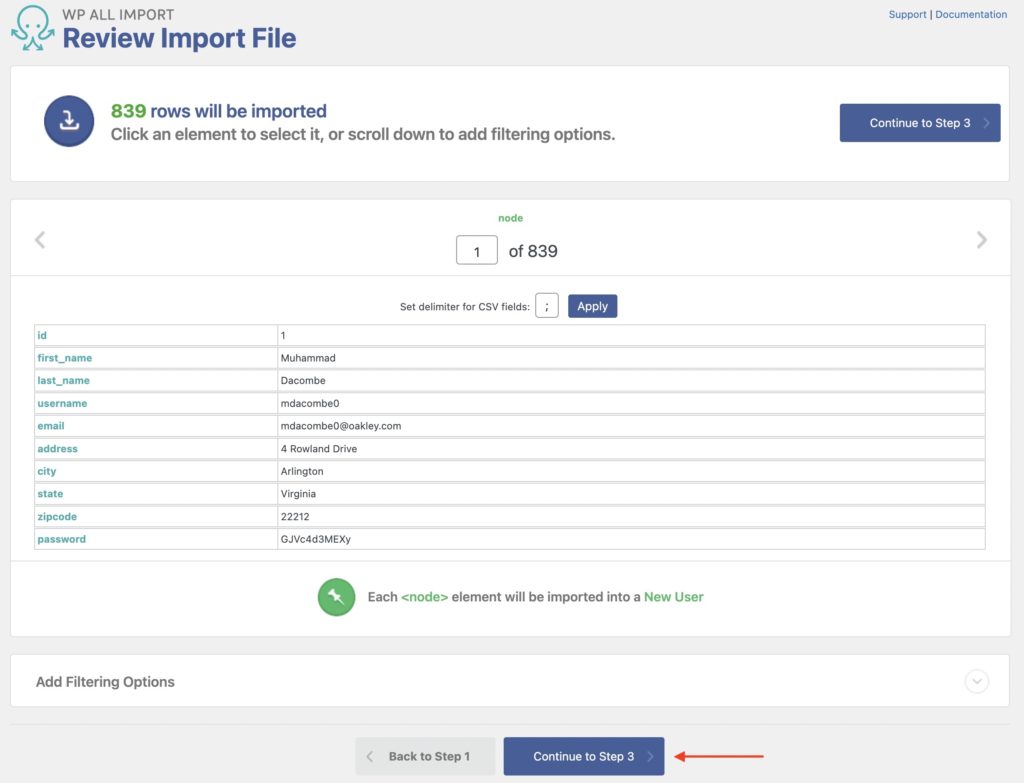
You can view the user information here. The import has detected 839 records. You can use the gray arrows to navigate between these records.
When uploading a CSV file, you can select the field delimiter to use. When uploading an Excel or XML file, you can instead select the node to import.
The data looks good, so click Continue to Step 3.
Step 3: Map the Incoming Data Elements to the WordPress User Fields
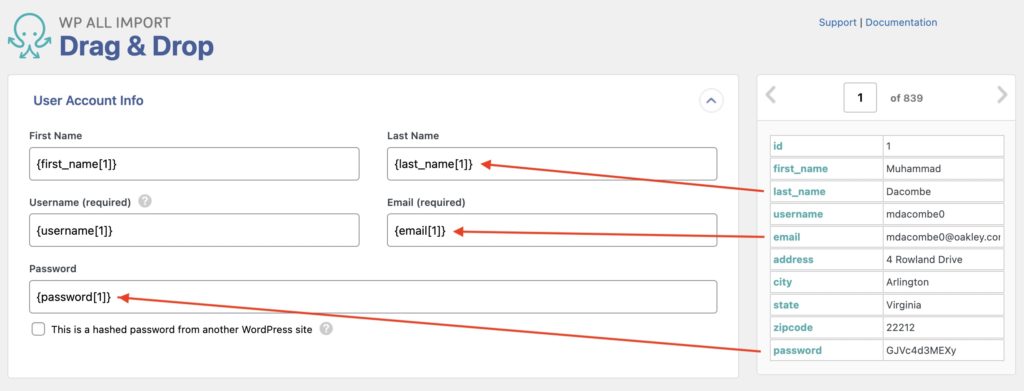
The Drag & Drop interface allows you to map the incoming data elements to their target fields. To do so, simply drag the data elements from the Available Data section on the right to the appropriate fields on the left. We are only showing a few of the mappings here to simplify the screenshot, but there should be mappings to all the fields in the User Account Info section.
You can map the remaining user data in the Other User Info panel, as well as custom fields in the Custom Fields panel.
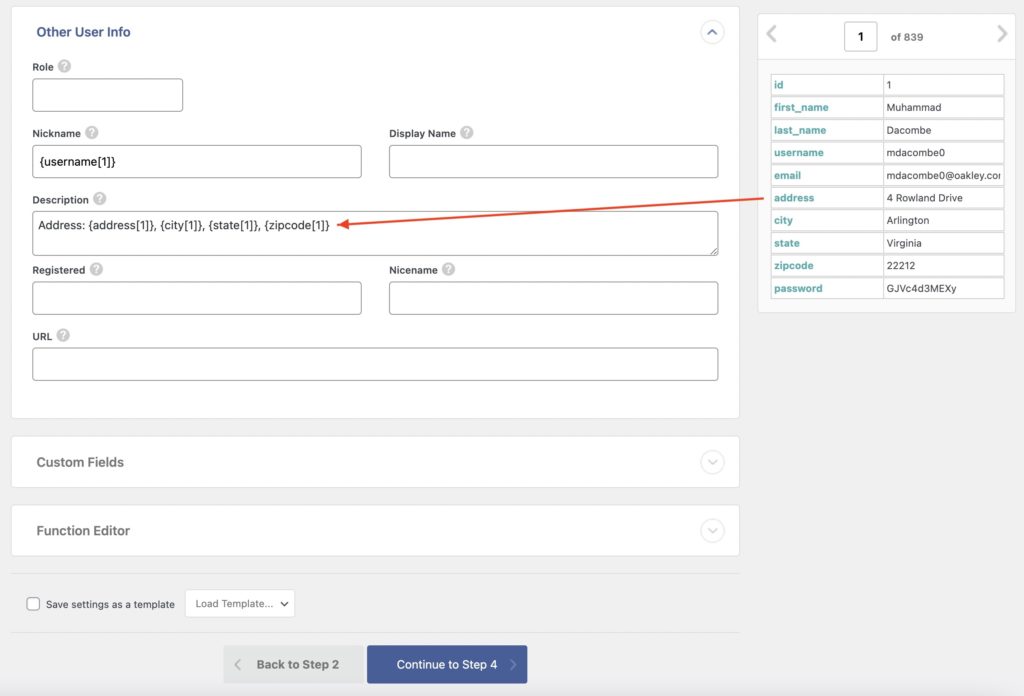
Once you've mapped all the relevant data elements to target fields, click the blue Continue to Step 4 button at the bottom.
Step 4: Configure the Import Settings
The Import Settings screen allows you to configure some important import options:
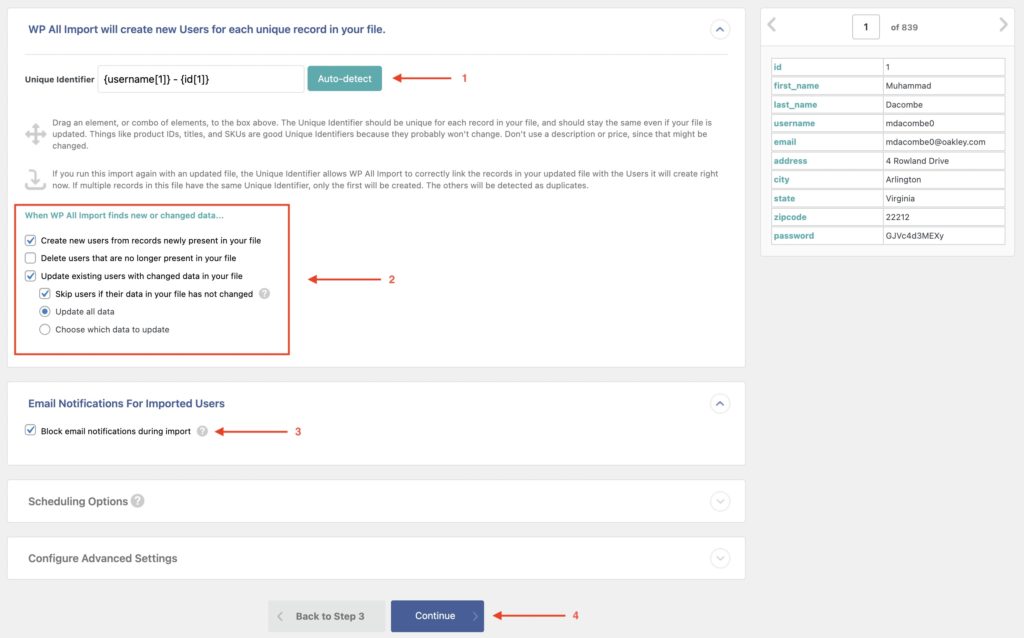
- Click the Auto-detect button. This will automatically identify a unique identifier for each incoming user.
- You do not have to worry about this set of options for an import of new users. But if you re-run this import, this set of options lets you instruct WP All Import on how to handle issues, such as whether the import should delete or update existing and previously imported users.
- Keep the Block email notifications during import option enabled to avoid sending WordPress email notifications to the imported users.
- Click Continue.
Step 5: Run the Import and Verify the Imported Users
The Confirm and Run screen allows you to confirm the selected settings before running the import:
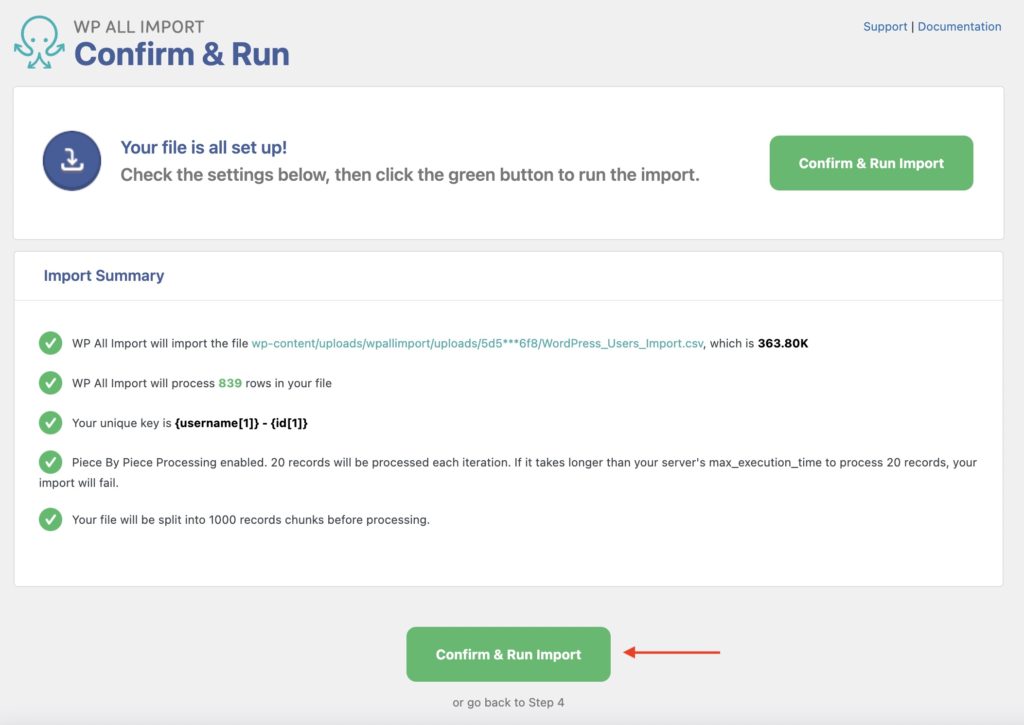
You can review the Import Summary section to confirm that the import settings are correct.
Click Confirm & Run Import to run the import. When it completes, you will see this screen:
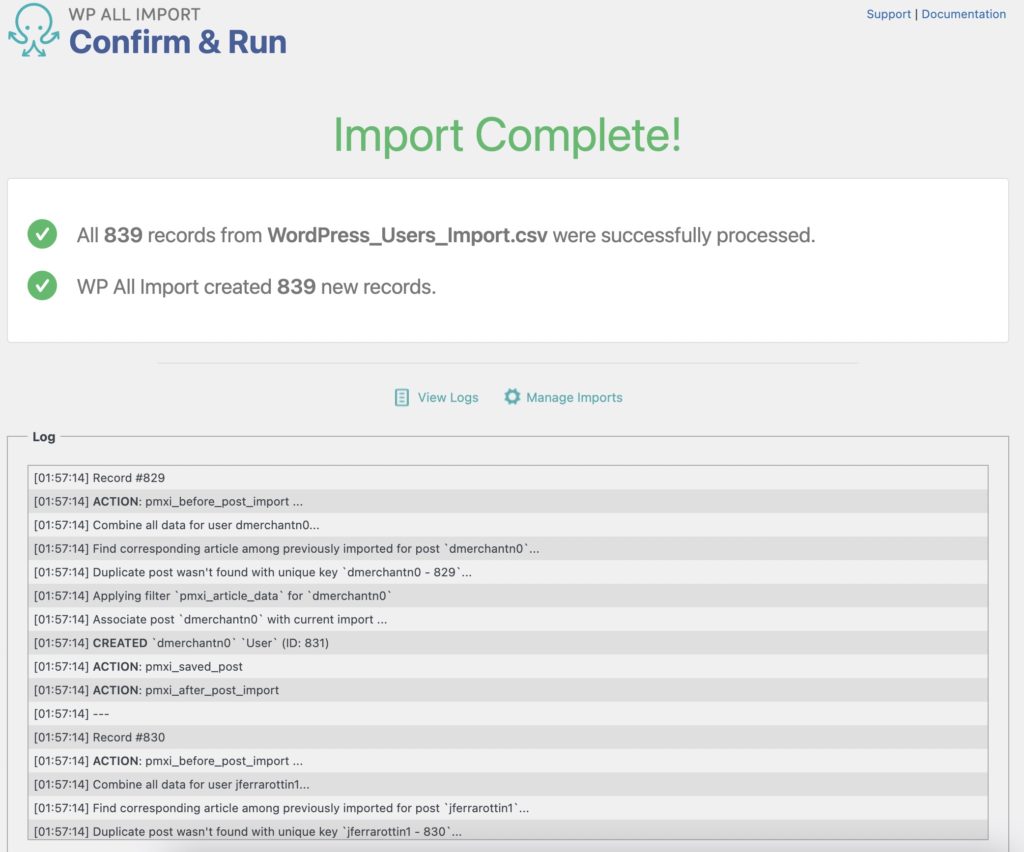
This means that the import was completed successfully. To confirm that everything worked as expected, navigate to Users › All Users in the WordPress main menu. There, you should see all of your imported users:
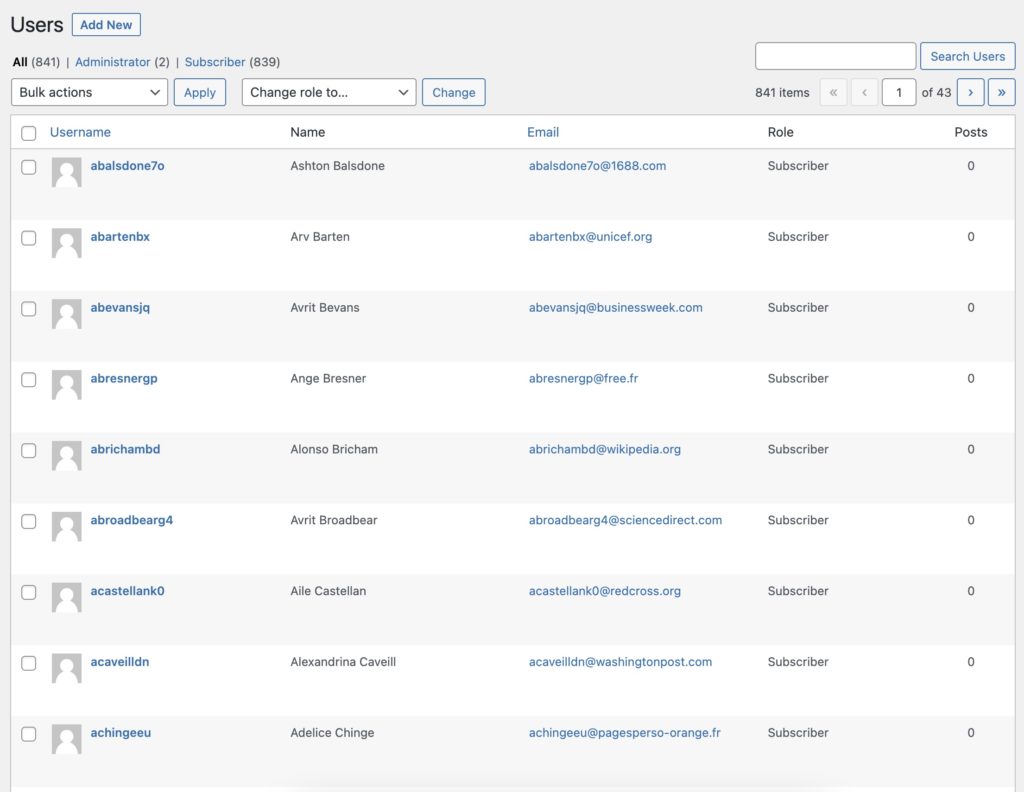
That's how you import WordPress users!

Import Users from a CSV, XML, or Excel to WordPress
- Passwords and all details
- Images & galleries
- Custom fields
- Woo, ACF, Meta Box, JetEngine
Import WordPress Users — Advanced Topics
Understanding WordPress User Passwords
To be secure, passwords should never be passed electronically between parties as plaintext. The reason for this is simple: if the file containing the passwords is intercepted, it can compromise the security of an entire website.
WordPress doesn't even store the plaintext version of a user's password. Instead, it generates a hash value for the password. Hashing is a one-way action that irreversibly scrambles a string of text. For example, a password like "Jackson7514" might become a hash value like "$P$BTCi9K8fpdALKni8kbbiyxi2IoStY71".
When a user logs into WordPress, their login password is converted to a hashed value using the same hashing algorithm, which is then compared to the stored hashed value for authentication.
As a consequence of this system, WP All Export can only export the hashed version of user passwords. If you import this data into a different WordPress site, make sure that you check the This is a hashed password from another WordPress site checkbox during the import:
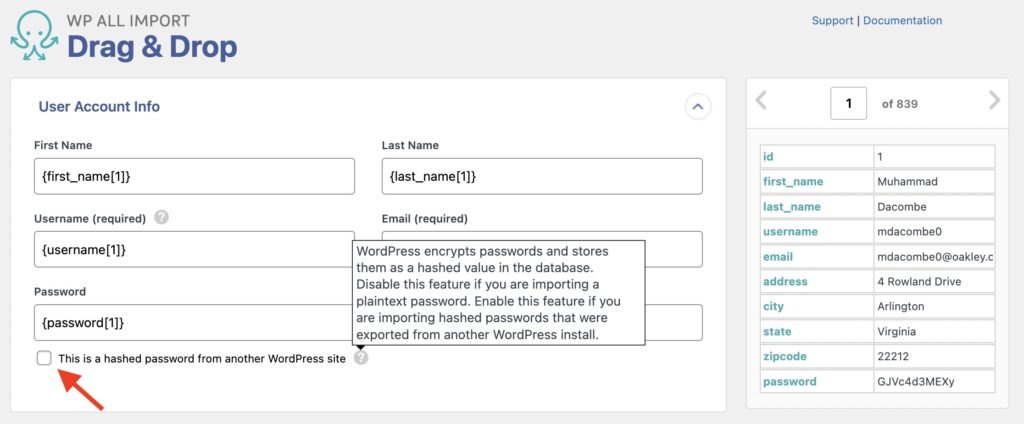
This informs WP All import that it is dealing with password values that have already been hashed, so it knows it shouldn't hash them again. This way, users will still be able to use their old passwords because the hashing algorithm is the same between sites.
If you do receive a user import file that contains a plaintext password, no problem. WP All Import can handle this, too. You just have to disable the This is a hashed password from another WordPress site checkbox, as shown in the previous image.
Bulk Editing User Information
Sometimes, we need to make changes to an entire subset of data. For example, maybe you're not happy with your current user roles, and you wish to change all Contributors into Authors. Or perhaps you're using a custom role plugin and decide to change your entire role structure.
You can obviously use the WordPress interface to change the role assignments one at a time, but this is monotonous and time-consuming.
An alternative is to use a bulk edit process as follows:
- Export the users you wish to change.
- Open the export file in a spreadsheet, where it is easy to perform bulk changes using copy and paste, search-and-replace functions, etc.
- After you've made your changes to the export file, reimport it back into WordPress with instructions to override the existing values.
For more information on how to do this, see this bulk editing overview.
Maintain Old User IDs When Importing
When you import WordPress users, every imported user will be treated as a new record, and a new user ID will be assigned to it. However, if there's an old user ID that needs to be retained, custom code can be used along with our API to attempt to use the old ID instead of generating a new one. Please see Keep old IDs when migrating users or customers.
Keep in mind that this is only an attempt, and if the desired user ID is not available, a new user ID will be assigned to the imported user.
Import WordPress Users — Frequently Asked Questions
How Does My Data Need to be Organized So That I Can Import WordPress Users?
Don't worry about it. Our software is extremely flexible and allows you to map any incoming data element to any field regardless of layout. If the content of a field needs to be adjusted in some way, you can do this during the import process.
Can I Import WordPress User Data That's Been Added by Another Plugin?
Yes. Our software will automatically recognize the custom fields of most plugins, such as WooCommerce. More complicated plugins like BuddyPress are a bit tougher. But if you run into a problem, you can always contact our support staff.
For more information, see Import Custom Fields Overview.
Can I Import WordPress User Passwords? Is it Secure?
Yes. If you are using WP All Export and WP All Import, it couldn't be more secure, as password data is fully encrypted. Users will still be able to log in with their old passwords, but if someone intercepts the import file, they won't be able to read those passwords.
How Do I Bulk Import WordPress Users?
To bulk import WordPress users, just follow the steps in this guide. Any import involving more than one user is technically a bulk import, so there is nothing special about this process.
How Do I Import WordPress Users from a CSV File?
To import WordPress Users from a CSV file, just specify the file as your input source when you create the import. Our plugin will automatically recognize the CSV format and adjust itself accordingly.
How Do I Import WordPress Users from an Excel File?
To import WordPress users from an Excel file, first save the file as a CSV file. You can then follow the instructions in the preceding question.
How Do I Export WordPress Users?
- Go to All Export › New Export and select Users as the export type.
- Configure your export columns using the Drag & Drop interface.
- Run the export.
- Download your export file.
- Verify the exported data.
For more information, see How to Export WordPress Users.
How Do I Migrate WordPress Users To Another Website?
- Export the users that you want to migrate.
- Download the bundle file, which contains instructions on how to import the data.
- Upload the bundle file on the target website.
- WP All Import will automatically configure itself based on the bundle file.
- Complete the import.
- Check the migrated users.
See our Migration Quickstart guide for additional information.
How Do I Schedule My User Imports?
You can schedule your WordPress user imports to run automatically using our automatic scheduling service or by setting up cron jobs on your server. We provide comprehensive guidance and support in either case.
For cron jobs, see Manual Scheduling.
For our automatic scheduling service, see Automatic Scheduling.
What Add-Ons Do I Need to Import WordPress Users?
To import WordPress users, you need to have the User Import Add-On active on your site along with WP All Import.
Import WordPress Users — Related Docs
Learn how to export WordPress users to CSV, Excel, or XML.
Learn how to migrate WordPress users from one website to another.
Describes how to export WooCommerce customers to CSV, Excel, or XML.
Describes how to import WooCommerce customers.
Describes how to migrate WooCommerce customers from one website to another.
Execute custom code to modify import user data on the fly.
Oxygen Builder's review of the five best plugins for WordPress user imports.
Oxygen Builder's review WP All Import.