The best import export plugin for WordPress & WooCommerce.

How to Import WooCommerce Products from CSV and XML
To import WooCommerce products, navigate to All Import › New Import, choose your import file, and select WooCommerce Products from the list. Use the Drag & Drop interface to build your import template, then run your import.
Import WooCommerce Products - Table of Contents
- Step 1: Create a New Product Import
- Step 2: Review the Import File
- Step 3: Map the Incoming Data
- Step 4: Configure the Import Settings
- Step 5: Run the Import
Advanced Topics
- Import Variable Products
- Import External/Affiliate Products
- Import Grouped Products
- Import Product Images to Gallery
- Sync Product Stock and Price
- Solve Issues with Recounting Terms
Step 1: Create a New WooCommerce Product Import
Go to All Import › New Import and select/upload your import file. In the dropdown list, choose to import WooCommerce Products.

Click Continue to Step 2.
Step 2: Review the Import File
You now see the Review Import File screen, which lets you validate the import data.
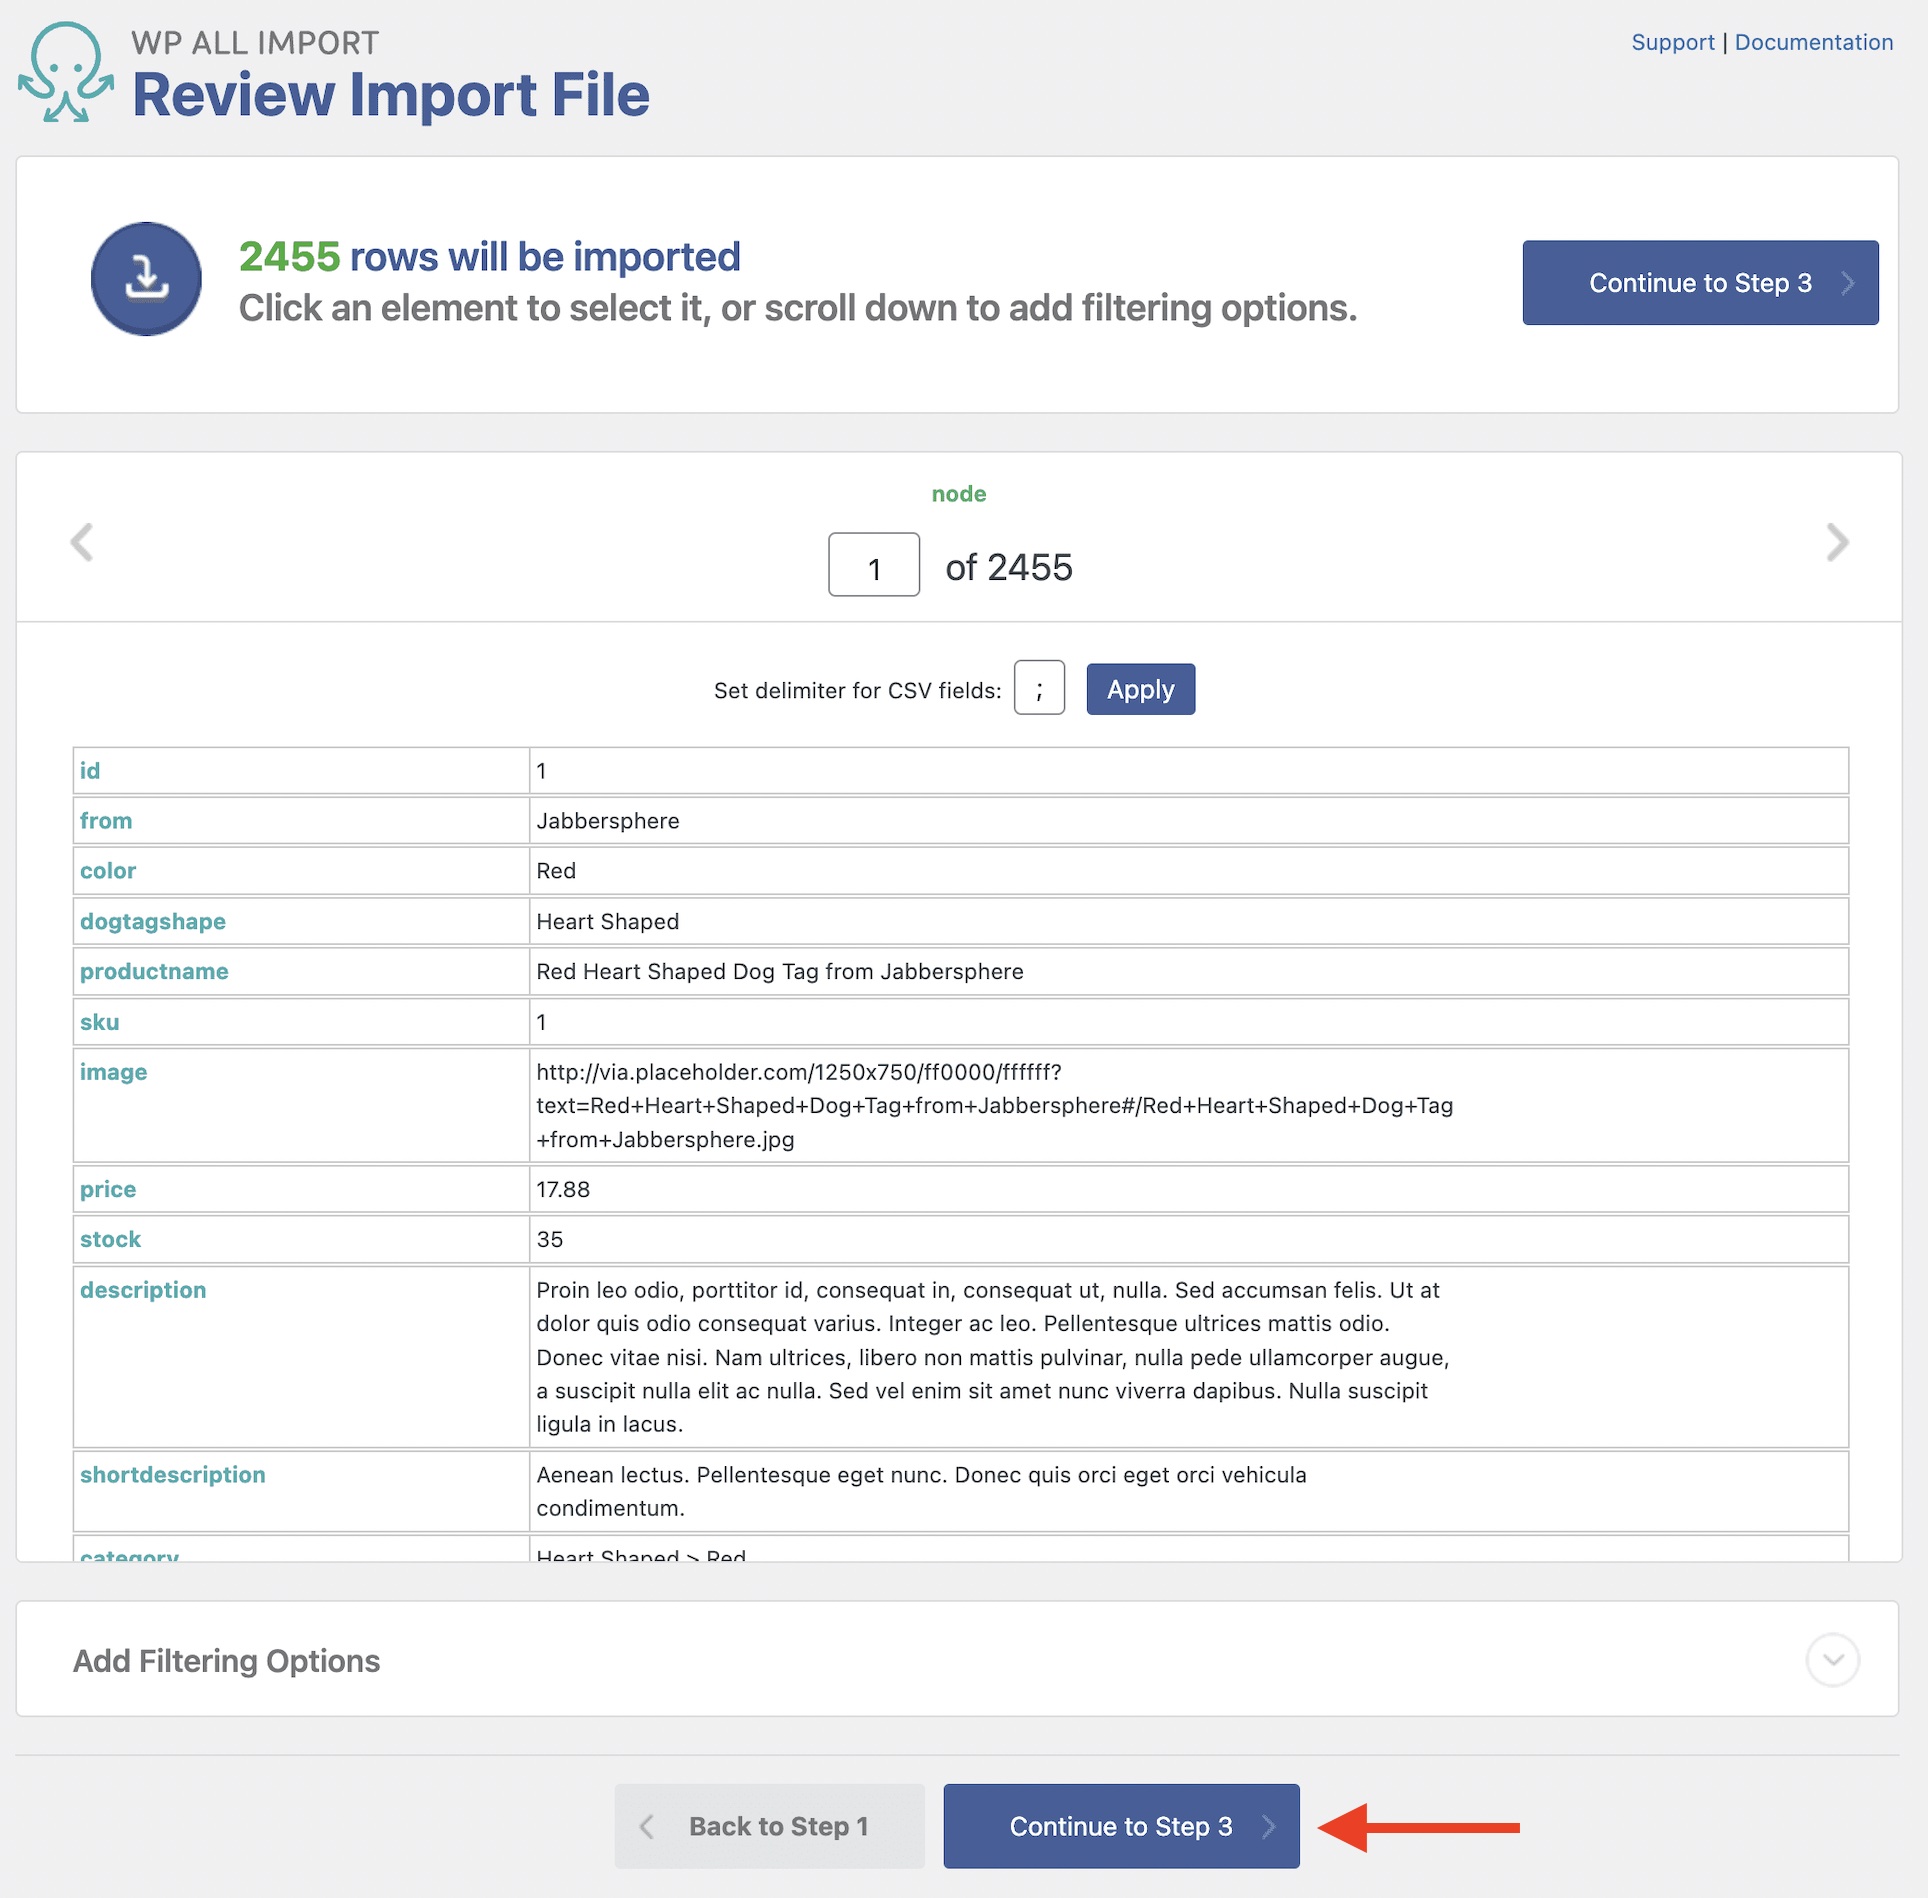
If you're importing a CSV file, you can set a different delimiter for the CSV fields. If you're importing an XML or Excel file, you can choose which parent node to use in the import process.
Near the bottom, use the Manage Filtering Options section to add filters to your import.
To proceed to the next step, click Continue to Step 3.
Import WooCommerce Products from CSV, XML, Excel
- Product variations & attributes
- Price & stock
- Images & galleries
- Scheduled imports
Step 3: Map the Incoming Data Elements to the Product Fields
The Drag & Drop interface now appears, which lets you build the template to import WooCommerce products. To map the required fields, drag and drop the data elements from the panel on the right to the appropriate import fields on the left.
Title & Description Section
Here, you can map the WooCommerce product title and description.

Next, expand the WooCommerce Add-On section.
WooCommerce Add-On Section
This section lets you define the import Product Type. By default, it's set as Simple product, but this can be changed to a different product type. You can also choose to Set Product Type With XPath and use an import element with an accepted product type (i.e., simple, grouped, external, variable).
Product Import General Tab
Immediately below the product type, you will see several tabs to configure the import. General, the first tab, is selected by default.
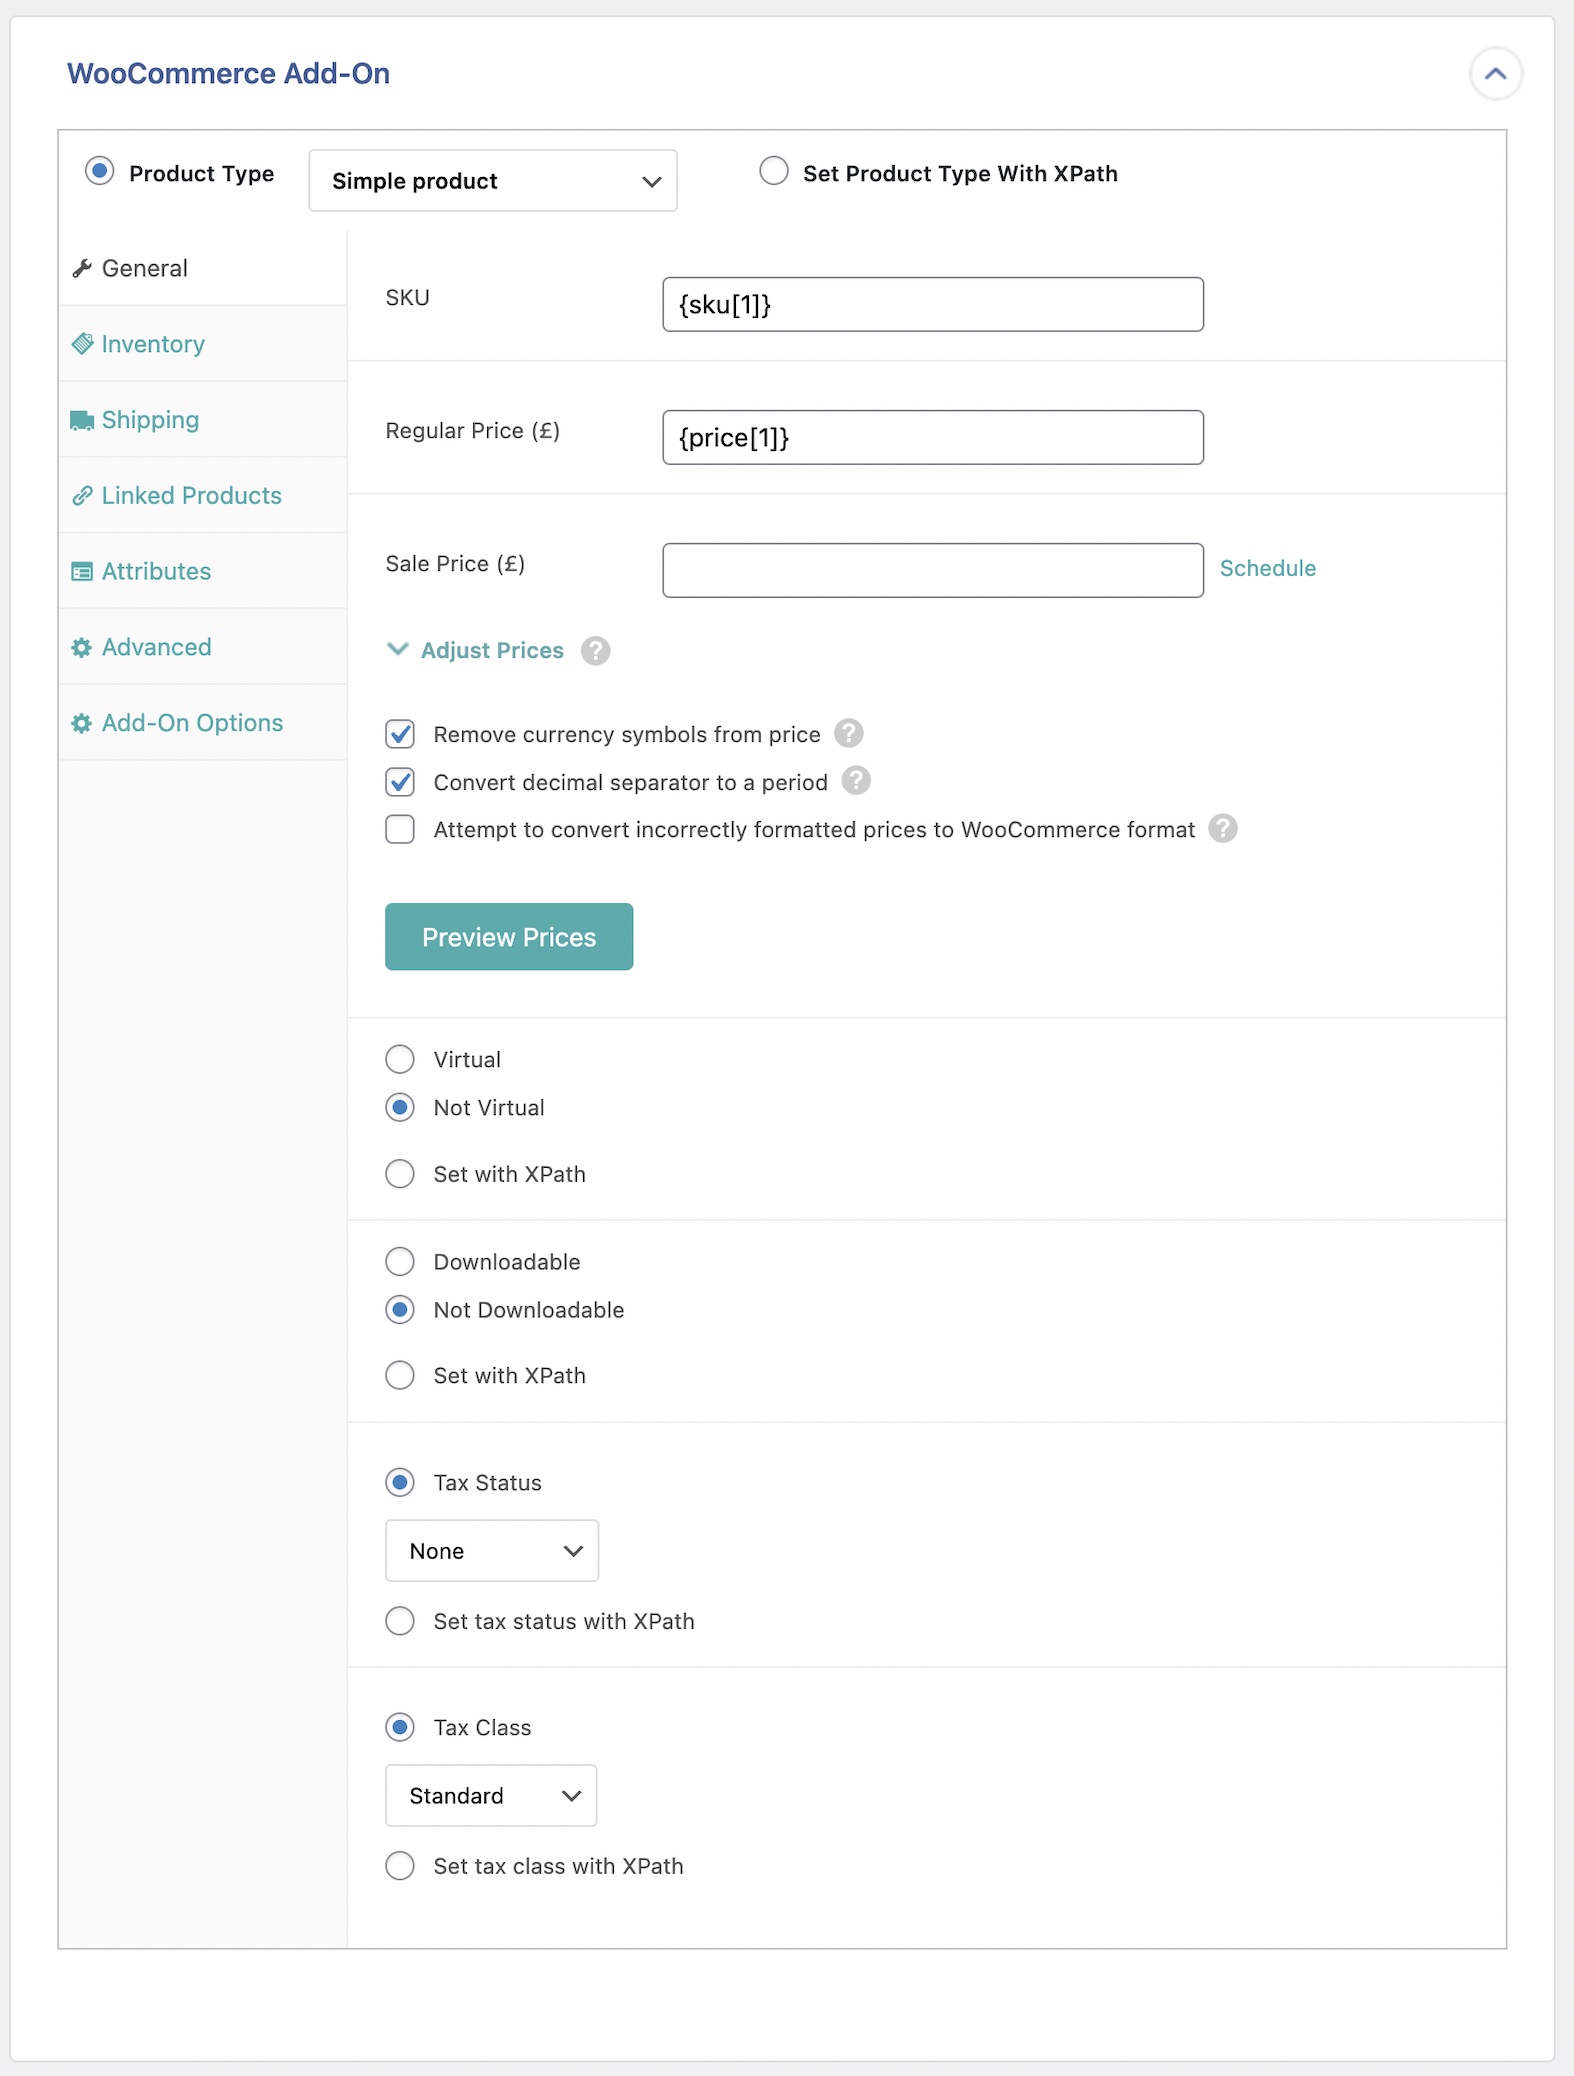
Here, you can configure the following fields:
- SKU: stock keeping unit, used internally by WooCommerce to keep track of your products.
- Regular Price: the amount to use as the normal product price.
- Sale Price: the amount to use as the discounted product price.
- Adjust Prices: a section that lets you adjust the prices imported by percentages or fixed amounts.
- Remove currency symbols from price: attempts to remove currency symbols from the imported price. Enabled by default.
- Convert decimal separator to a period: converts any commas to periods in the price. Enabled by default.
- Attempt to convert incorrectly formatted prices to WooCommerce format: self-explanatory. Disabled by default.
You also have a Preview Prices button that will show an example of how the prices are imported for that record.
Below this, other options allow you to configure if the product is Virtual or Not Virtual, if it's a Downloadable or a Not Downloadable product, and to define the Tax Status and the Tax Class.
If you don't want to select a specific option for these four settings, you can dynamically set them using the Set with XPath option. This allows you to map the settings to incoming data elements.
Product Import Inventory Tab
This tab contains settings related to stock availability.
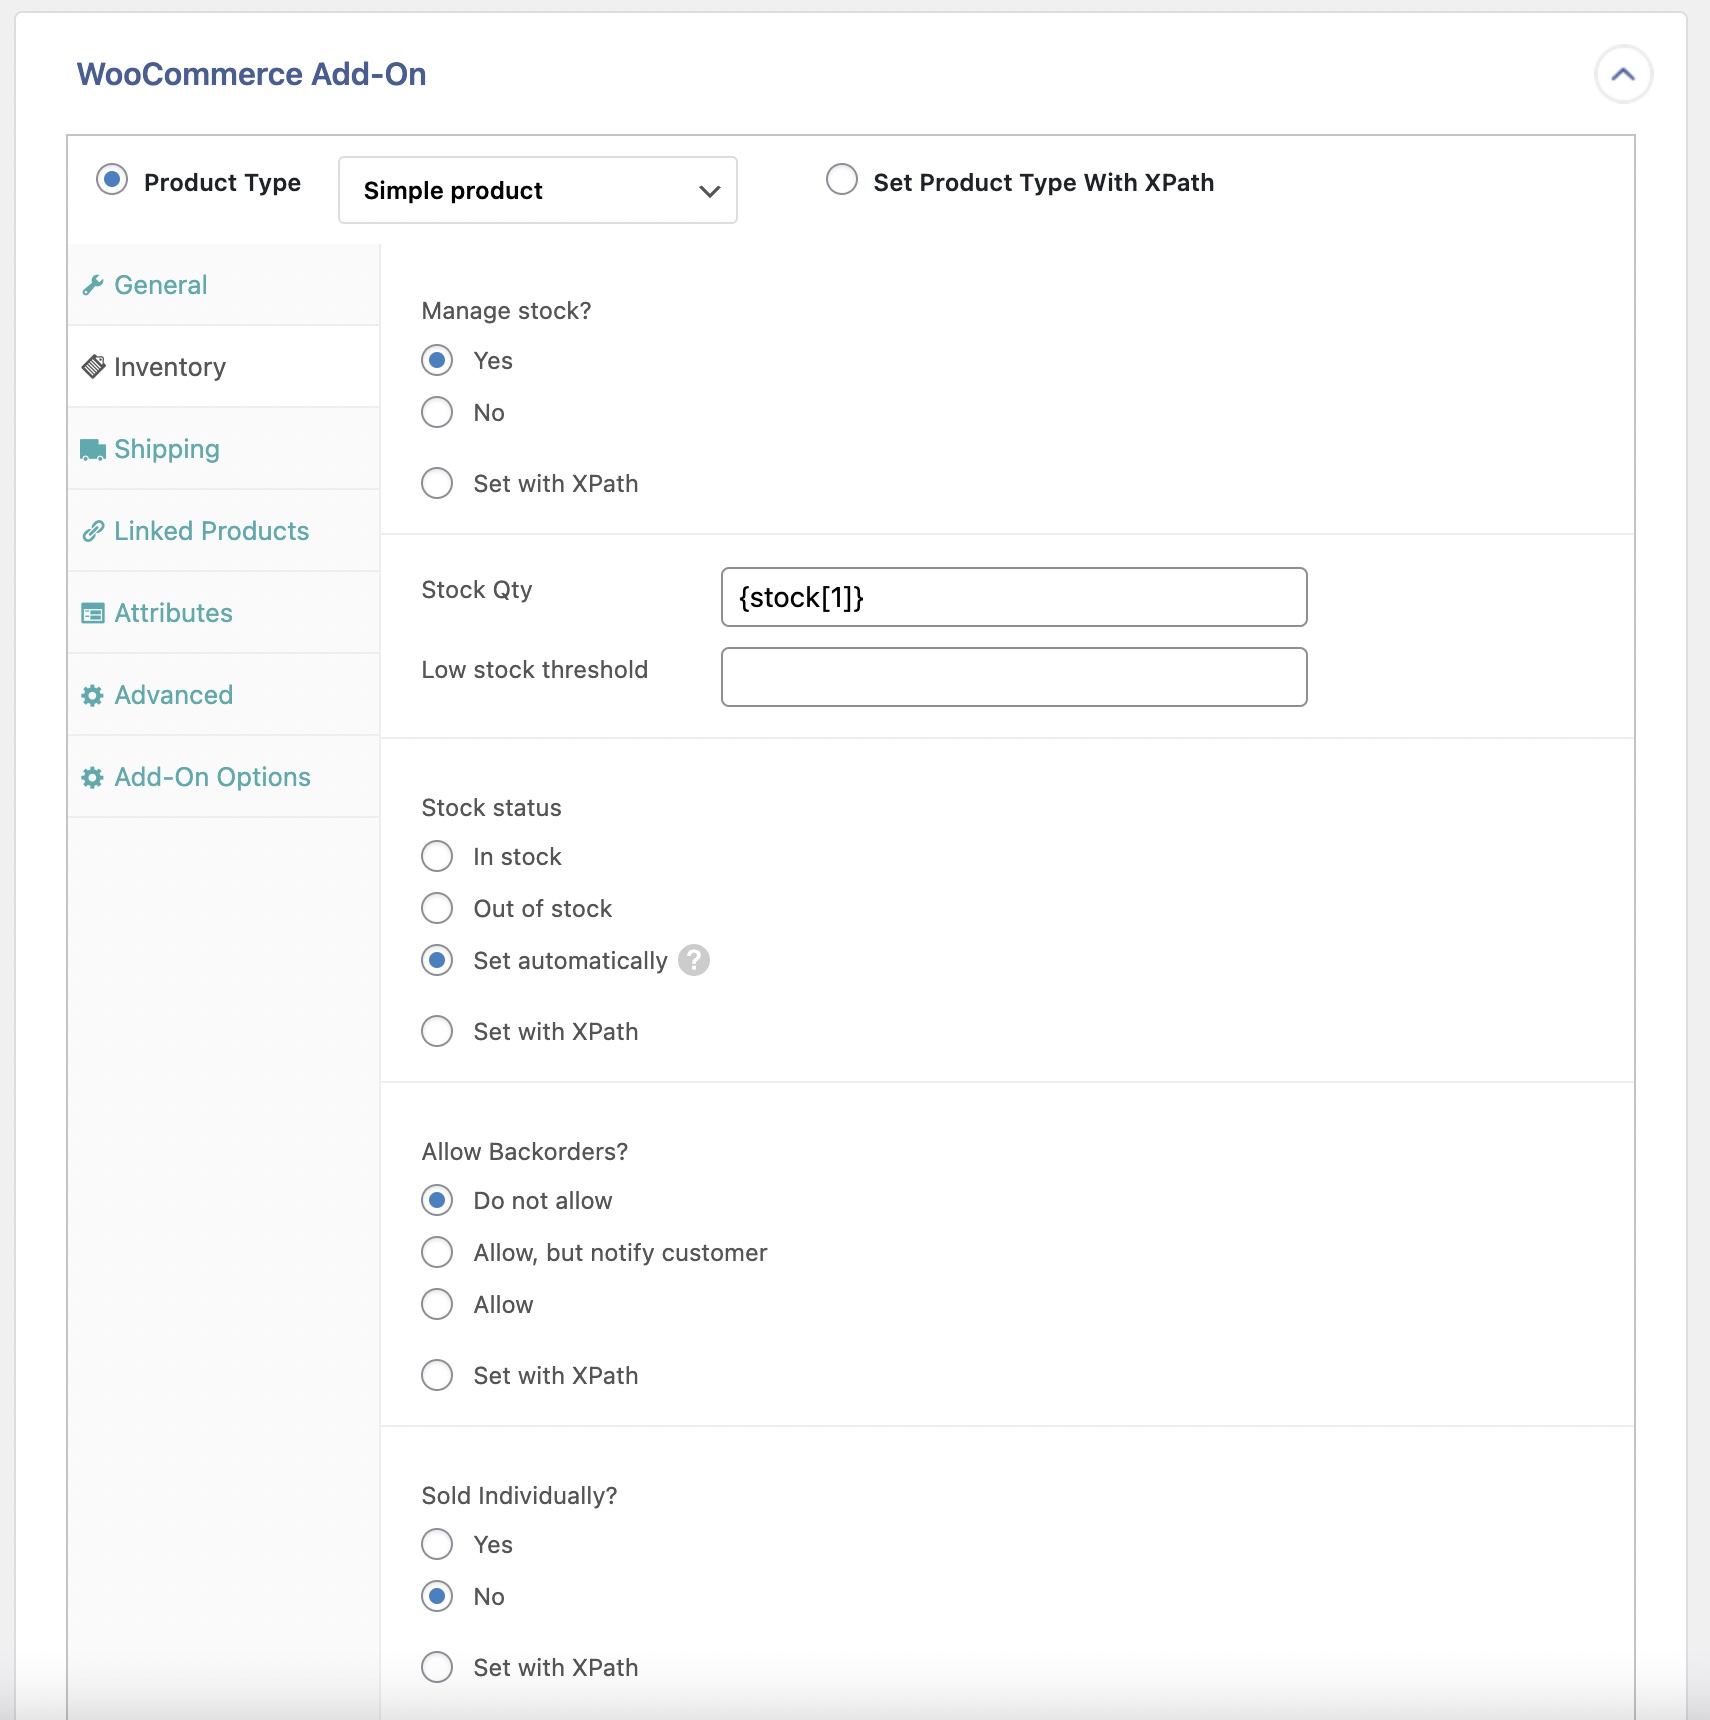
The four settings available are:
- Manage stock?: Select Yes and then import a Stock Qty, or select No to avoid managing stock. No is set by default. To import dynamically, select Set with XPath and import either
yesorno. - Stock status: Assign a stock status to the imported product, either In stock or Out of stock. By default, Set automatically is set, which uses the stock quantity to assign the stock status. To import dynamic data, select Set with XPath and import any of the accepted values:
instock,outofstock,onbackorder. - Allow Backorders?: Used to enable or disable backorders in the product. Do not allow is set by default. You can also select Allow, but notify customer and Allow. The Set with XPath option accepts the values:
no,notify, andyes. - Sold Individually?: By default, No is set. You can also select Yes. The Set with XPath option accepts
yesorno.
Product Import Shipping Tab
Next up is the Shipping tab, which lets you import the product's weight and dimensions along with the Shipping Class.
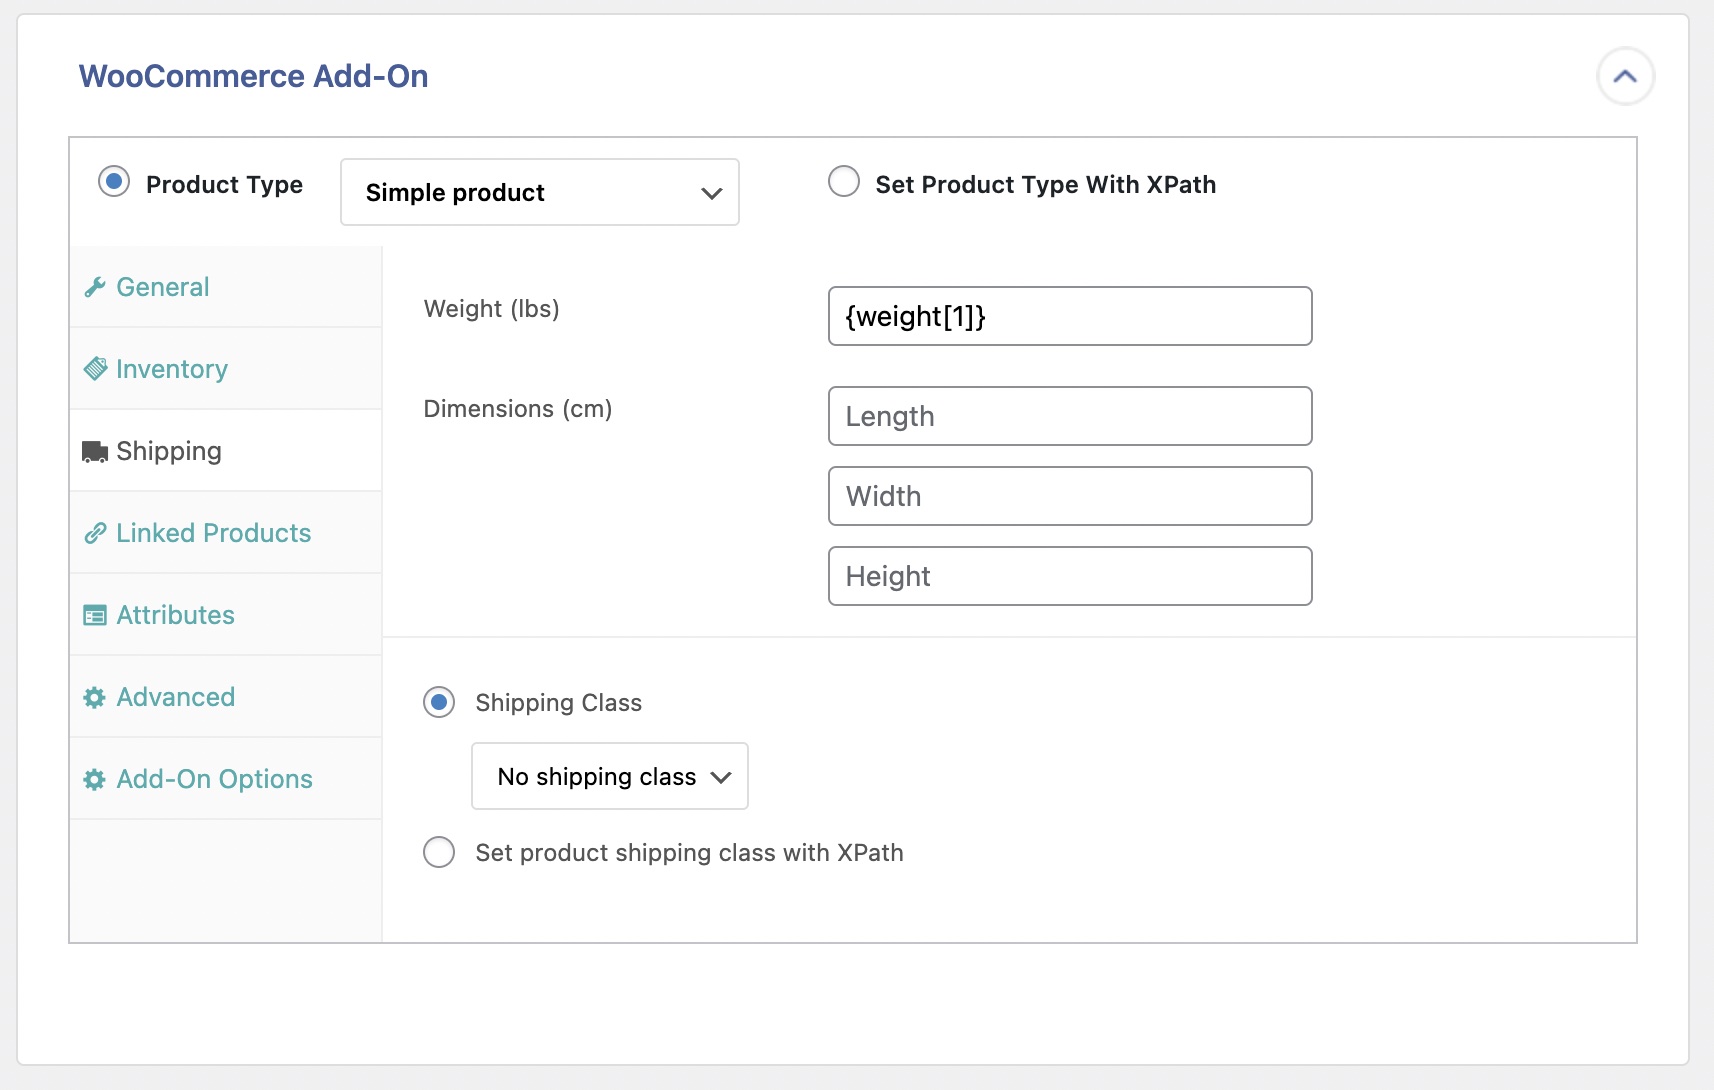
The Set product shipping class with XPath option accepts the name, ID, or slug for the shipping class.
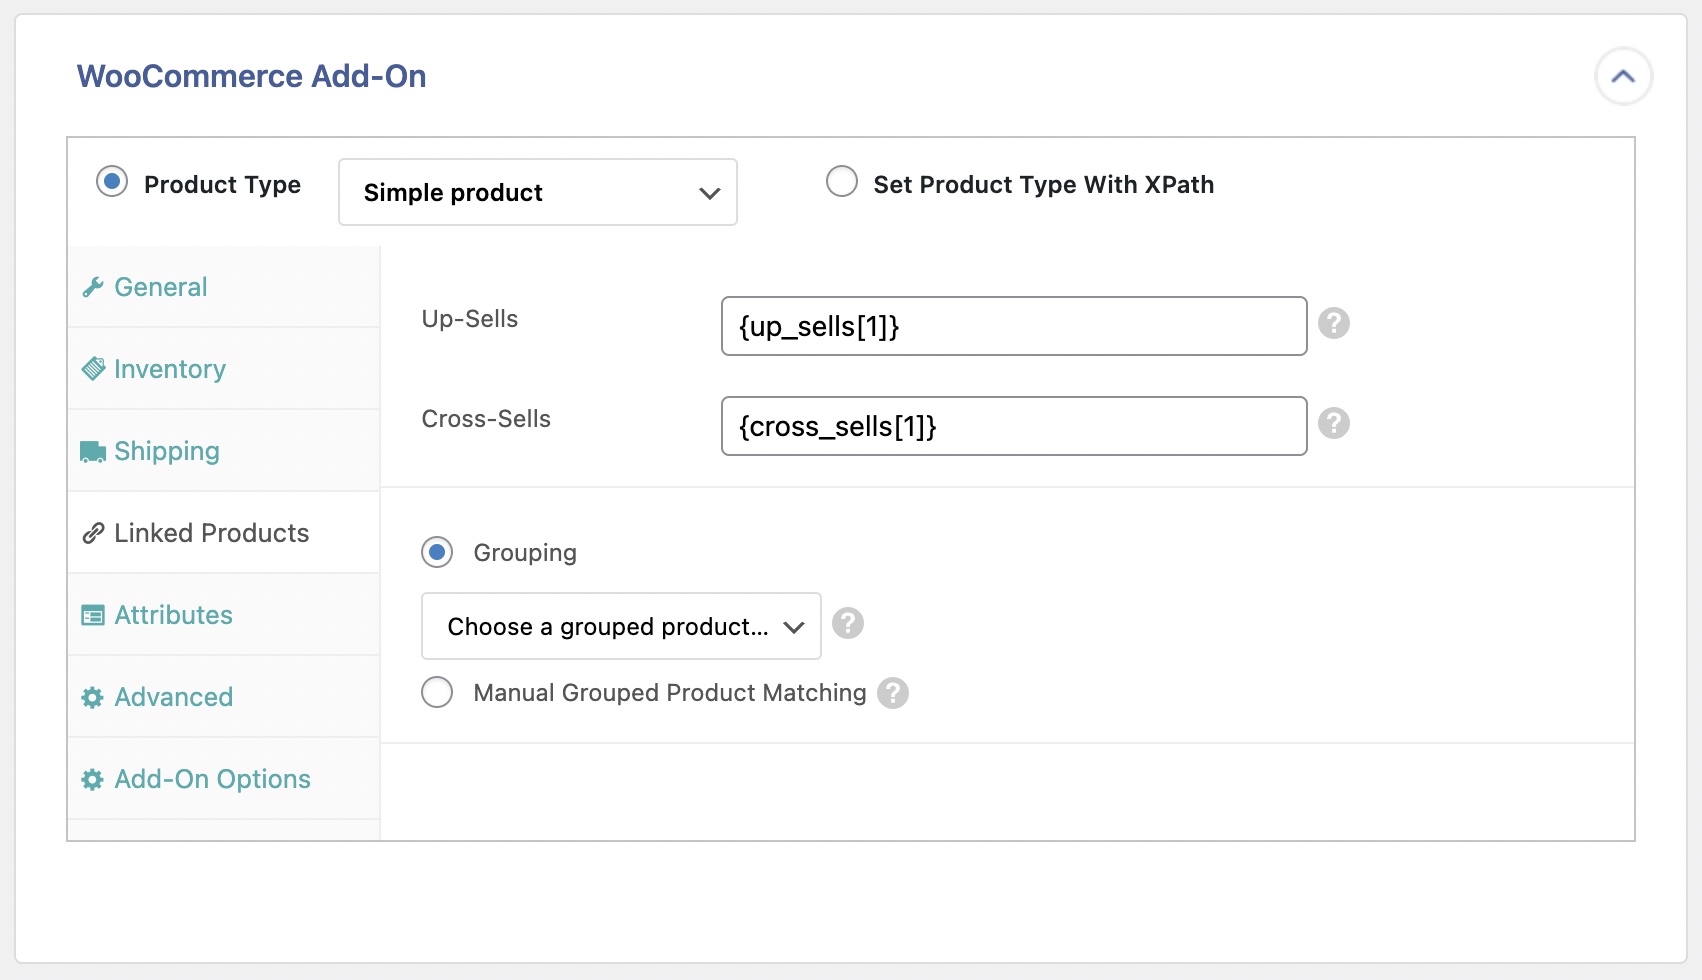
Linked Products tab
This tab lets you define Up-Sells, Cross-Sells, and also group products with Manual Grouped Product Matching.
Product Attributes
The Attributes tab lets you import product attributes, which can be used to better sort products. You can add as many attributes as needed.

The name used will be converted to a slug that is matched to any existing attributes.
You can also use the attribute slug instead of the name to directly match with any existing attribute. For example, if your attribute slug is color-slug, you can match it like so:

Product Import Advanced Tab
The Advanced tab has the Purchase Note and Menu order import fields.

This tab contains the following settings:
- Enable reviews: By default, No is set. You can also select Yes. The Set with XPath option accepts
yesorno. - Featured: By default, No is set. You can also select Yes. The Set with XPath option accepts
yesorno. - Catalog visibility: By default, Shop and search results is set. Other options are:
- Shop only
- Search results only
- Hidden
- Set with XPath: accepts any of the following values:
visible,catalog,search,hidden.
Add-On Options
The last tab is Add-On Options.

Here, you have the following import options:
- Disable auto SKU generation: This option is disabled by default. When checked and the SKU is empty, it won't generate a random SKU using the md5 algorithm.
- Don't check for duplicate SKUs: This option is enabled by default. When unchecked, WP All Import will try to find duplicate SKUs. Any match found will be imported with a blank SKU.
Other Sections
There are other sections available when you import WooCommerce products, such as Images, Custom Fields, Other Product Options, etc. However, we won't cover them here.
After you map all product data elements, click Continue to Step 4 at the bottom (not shown).
Step 4: Configure the Product Import Settings
Now the Import Settings interface appears, where you can modify the import configurations. First, proceed to click on Auto-detect to automatically generate a unique identifier for your product's import.

The subsequent panel lets you tell WP All Import how to behave whenever this import runs again. For example, you can select whether to create new products or not, modify existing products with new data, or delete existing products that are no longer found in the import file.
Below that, you will find panels to define Scheduling Options and Configure Advanced Settings. Leave these alone for now, as these settings can typically use their default selections.
Click Continue at the bottom to move on to the next step.
Step 5: Run the Import and Verify the Imported Products
Before running the import, the Confirm & Run screen will appear, which lets you review the import summary.
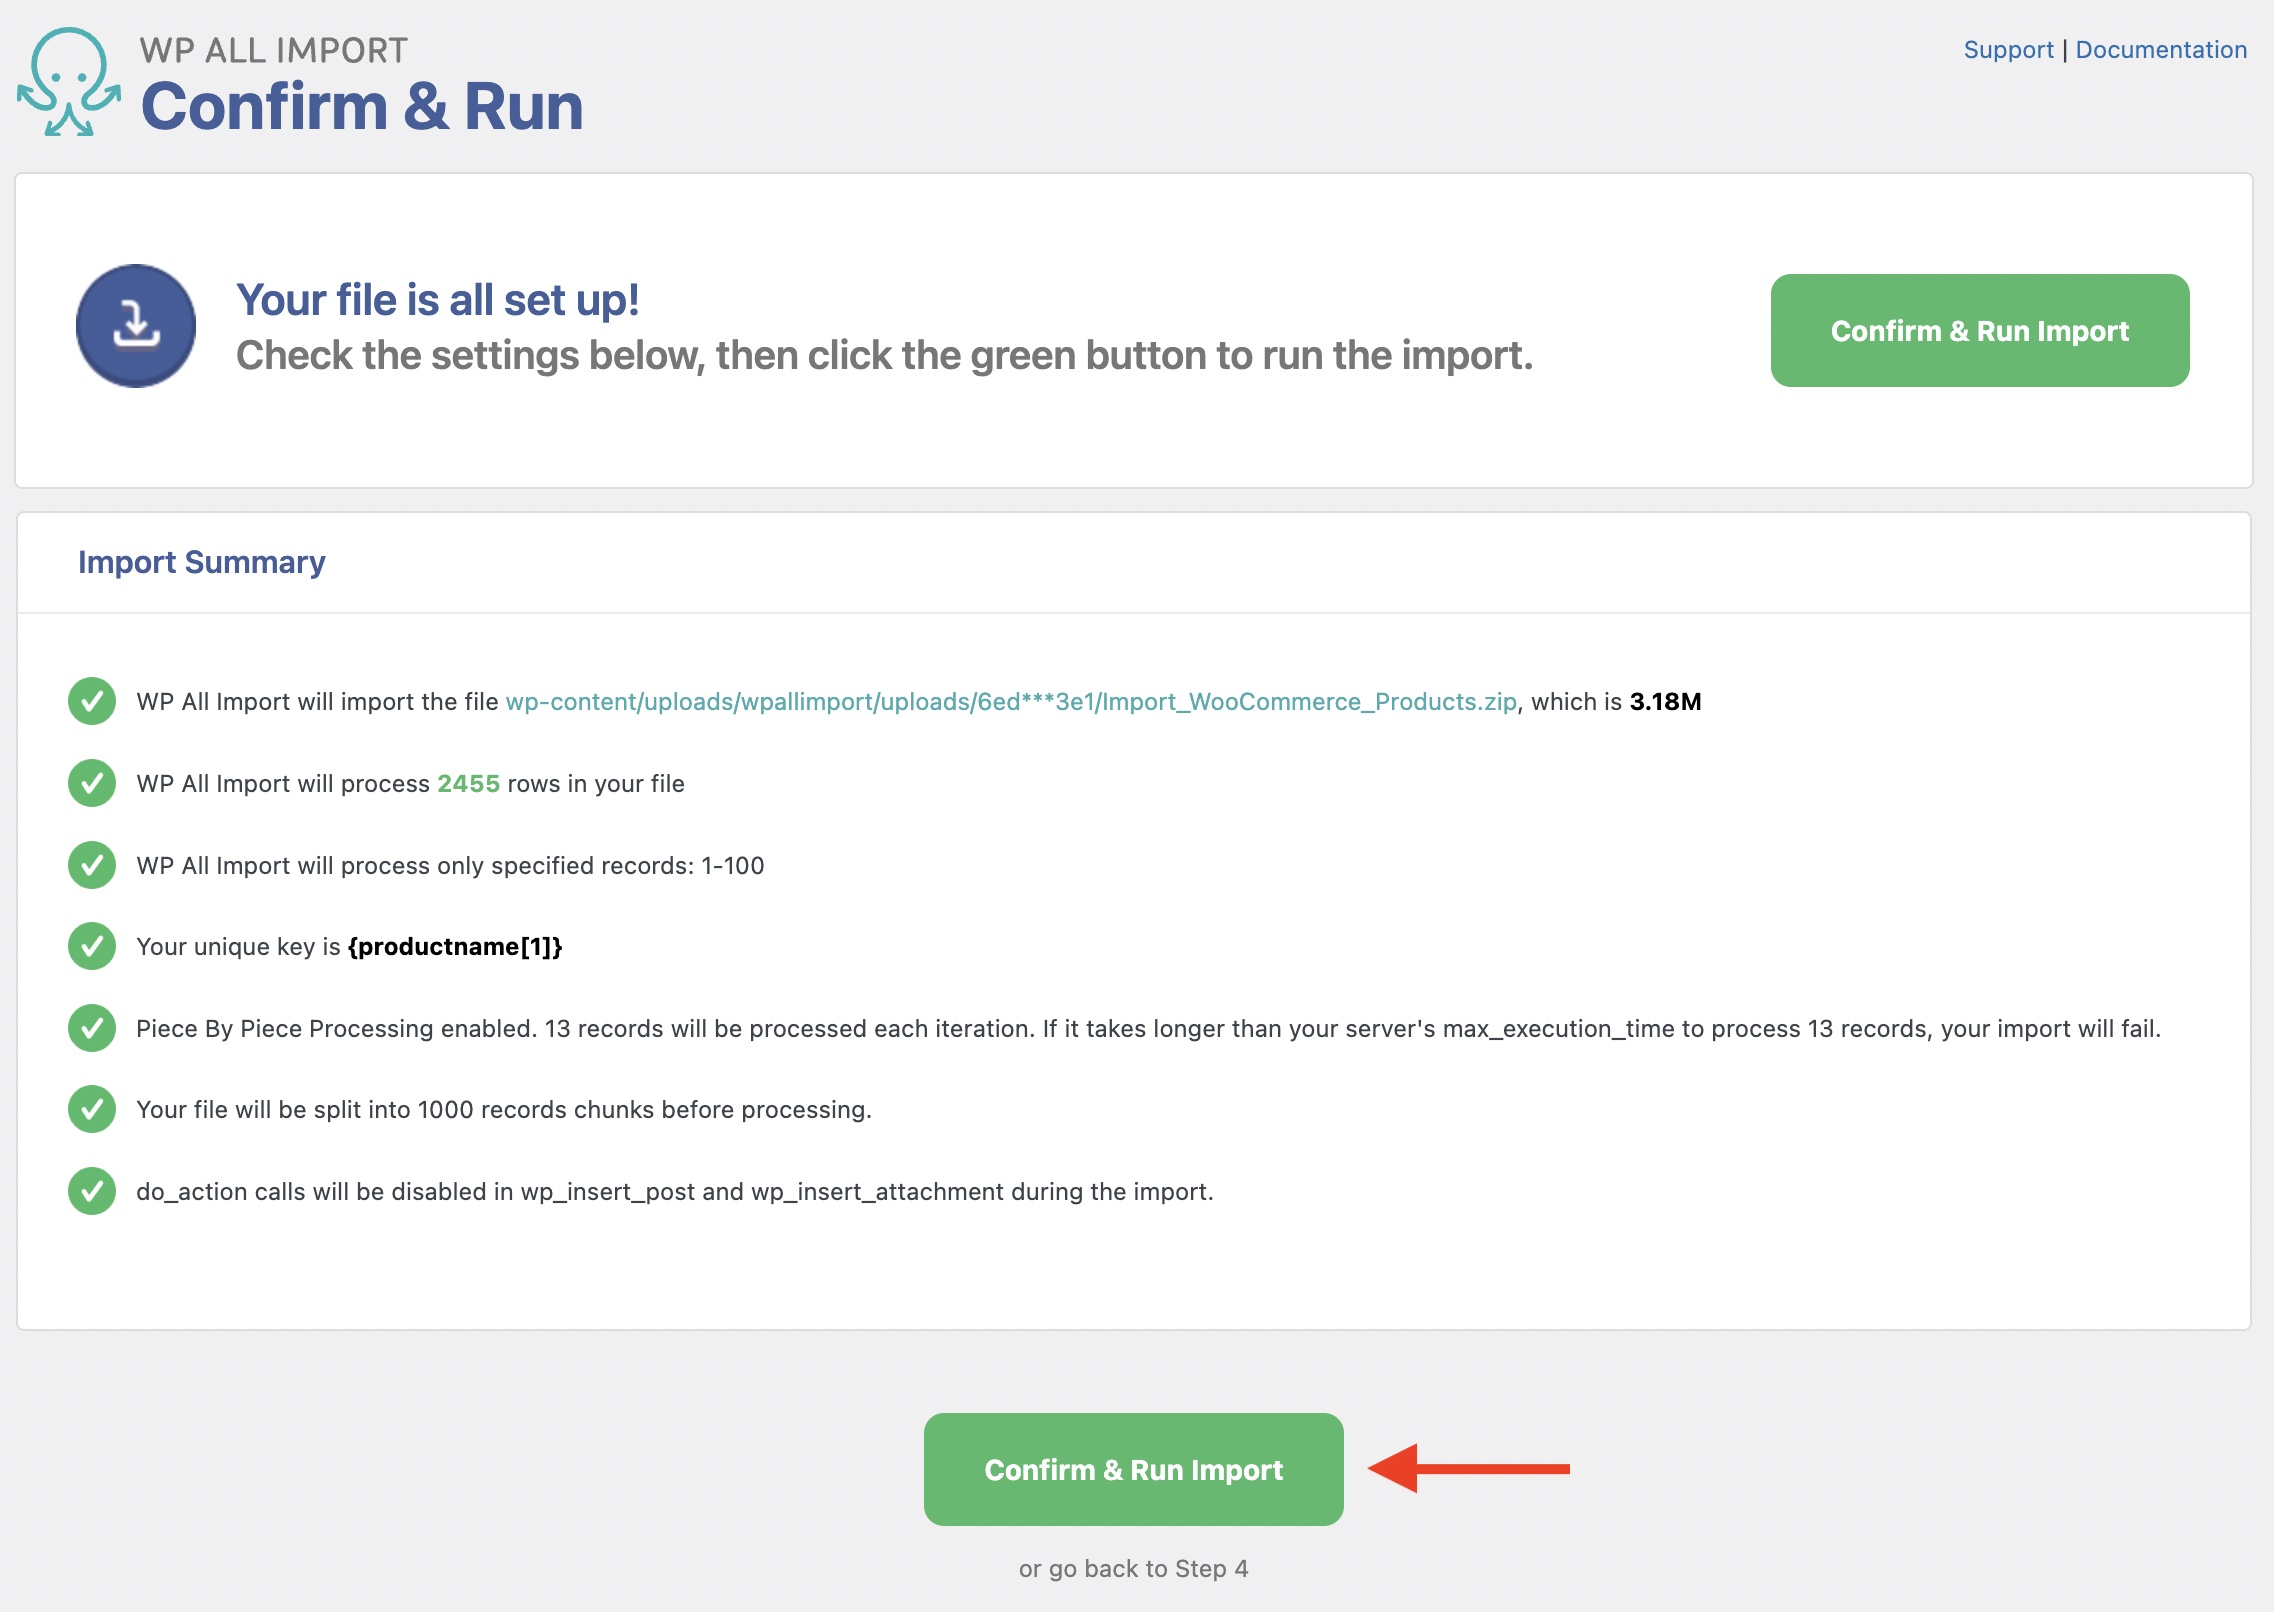
If everything looks good, click Confirm & Run Import to continue and run the import. Once the import completes, the following screen will display:
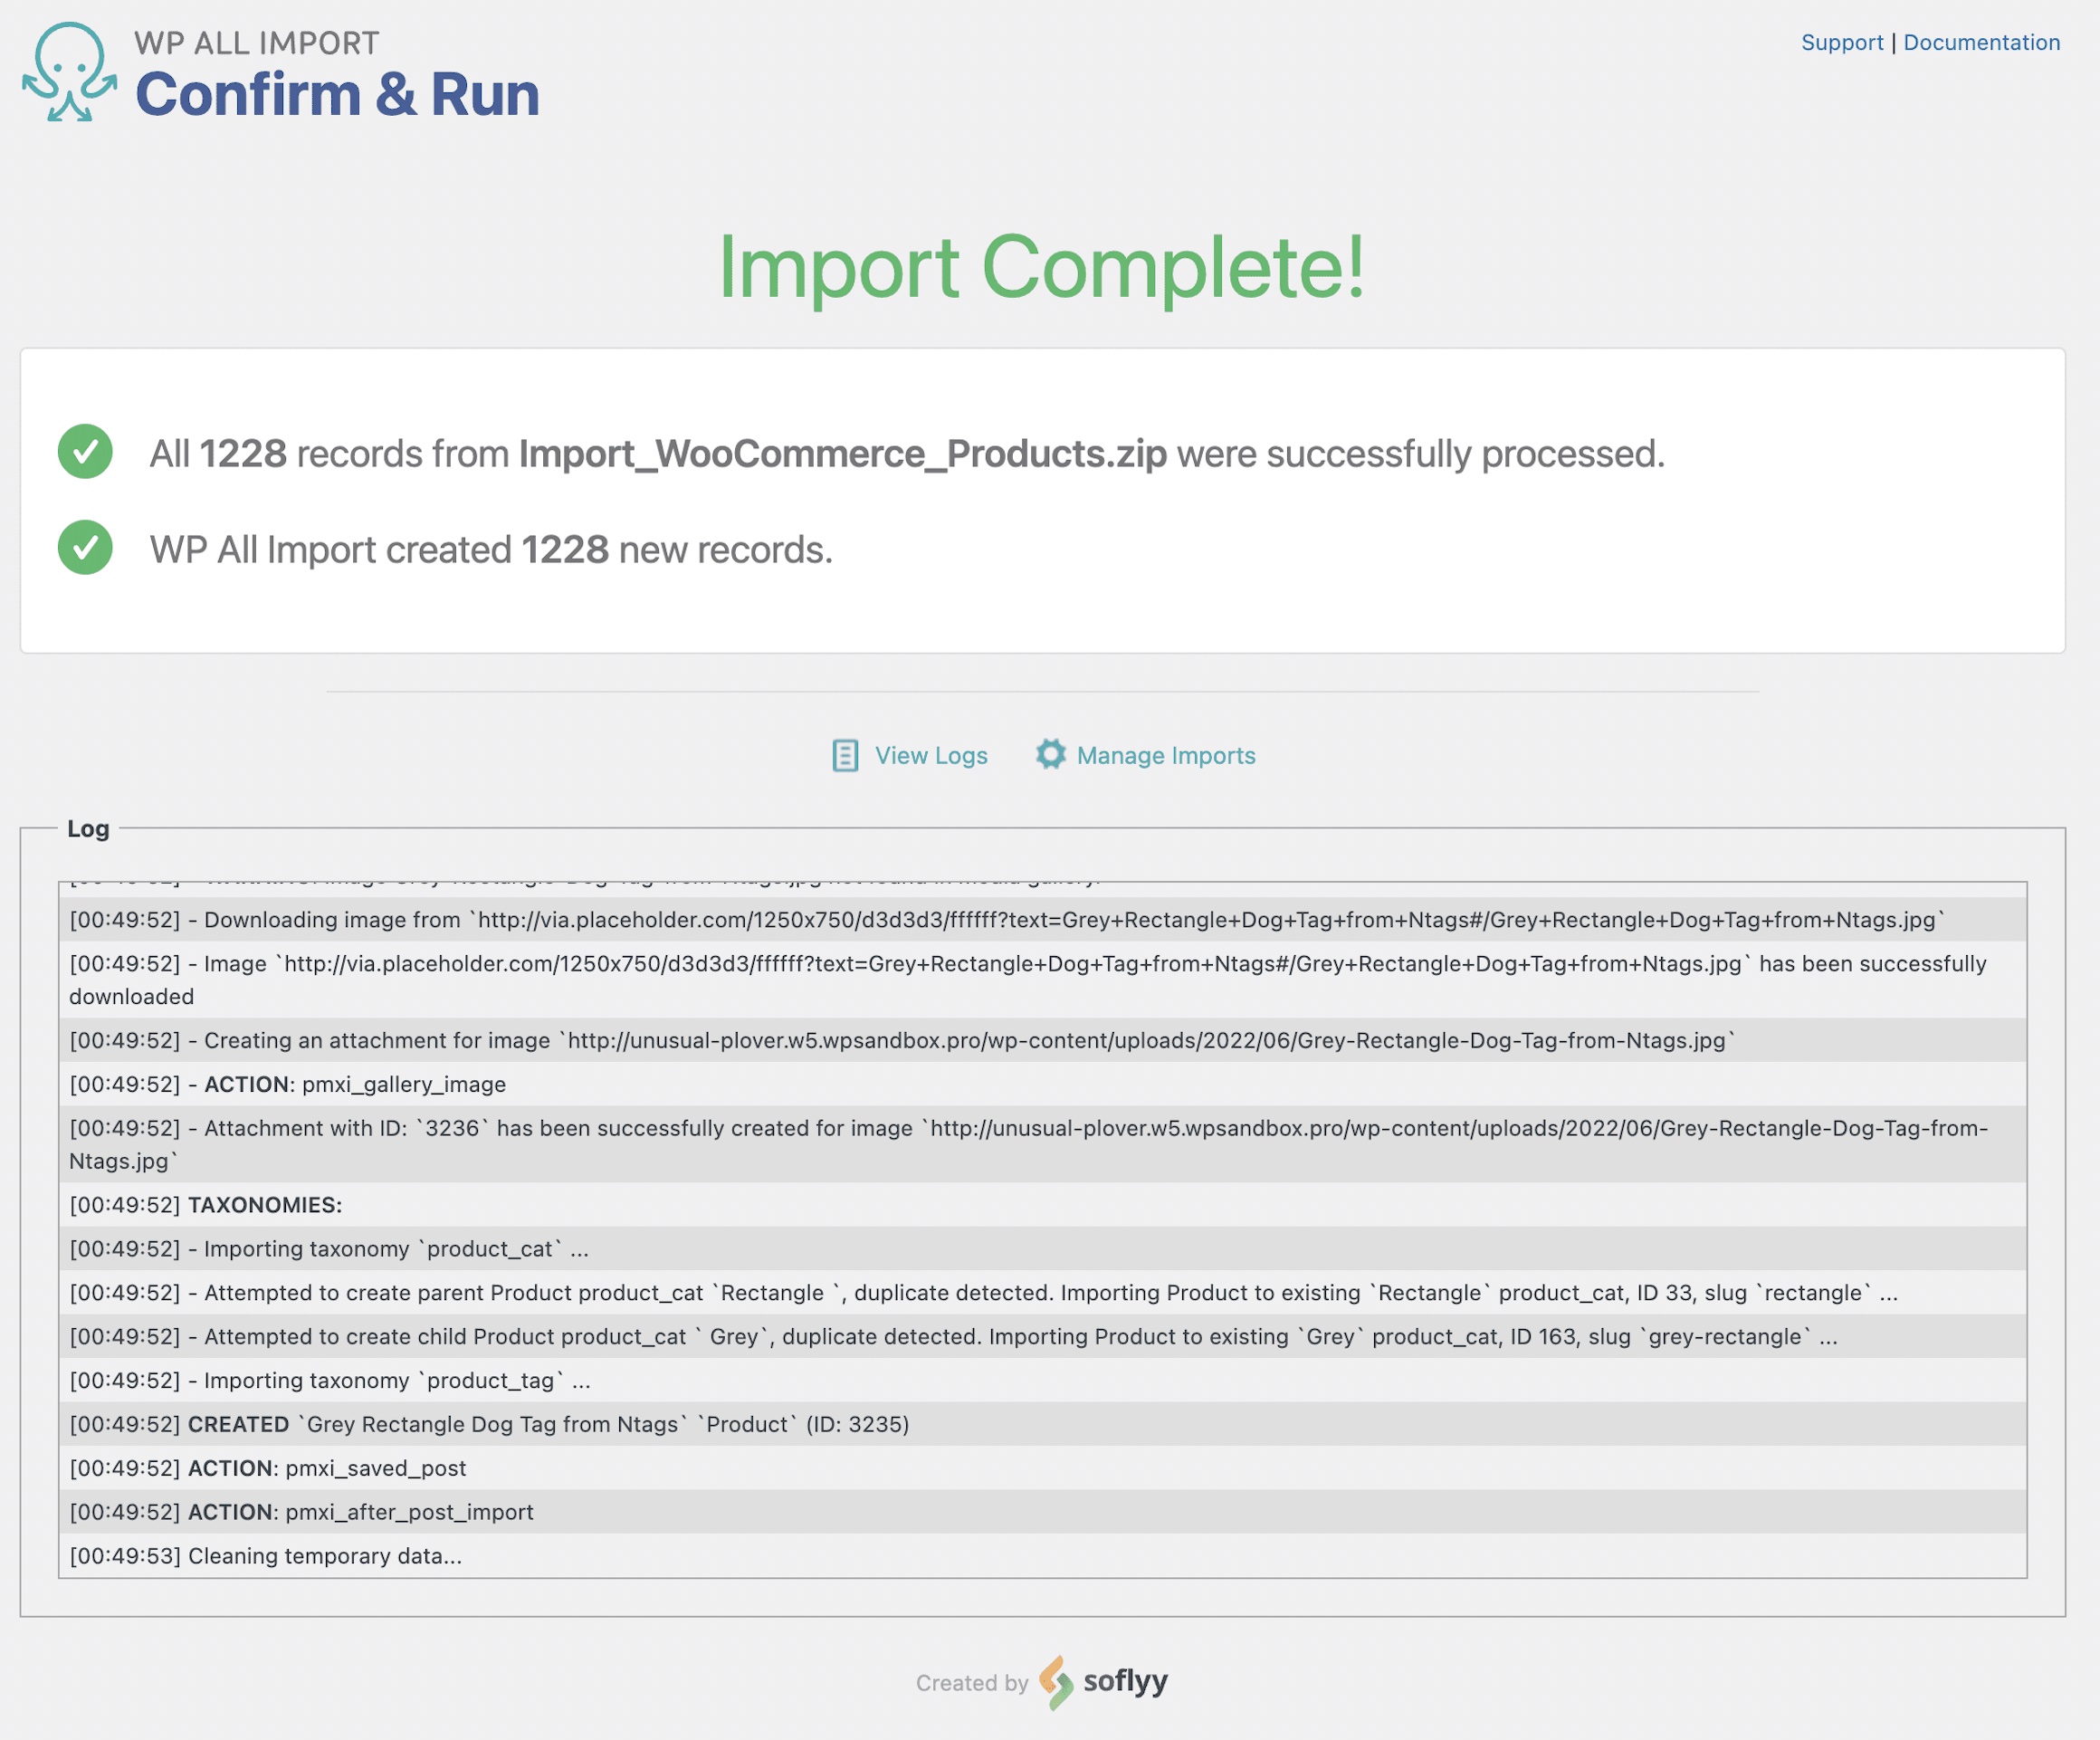
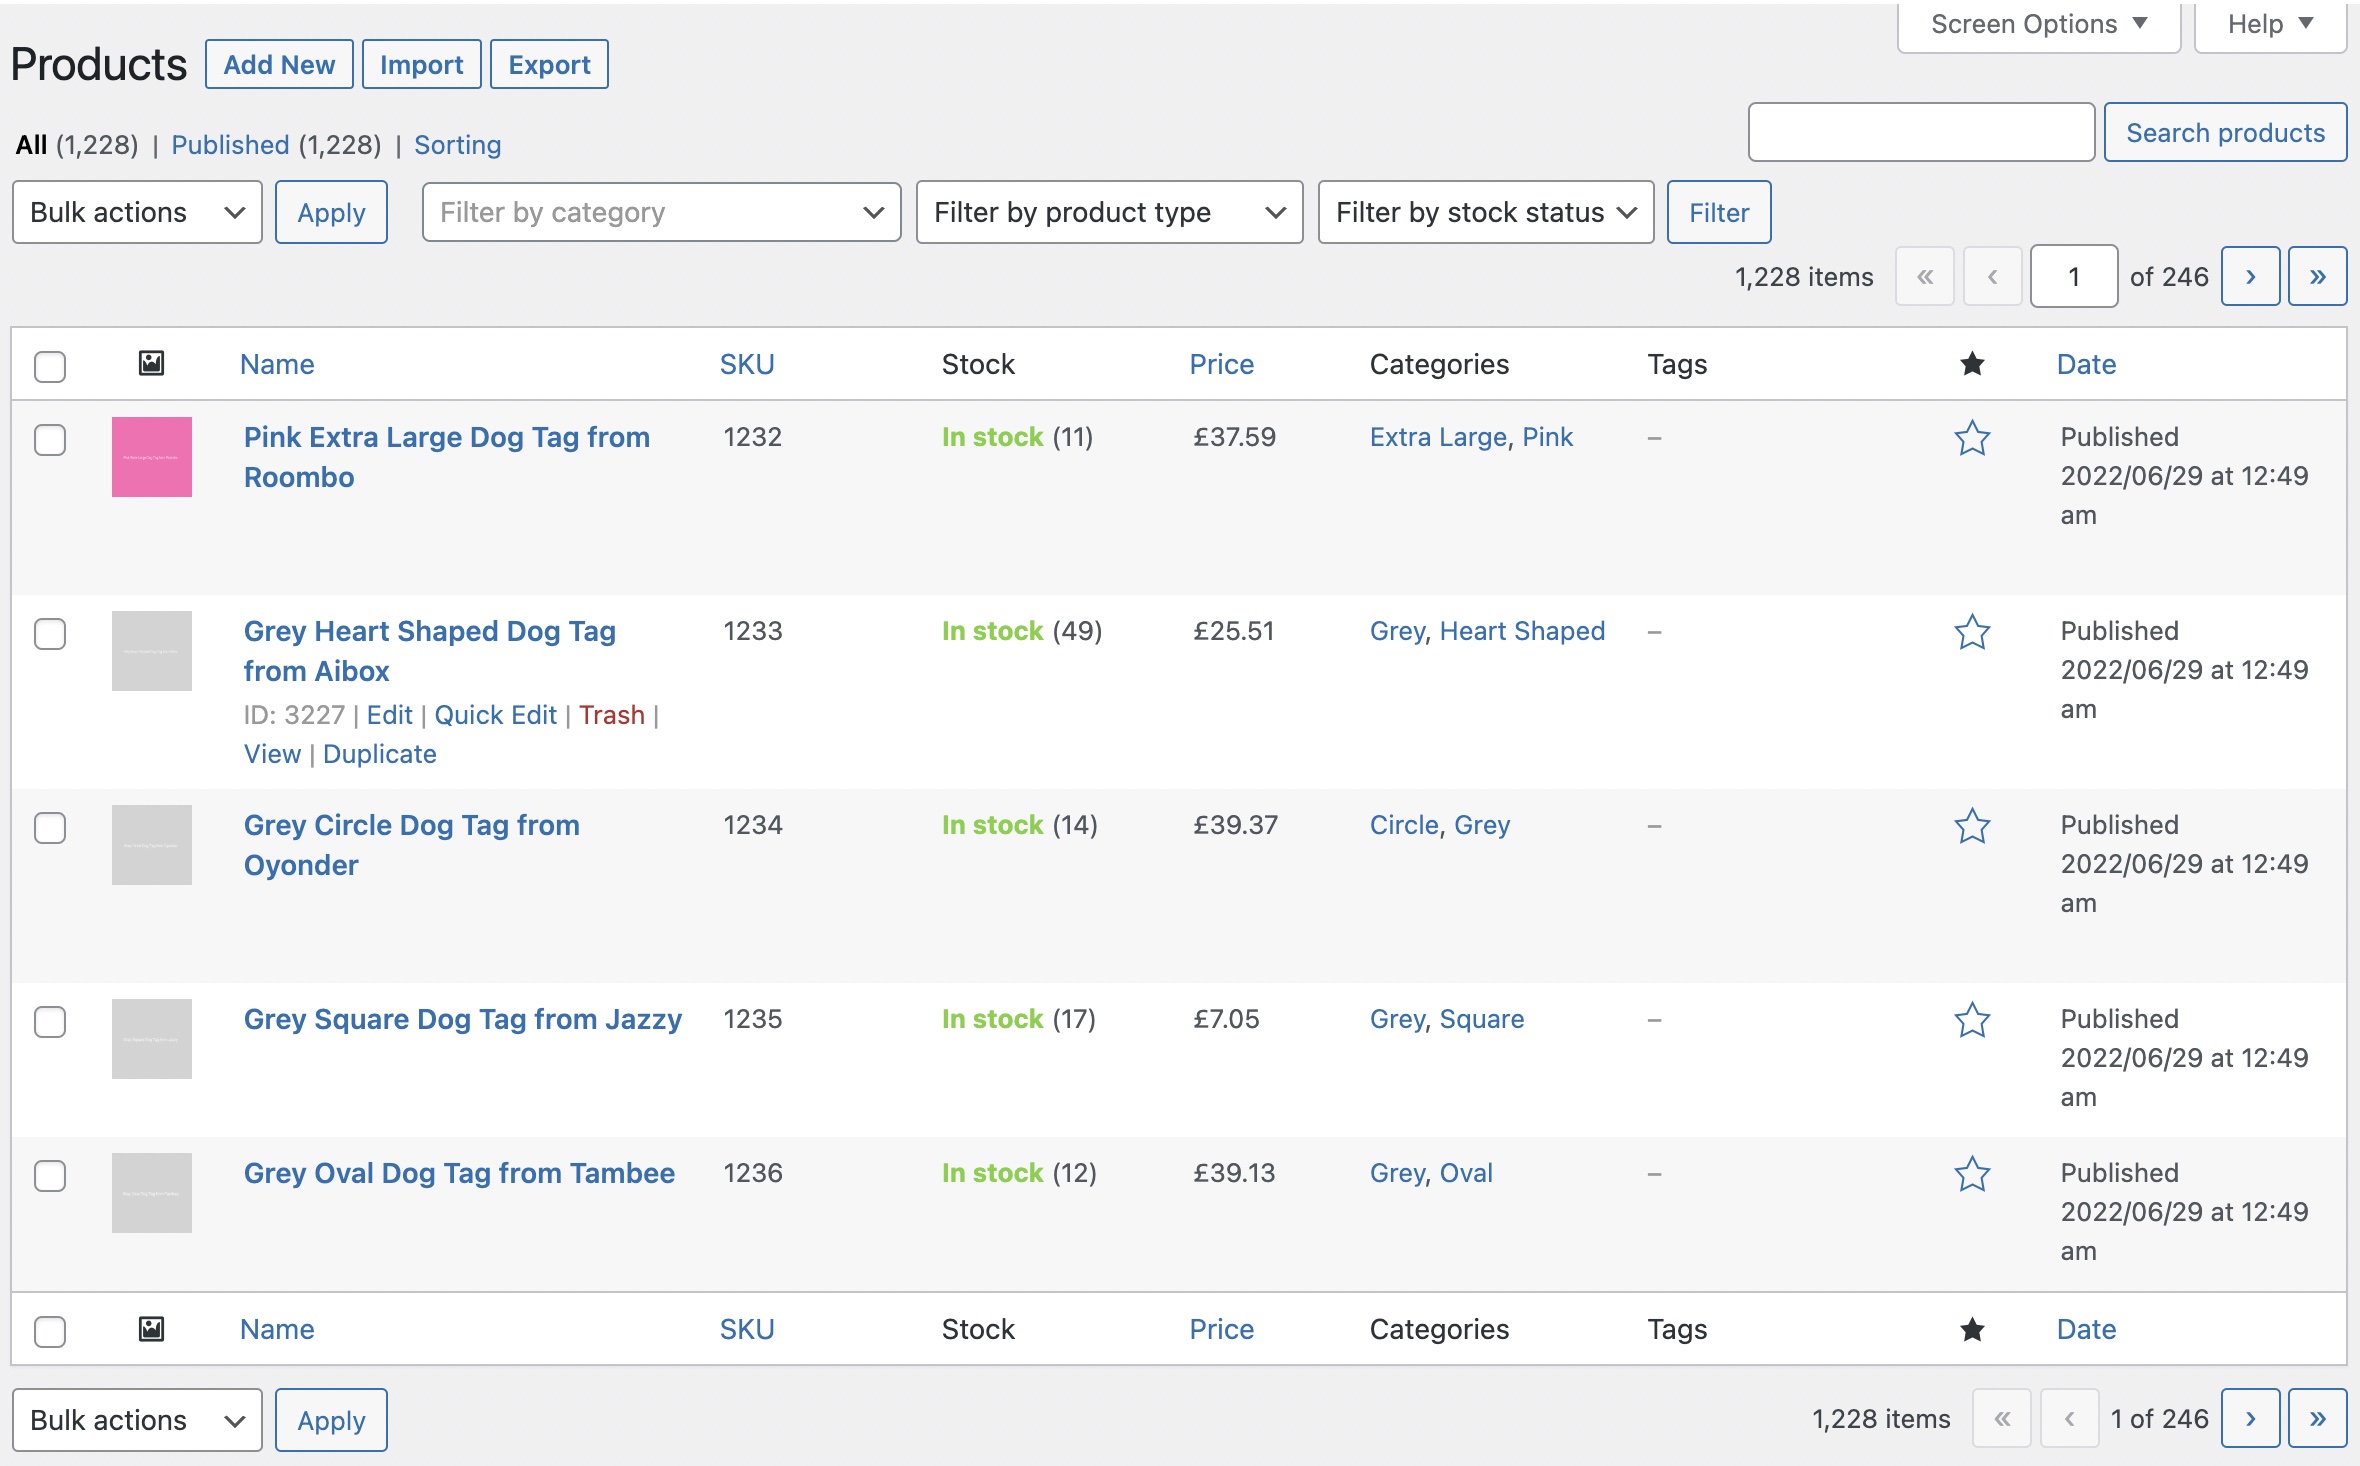
To confirm that all WooCommerce products were correctly imported, navigate to Products › All Products in the WordPress menu.
Import WooCommerce Products from CSV, XML, Excel
- Product variations & attributes
- Price & stock
- Images & galleries
- Scheduled imports
Import WooCommerce Products – Advanced Topics
Import Variable WooCommerce Products
To import WooCommerce variable products, follow the steps above but choose Variable product as the Product Type. This will enable the Variations tab, which lets you configure and import variable products.

To learn more about this and see file examples, please visit How To Import Variable WooCommerce Products.
Import External/Affiliate WooCommerce Products
To import WooCommerce external or affiliate products, follow the steps above but choose External/Addiliate product as the Product Type. Enabling this product type will hide the Inventory and Shipping tabs.
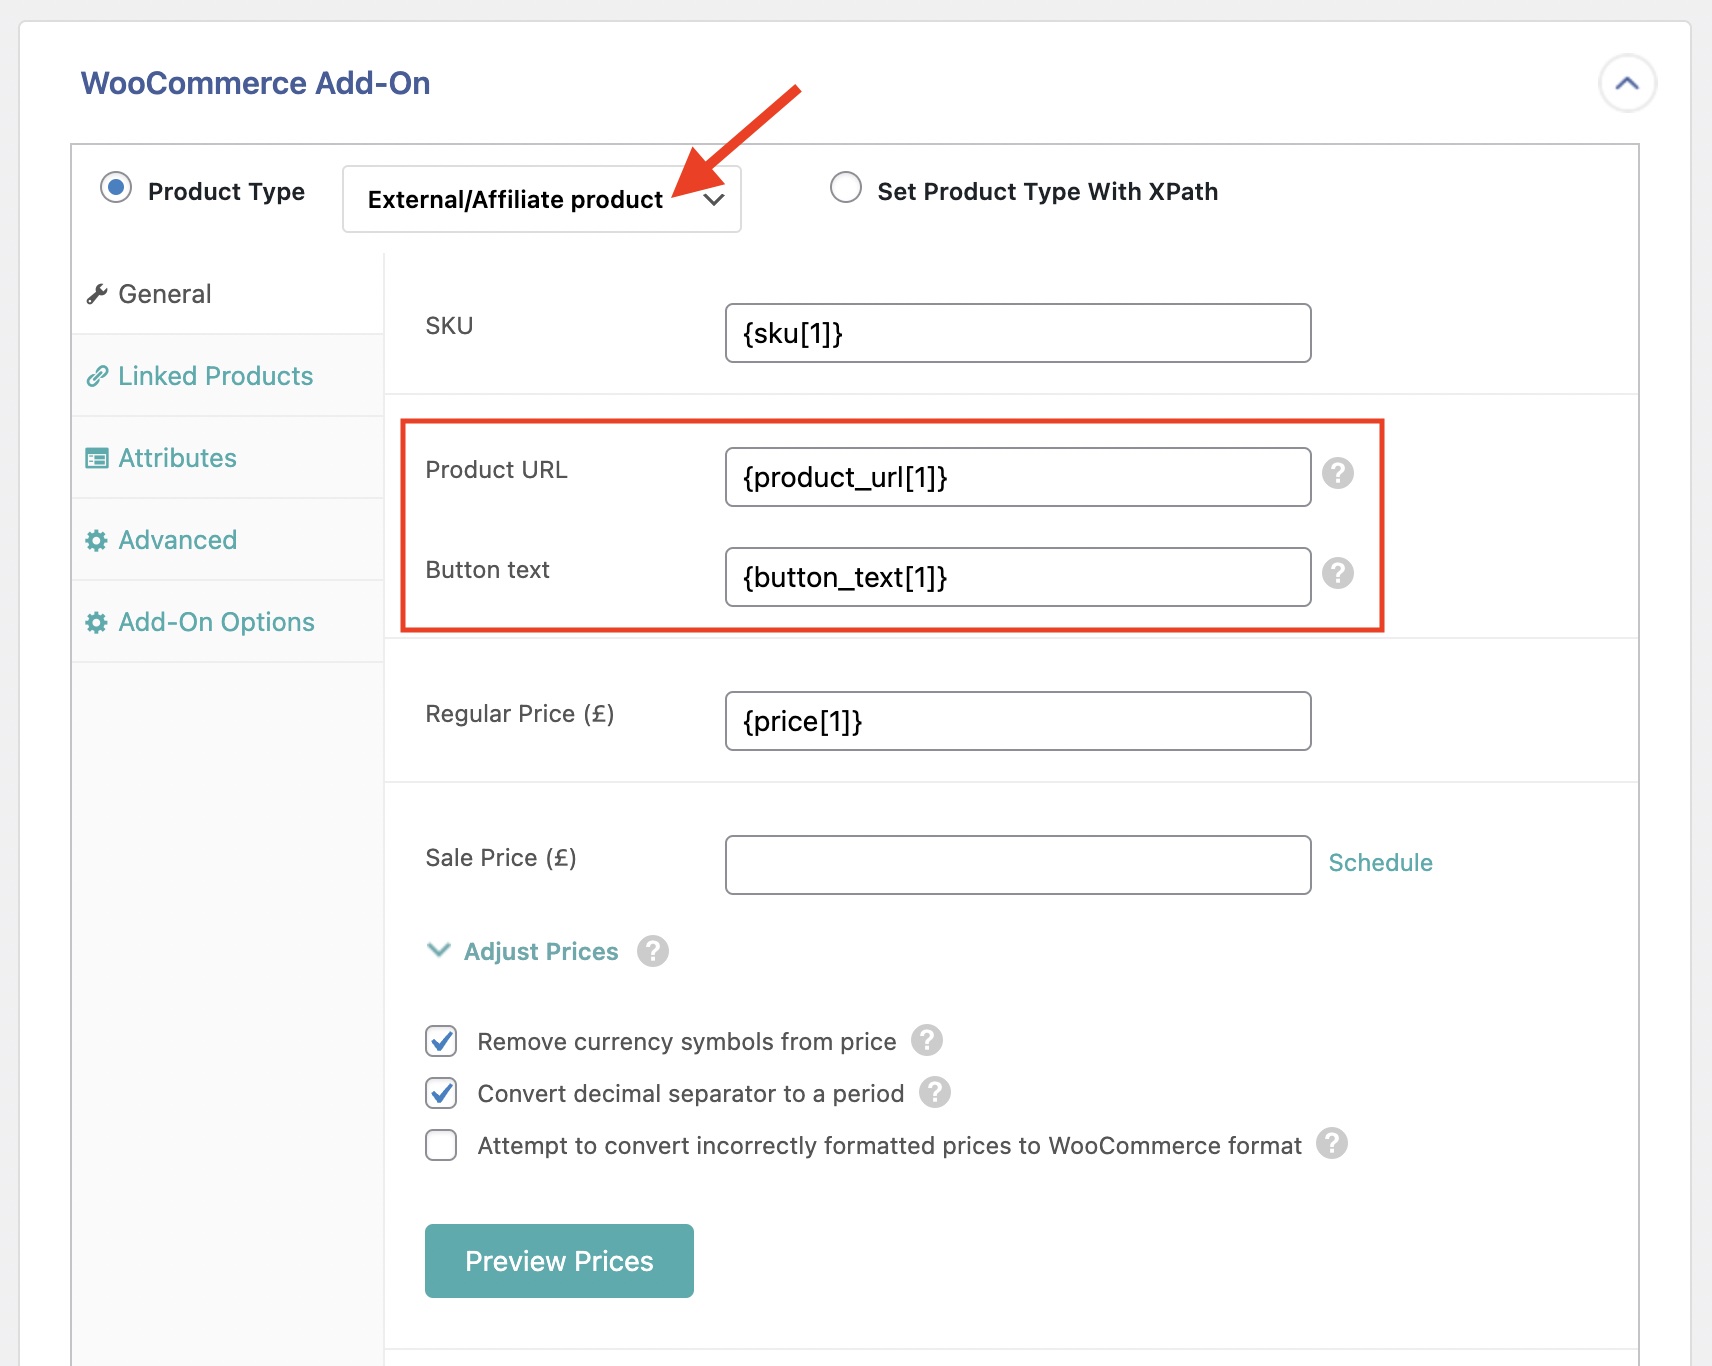
This product type uses a Product URL and Button text.
Import Grouped WooCommerce Products
To import WooCommerce grouped products, follow the steps from this guide but instead select Grouped product as the Product Type. This action will hide the Shipping tab.
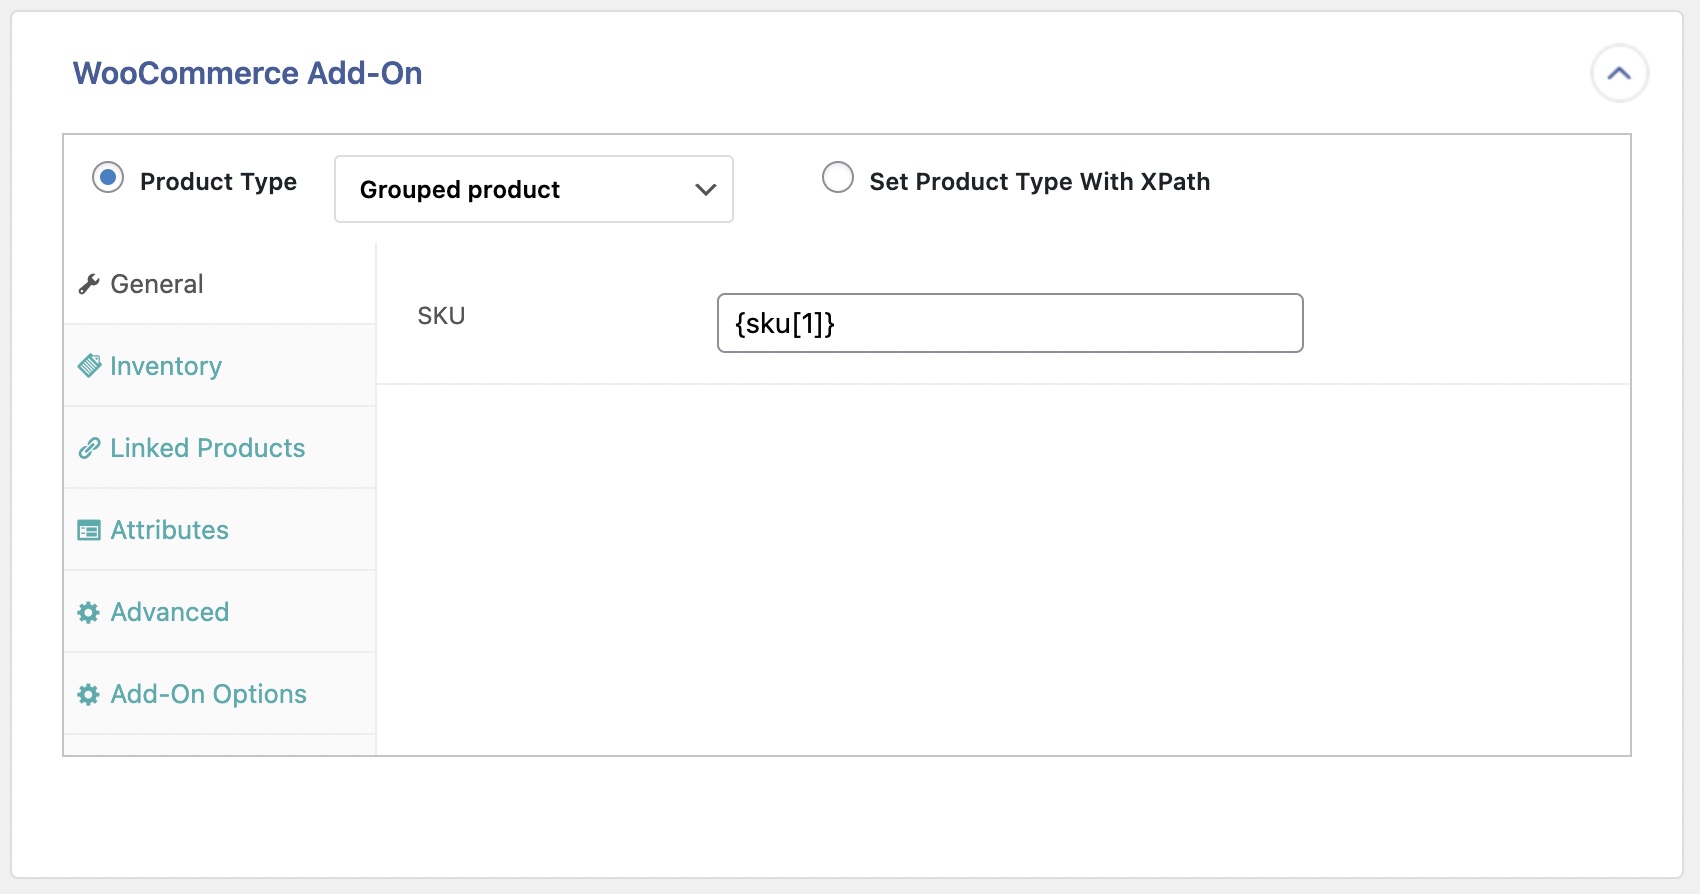
This import type requires a way to group all imported products together, such as a group ID.
Import WooCommerce Product Images to Product Gallery
The first imported image will be set as the Featured Image as long as the option Set the first image to the Featured Image (_thumbnail_id) is enabled. Any additional images will be added as a part of the Product Gallery.
If the option described above is not enabled, all images are added as part of the Product Gallery.
If you're importing images into a different plugin, you may need to use custom code and our API to add the images as required.
Sync Stock and Price for Imported WooCommerce Products
Syncing WooCommerce products' stock and price is fairly simple. Here's what to do when using a different file than the one used to import the products:
- Create a new Existing Items import with the data to update.
- Set up the import to update only price and/or stock.
- Schedule that import so that it runs automatically.
To learn more, please see:
If you're using the same import source used to import these products (such as a file from an URL), you can modify the existing import and set it up to only update stock/price when the import is re-run.
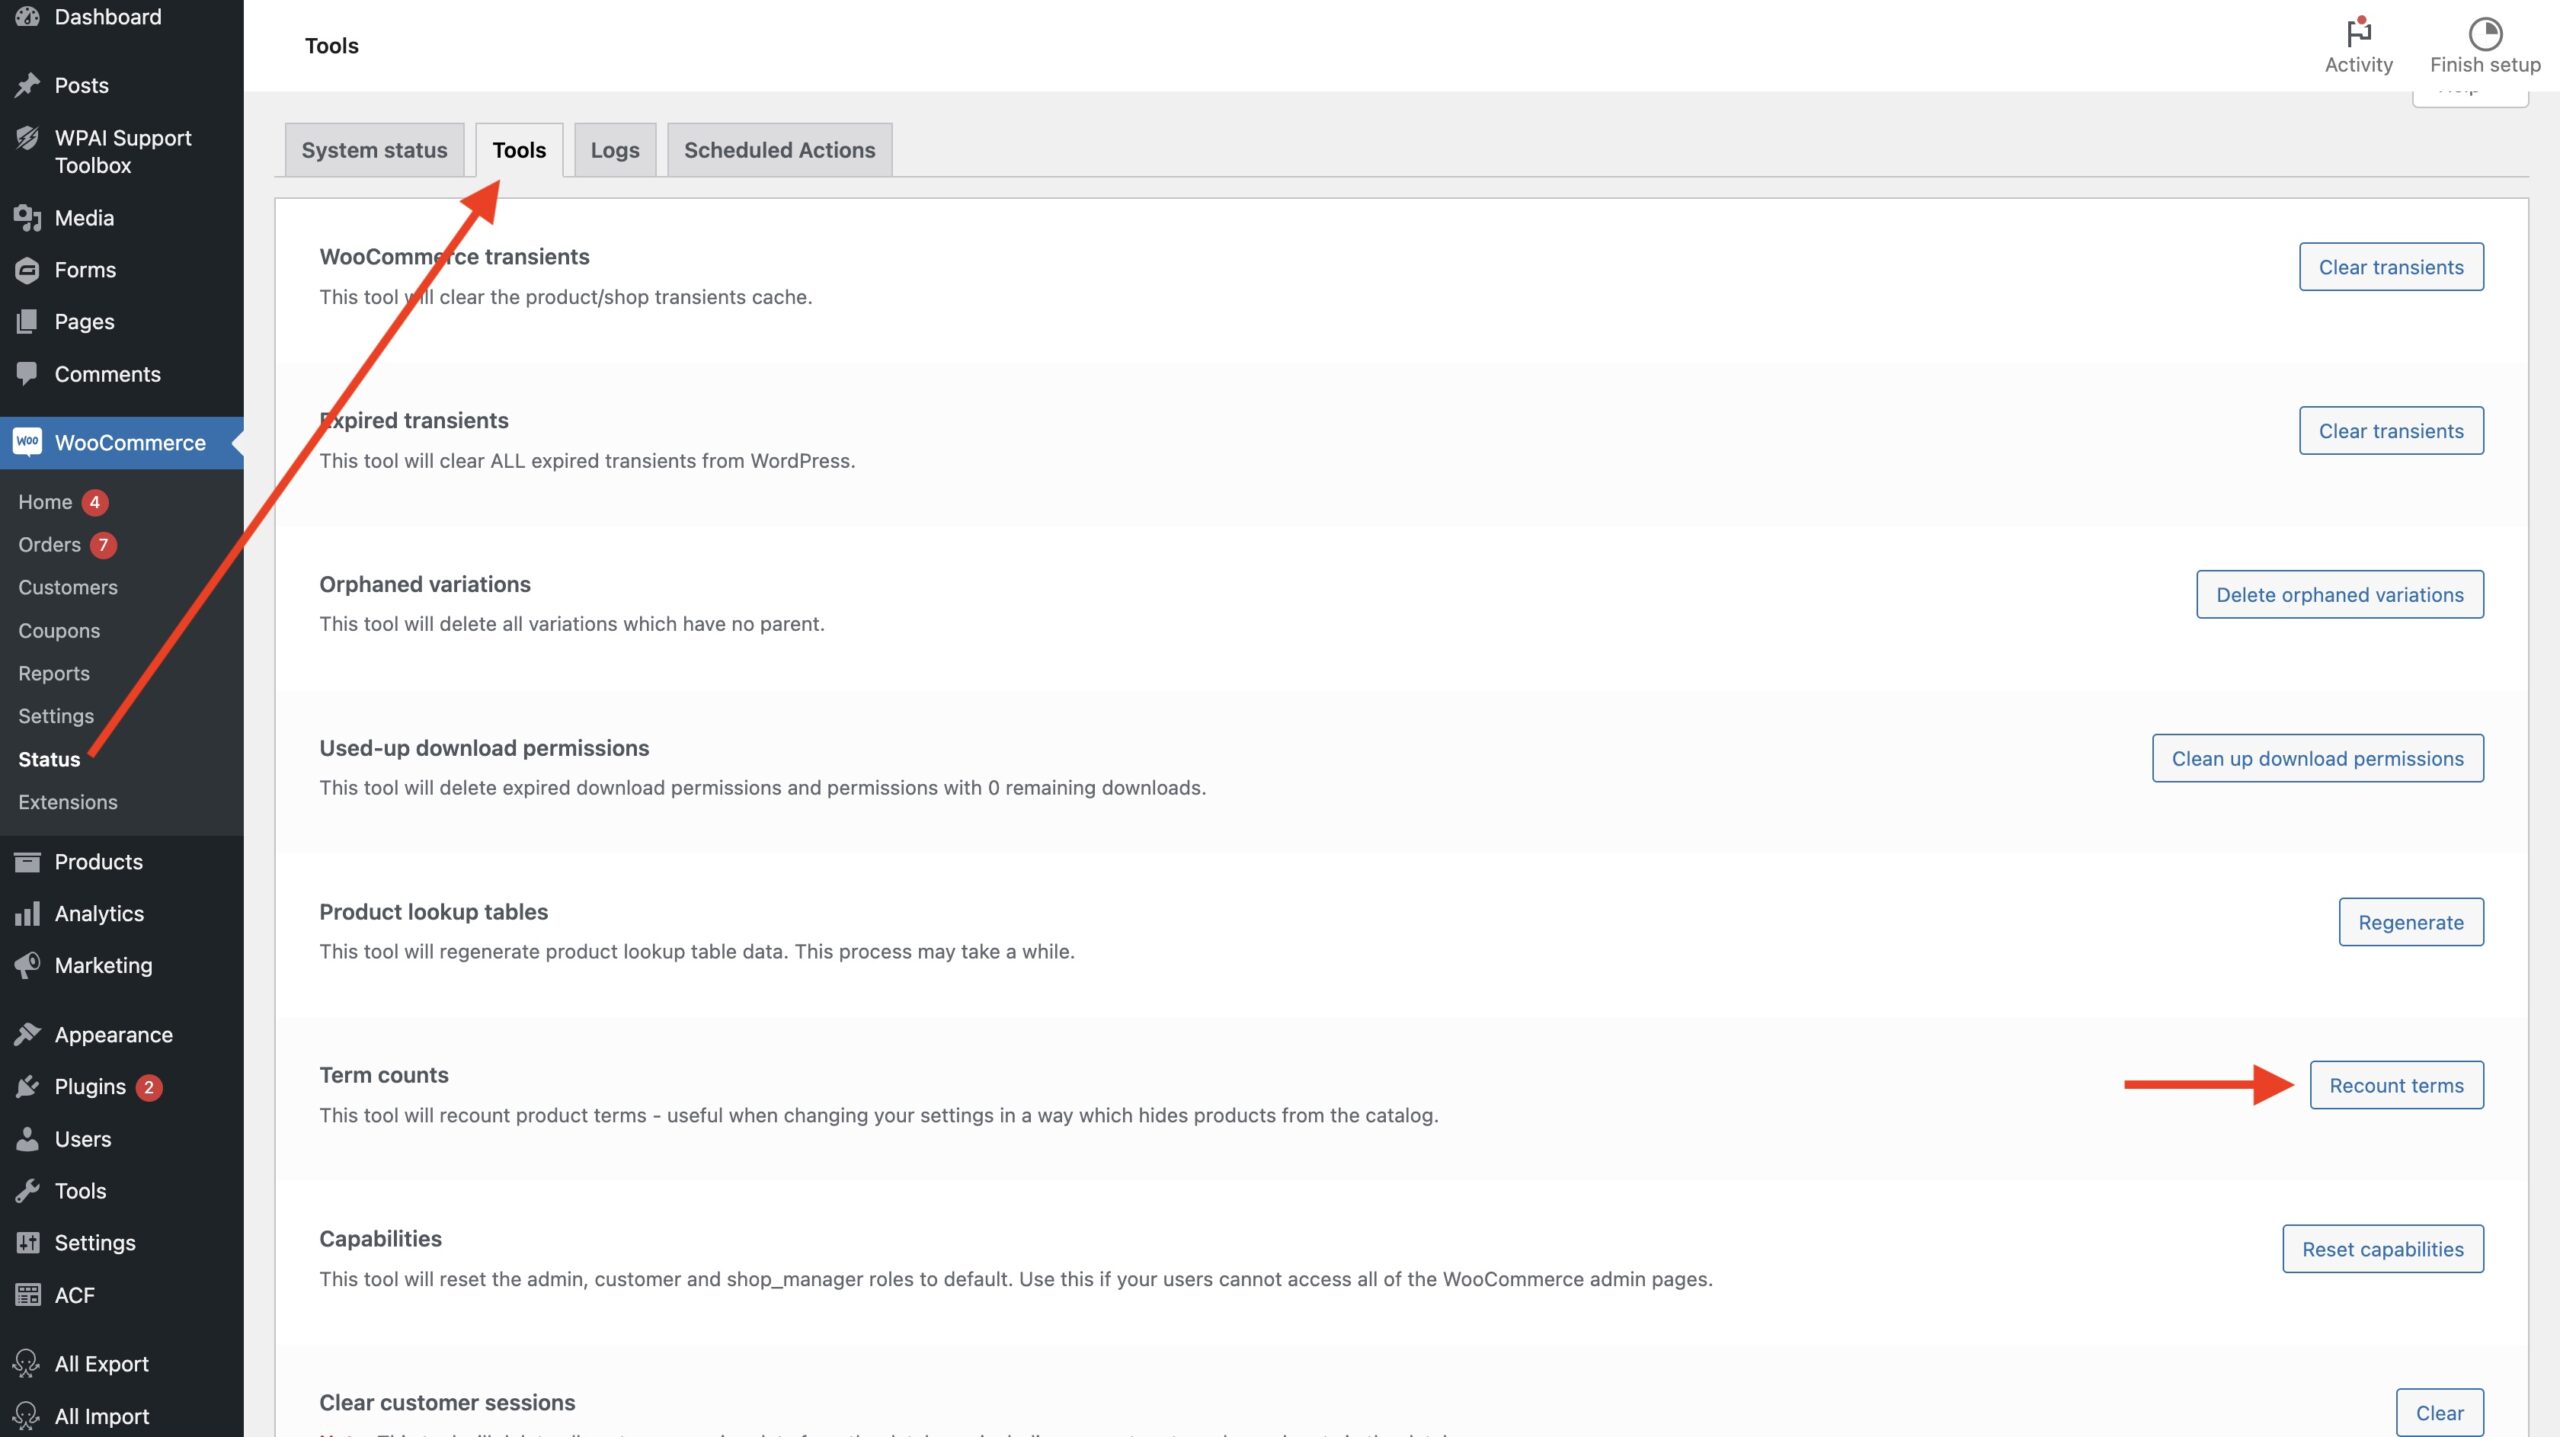
Solve Issues with Re-counting Terms
Right before the import finishes, the import process calls the WooCommerce _wc_term_recount function to re-count the terms existing on your site.
Sometimes, this can cause the import to hang and error out. This would happen right at the end of the import process. If you're running into that issue, you can solve it with this snippet:
add_filter('wp_all_import_recount_terms_after_import', 'wpai_wp_all_import_recount_terms_after_import', 10, 2);
function wpai_wp_all_import_recount_terms_after_import($is_recount_terms, $import_id){
    return false;
}
If that works, you'll need to re-count the terms manually:
Import WooCommerce Products – Frequently Asked Questions
How Do I Import a CSV File Into Products?
To import a CSV file into products, just specify the CSV file as your import source in the All Import > New Import screen. Our plugin will recognize the file format and will automatically adjust its interface accordingly.
How Do I Import a Product Spreadsheet into WooCommerce?
To import a product spreadsheet into WooCommerce, save or export the spreadsheet data as a CSV file. You can then load the CSV file as your import source, and our plugin will take it from there.
How Do I Import Products From XML?
To import products from XML, just specify the XML file as your product source. WP All Import will automatically recognize the file type, parse the XML, and adjust its interfaces as required. It doesn't matter if the XML is simple or complex — we've got you covered!
How Do I Import a Product Feed into WooCommerce?
A product feed is usually organized around a URL or FTP/SFTP import source. Our plugin will handle either. Just select Download a File > From URL or Download a File > From FTP/SFTP and provide the information required by the interface.
Can I Import Any WooCommerce Product Type?
Yes. You can import any standard product type such as simple, variable, grouped, affiliate, simple subscription, etc. To do this, just set the product type during the import process. WP All Import will adjust the panels, fields, and options accordingly.
How Do I Import WooCommerce Products With Images?
We provide complete support for importing products with images. You can use images already in the media library, download them from another website, or import images that you uploaded to your server in advance. You can also avoid duplicates by having our software check for existing images during the import process.
For more information, see Import WooCommerce Products with Images.
How Do I Import Products to WooCommerce for Free?
To import products to WooCommerce for free, use our Import Products from any XML or CSV to WooCommerce free add-on. Note, however, that to get full support for Grouped, External/Affiliate, and Variable products, you will need to upgrade to our premium version.
How Do I Bulk Upload Products to WooCommerce?
To bulk upload products to WooCommerce, just follow the steps in this tutorial while using an import file that contains multiple products. There is nothing special about this process. Most imports contain multiple products.
How Do I Automatically Import Products into WooCommerce?
To automatically import products into WooCommerce, you must schedule your imports. You can do this directly from within WP All Import's interface by using our Automatic Scheduling Service, which is an optional monthly subscription.
Alternatively, you can manually schedule your imports by setting up cron jobs on your server.
For more information, please see our articles on Automatic Scheduling and Manual Scheduling.
Keep in mind that to schedule an import, you must download the import file from a URL or FTP connection, or use the Use existing file option in the Settings interface.
How Do I Export WooCommerce Products?
- Navigate to All Export › New Export in the WordPress main menu.
- Choose WooCommerce Products as your export post type.
- Set filters, if applicable.
- Use our Drag & Drop interface to select your export columns.
- Run the export.
- Download your product file.
For a full list of import features, see Export WooCommerce Products.
Import WooCommerce Products from CSV, XML, Excel
- Product variations & attributes
- Price & stock
- Images & galleries
- Scheduled imports
How Do I Migrate WooCommerce Products?
- Export the WooCommerce products that you wish to migrate.
- Choose the Bundle option when downloading your export file. The bundle file contains an import template in addition to the product data.
- Upload the bundle file on the target site.
- WP All Import will automatically configure itself based on the bundle file.
- Run the import.
- Check your imported products.
For additional information, see Migrate WooCommerce Products.
What Add-Ons Do I Need to Import WooCommerce Products?
To import WooCommerce products, you need to have the WooCommerce Import Add-On active on your site, along with WP All Import.
Import WooCommerce Products – Related Docs
Learn how to export WooCommerce products.
Describes how to export WooCommerce variable products.
Describes how to import WooCommerce variable products.
Learn how to export WooCommerce products with images.
Learn how to import WooCommerce products with images.
Describes how to bulk edit WooCommerce products.
Describes how to migrate WooCommerce products from one website to another.
Oxygen article on the five best plugins to import WooCommerce products.
Oxygen Builder review of WP All Import.
