The best import export plugin for WordPress & WooCommerce.

How to Export Gravity Forms Entries to CSV, Excel, or XML
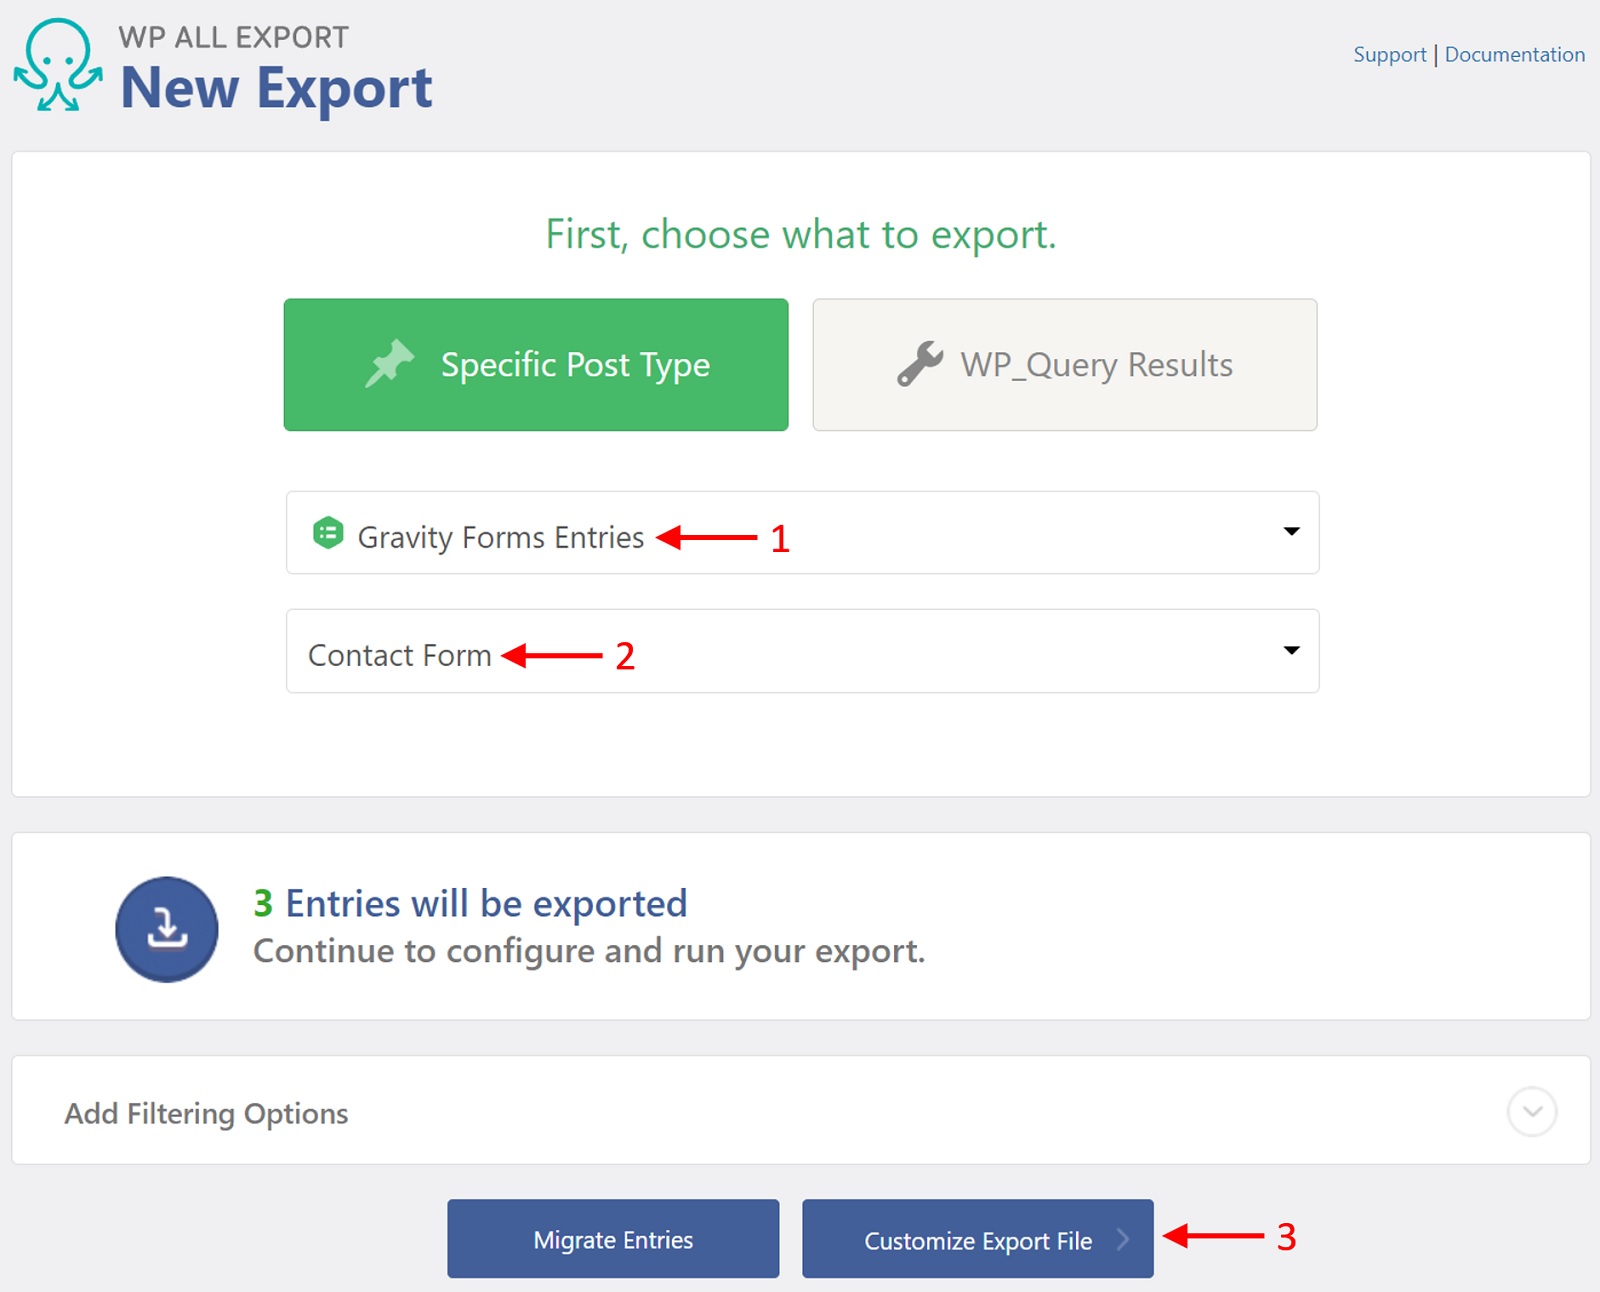
To export your Gravity Forms entries, go to All Export › New Export, select Gravity Forms Entries, and then select the form that you wish to export. Use the drag-and-drop tool to build your export, then run the export and download your file.
Table of Contents
- Step 1: Create a New Export
- Step 2: Customize Your Export Columns
- Step 3: Configure Your Export Settings
- Step 4: Download the Exported Data
Advanced Topics
Step 1: Create a New Export for Gravity Forms Entries
Go to All Export › New Export and choose to export Gravity Forms Entries, then select the form to export. To continue, click the blue Customize Export File button at the bottom.
Step 2: Customize Your Export Columns
Gravity Forms entries data is found in the Available Data section on the right. Drag and drop the data elements from that section to the column selection area to add them to your export file.
To remove a column from the export, drag it outside of the selection area.
Gravity Forms Entry Fields
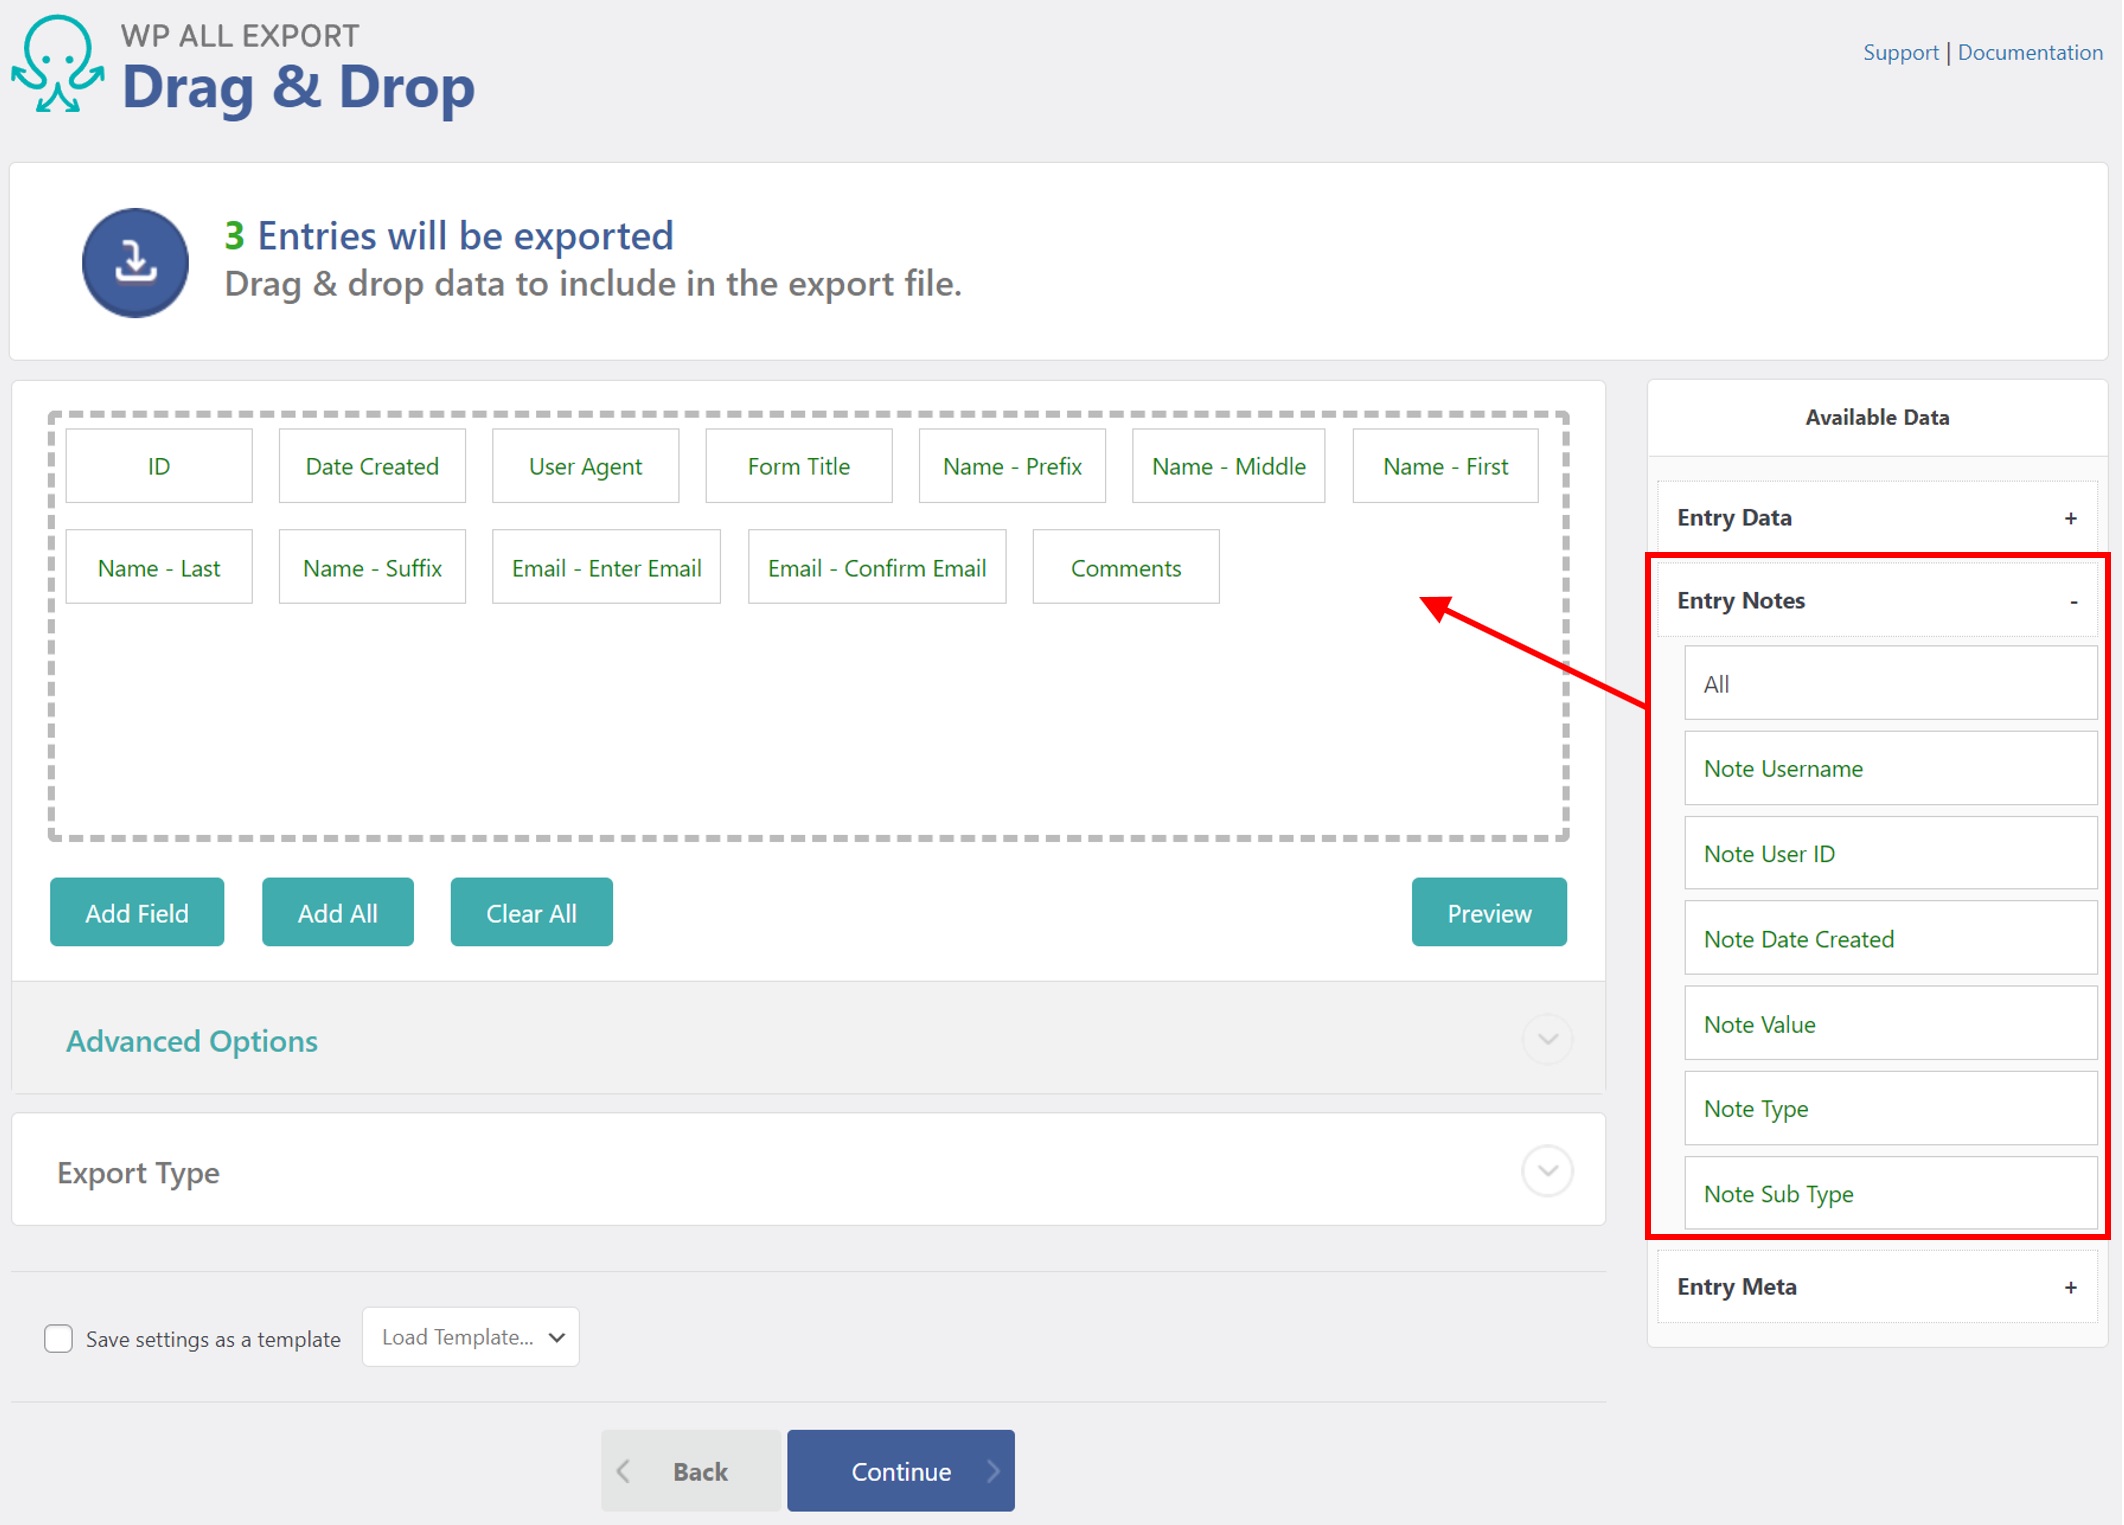
The available export data are divided into the following sections: Entry Data, Entry Notes, and Entry Meta.
Gravity Forms Entry Data
Basic Gravity Forms Entry Data is in Available Data › Entry Data:
- ID: The entry ID, a unique number assigned to each entry.
- Date Created: The date when the entry was submitted.
- Date Updated: The date when the entry was last updated.
- Starred: If the entry was starred, exports
1, otherwise, exports0. - Read: If the entry was seen/read, exports
1, otherwise, exports0. - IP: The internet protocol address of the entry author.
- Source URL: The web address where the Gravity Form entry was submitted.
- User Agent: Information on which browser the entry author was using.
- Currency: The currency for the site.
- Payment Status: Information on the payment status.
- Payment Date: The date when the payment was made.
- Payment Amount.
- Payment Method.
- Transaction ID.
- Is Fulfilled.
- Created by User ID: The ID of the user account which created the entry, if any.
- Transaction Type:
- Status.
- Form Title: The title of the form where the entry was submitted.
- Created by Username: The username of the user account which created the entry, if any.

Entry Notes:
Entry Notes for a Gravity Form can be found under Available Data › Entry Notes. The following fields are available:
- Note Username: Name of the account that made the note.
- Note User ID.
- Note Date Created: When the note was made.
- Note Value: Message from the note.
- Note Type.
- Note Sub Type.
Entry Meta:
The main entry information is found under Available Data › Entry Meta. This will show all form fields added to the Gravity Form itself. In this example, we are exporting a Gravity Form named "Contact Form", which has the following fields:
- Name - Prefix
- Name - First
- Name - Middle
- Name - Last
- Name - Suffix
- Email - Enter Email
- Email - Confirm Email
- Comments

Once you've configured your Gravity Forms entries export, click Continue to verify your export settings.
Step 3: Configure Your Export Settings
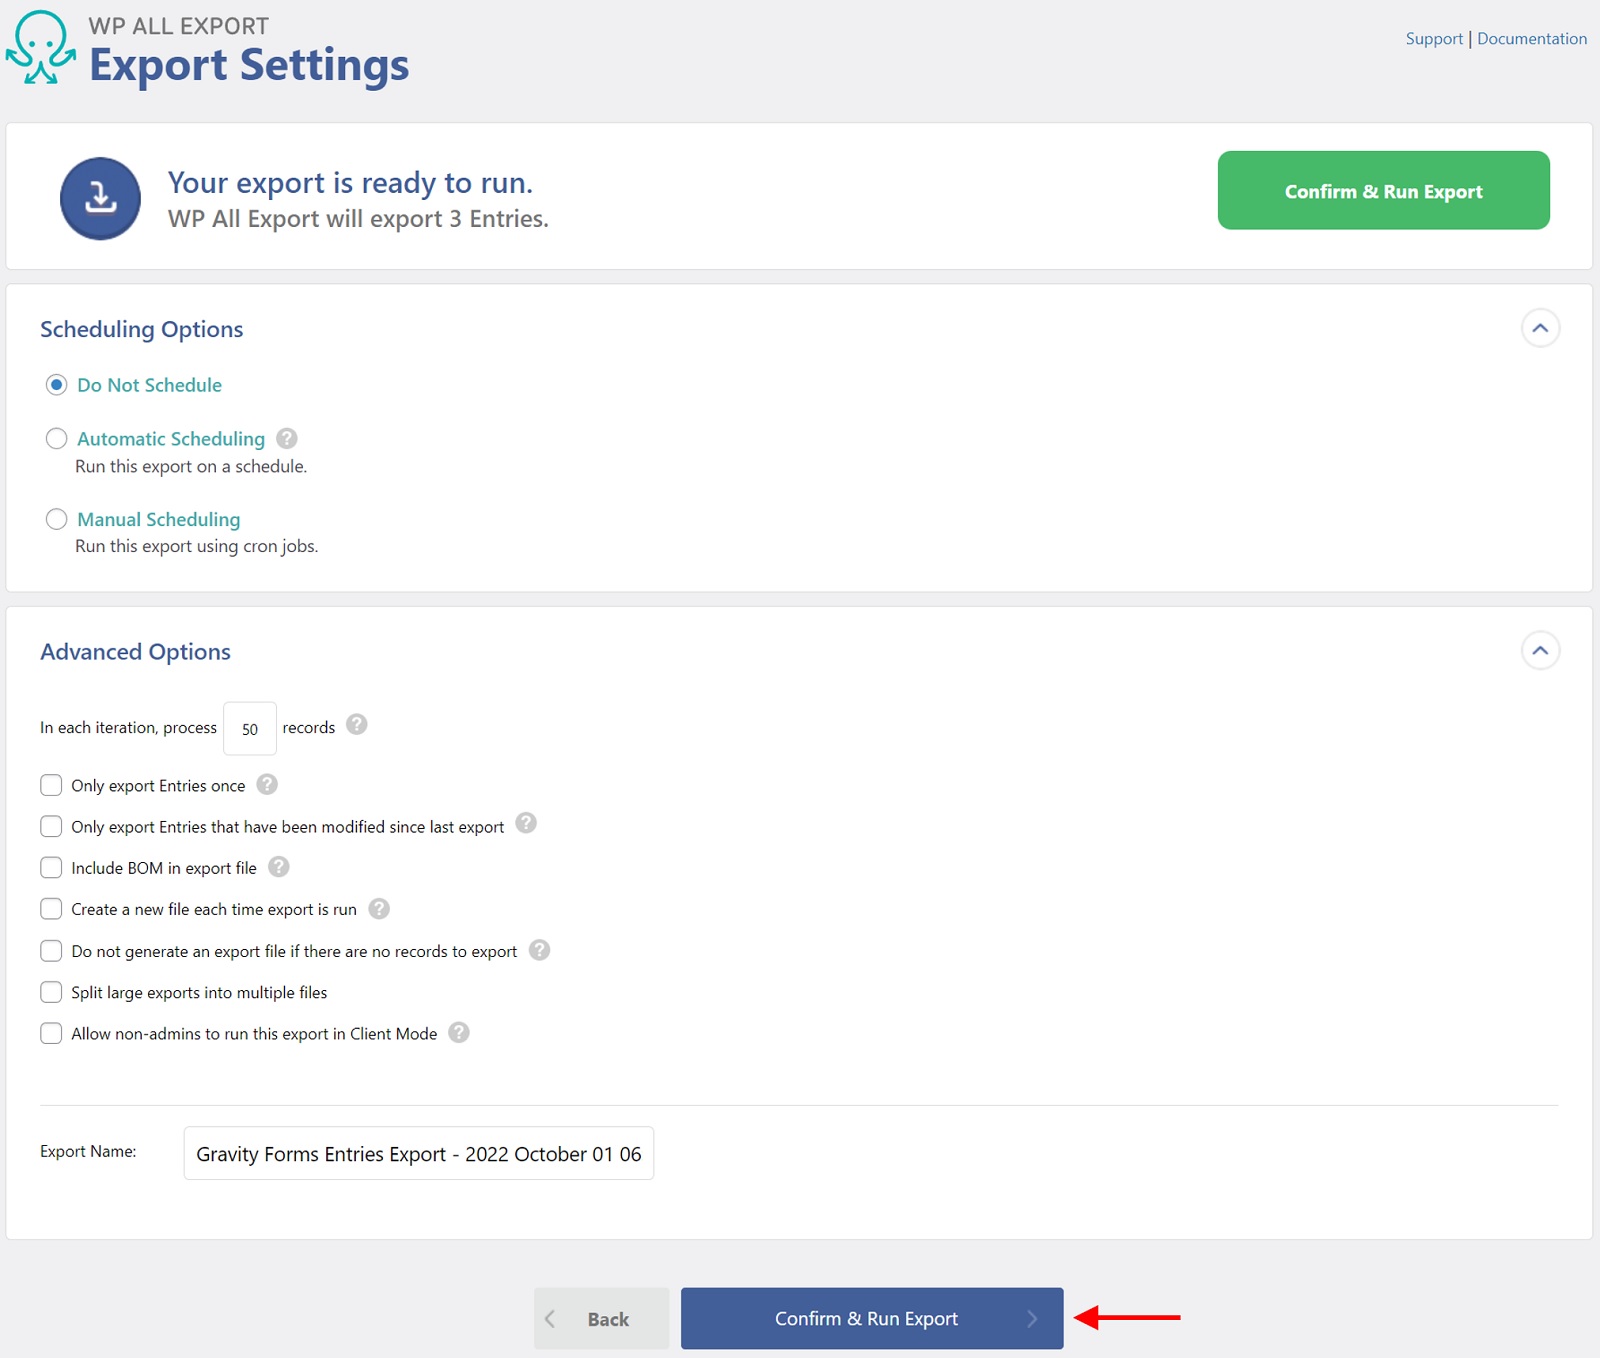
This screen has two main sections. The Scheduling Options section allows you to configure your export to run automatically on a weekly or monthly schedule, which is ideal if you want to routinely feed your Gravity Forms entries data to another system.
The Advanced Options section lets you control some important export settings, including:
- How to handle Gravity Forms entries that were previously exported using the same export template;
- Whether to split large exports into multiple files to avoid violating server file-size limits;
- The batch processing size for the export, which can help you avoid overwhelming server resources;
For now, leave these settings alone and click the Confirm & Run Export button.
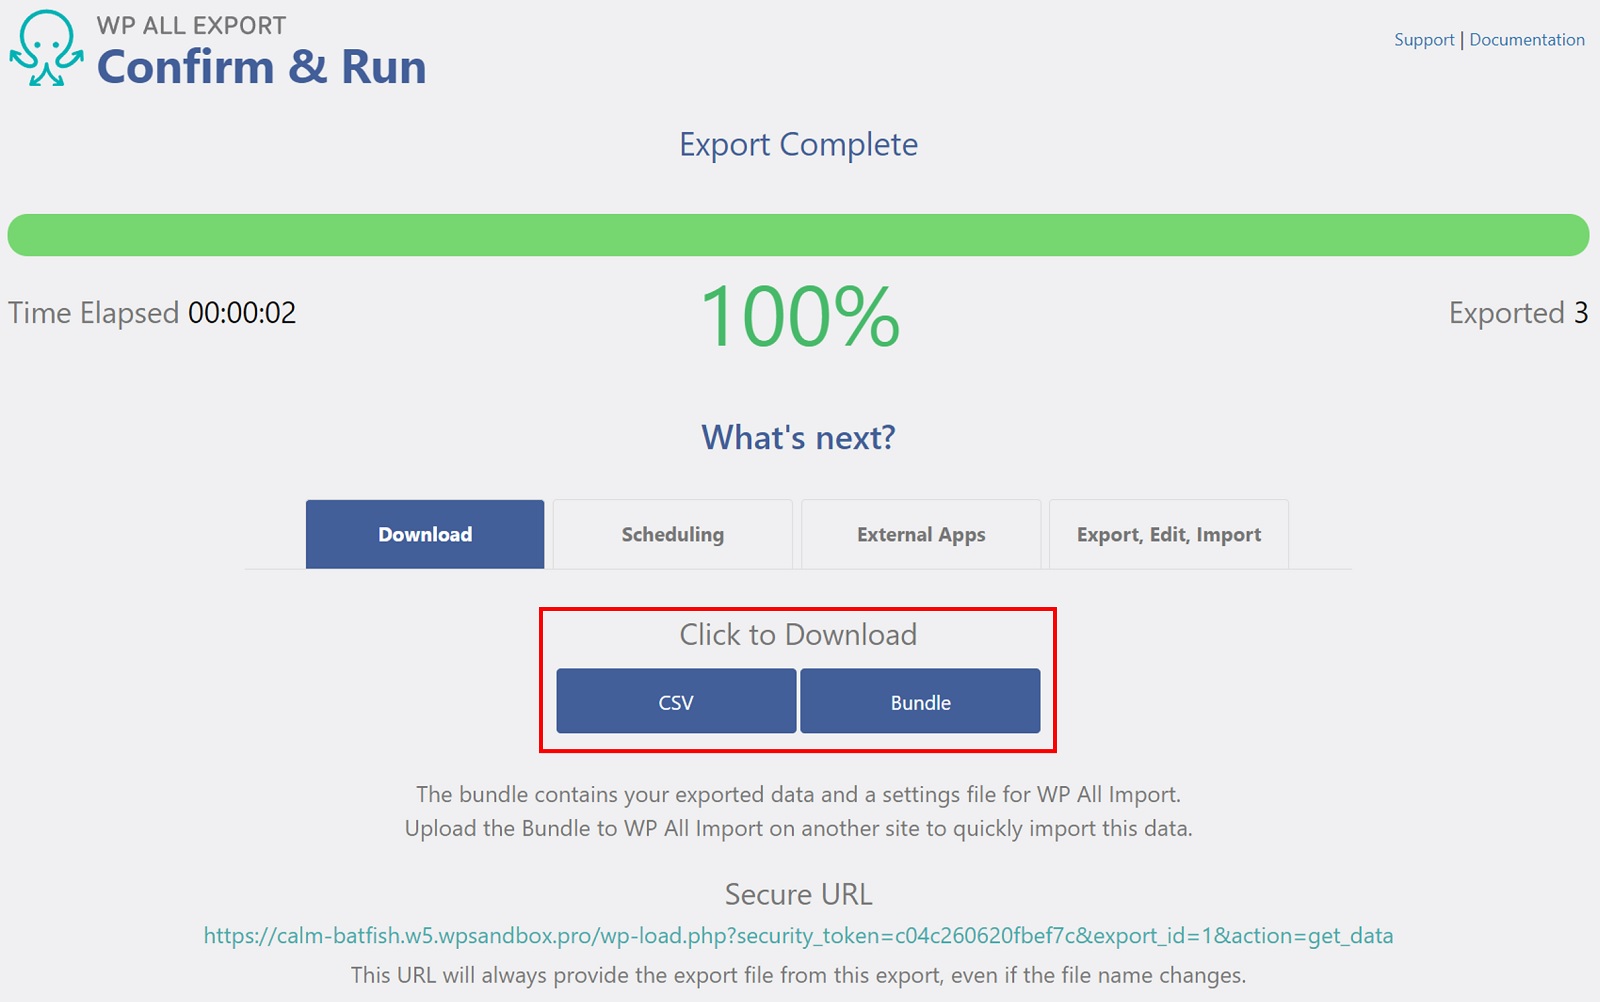
Step 4: Download the Exported Gravity Forms Entries
After the export has finished, click CSV to download the exported entries. By clicking the Bundle option instead, you can also download an import template along with the entries data. This template can be used to migrate the entries to another site using WP All Import.
Here's a sample export of Gravity Forms entries data:

Export Gravity Forms Entries to Any XML or CSV
- Drag & drop
- Documented API
- Scheduled exports
- Zapier integration
- Woo, ACF, Meta Box, JetEngine
Export Gravity Forms Entries — Advanced Topics
Exporting to Different File Types
Gravity Forms entries are exported to a CSV file format by default. To change this to Excel, take the following actions in the Drag & Drop interface:
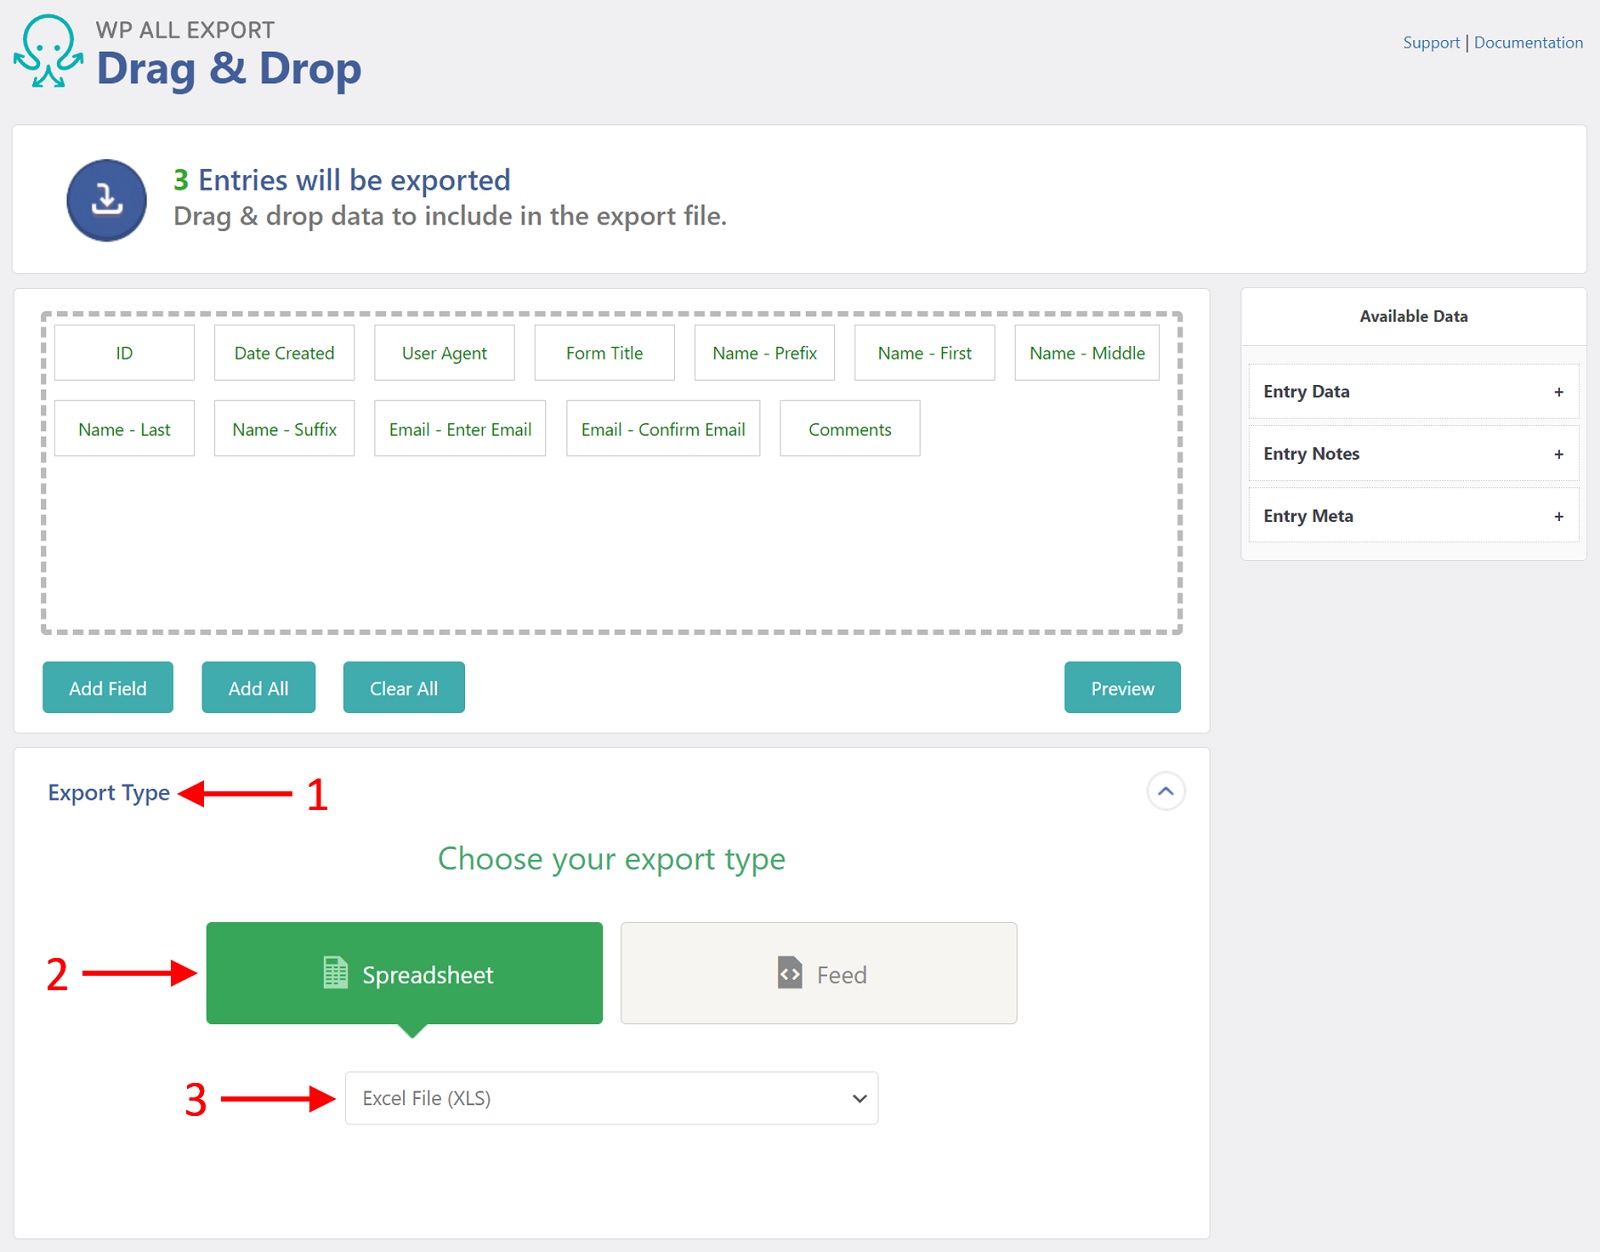
- Expand the Export Type panel.
- Choose Spreadsheet.
- Select either Excel File XLS or Excel File XLSX.
You can also export your Gravity Forms entries to an XML file:
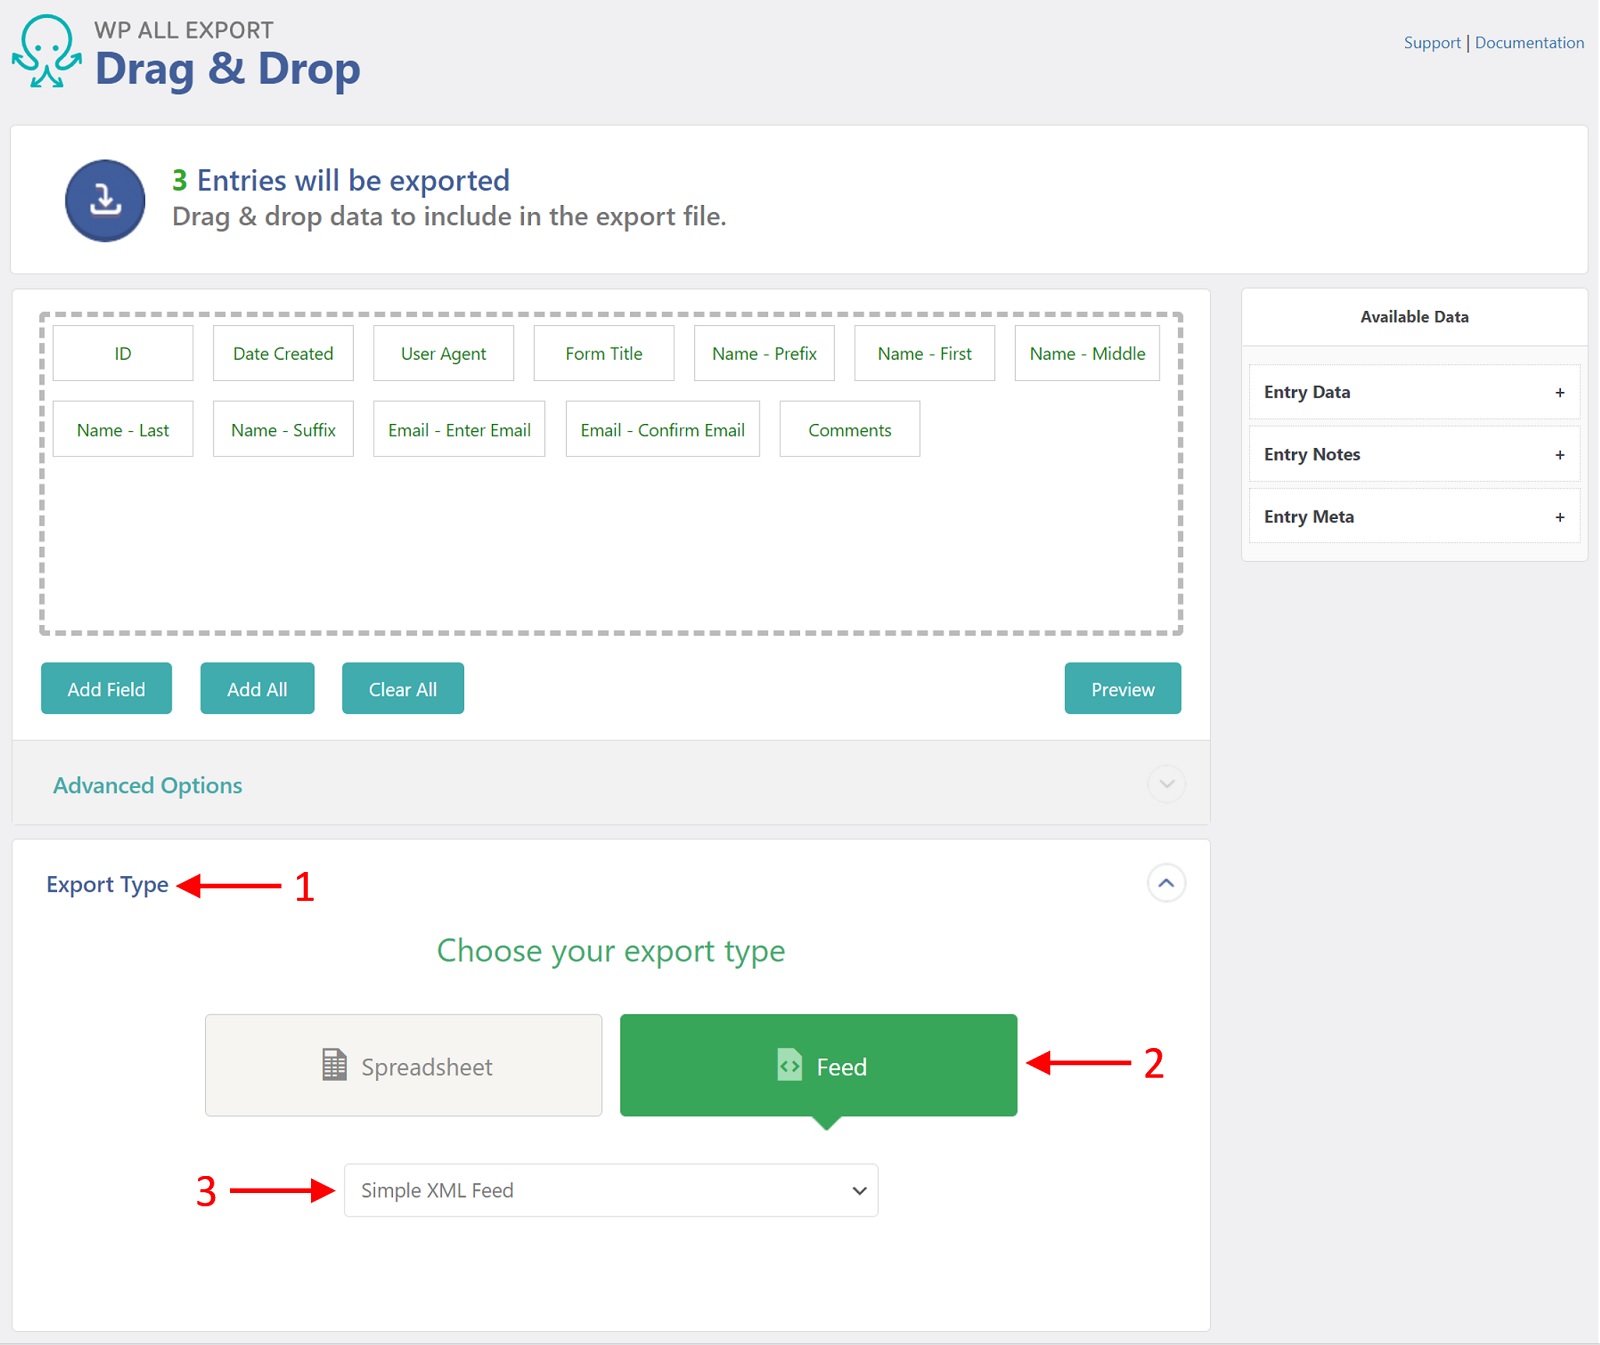
- Expand the Export Type panel.
- Choose Feed.
- Select either Simple XML Feed or Custom XML Feed.
Export Gravity Forms Entries Advanced Options
Expand the Advanced Options panel:
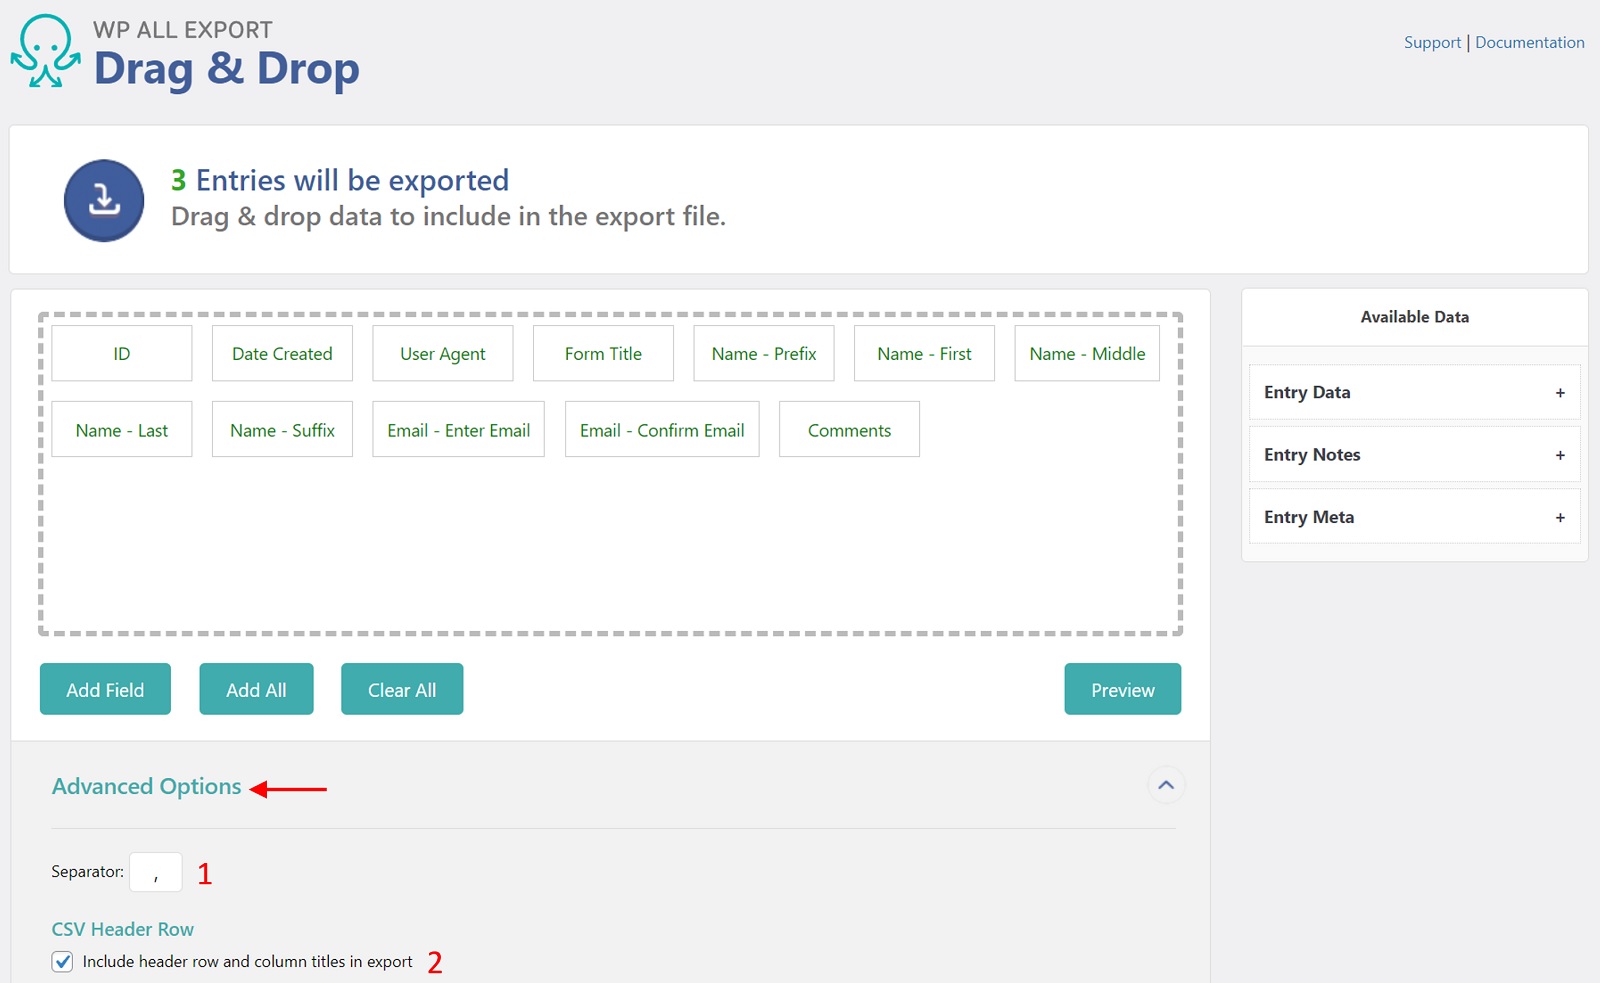
Use this panel to configure various export file settings. The settings differ according to the export file type. Here are the settings for the CSV file type:
- Separator: By default, this is set to a comma. Another popular option is the pipe character (|).
- Include header row and column titles in export: If checked, the first row becomes a header row with column titles. When unchecked, the first row contains the first Gravity Forms entry data with no header or column titles.
For information on advanced XML export settings, see exporting WordPress data to XML.
Filtering Gravity Forms Entries
Some Gravity Forms exports require only a subset of the entries. This subset can be based on any of the export fields described in Step 2 of this tutorial.
To select your entries, expand the Add Filtering Options panel near the bottom of the New Export screen. A filter consists of an Element, a Rule, and a Value:
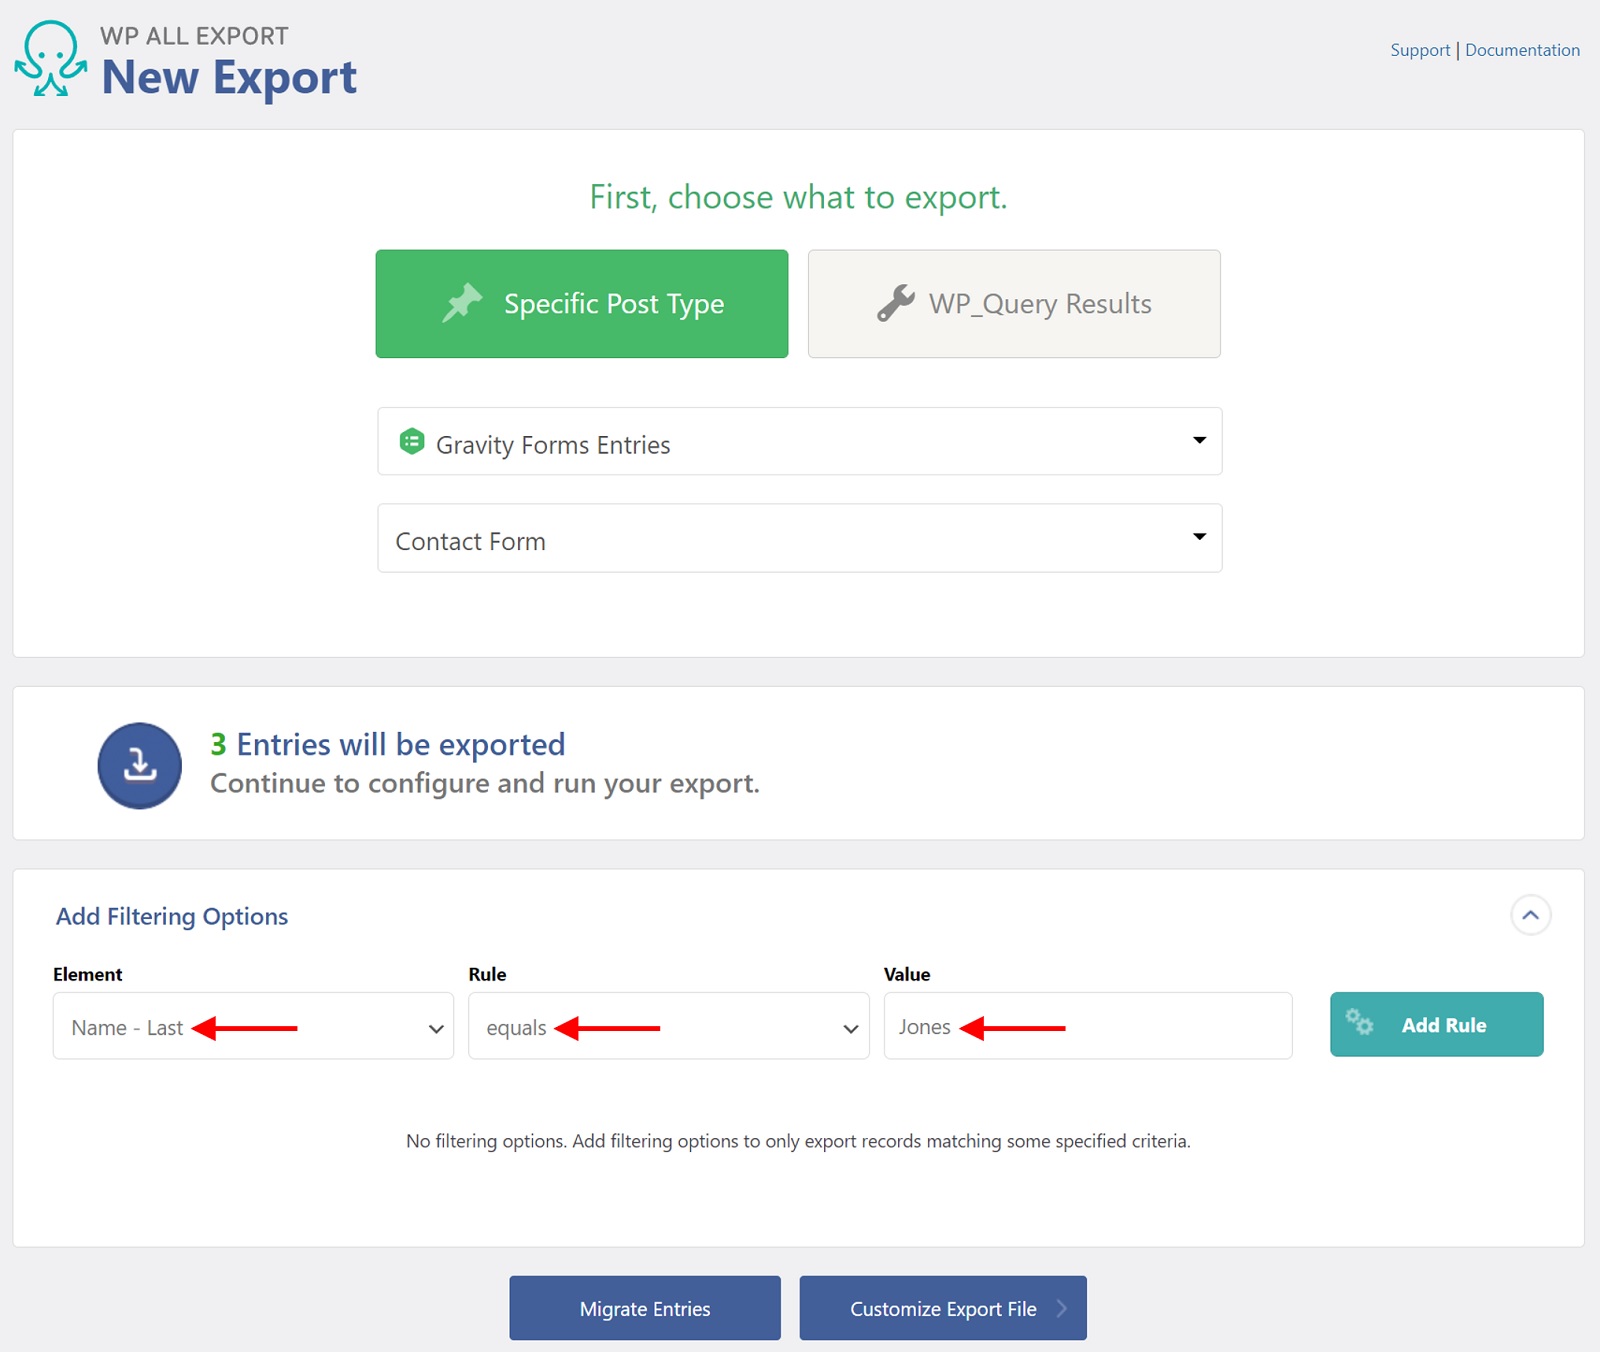
Here are the values for this filter:
Element = Name - Last
Rule = equals
Value = Jones
This means, “Export all Gravity Forms entries with the last name of 'Jones'”
Export Gravity Forms Entries — Frequently Asked Questions
How Do I Export Gravity Forms Entries to CSV?
To export Gravity Forms Entries to CSV, just follow the procedures in this tutorial and leave the export file type at its default setting, which is always CSV. After the export is complete, make sure to download the CSV option (as compared to the Bundle option, which is mostly used for data migration).
How Do I Export Gravity Forms Entries to Excel?
To export gravity forms entries to Excel, follow the procedures in this tutorial but set the Export Type to either Excel (XLS) or Excel (XLSX), depending on the version of Excel that you wish to generate.
How Do I Export Gravity Forms Entries to PDF?
To export gravity forms entries to PDF, first export them to CSV or XML, then automatically send the exported data to a PDF converter via Zapier. You can see an example of this kind of setup at How to connect WP All Export Pro + PDF.co.
How Do I Export All Entries from a Gravity Form?
To export all entries from a Gravity Form, just run a standard export as described in this article, choose the form in question, but do not set any other filters. That should export all the entries for the form in question.
How Do I Import Gravity Forms Entries?
- Go to All Import -> New Import.
- Choose how to load your data (i.e., upload a file, use a URL, or use an existing file).
- Select your import file and choose Gravity Forms Entries as your import type.
- Choose your target form.
- Map incoming data elements to your target form fields using the Drag & Drop interface.
- Run the import.
To learn more, see How to Import Gravity Forms Entries.
How Do I Migrate Gravity Forms Entries to Another Website?
- Export the Gravity Forms entries that you want to migrate.
- Download the Bundle file, which contains instructions on how to import the exported data.
- On the target website, upload the bundle file using WP All Import.
- Run the import.
- Review the imported entries.
See the How to Migrate Gravity Forms Entries From One WordPress Site to Another for more information.
How Do I Export Gravity Forms Entries Automatically?
You have two options to export your Gravity Forms entries automatically. You can use cron jobs to manually schedule your exports from your server, or our automatic service to schedule them directly from our interface.
To learn more about scheduling exports of your Gravity Forms entries, see How to Schedule WordPress Exports.
Where Are Gravity Forms Entries Stored?
Gravity Forms entries are stored in custom tables in your WordPress database on your hosting provider, which ensures that they are as secure as all the other data in your WordPress database.
What Happens When Gravity Forms Adds a Field?
We always monitor Gravity Forms for changes and adjust our software accordingly. If you happen to encounter a field that we don't support, just contact us and we'll get right on it.
How Do I Export a Gravity Form?
To export a Gravity Form (i.e., the form itself, not the entries), go to Forms > Import/Export and select the Export Forms tab. Select the form(s) that you wish to export, then click the Download Export File button. The download file will be in the JSON format.
What Add-Ons Do I Need to Export Gravity Forms Entries?
To export Gravity Forms entries, you need to have the Gravity Forms Export Add-On active on your site, along with WP All Export.
Export Gravity Forms Entries — Related Docs
Get a complete description of our plugin's features for exporting Gravity Forms entries.
Learn how to import Gravity Forms entries.
Learn how to migrate Gravity Forms entries from one WordPress site to another.
