The best import export plugin for WordPress & WooCommerce.

How to Export WordPress Posts
To export WordPress posts, go to WP All Export › New Export and select Posts from the dropdown list. Build your export file using the Drag & Drop interface. Once done, export the posts and download the exported file.
Table of Contents
- Step 1: Create a New Export for WordPress Posts
- Step 2: Choose Your Export Columns
- Step 3: Configure the Export Settings
- Step 4: Download the Exported Posts
Advanced Topics
- Add Filters to Your WordPress Post Export
- Choose A Different Export File Format
- Connect Your Export With External Apps
Step 1: Create a New Export for WordPress Posts
Go to All Export › New Export on the site, choose Posts, and WP All Export will update to show the number of posts it will export:
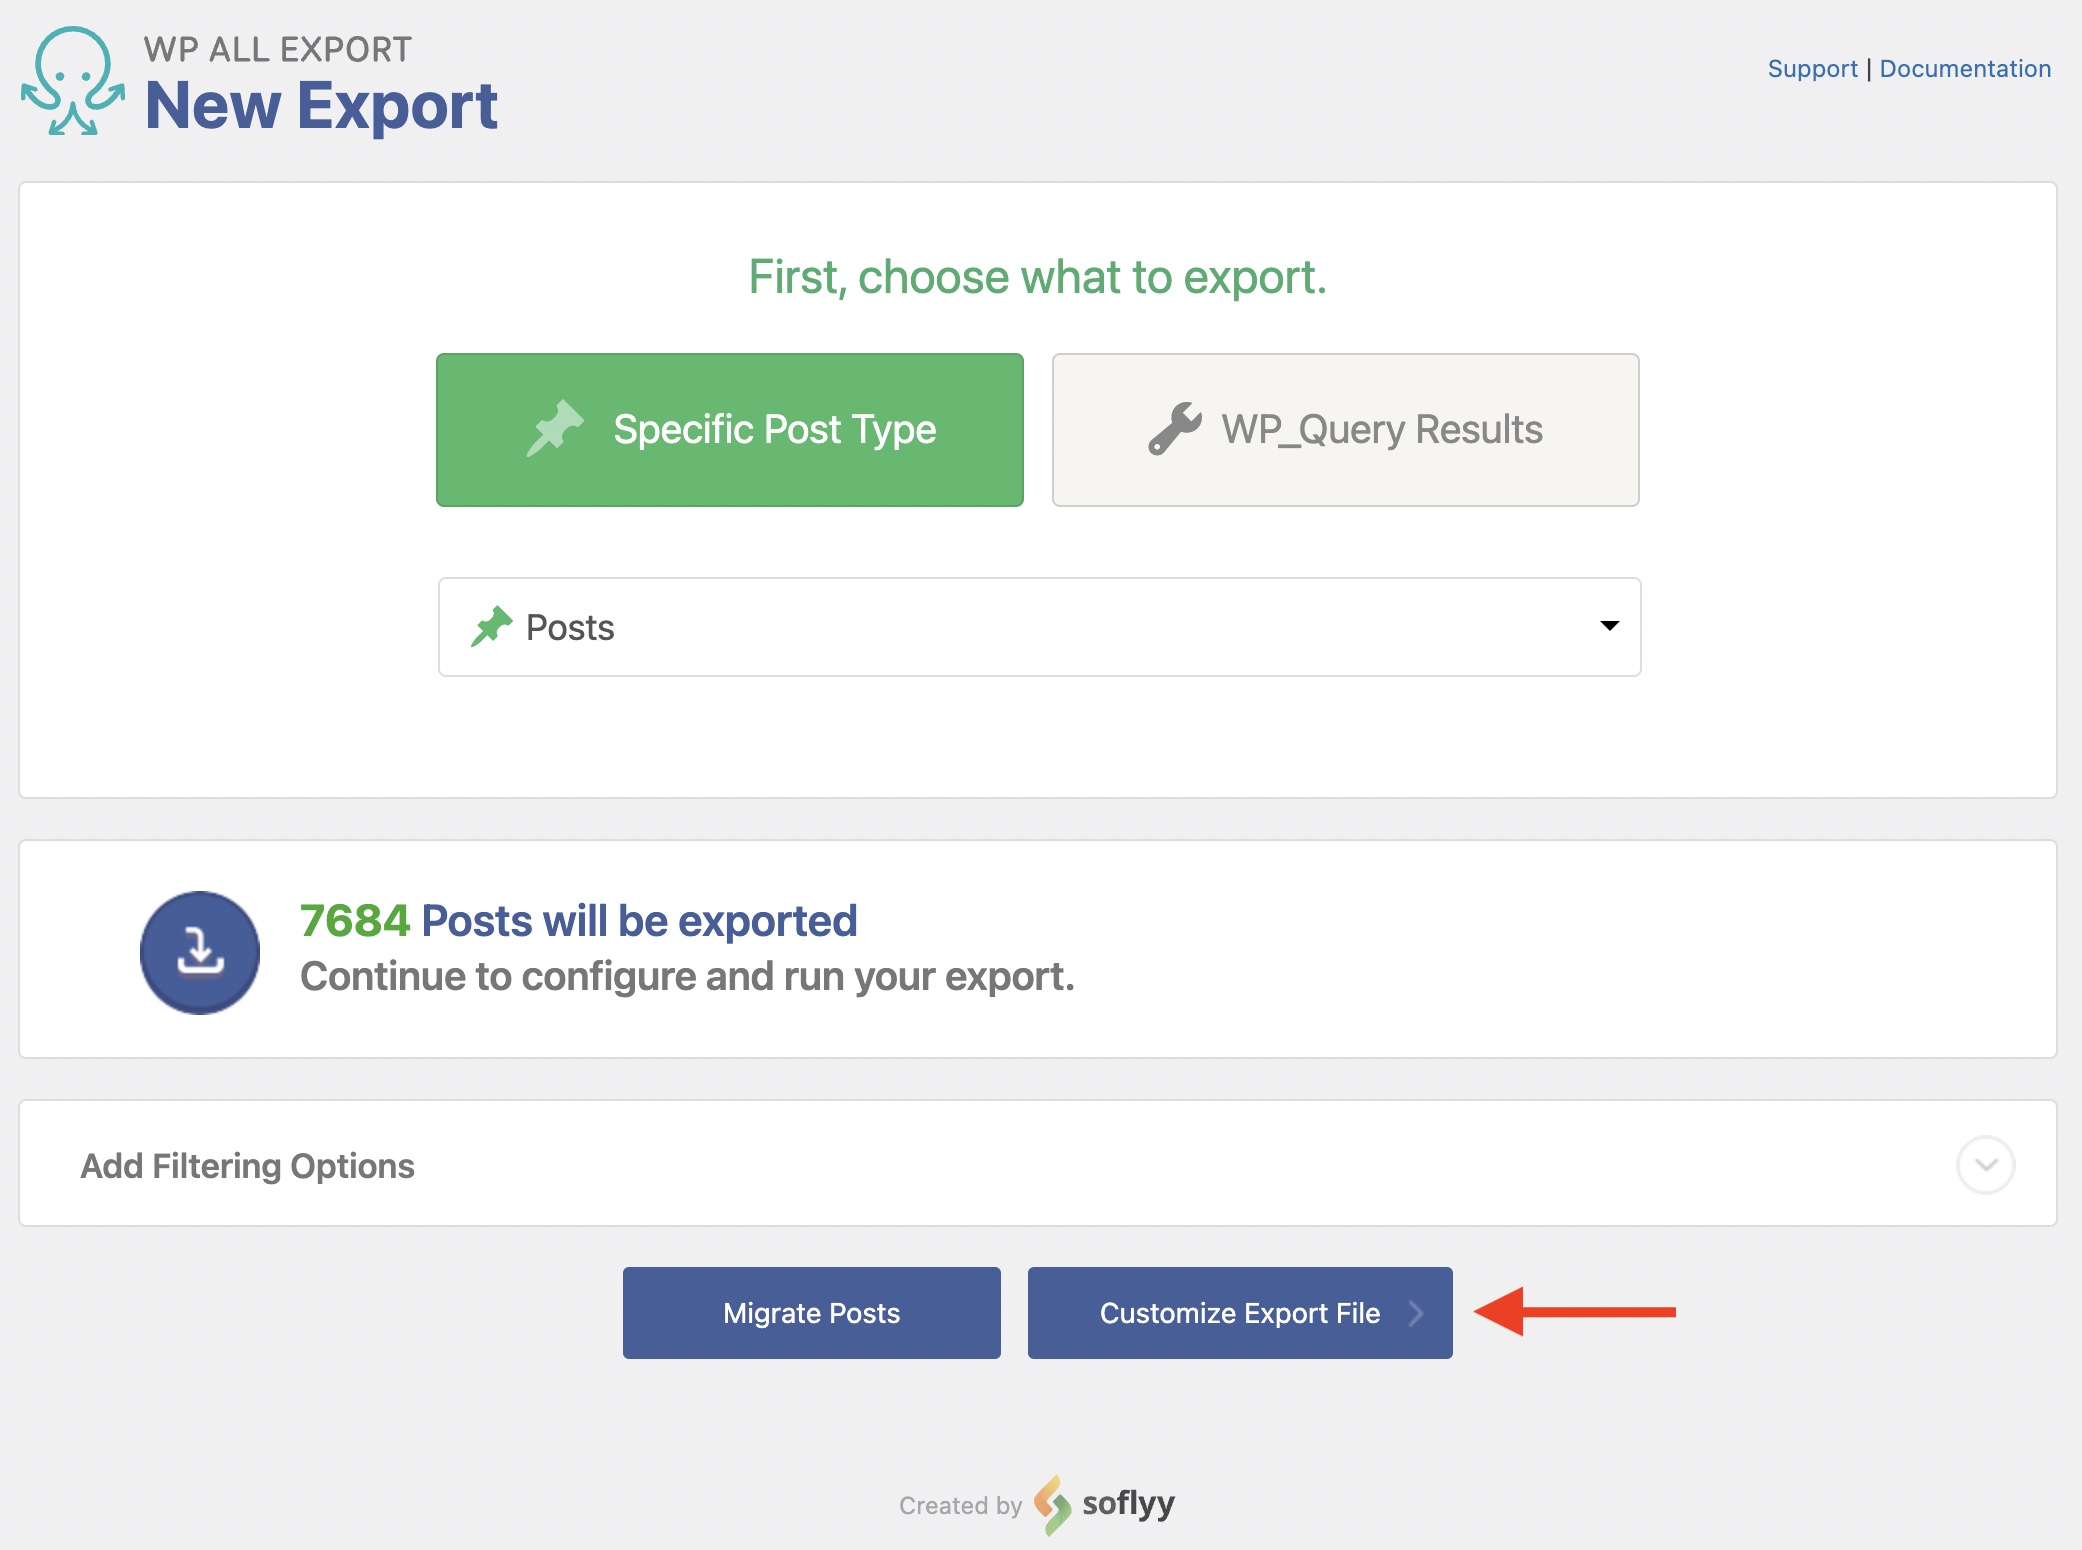
Below this section, you can Add Filtering Options to make the export more selective.
Once you've defined which posts to export, click on Customize Export File.
Step 2: Choose Your Export Columns
The Drag & Drop interface will appear, which lets you decide which data columns to export and allows you to modify the export file format.
The data available for export is shown in the Available Data section on the right. To add a field to the export, drag it from that section to the column selection area on the left:
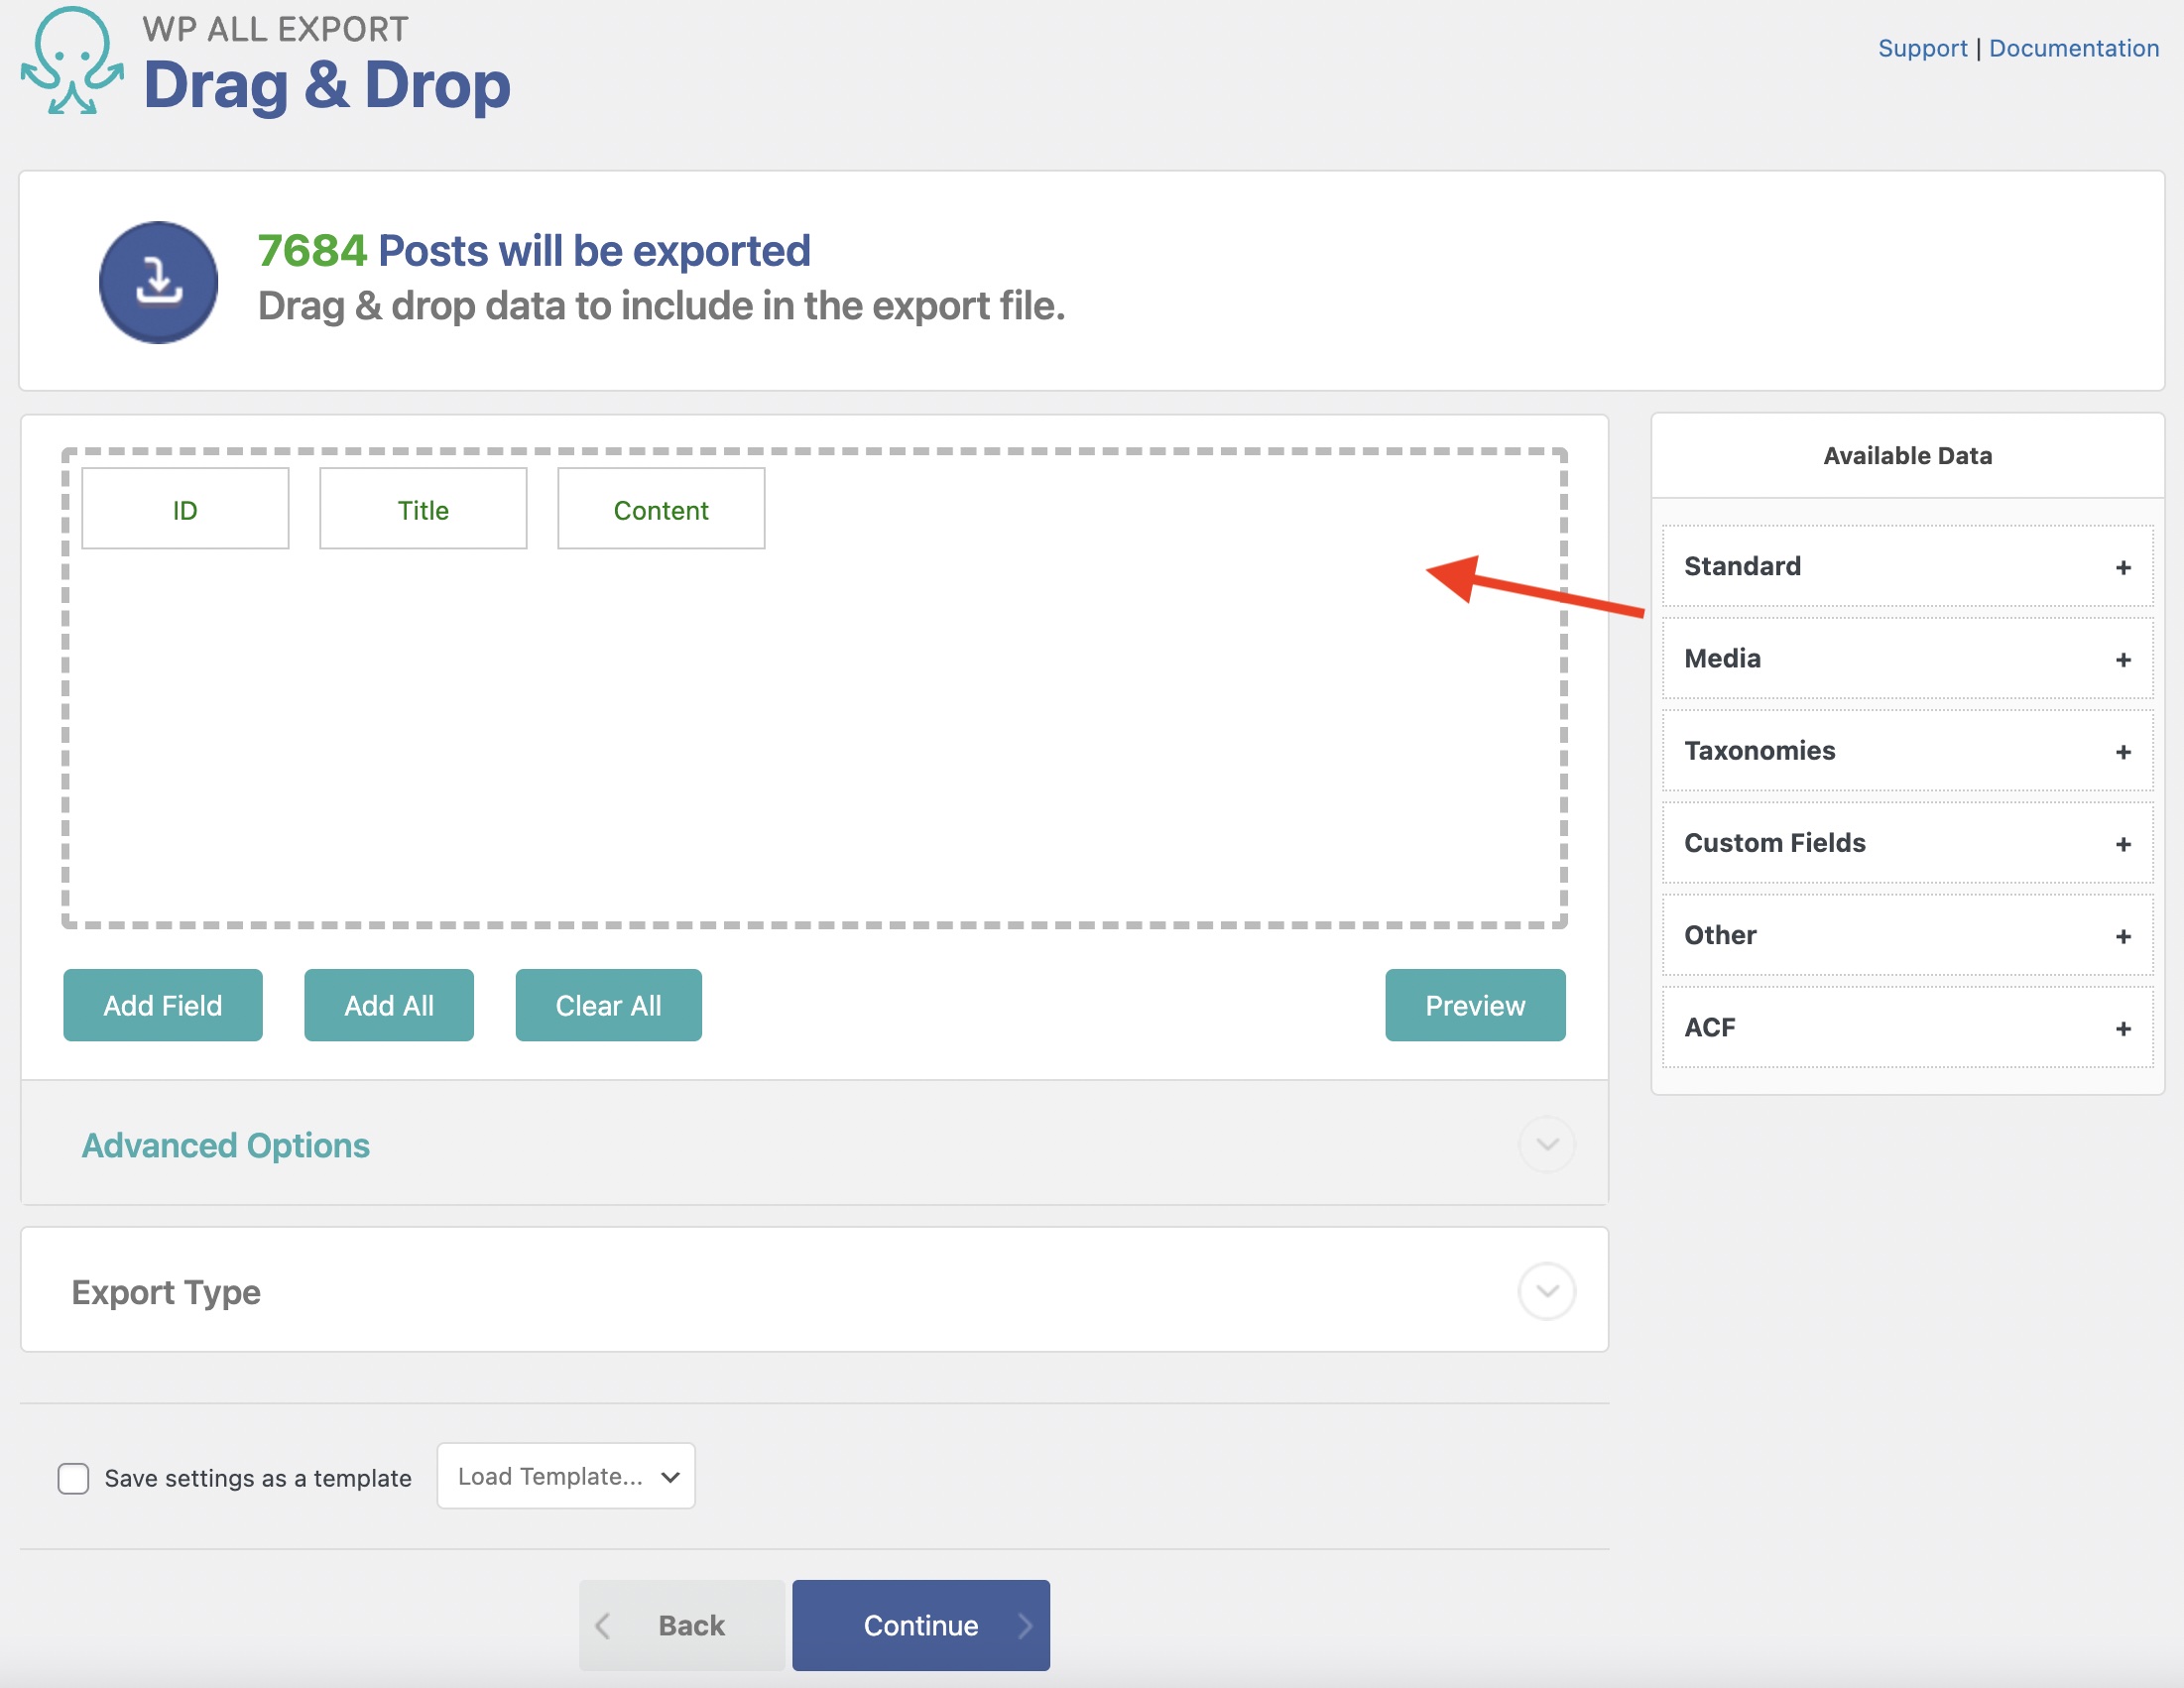
You can delete an export column by dragging it outside the column selection area, or by clicking on the column and then clicking on Delete.
When exporting WordPress posts, you will see the following sections: Standard, Media, Taxonomies, Custom Fields, and Other.
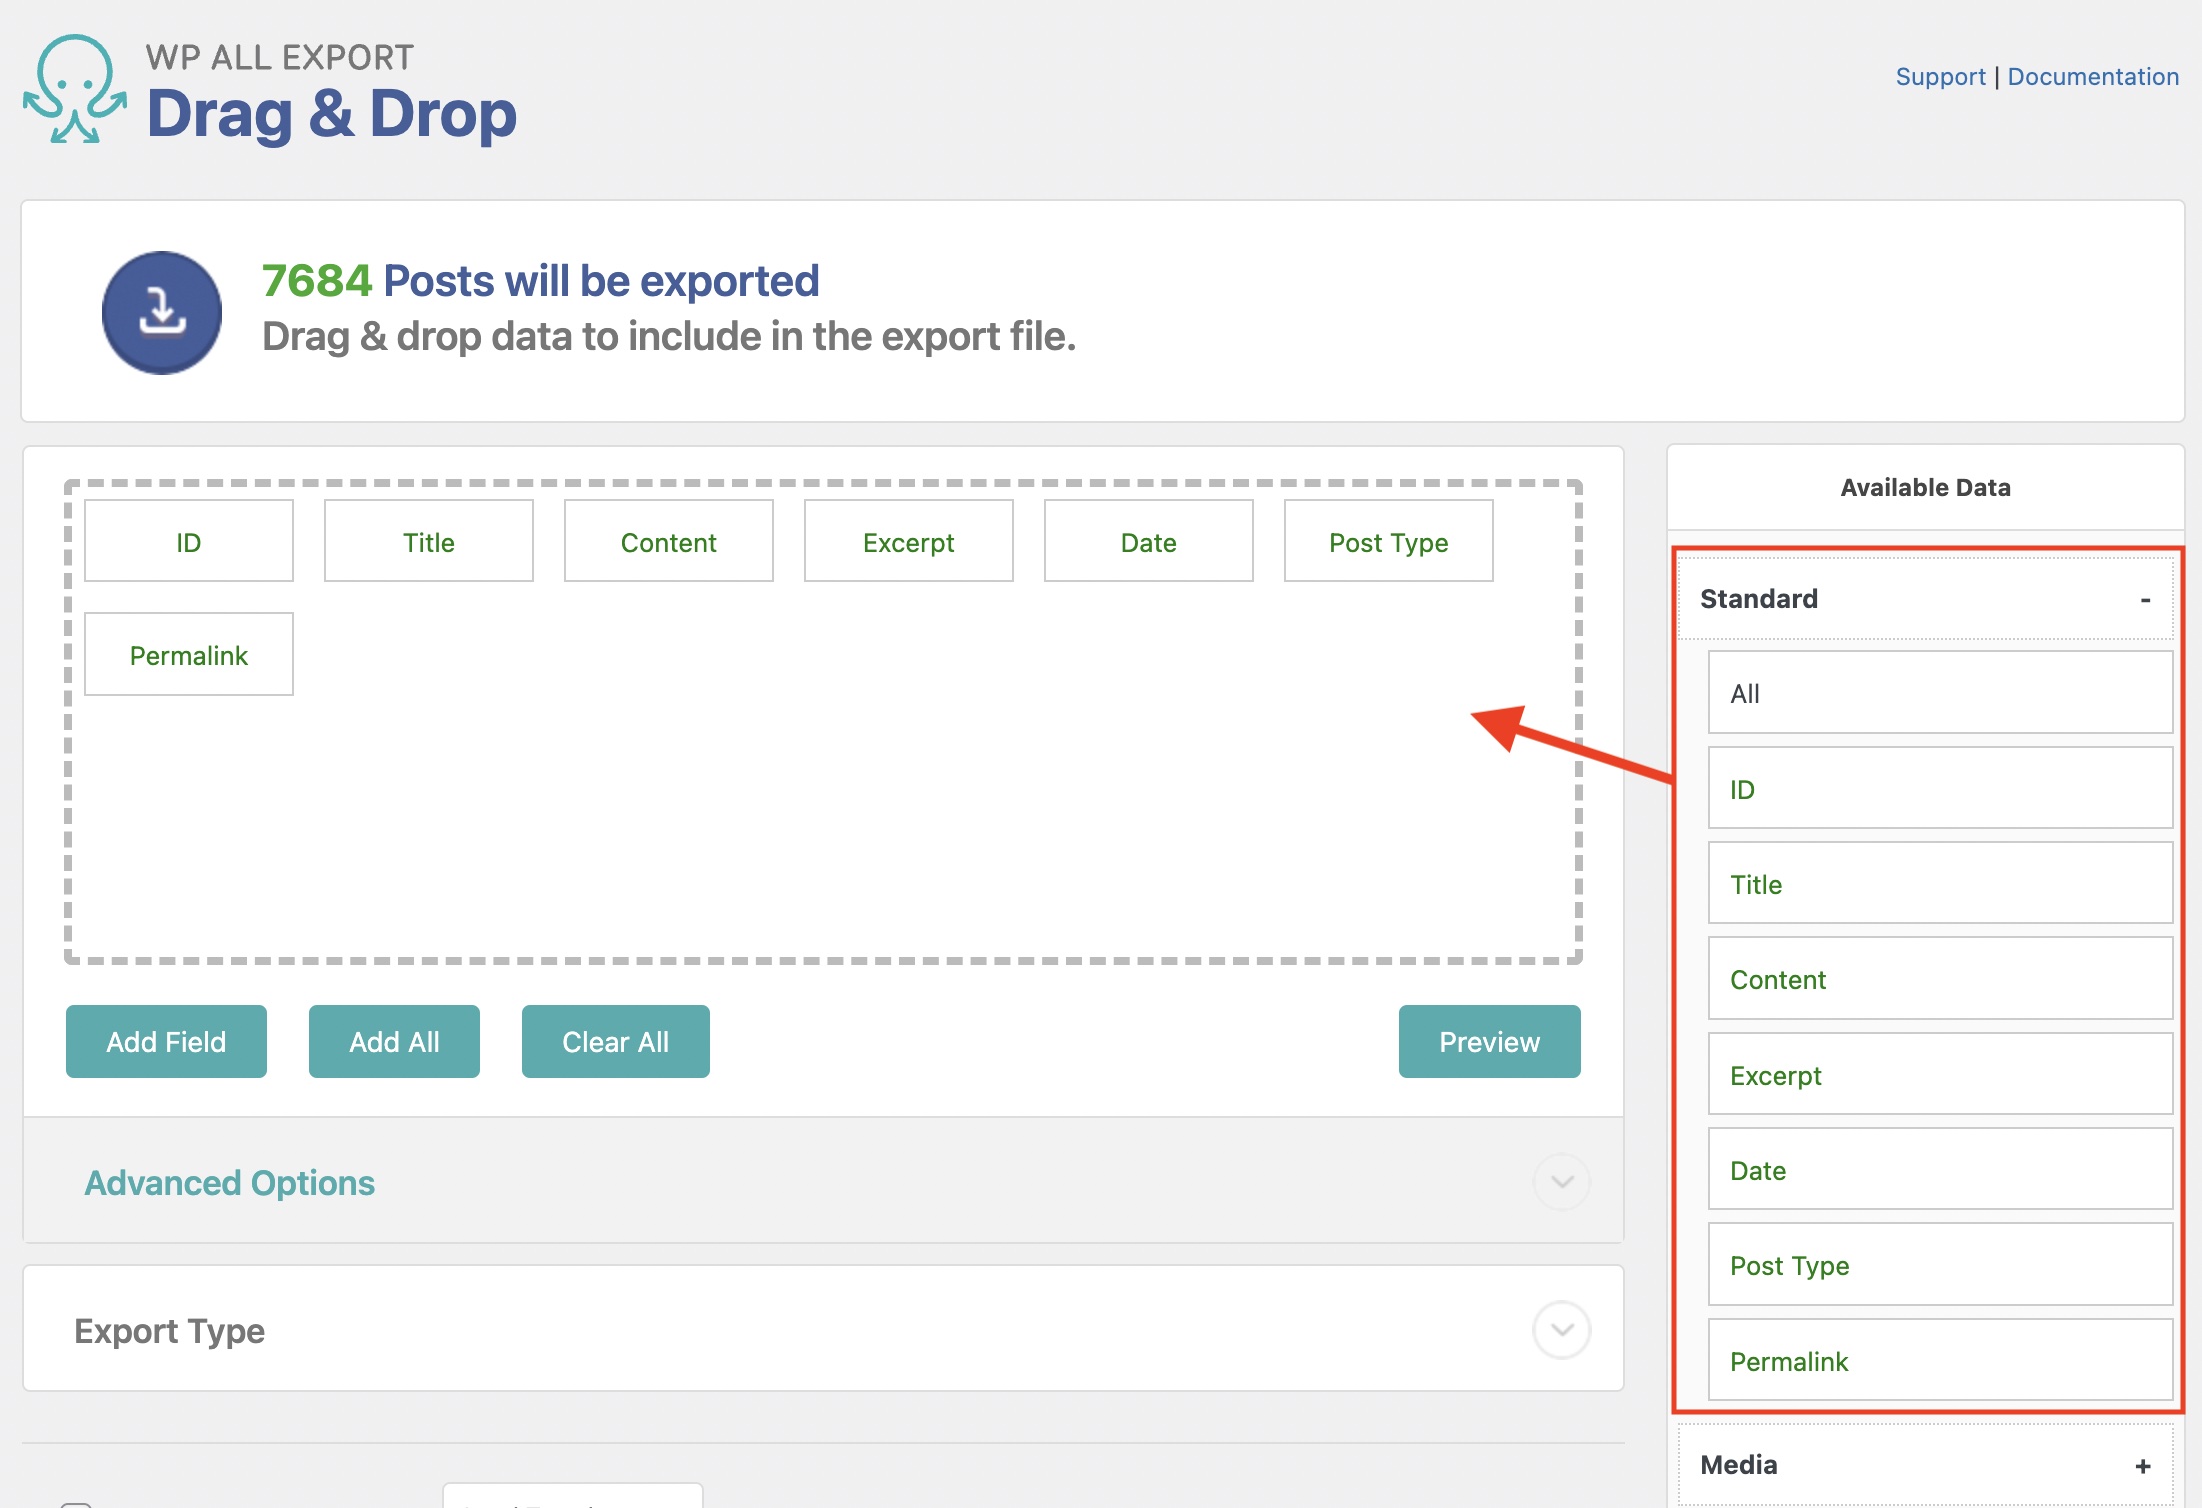
Posts Standard Data
WordPress post standard data is found in Available Data › Standard. The following data fields are available:
- ID: The post ID is a unique number given to every post in WordPress.
- Title: The title of the WordPress post.
- Content: The post's content.
- Excerpt: A short description of the post.
- Date: The date the product was published, in y-m-d H:i:s format.
- Post Type: The post type to export, which is
postin this case. - Permaink: The URL of the post.
Posts Media
All Images and attachments associated with the exported WordPress posts will appear here. You will see two sections inside the Media section: Images and Attachments. Both sections contain the same types of fields:
- URL: The URL of the image or file.
- Filename: The filename for the full-size image or the file.
- Path: The path or location on the server of the image or file.
- ID: The attachment ID of the image or file, similar to a post ID.
- Title: The image or file title.
- Caption: The image or file caption.
- Description: The image or file description.
- Alt Text: The image or file's alternative text.
- Featured: The URL of the featured image (not shown for attachments).

Posts Taxonomies
This section includes the categories and tags attached to the WordPress posts. By default, posts only have two taxonomies, but all taxonomies are detected and shown here during export:
- Categories
- Tags

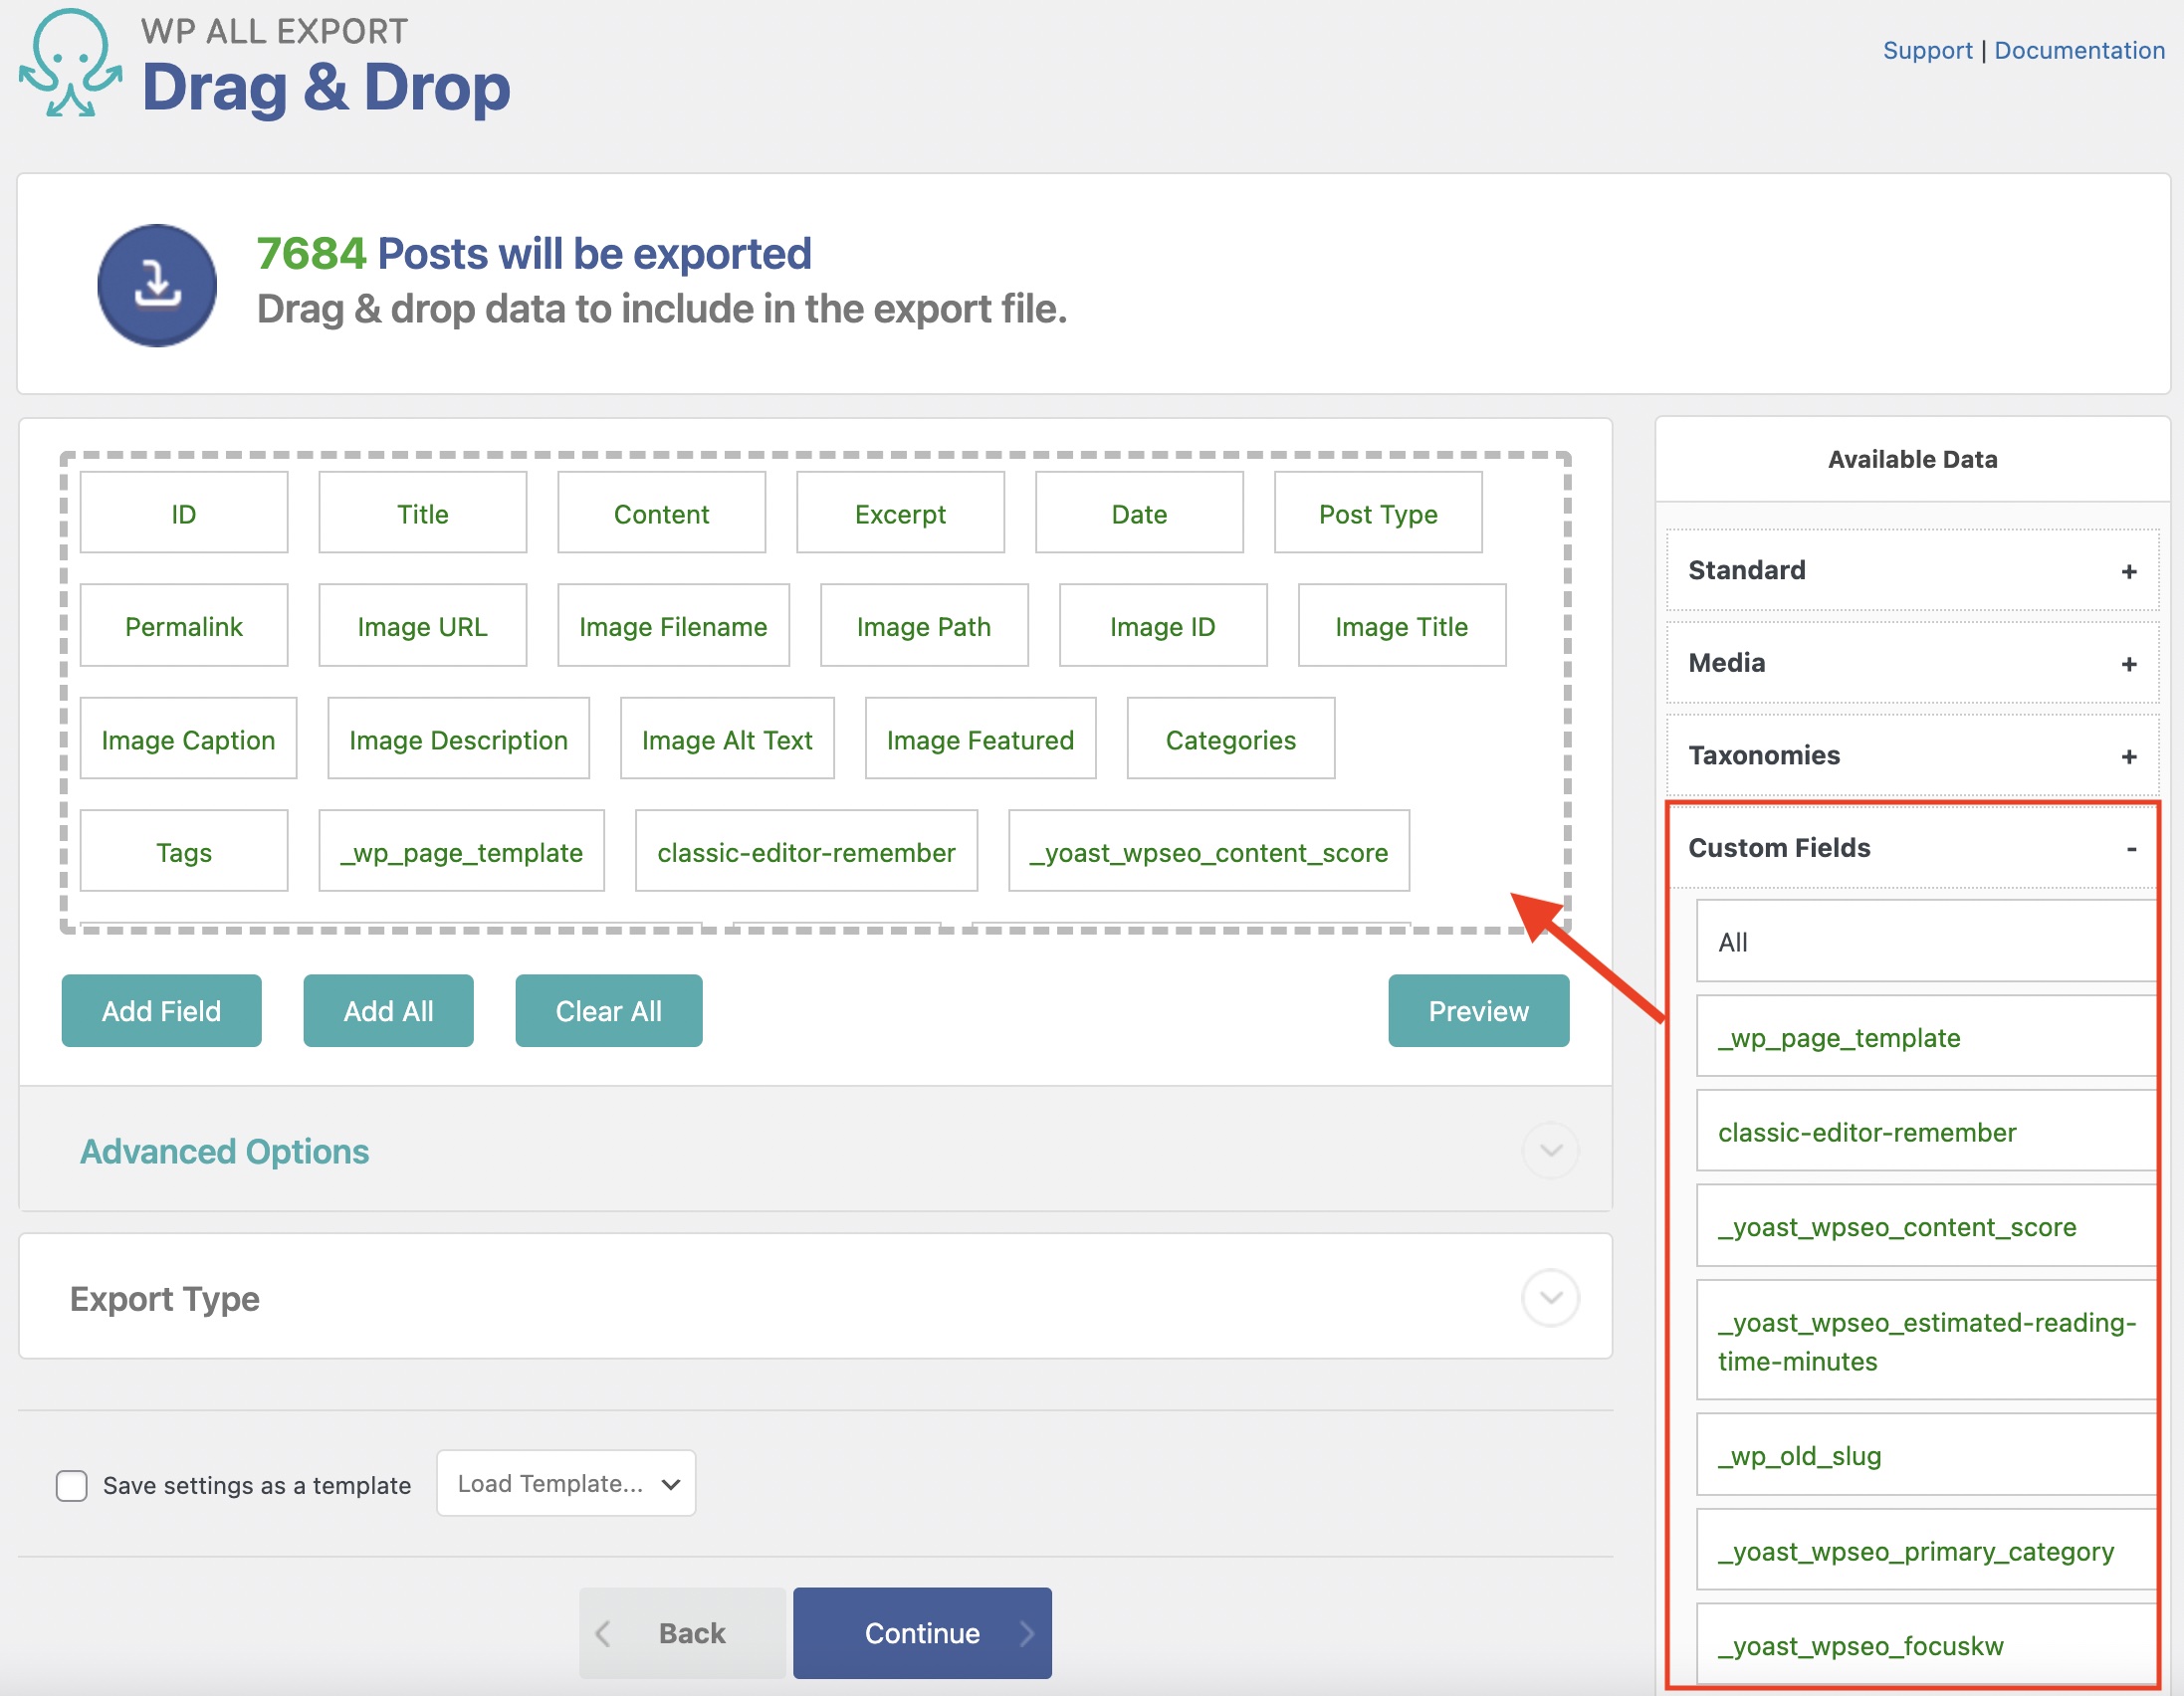
Posts Custom Fields
This section contains any custom fields added by custom code or other plugins. This interface will show up to 1000 custom fields, but custom code can be used to retrieve any custom field.
Other Posts Data
This section contains other post data not included in the other sections. The following is an incomplete list with only the more important other export fields:
- Status: The post status. The default post statuses are
publish,draft,pending, andprivate. - Author ID: The ID of the user that created the post.
- Author Username: The username of the user that created the post.
- Slug: The post's slug.
- Parent: If the post has a parent post, it will export its ID. Otherwise,
0is exported. - Parent Slug: If the post has a parent, it will export its slug. Otherwise,
0is exported. - Post Modified Date: The date the product was last modified, in y-m-d H:i:s format.

Step 3: Configure the Export Settings
Once the export template is set up, click Continue at the bottom. This will bring you to the Export Settings screen, where you will see the following:
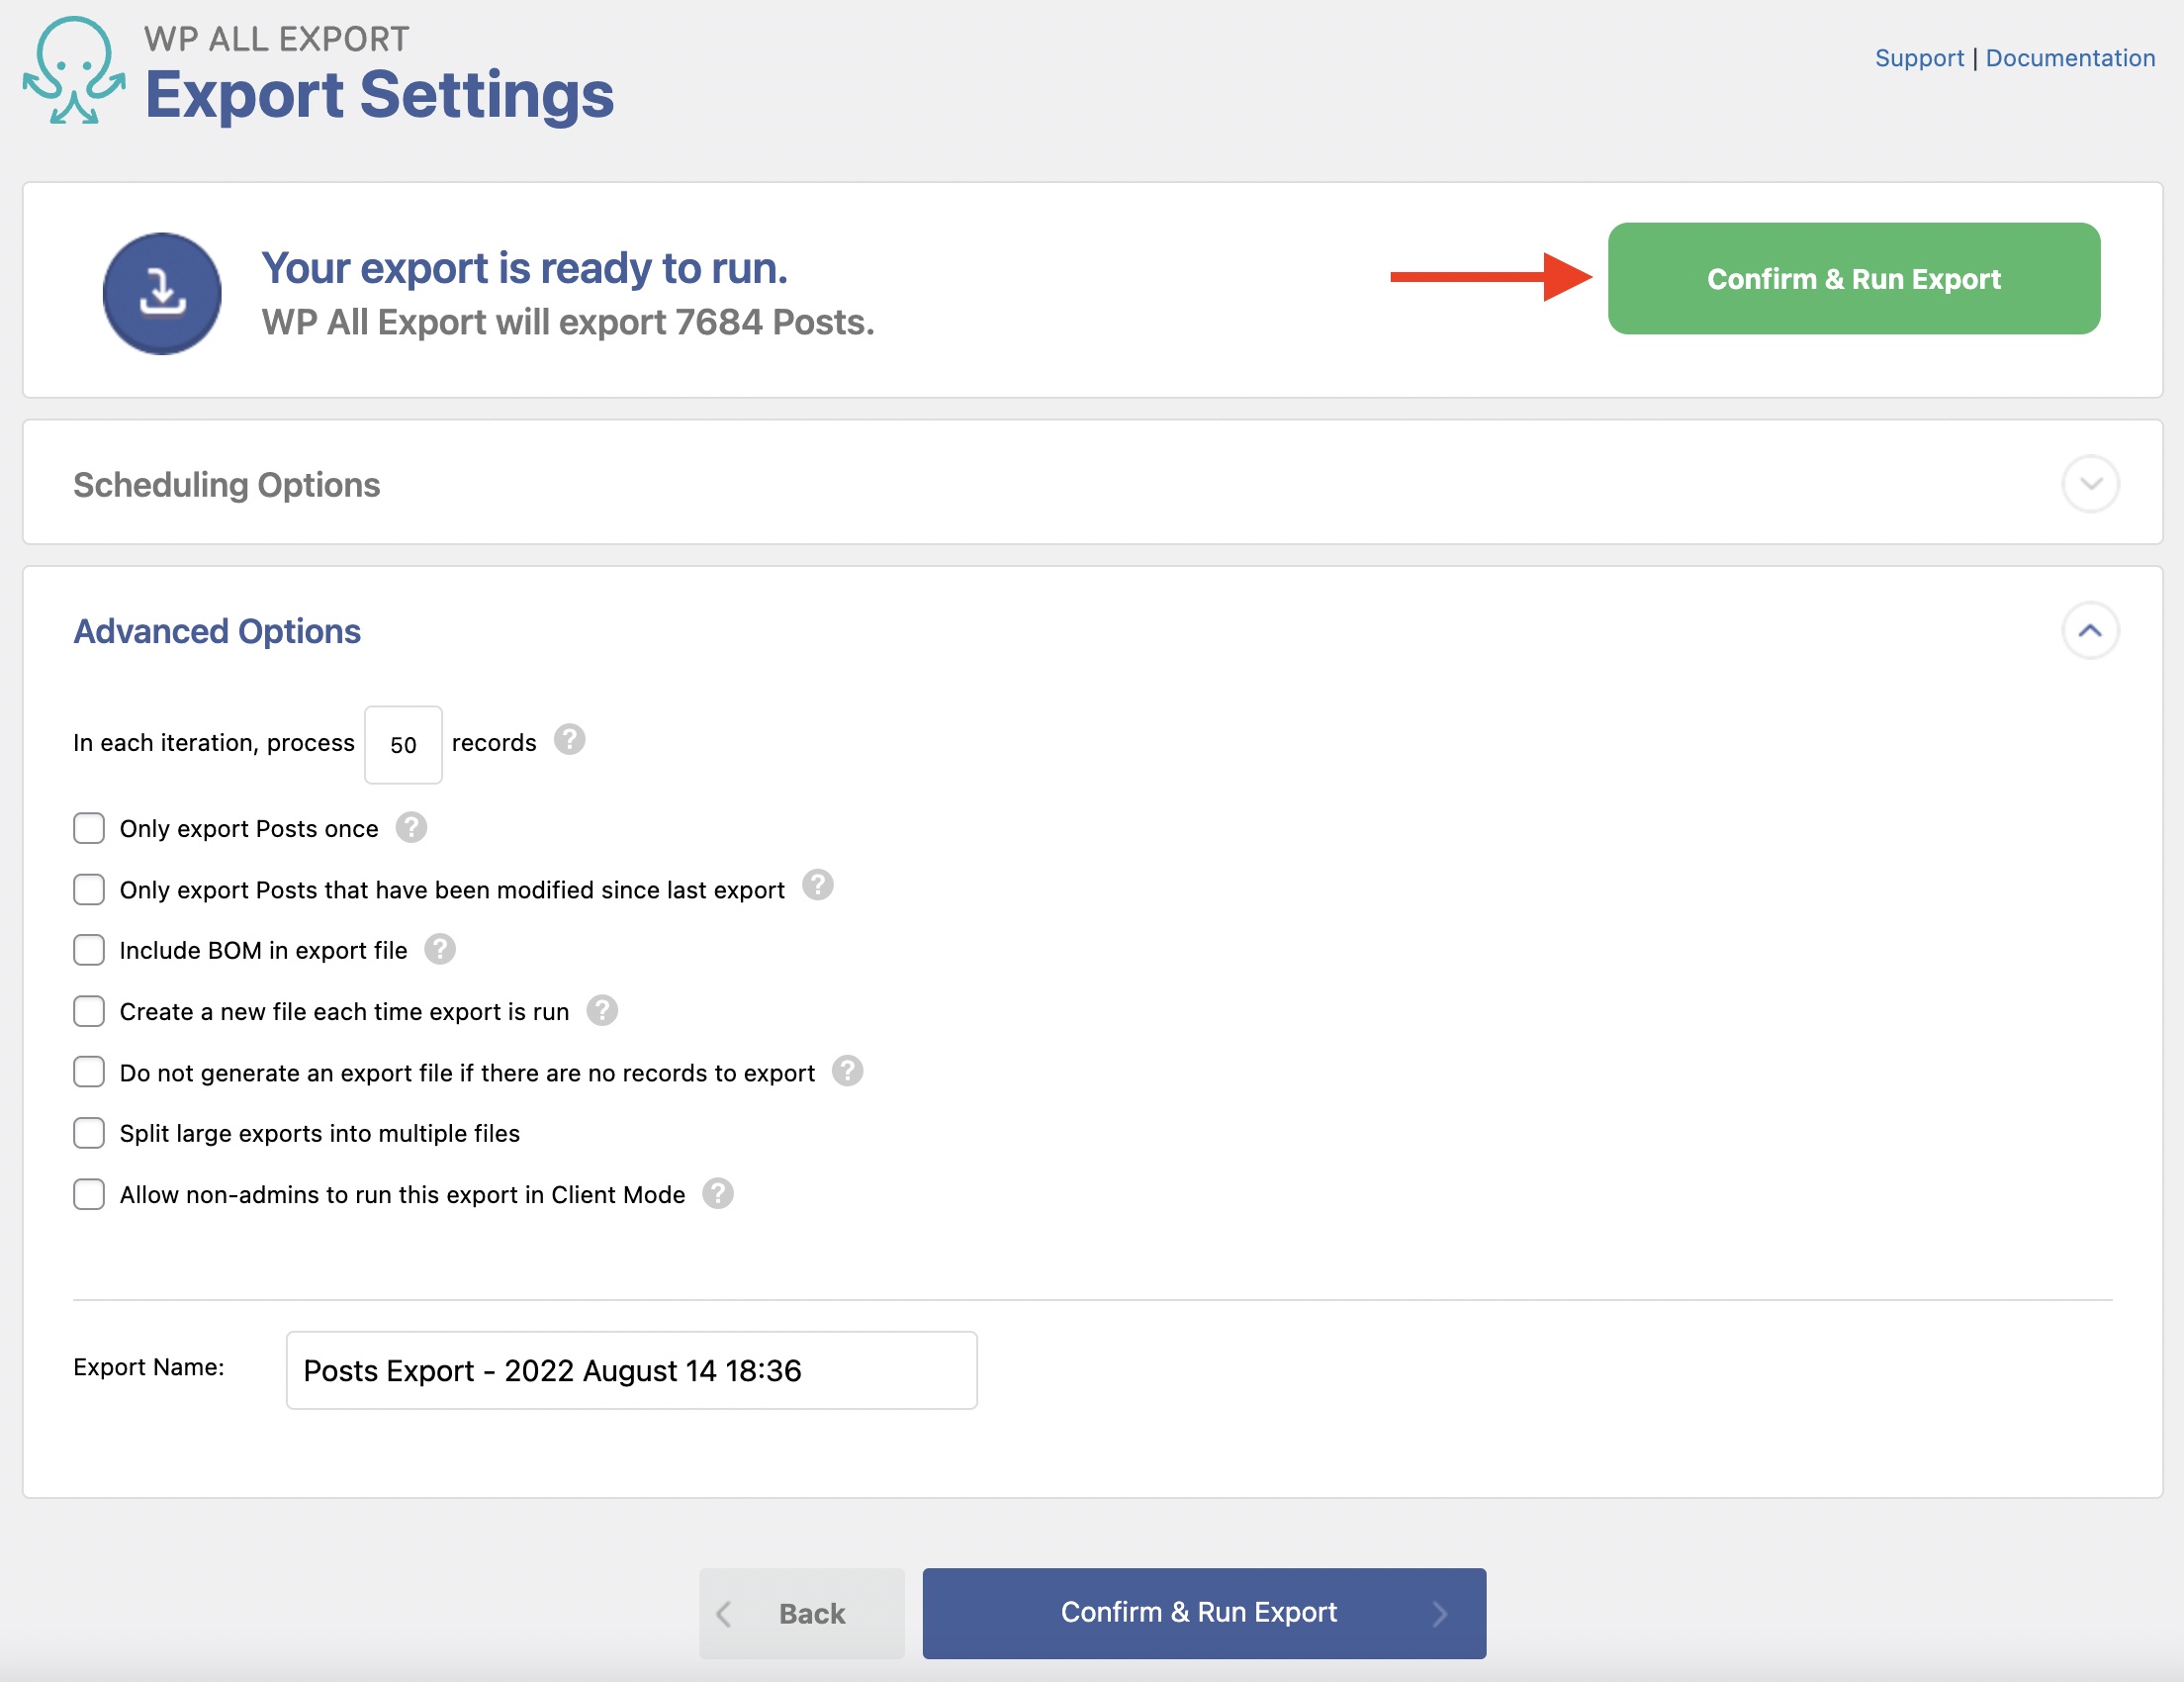
Here you can configure Scheduling Options and Advanced Options. When you are ready to run your export, click Confirm & Run Export.
Step 4: Download the Exported WordPress Posts
The export will begin to process. Once it is complete, you can download the exported file in either the selected format (i.e., CSV, XML, Excel) or as a Bundle file. In addition to the export data, the bundle file contains instructions that tell WP All Import how to import the data.
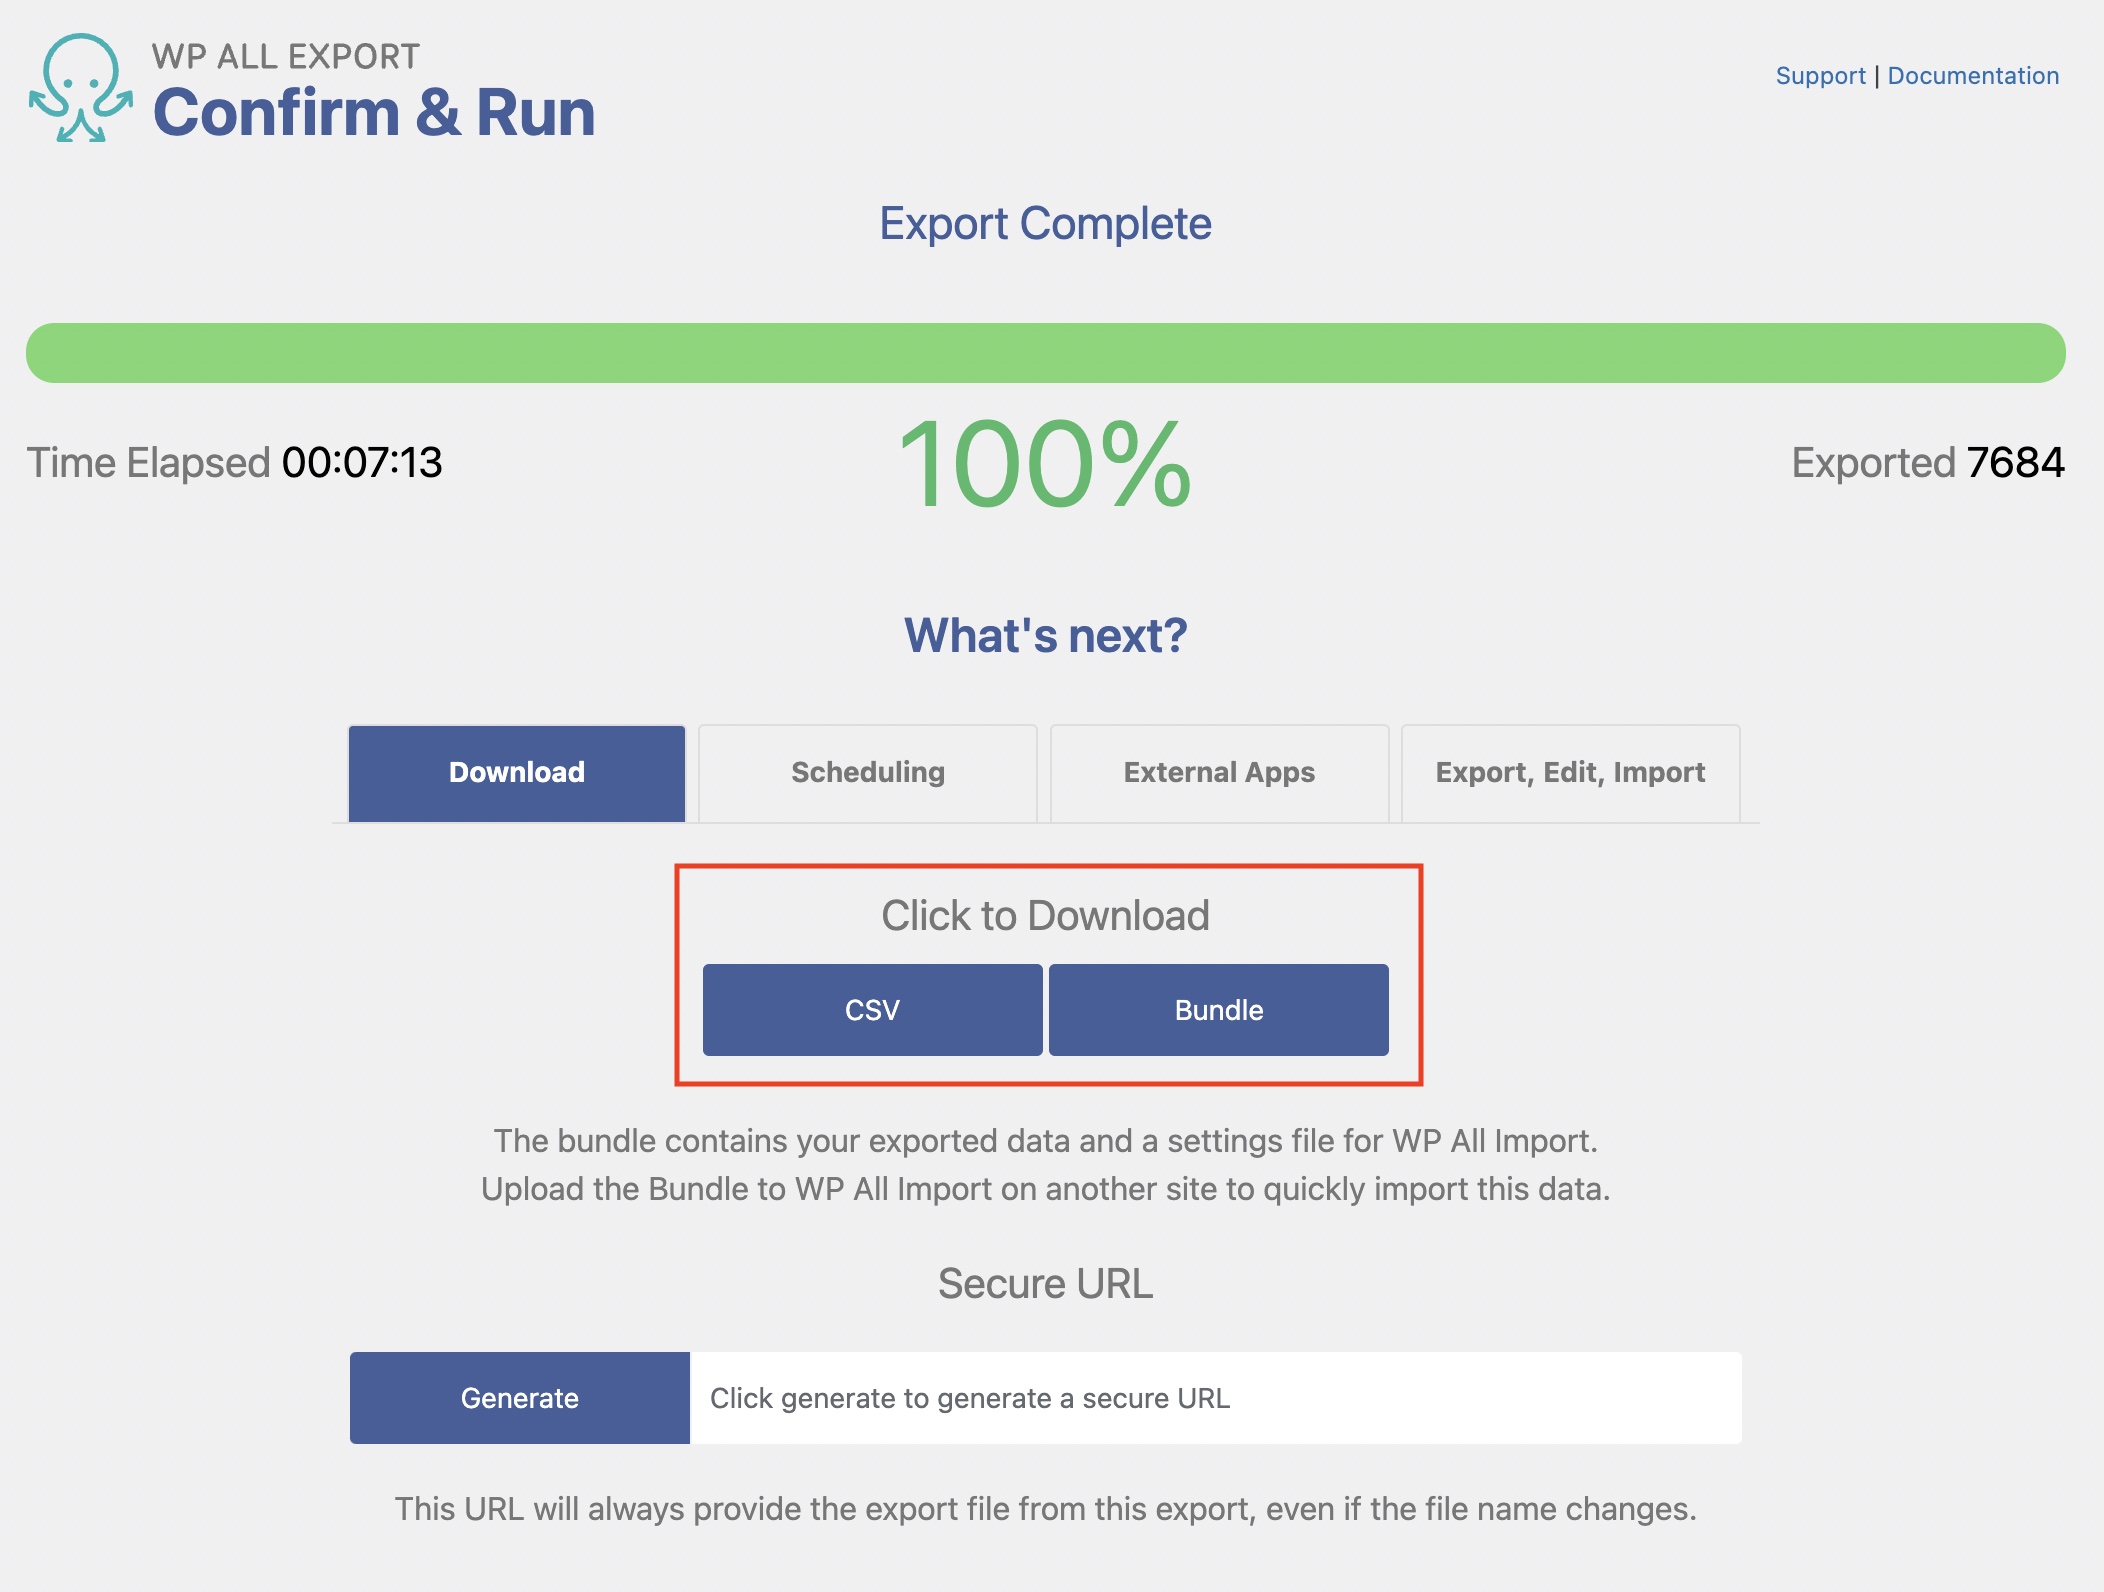
Here's a look at an example WordPress posts export:

Export WordPress to any CSV, XML, or Excel
- Any theme or plugin
- Images & galleries
- Custom fields
- Zapier integration
- Woo, ACF, Meta Box, JetEngine
Export WordPress Posts —Advanced Topics
Add Filters to Your WordPress Post Export
You can add a filter to export only a subset of WordPress posts. The filter can be used on all export fields described in Step 2 of the guide above.
To filter your WordPress posts, expand Add Filtering Options in the panel at the bottom of Step 1, then choose an Element, select a Rule, and input a Value:
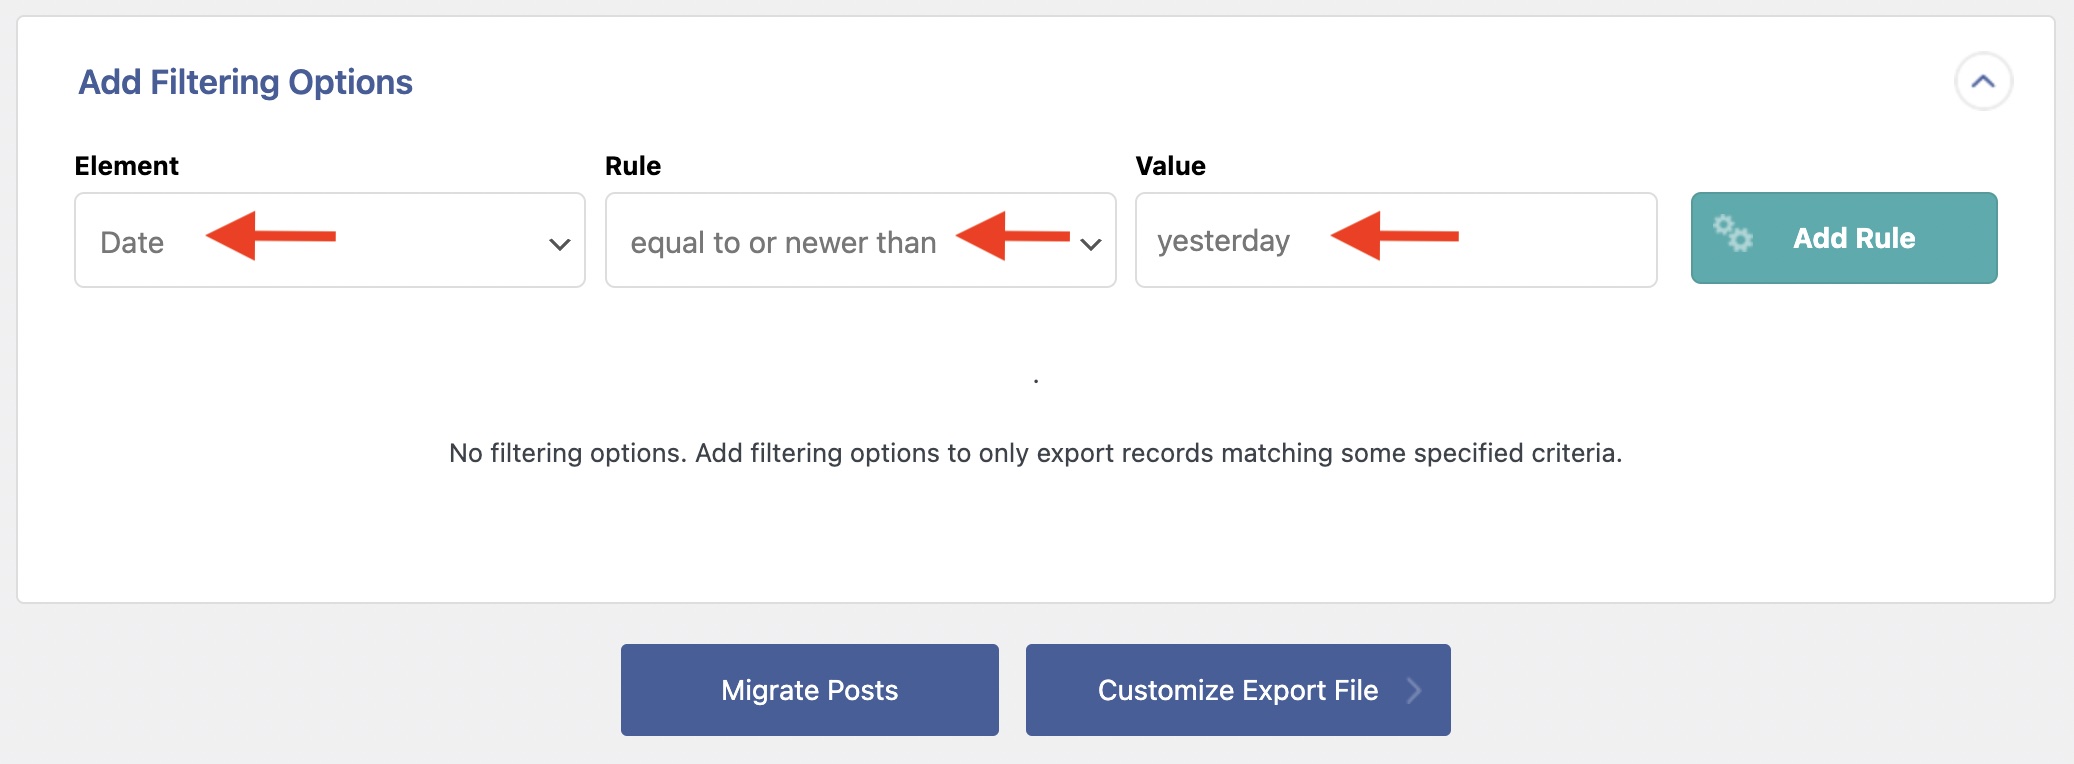
In this example, you are setting:
Element = Date
Rule = equal to or newer than
Value = yesterday
This is the same as saying, “Export posts with a date equal to or earlier than 'yesterday.'"
You can also combine multiple filters. For example, to export posts with a category of "News" that have a status of publish, set your filters like this:
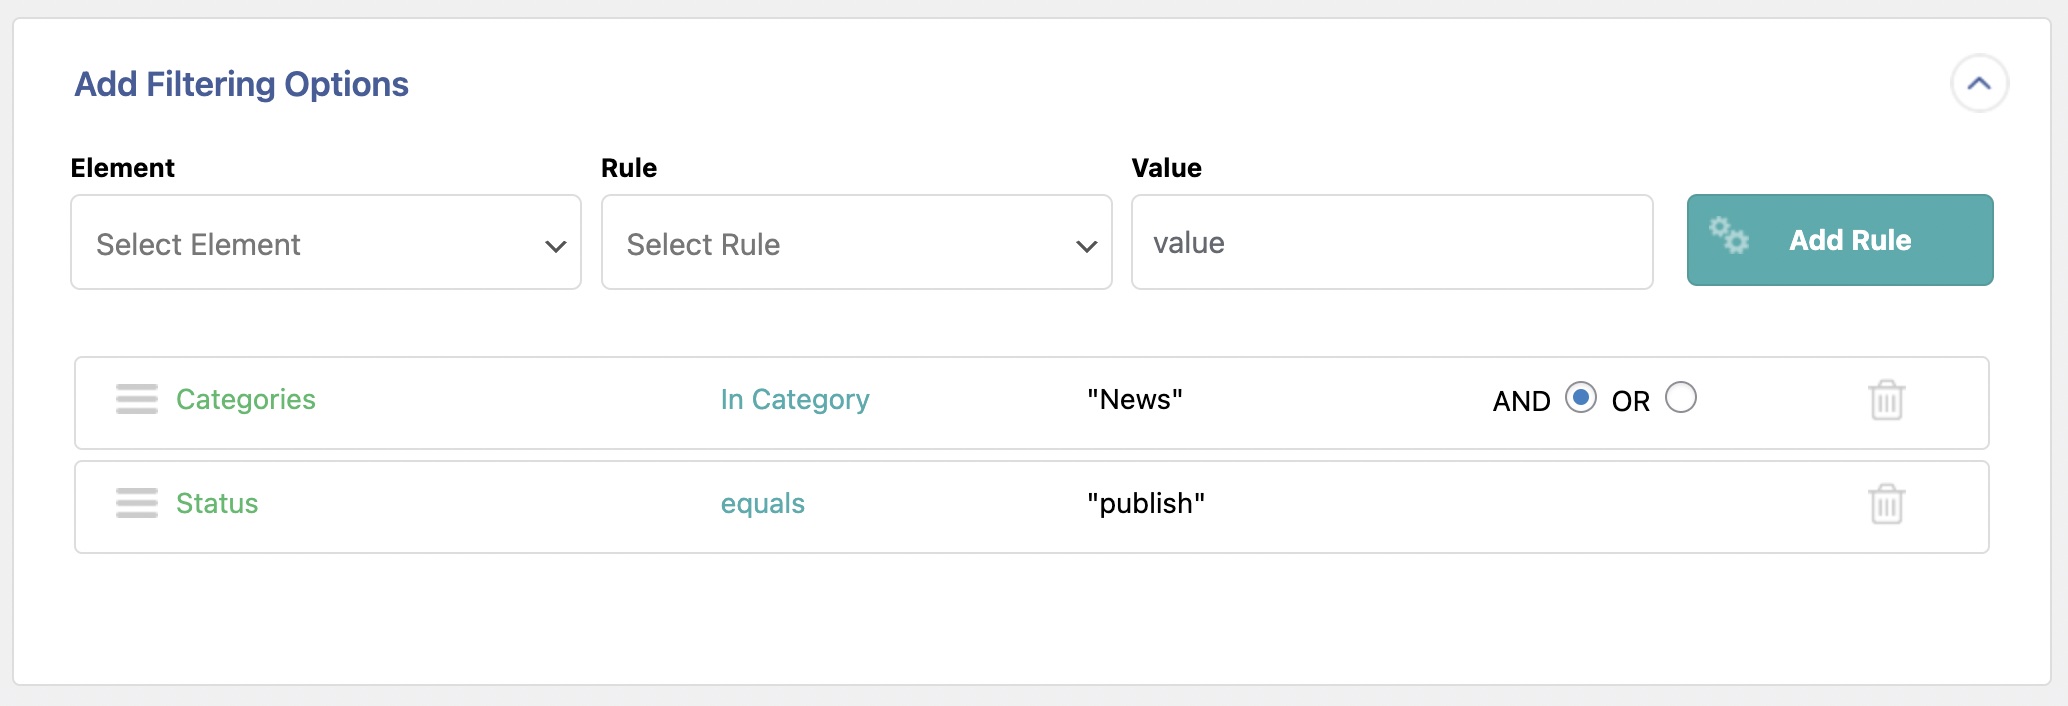
The filters can be as complex as you want. Using the same Filtering Options section, you can modify existing filters in All Export › Manage Exports › Settings.
Choose A Different Export File Format
You can choose a different export type to output a different file format. The following options are available:
- Spreadsheet
- CSV File
- Excel File (XLS)
- Excel File (XLSX)
- Feed
- Simple XML Feed
- Custom XML Feed
You can learn more about using any of the available export types here: Export WordPress to CSV, Excel, or XML.
Learn How To Connect Your Export With External Apps
You can use Zapier to connect with external apps. Zapier acts as a middle man between WP All Export and hundreds of other popular apps. For example, you can send the exported posts via email (i.e., using Gmail) or to Google Drive.
To learn more, read: How to Send Exported WordPress Data to Zapier.
Export WordPress Posts — Frequently Asked Questions
How Do I Export WordPress Posts to Excel?
- Go to All Export > New Export and select Posts.
- Configure the export columns using our Drag & Drop interface.
- In that same interface, change the Export Type to Spreadsheet > Excel File (XLS) or Spreadsheet > Excel File (XLSX), depending on the version of Excel that you are using.
- Run the export.
- Verify the content of your export file.
How Do I Export WordPress Posts to CSV?
To export WordPress posts to CSV, just follow the steps in this guide, as CSV is the default file format for all exports using WP All Export.
How Do I Extract a Single Post From WordPress?
To extract a single post from WordPress, follow the steps in this guide but set a filter to isolate the desired post as described in the section Add Filters to Export WordPress Posts Selectively.
How Do I Export Selected Posts from WordPress?
To export selected posts from WordPress, just follow the steps in this guide but add a filter that targets those specific posts. This is done in Step 1 at the bottom of the New Export page.
How Do I Download a List of Posts From WordPress?
Use the steps from this guide to export all WordPress posts from your WordPress site using the exact columns that you want in your list. If you only need a subset of posts, you can apply a filter as explained in the section Add Filters to Export WordPress Posts Selectively.
How Do I Export WordPress Posts Automatically?
You can use our automatic scheduling service to run your WordPress posts export automatically on a predefined schedule. This can be scheduled directly from our interface. Alternatively, you can manually set up cron jobs on your server.
How Do I Migrate Posts From One WordPress Site to Another?
- Go to WP All Export and select Migrate Posts on the export site.
- After the export is complete, download the Bundle file, which contains instructions on how to import the data.
- Upload the bundle file on the import site.
- Process the import to complete the migration.
- Verify that the posts were migrated.
To see this process in more detail, refer to our Migrate quickstart guide.
How Do I Import WordPress Posts?
- Navigate to All Import › New Import.
- Choose how you want to import your data (i.e., upload a file, download a file from a URL, etc.)
- Upload your file.
- Choose Posts as your import target.
- Use our Drag & Drop interface to map the incoming data elements to the post target fields.
- Run the import.
For more information, see How to Import WordPress Posts.
Can I Export WordPress Pages?
There are no major differences between exporting WordPress pages versus exporting posts. Just select Pages instead of Posts as the export type and WP All Export will adjust accordingly. See How to Export WordPress Pages.
Export WordPress Posts — Related Videos
Export WordPress Posts — Related Docs
Export images along with their WordPress type or custom post type.
Export custom fields from any theme or third-party plugin.
Use filters to tell WP All Export which data should be exported specifically.
