The best import export plugin for WordPress & WooCommerce.

How to Import Advanced Custom Fields (ACF) From CSV, Excel, and XML
To import Advanced Custom Fields (ACF), go to All Import > New Import and start a new import of the post type that contains the ACF fields. Expand the Advanced Custom Fields Add-On section and map the incoming data elements to their target ACF fields.
Table of Contents
- Step 1: Create a New ACF Import
- Step 2: Review the Import File
- Step 3: Map the Data to ACF Fields
- Step 4: Run the ACF Import
- Step 5: Verify the ACF Fields
Advanced Topics
The ACF plugin extends WordPress's basic functionality to enable more complex fields, different layouts, and settings. Using our integration with this plugin, you can import ACF data from a CSV file or other file types without having to add it manually.
Step 1: Create a New ACF Import
Navigate to All Import › New Import and upload a valid import file. Our plugin will automatically identify the file type, i.e., CSV, Excel, XML, etc.
Next, choose from the drop-down list the post type that has the Advanced Custom Fields attached.
In this example, we're importing ACF fields to Posts.
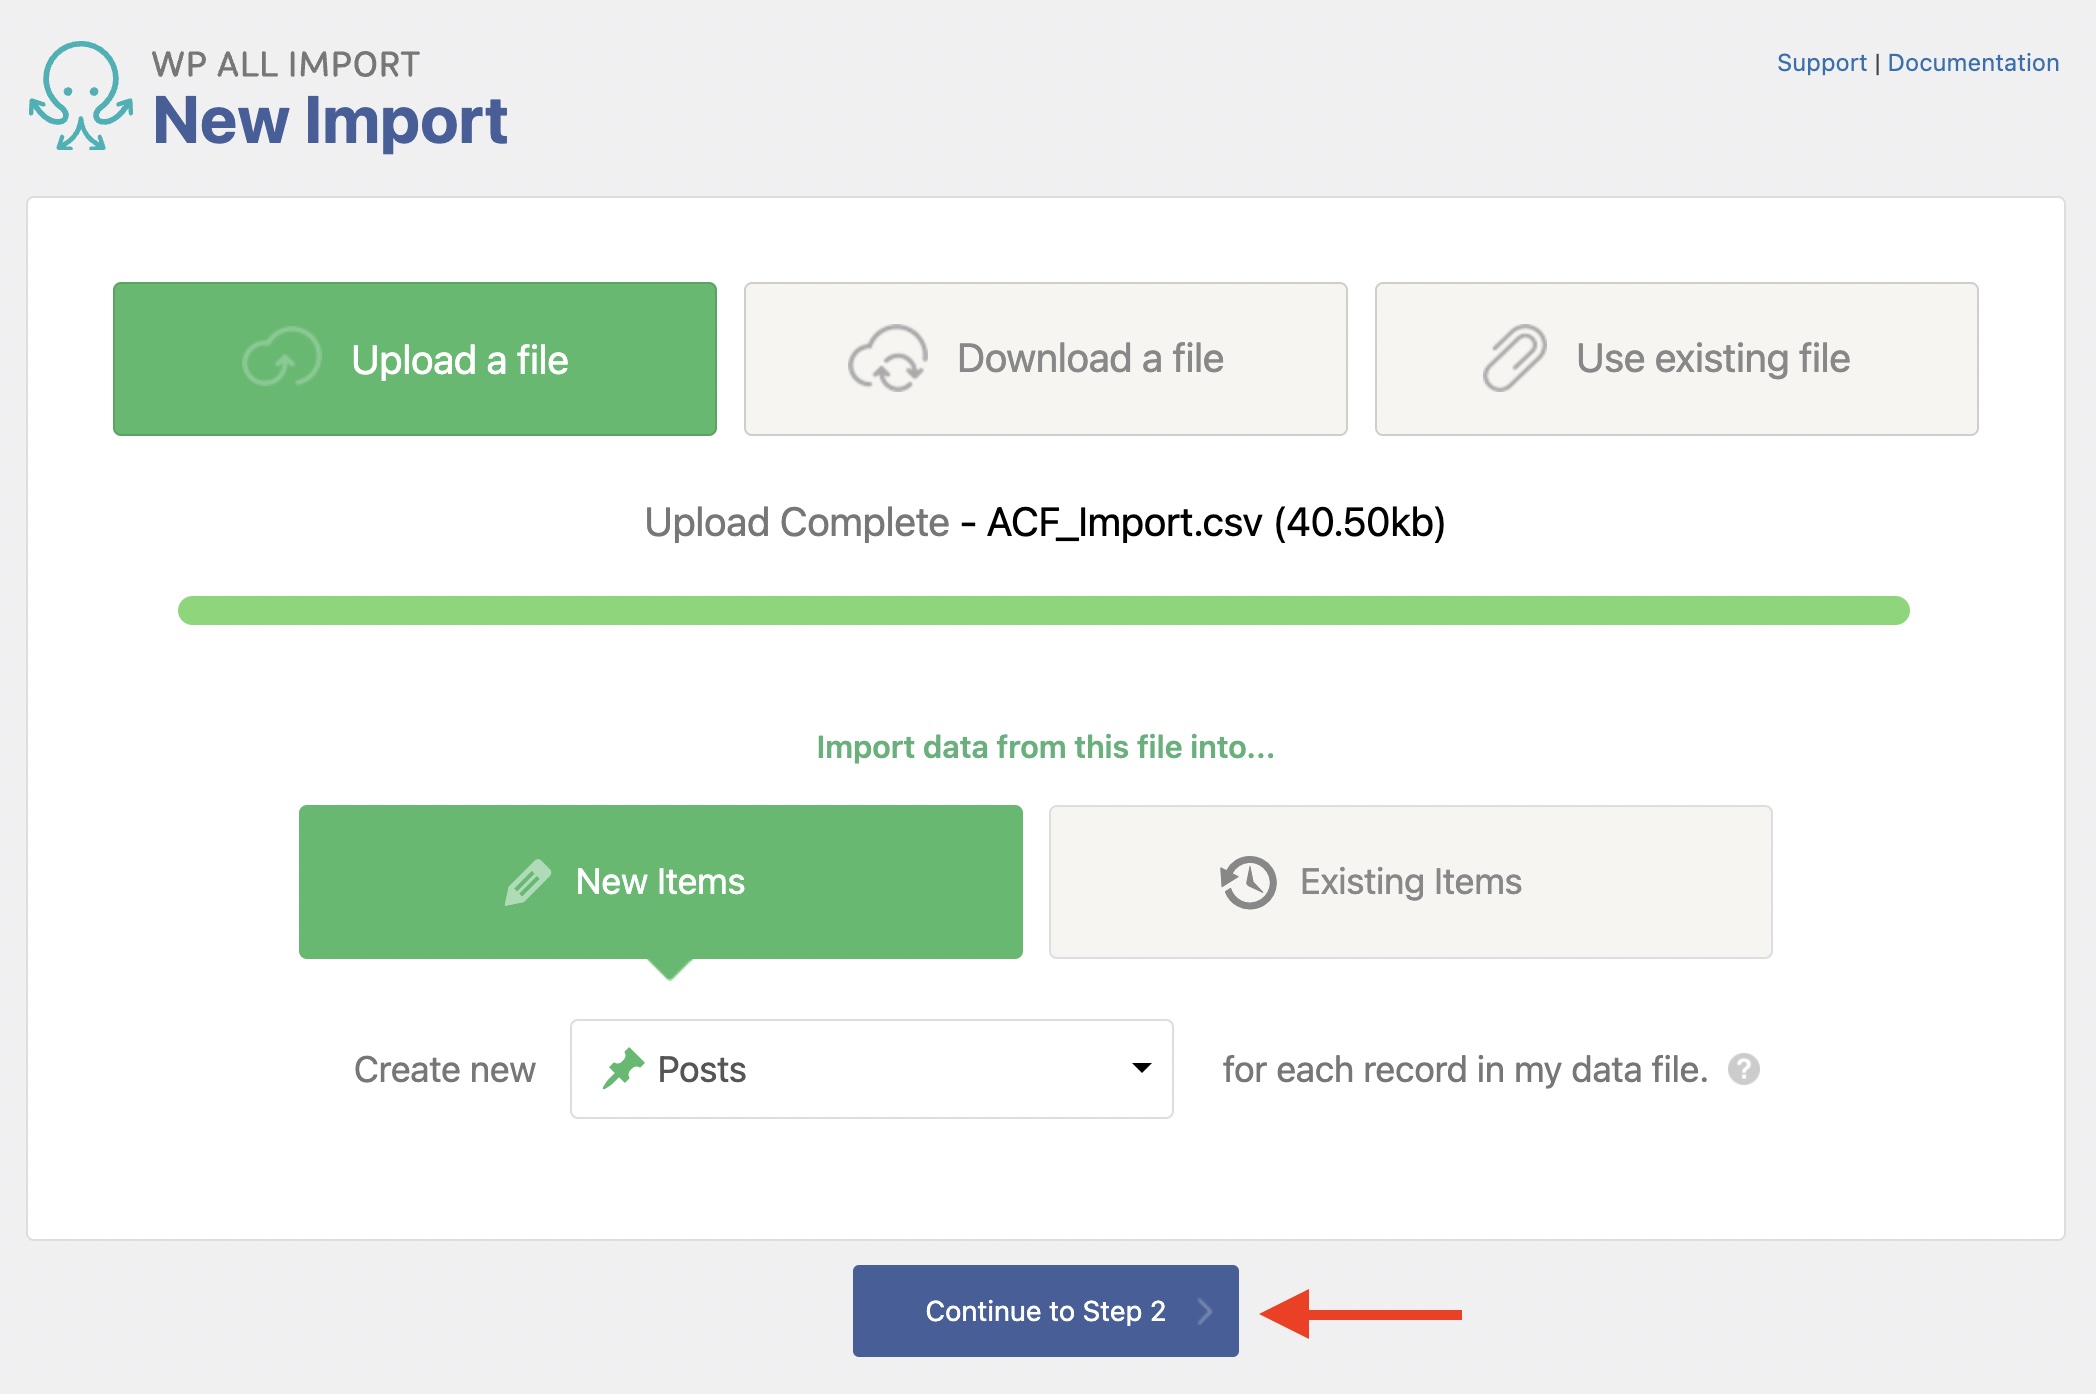
Click Continue to Step 2 to move on to the next step.
Keep in mind that your Advanced Custom Fields and Fields Groups need to be created and defined for posts in the ACF plugin prior to importing data.
If you're not certain how to create the field groups, please review How to Create ACF Fields Groups in the Advanced Topics section below.
Step 2: Review the Import File
The Review Import File interface appears next. Here, you can review and confirm that the import data looks correct:
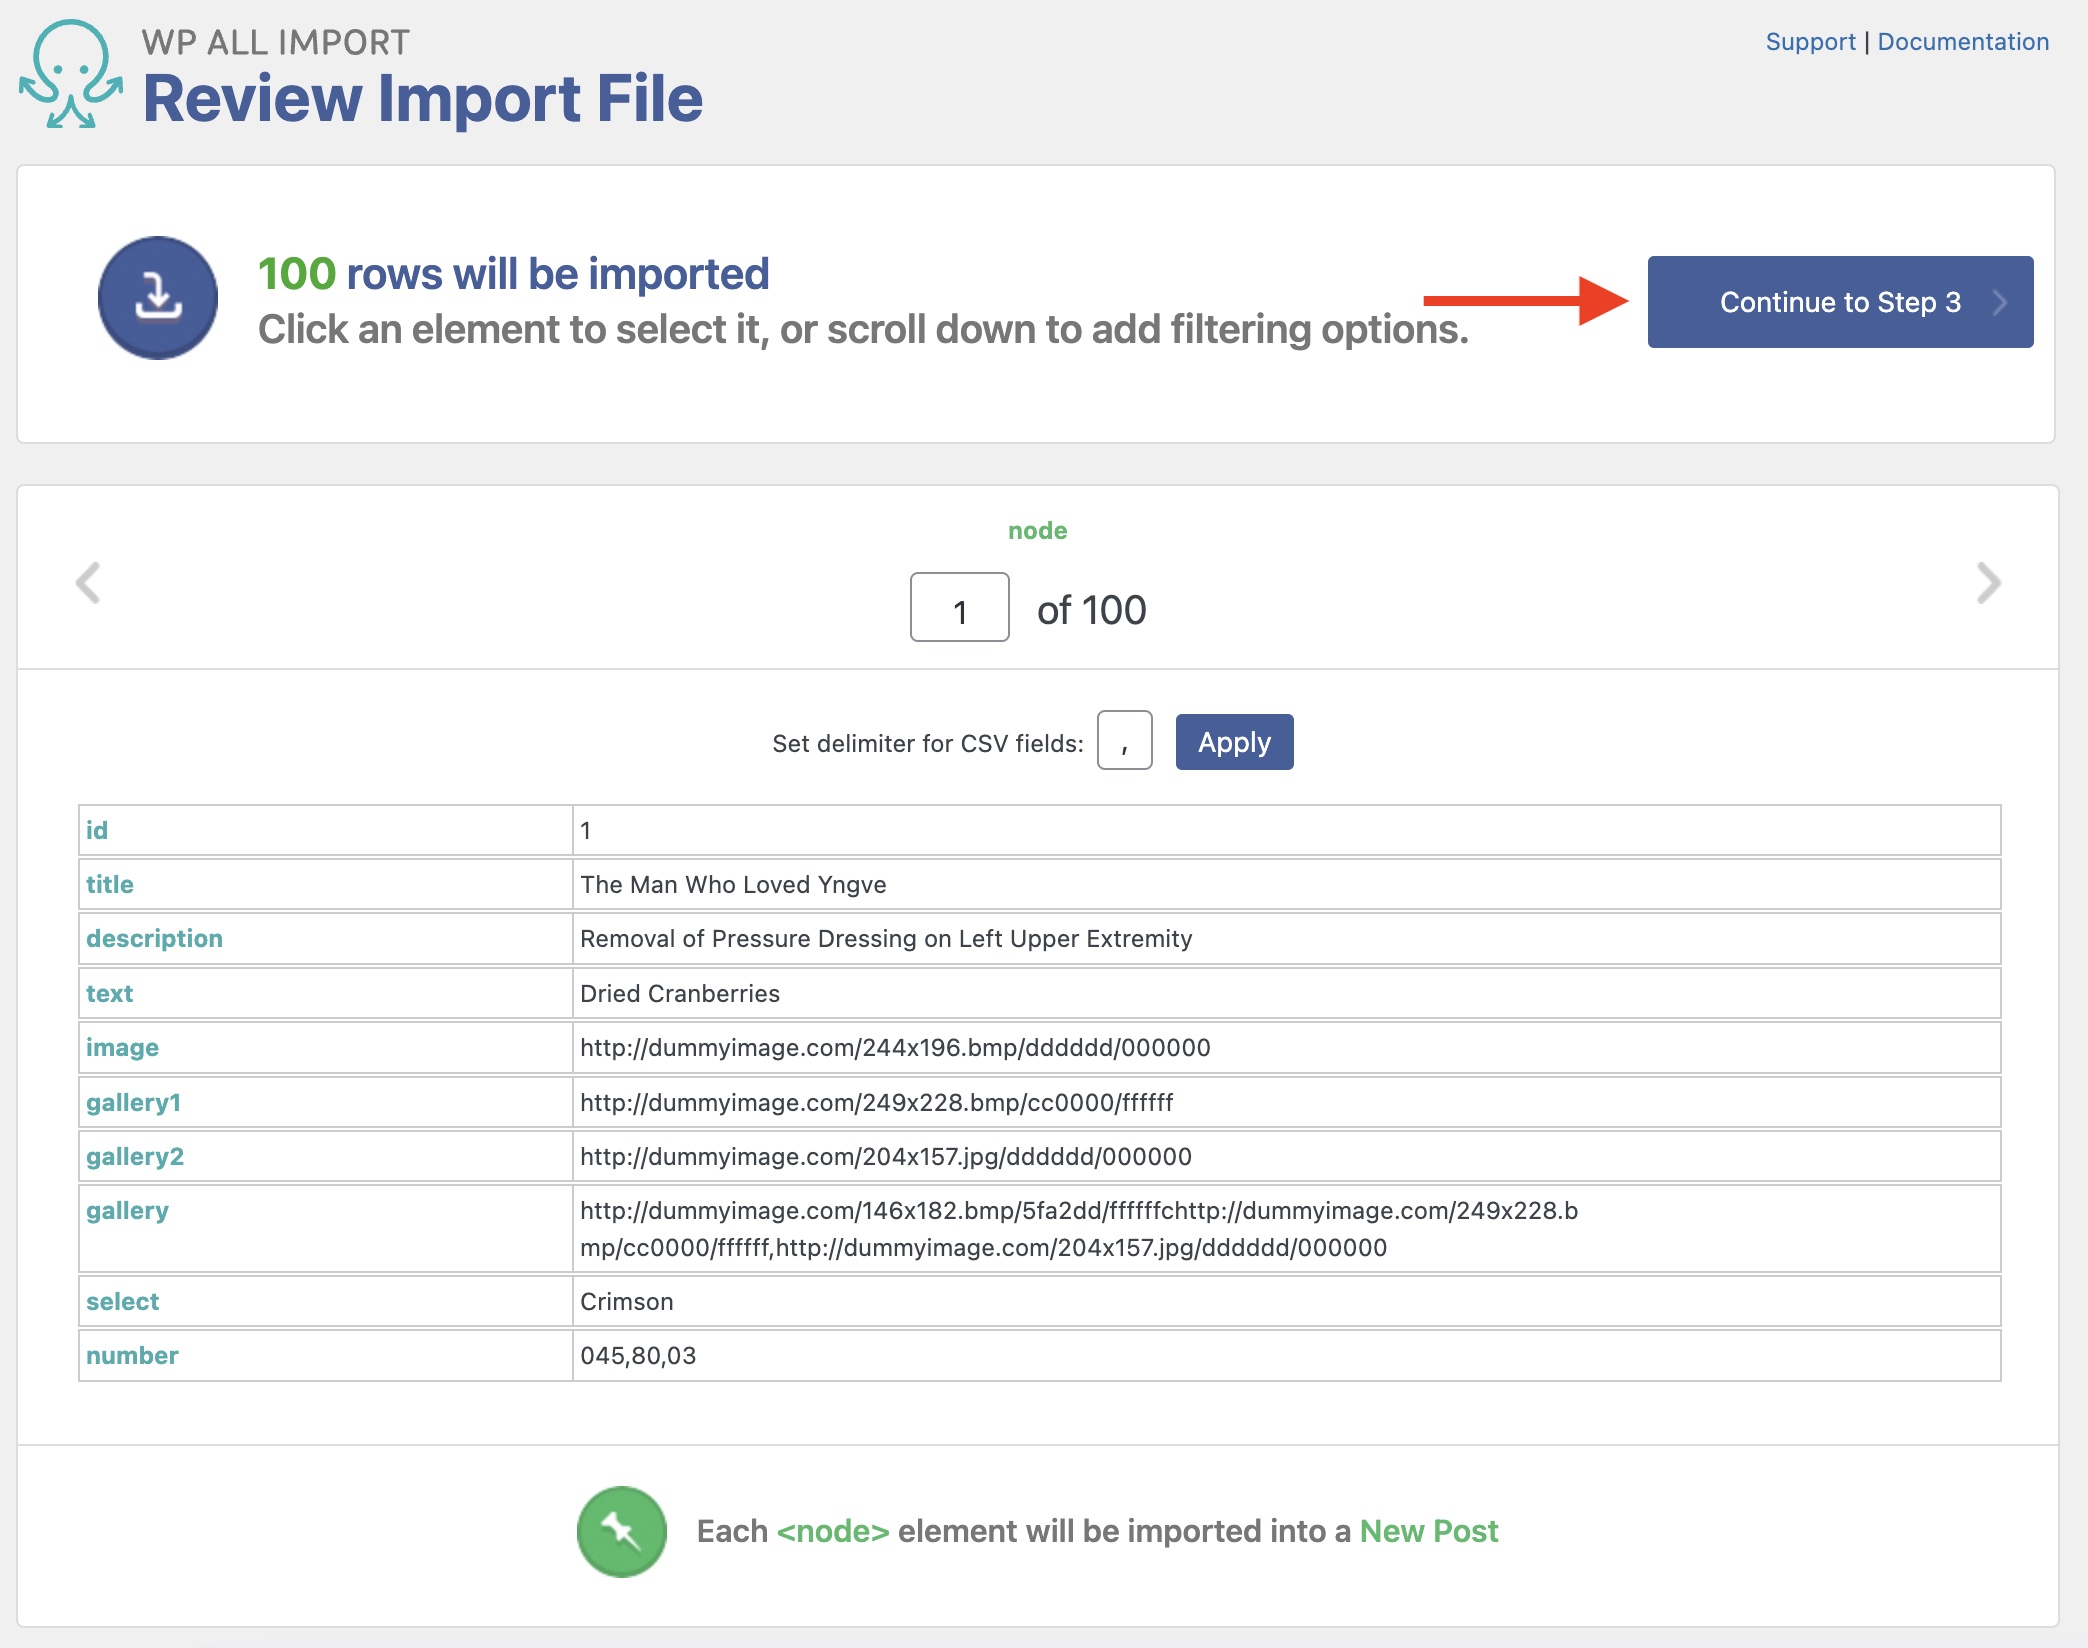
The import has detected 100 records to import. To make sure that the data is correct, you can review each record with the gray arrows at the top.
In this step, you can add filers via the Manage Filtering Options section, if they are needed.
This example uses a CSV spreadsheet. If you import an XML or Excel file, you can decide which will be the main node to import.
Once you confirm that the data looks good, click Continue to Step 3.
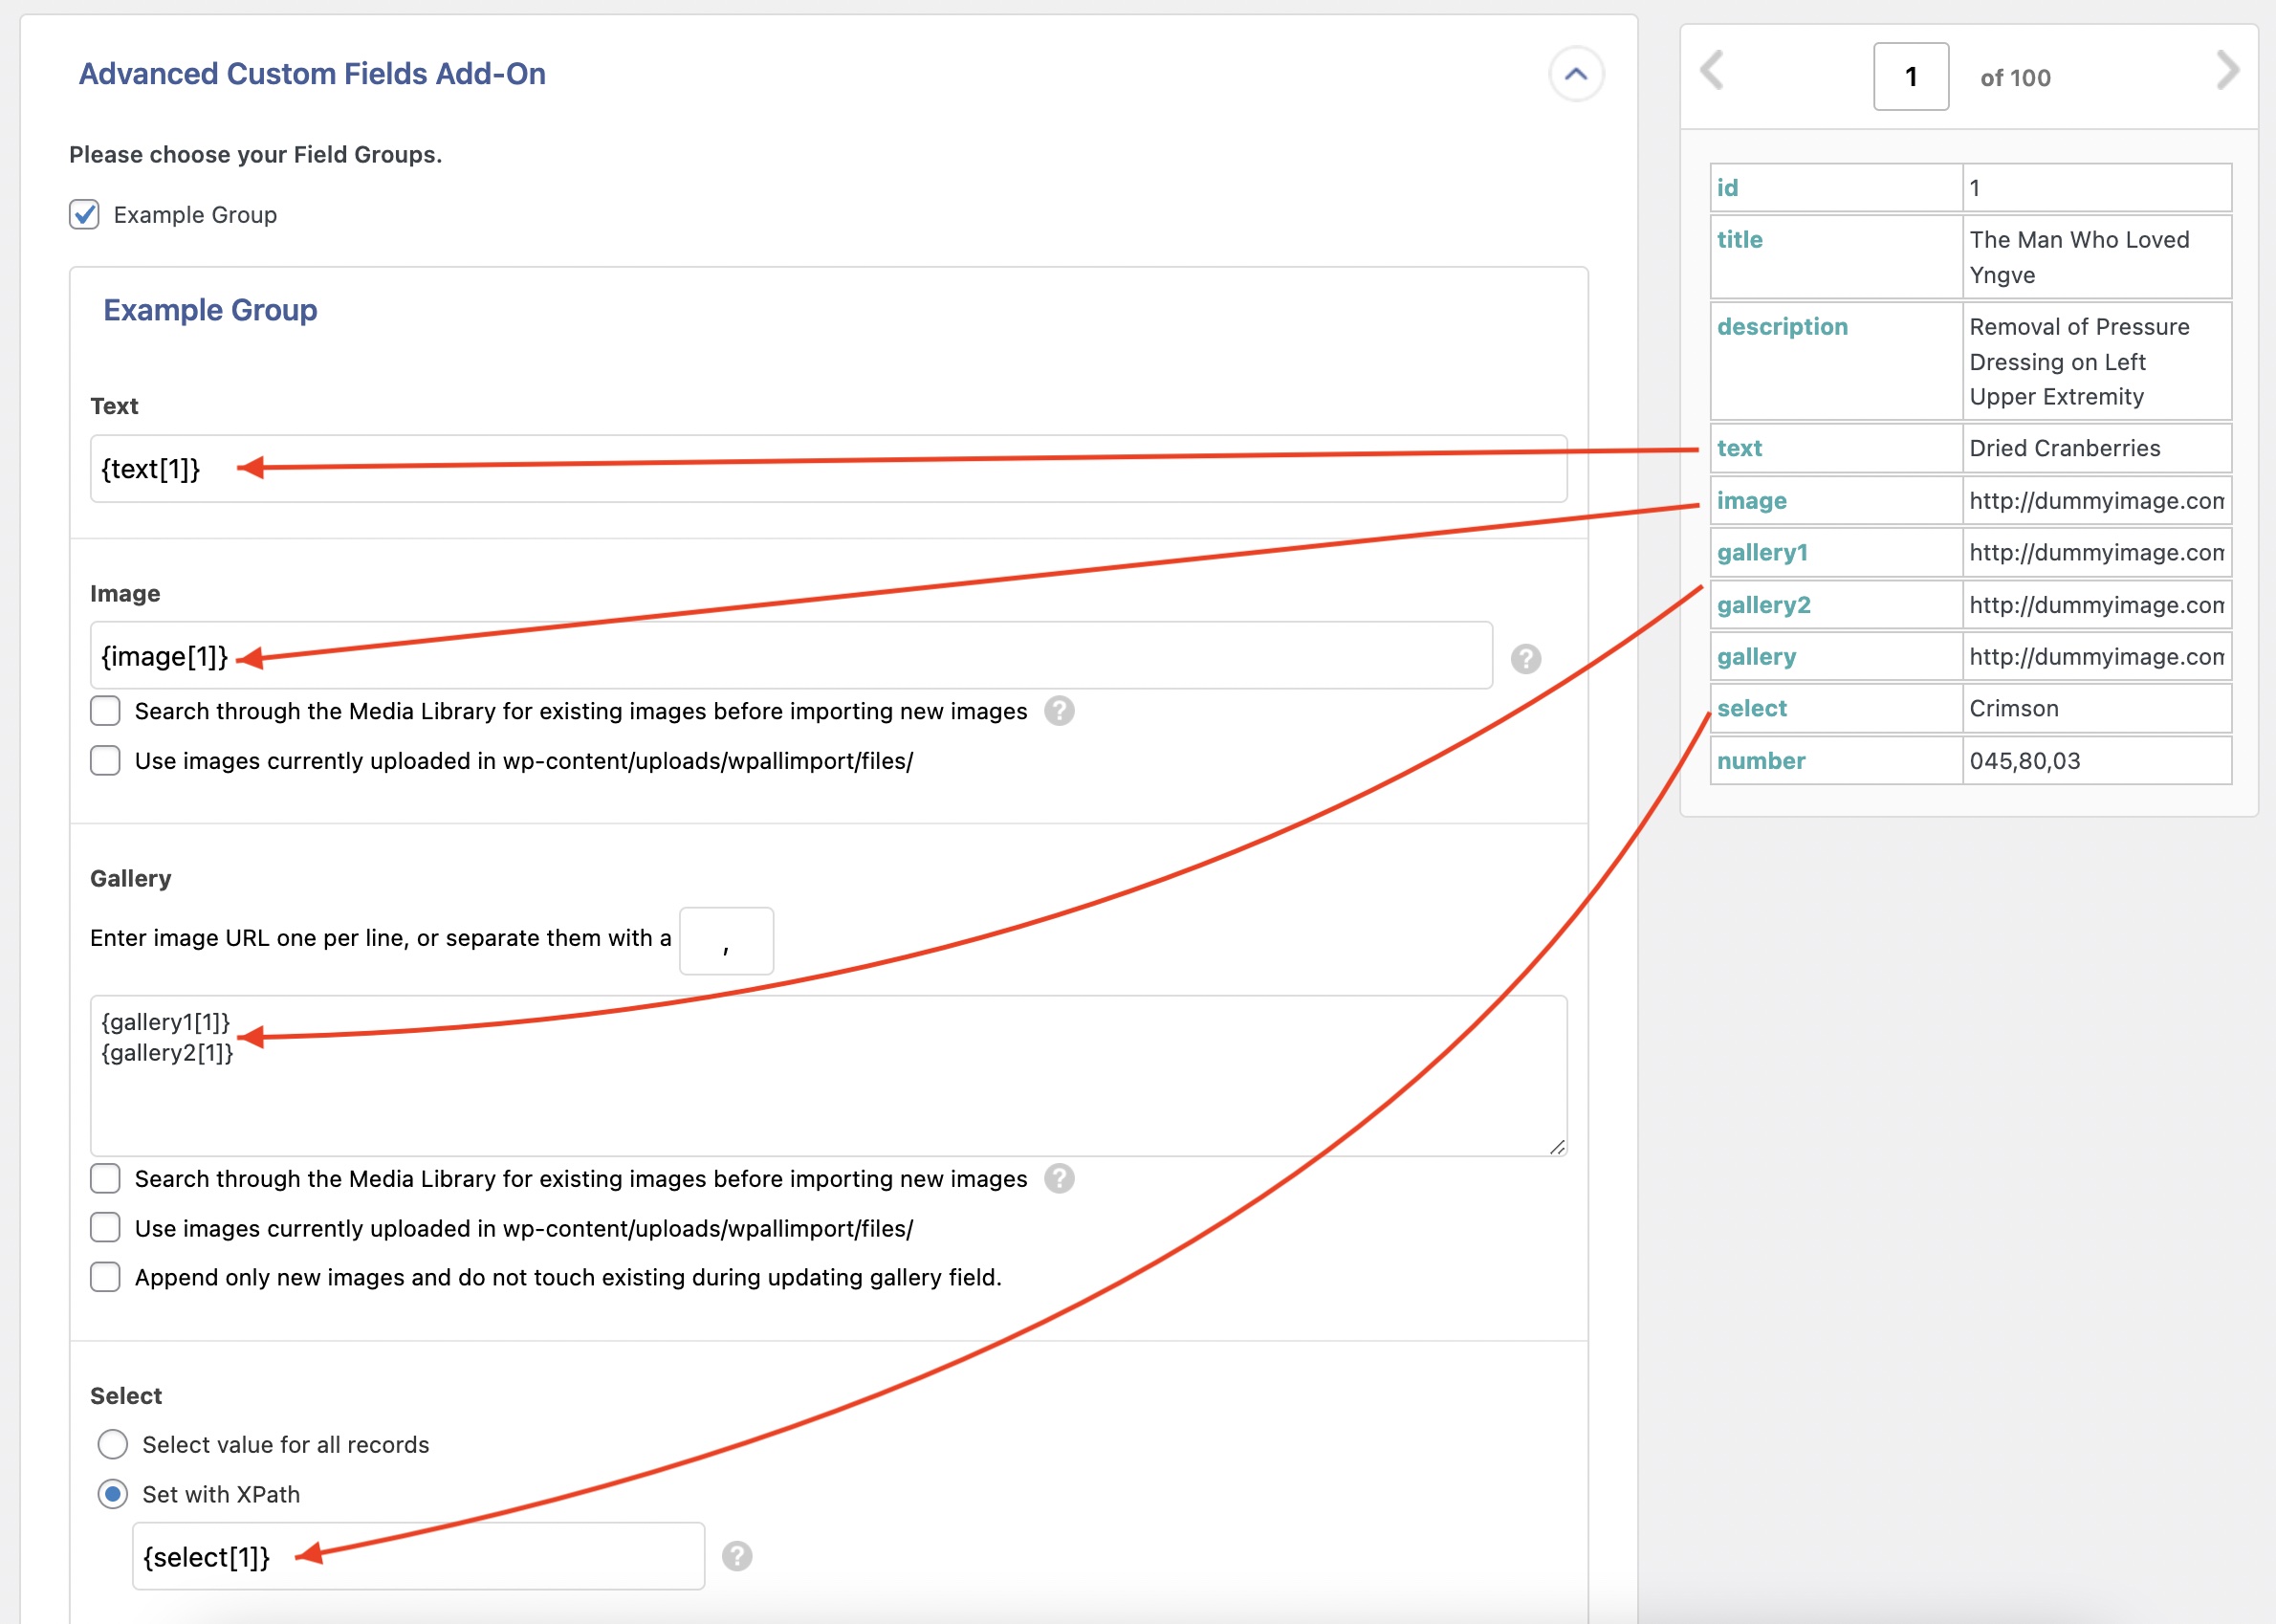
Step 3: Map the Incoming Data Elements to ACF Fields
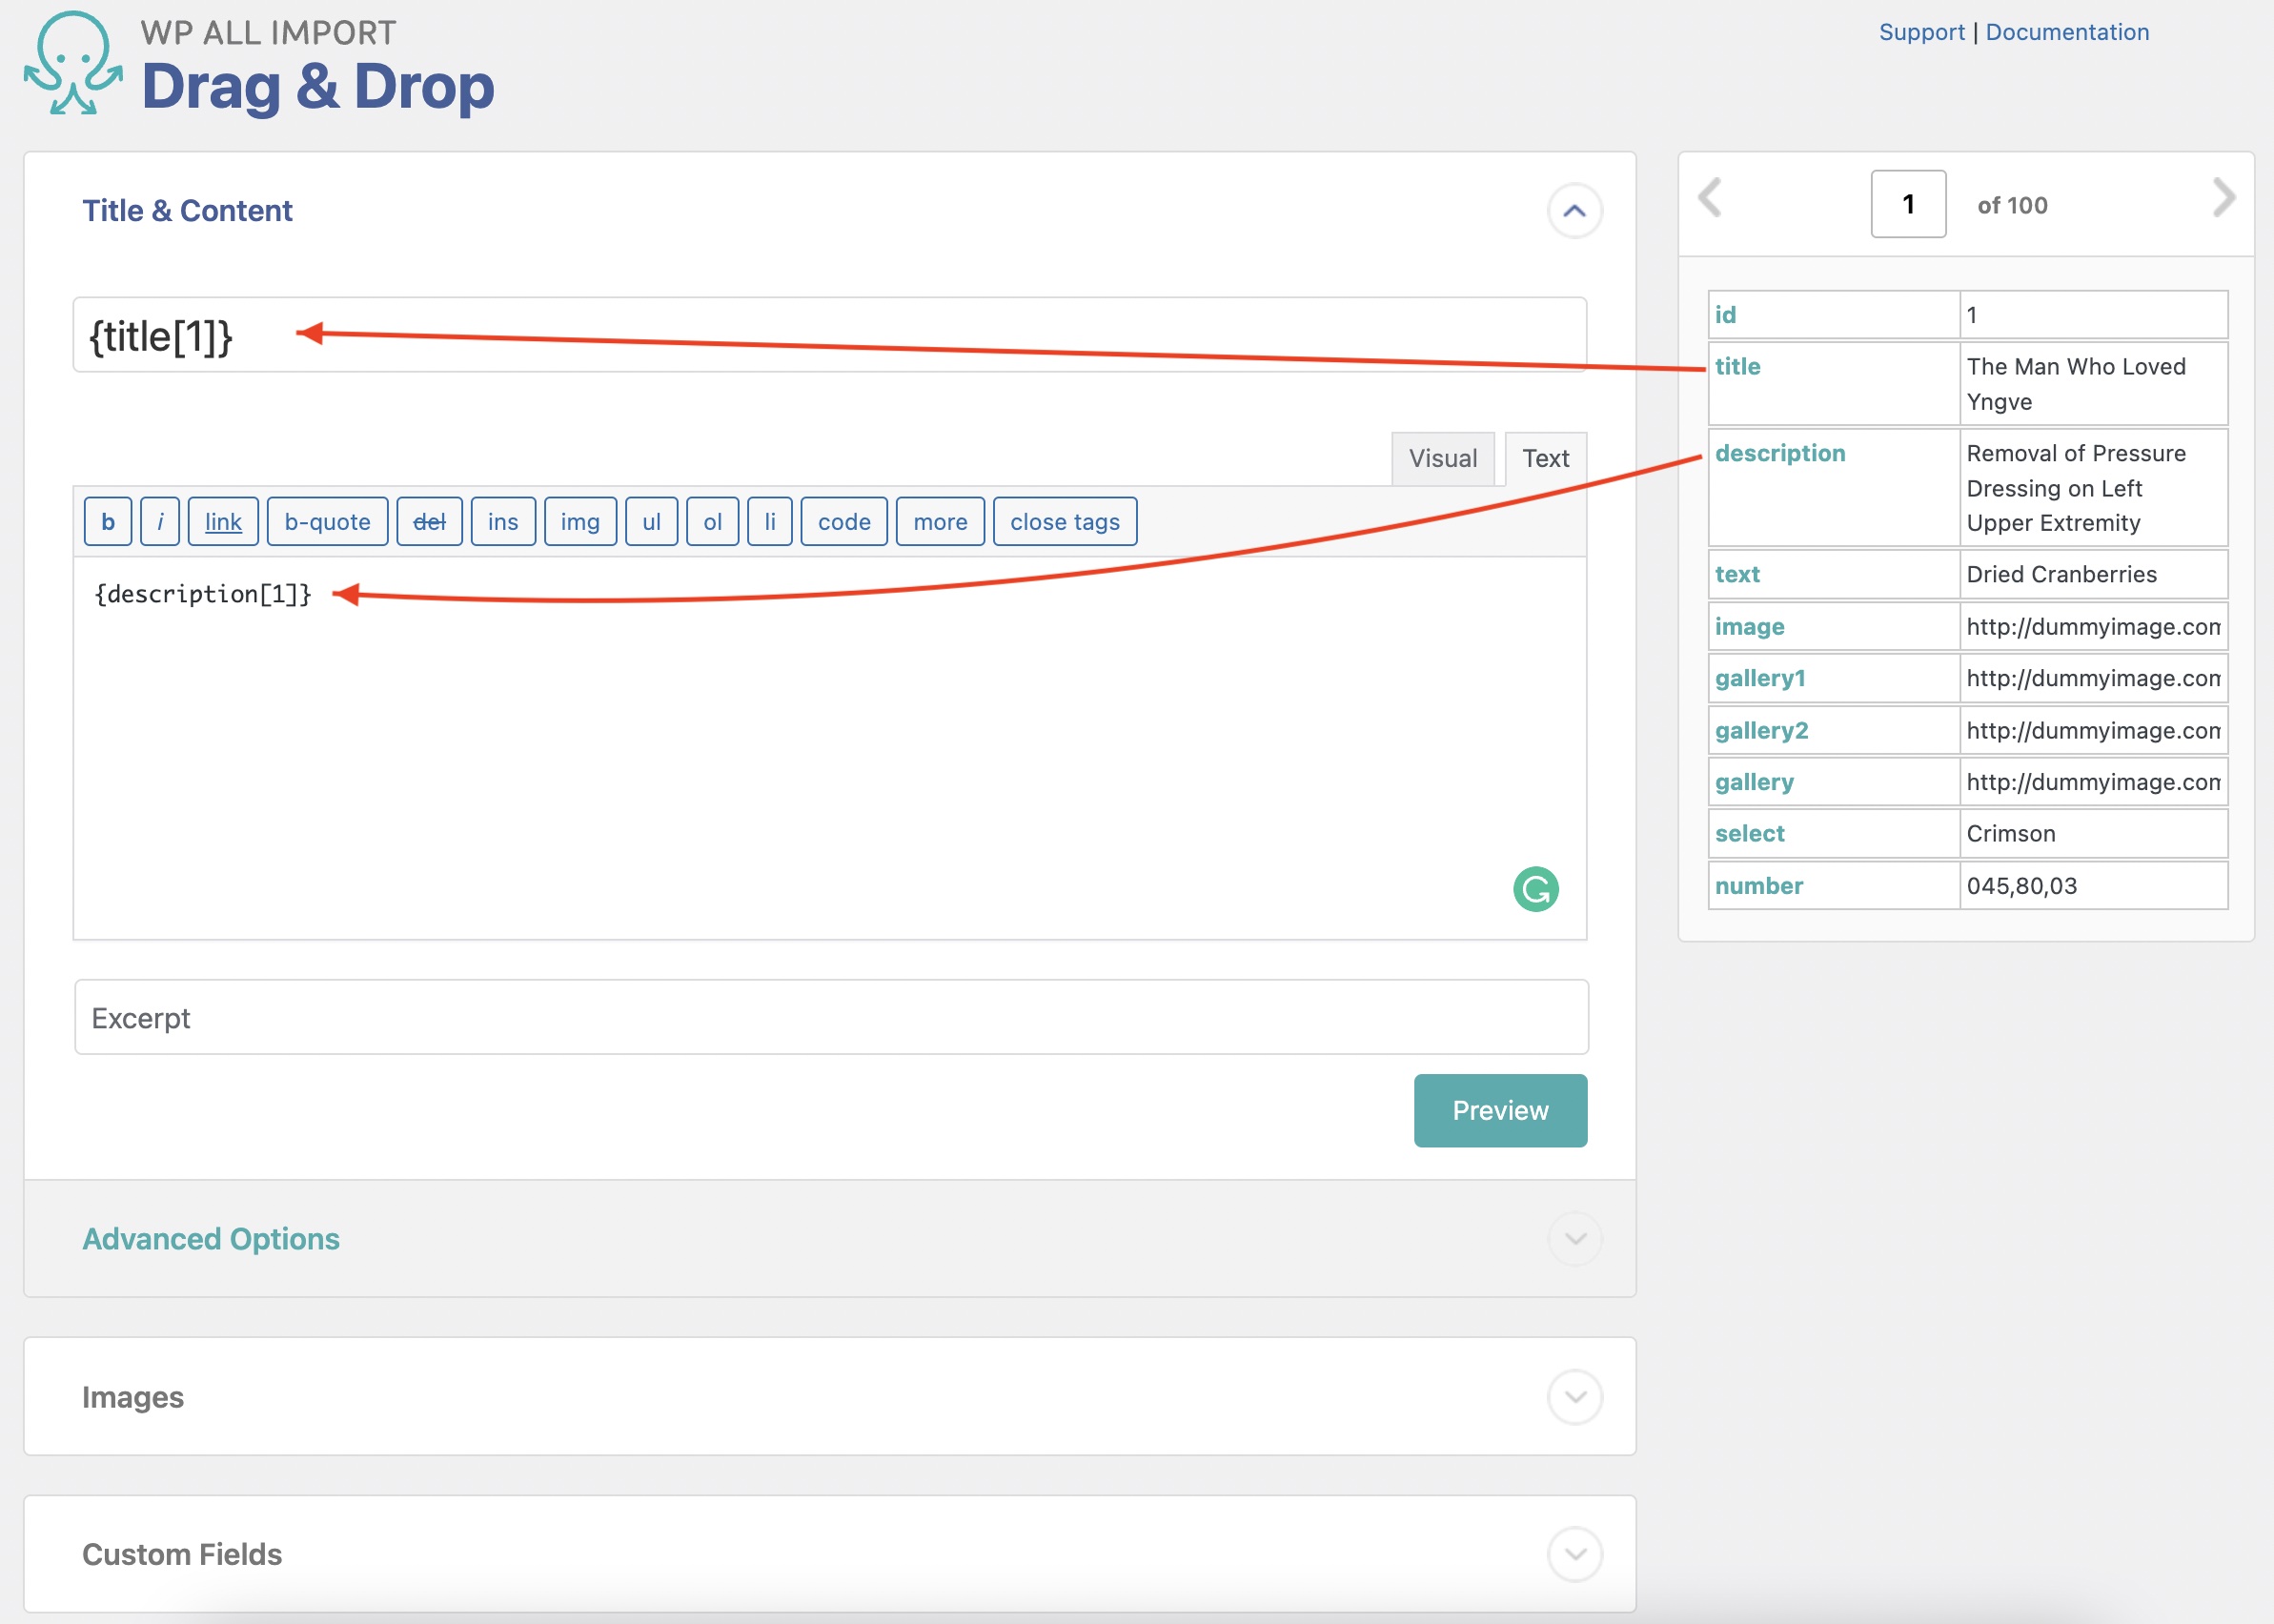
This brings you to the Drag & Drop interface, which allows you to map the data elements to their respective target fields.
To map the data, drag each desired data element from the panel on the right to its corresponding field on the left.
The Advanced Custom Fields Add-On section is where you define the ACF fields to import.
Locate that section by scrolling down and then enable the field group to import:
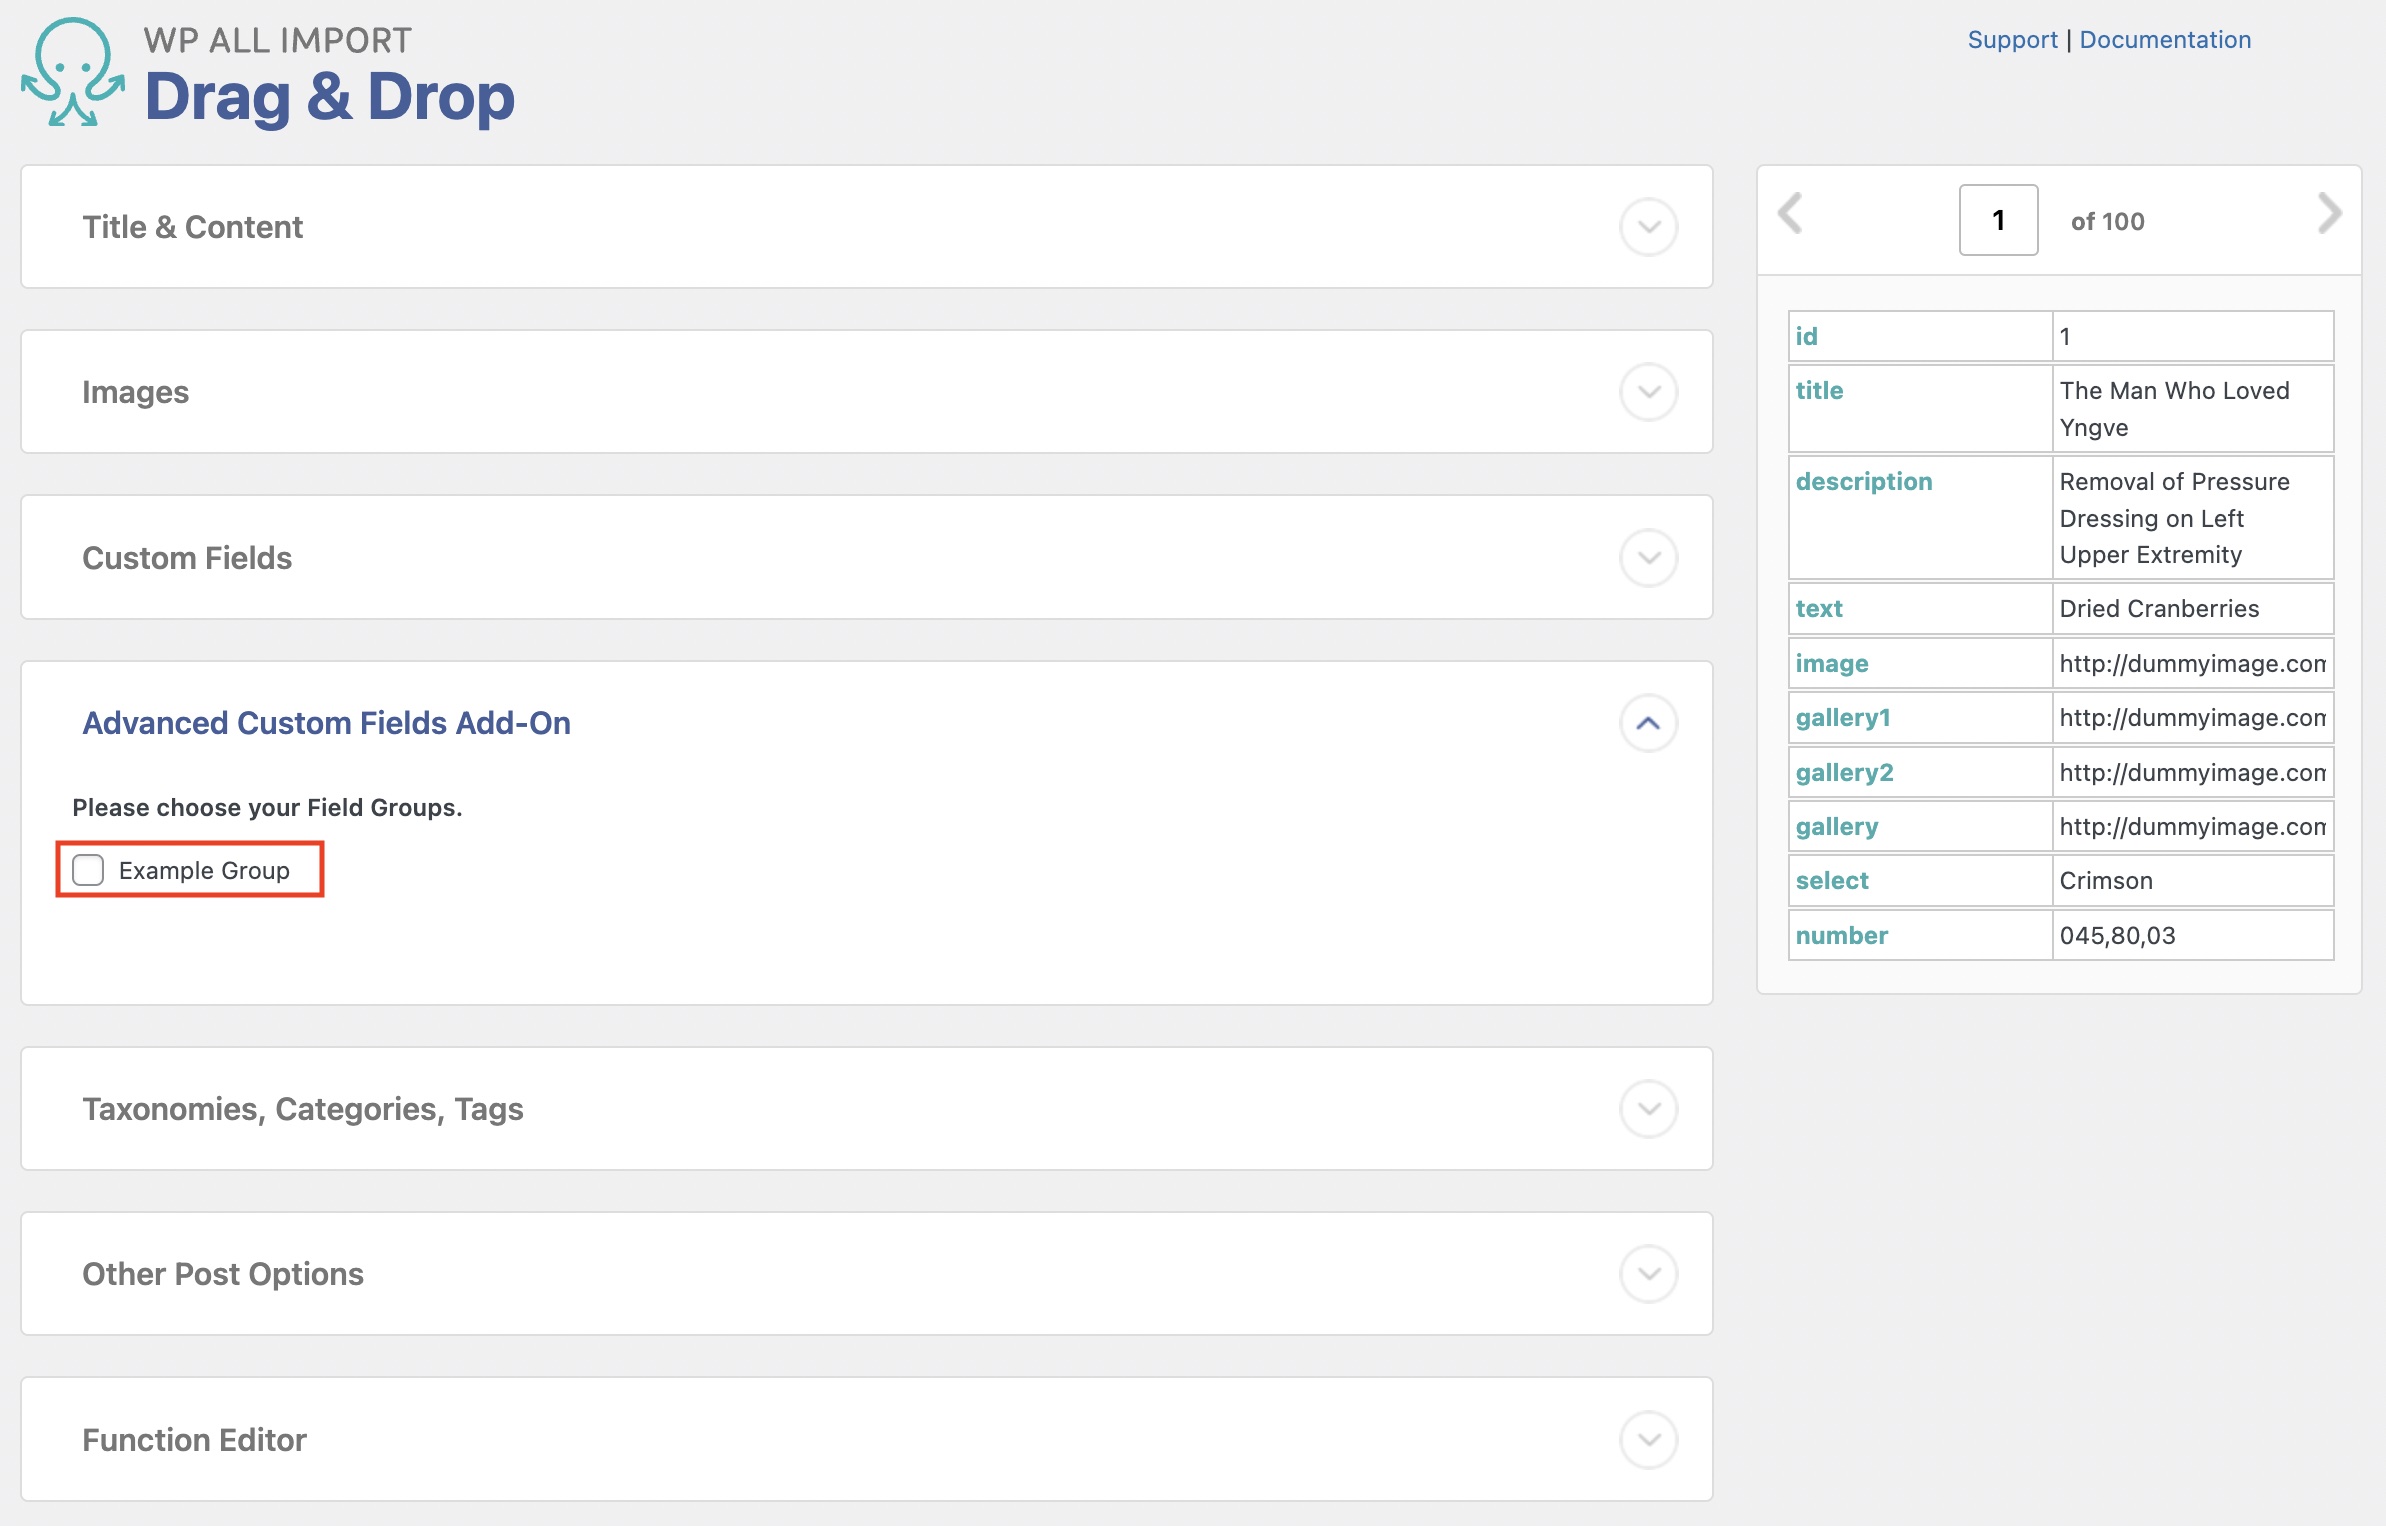
You can map each individual Advanced Custom Field as required:
Once all of the relevant data elements are mapped to their target fields, click on Continue to Step 4 at the bottom to move to the next step.
Before proceeding, make sure that you map all other fields related to the post type or custom post type that you're importing.
Step 4: Configure the Remaining Settings and Run the Import
The Import Settings interface is where you configure the remaining import settings and other options:

Specifically, you need to define a Unique Identifier for the import. WP All Import uses the unique identifier to keep track of imported records. To create it, simply click on Auto-detect.
You can also define this unique identifier by manually dragging and dropping fields from the right.
Here you can modify the import behavior if it is run again (to update, delete, or create new records found on the import file). You can set up Scheduling Options and Configure Advanced Settings. With most imports, there's no need to modify any of these settings.
Click the blue Continue button at the end to move to the next step.
Step 5: Verify That the ACF Fields Were Created Correctly
Next, you see the Confirm & Run interface. In the Import Summary section, you can review the import, what's in the import file, and other import settings.
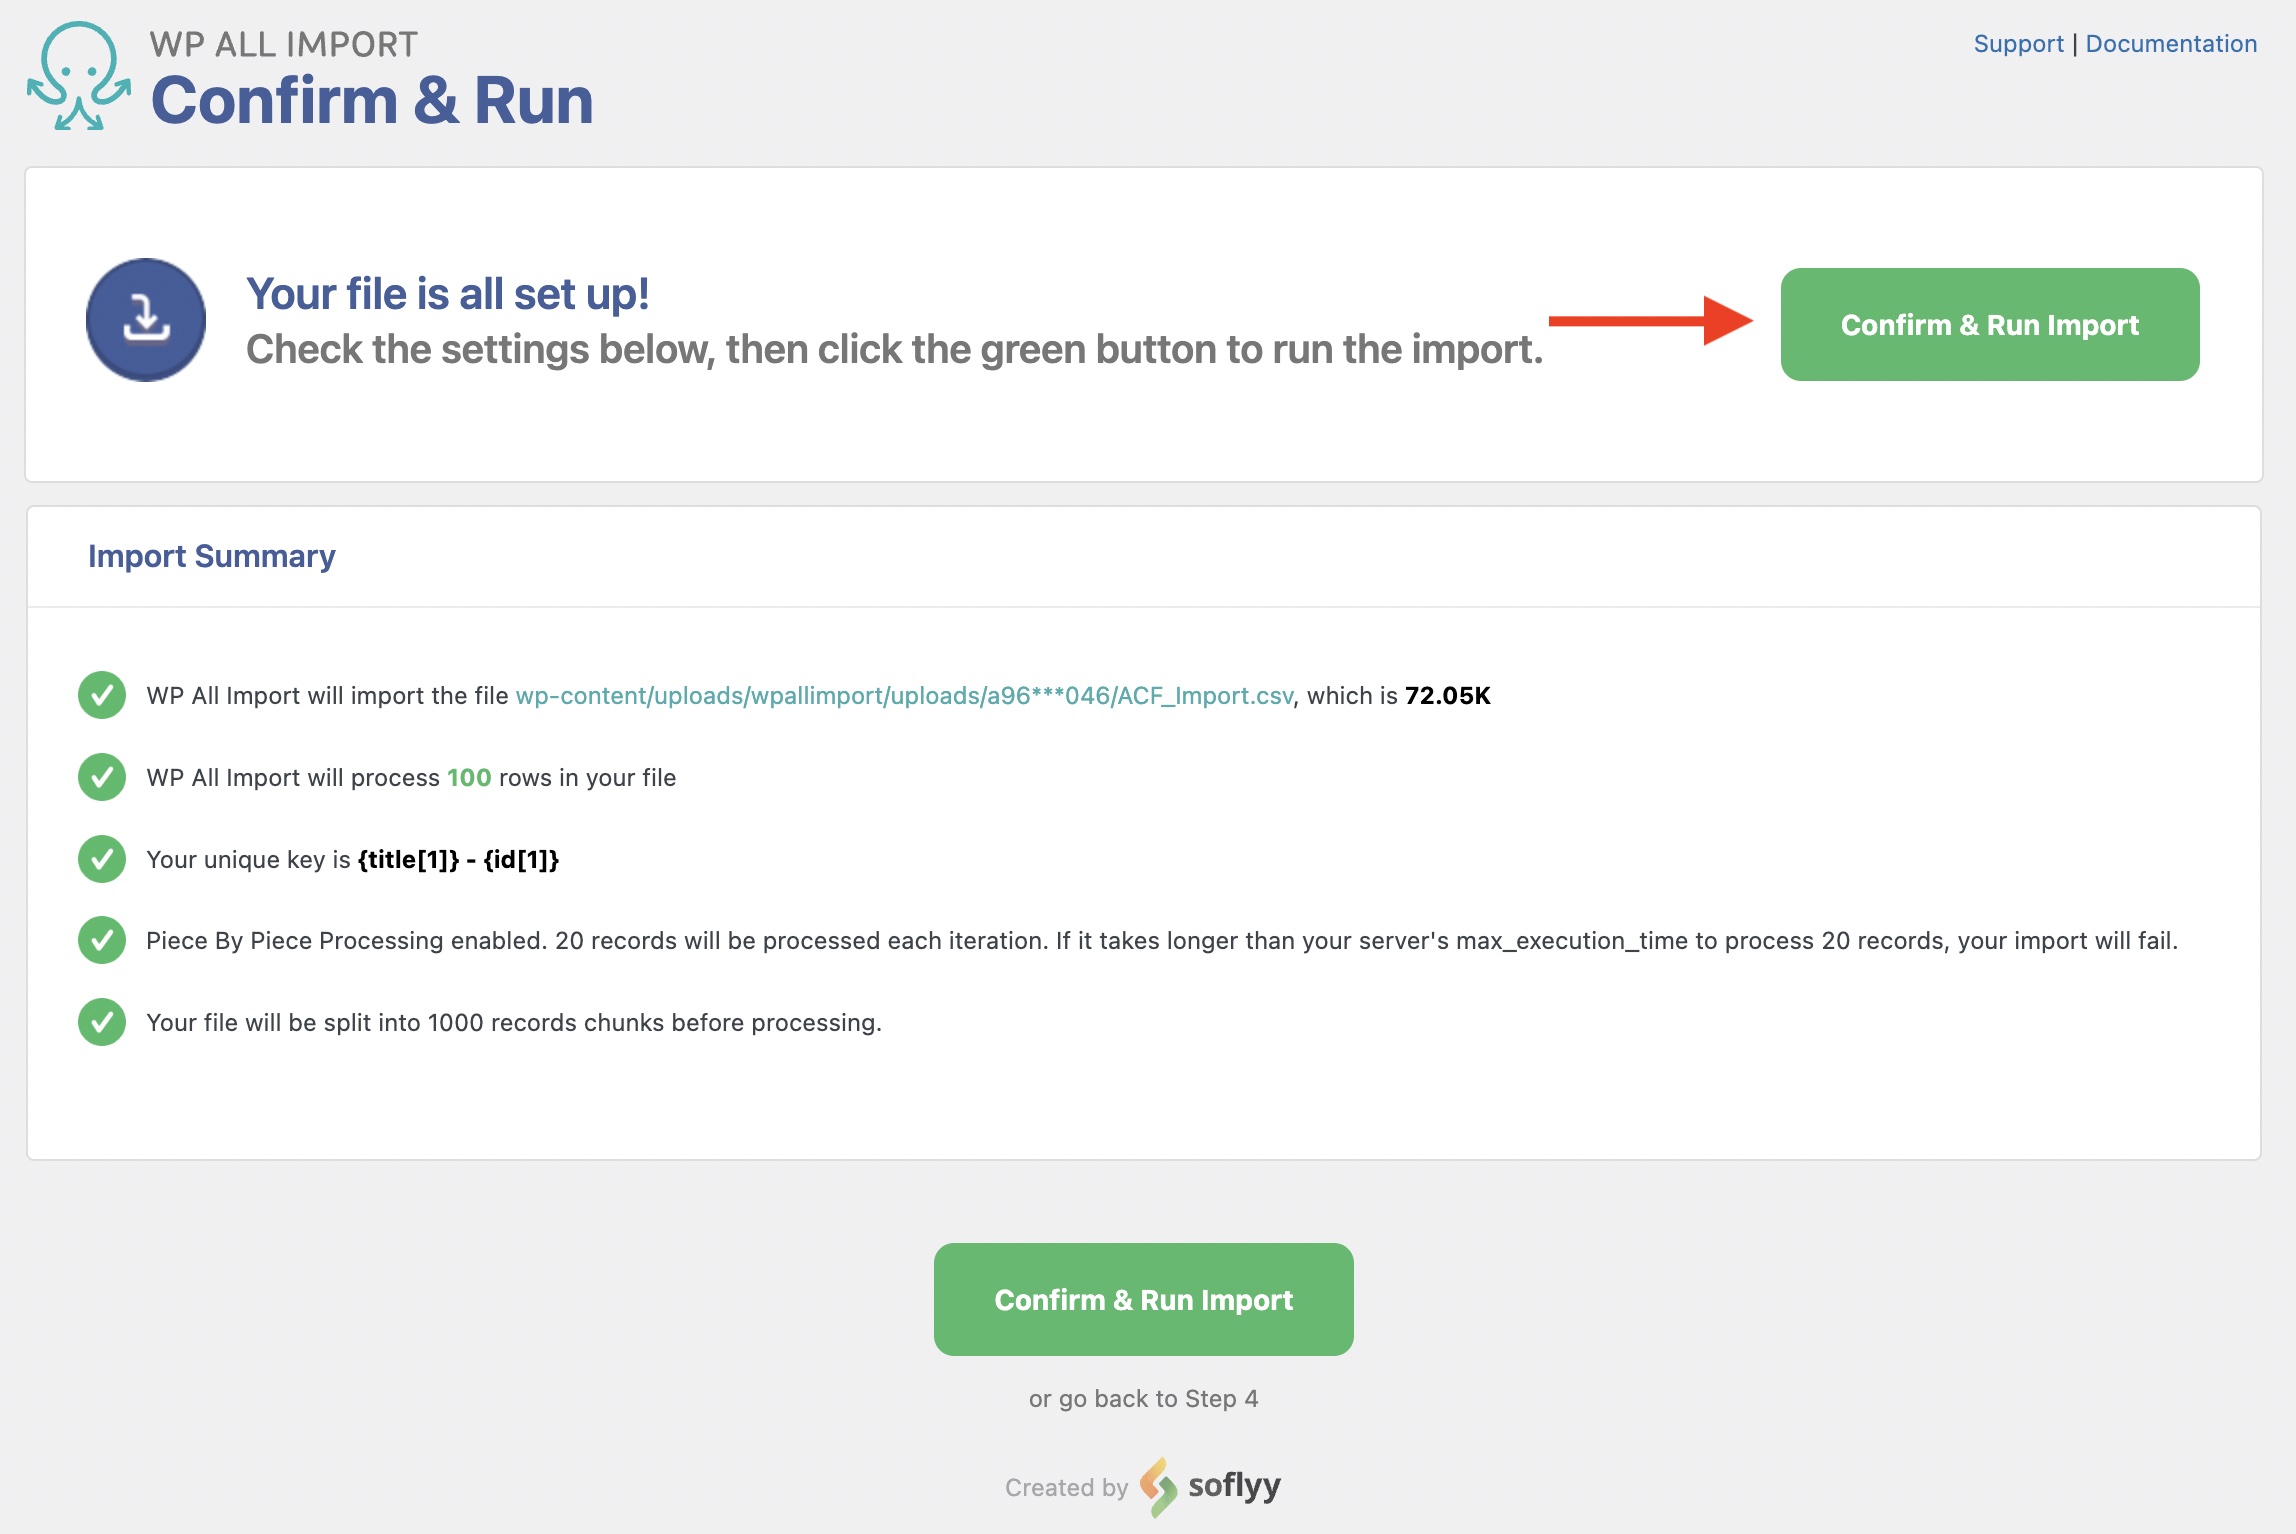
Click the green Confirm & Run Import button to execute and run this import.
When it completes, you will see the Import Complete screen:
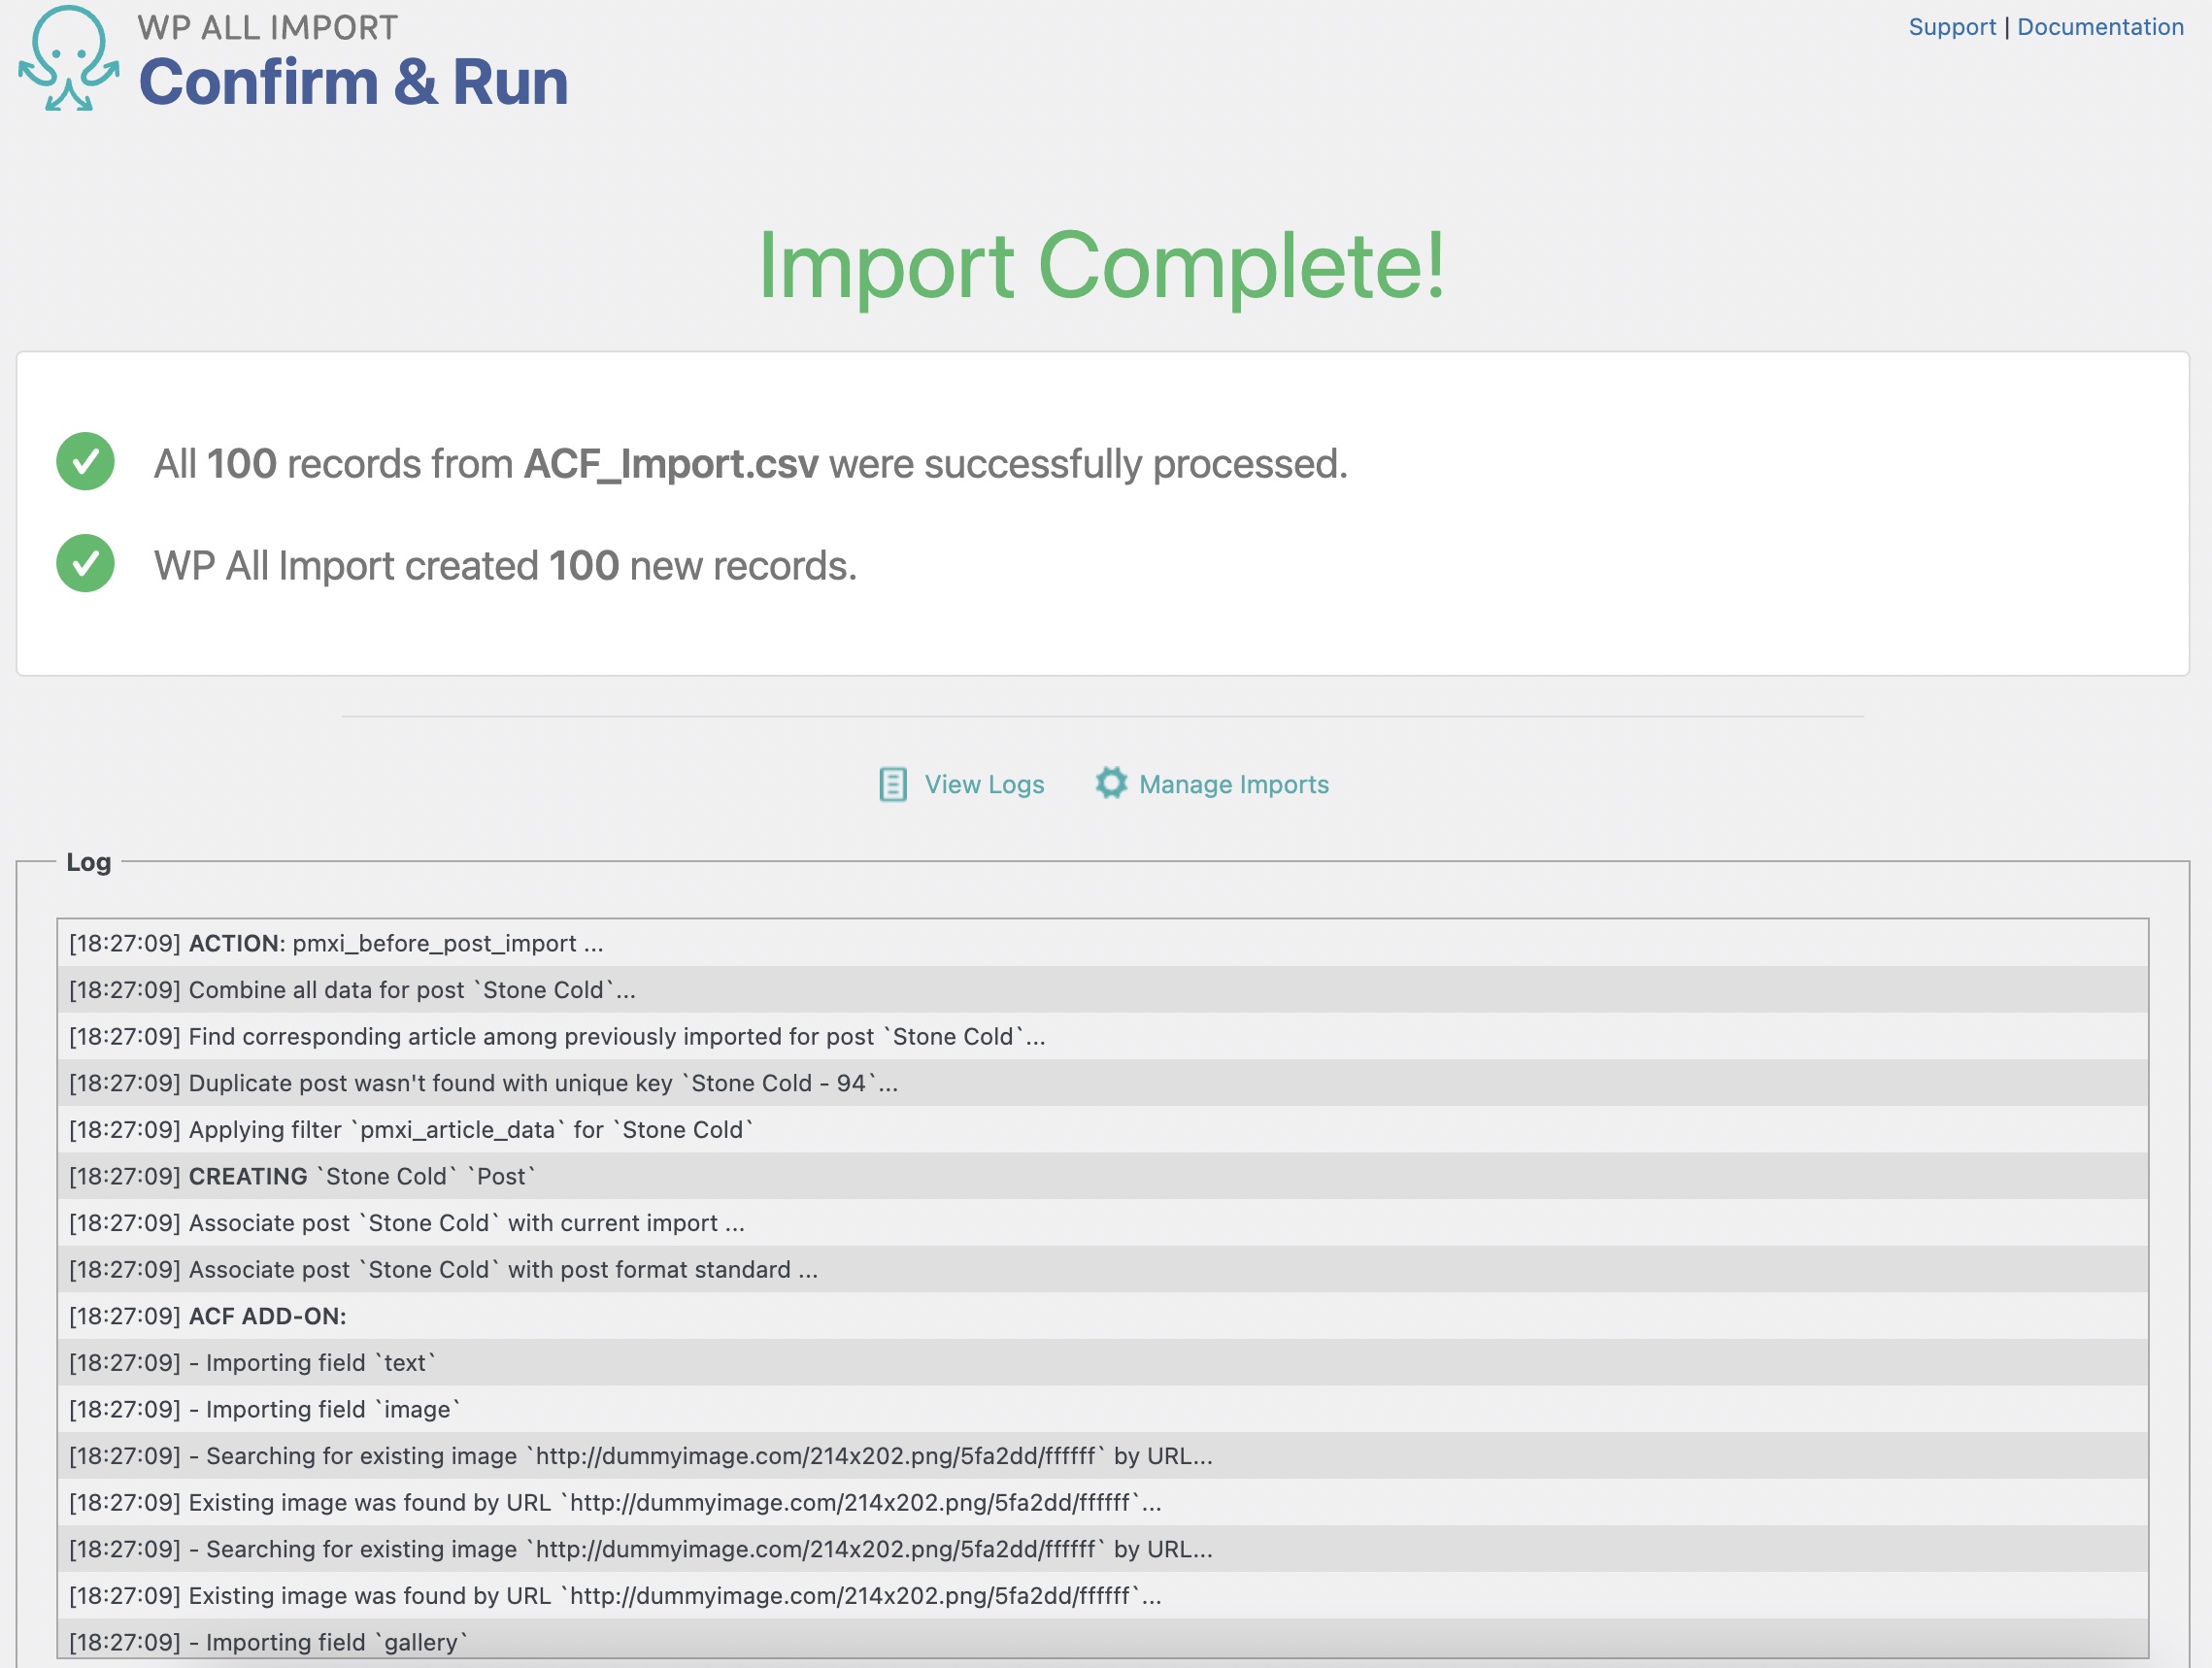
That's it! The import correctly processed the posts and ACF fields from this example.
You can review the imported fields by checking any of the imported posts in Posts › All Posts.
Import to ACF from any CSV, Excel, and XML
- Every ACF Field
- Any file format
- Any data structure
- Inline PHP
- Images, galleries, repeaters, and more
- Woo, Meta Box, JetEngine
- Any theme or plugin
Import Advanced Custom Fields — Advanced Topics
How to Create ACF Field Groups
Every Advanced Custom Field that exists on your site is part of a Field Group. A Field Group is the method used by the ACF plugin to attach fields to post types or custom post types. Each field group has a title, fields, location rules, and visual settings.
Here's what you need to do to add field groups:
- Go to Custom Fields › Field Groups.
- Click on Add New at the top.
- Input a title for the field group
- Add the desired Advanced Custom Fields by using the + Add Field button.
- Define where these fields will show by setting a Location.
- Click Publish to create the new field group.
Import to Repeater Advanced Custom Fields
The ACF Import Add-On offers three different ways to import ACF repeater data:
- Fixed Repeater Mode: used when each piece of the repeating data is stored in separated columns or elements.
- Variable Repeater Mode (XML): used when each piece of the repeating data is stored in XML format as a sibling element.
- Variable Repeater Mode (CSV): used when each piece of data is stored in different columns but with multiple data entries that are also separated by a character.
The mode used to import your ACF repeater data will depend on the format provided by your import file.
The ACF Import Add-On recognizes that each dataset is different. This allows you full control over your ACF import and enables support for multiple file formats.
To learn more about the different modes available, see our in-depth guide on importing Repeater Fields.
How to Import Advanced Custom Fields on Their Own
Unfortunately, this isn't possible since the actual Advanced Custom Fields are attached to a post type or custom post type on your site.
This means that, as explained in this guide, you need to import data into the specific post type or custom post type where the fields are attached.
WP All Import and the ACF Import Add-On can import data to the fields, but they cannot import the actual fields (in other words, it's not possible to create the fields while importing).
To import (or export) the ACF Field Groups themselves, use the options found in Custom Fields › Tools.
Import Advanced Custom Fields — Frequently Asked Questions
How to Schedule an Advanced Custom Fields Import?
You can schedule your ACF imports using either cron jobs on your server or our Automatic Scheduling Service. The advantage of using our service is that you can schedule your imports directly from our plugin interface.
To learn more, see Manual Scheduling and Automatic Scheduling Service.
How to Export Advanced Custom Fields?
- Go to All Export › New Export and select the post type with the ACF Fields.
- Use our Drag & Drop tool to select the ACF fields that you want to export.
- Generate the export file and download it.
- Review the export file's contents.
To learn more, please see How to Export Advanced Custom Fields (ACF).
How to Bulk Edit Advanced Custom Fields?
- Export the ACF fields that you want to edit.
- Use a spreadsheet app to modify the contents of the export file.
- When you've completed your edits, use the Import with WP All Import option to import the file back into WordPress.
- Once the import is finished, verify that your edits were correctly applied.
How to Add a Custom Field in ACF?
- Locate the field group where you want to add the custom field in Custom Fields › Field Groups.
- Click Edit.
- Click + Add Field and configure the new field.
- Once done, click Update to save the changes.
How to Add Advanced Custom Fields in WordPress Programmatically?
While you can use ACF functions to import Advanced Custom Fields programmatically, we recommend using WP All Import and the ACF Import Add-On, as described in this tutorial. This also allows you to modify ACF field values during the import.
Where Are Advanced Custom Fields Stored?
ACF stores the data for post custom fields in the post_meta table. It stores the data for all other custom fields in the options table. The best way to access ACF data is to use an ACF function like get_field(), which properly formats the return value based on the field type.
What Happens When ACF Adds a Field?
We monitor all new fields coming to ACF by staying in touch with the ACF team. This means that our plugins should identify any new fields shortly after their release. If you encounter an ACF field that we haven't incorporated, just contact our support staff, and we'll take care of it.
What Format Should I Use For ACF Date Fields?
You can import dates with any format supported by the PHP strtotime function (see documentation). Or, you can convert your date to an easier format, such as Y-m-d.
What Does WP All Import Do That Other Importers Don't?
To start with, it imports every type of WordPress and WooCommerce data, not just Advanced Custom Fields. It is also the most flexible importer on the market, giving you precise control over every aspect of importing your data.
Why Is ACF Data Not Working with Oxygen Builder?
This could happen if the '_field-slug' ACF field is not populated during import. That issue would only occur when importing ACF data using the regular Custom Fields section, since the hidden ACF reference fields aren't created in that case (unless done manually).
To solve this, you must use WP All Import along with the ACF Import Add-On, as we only support importing to ACF fields with the ACF Import Add-On.
What Add-Ons Do I Need to Import ACF Fields?
To import Advanced Custom Fields (ACF), you must have the ACF Import Add-On active on your site, along with WP All Import.
Import Advanced Custom Fields — Related Docs
Learn more about exporting Advanced Custom Fields with WP All Export.
Learn how to import correctly into ACF repeater fields.
Execute PHP or custom code to modify ACF data during import.
Oxygen Builder's review of the 5 best plugins for ACF import.
Oxygen Builder review of WP All Import.
