How to Import Reviews to WooCommerce
To import WooCommerce reviews, navigate to All Import › New Import, choose your import file, and select WooCommerce Reviews from the dropdown list. Map the incoming data elements to the appropriate data fields, then run the import.
Table of Contents
- Step 1: Create a New Reviews Import
- Step 2: Review the Import File
- Step 3: Map Data Elements to Fields
- Step 4: Configure the Import Settings
- Step 5: Run the Import
Advanced Topics
Step 1: Create a New Import for WooCommerce Reviews
Navigate to All Import › New Import, load the import file, and select WooCommerce Reviews from the dropdown list.
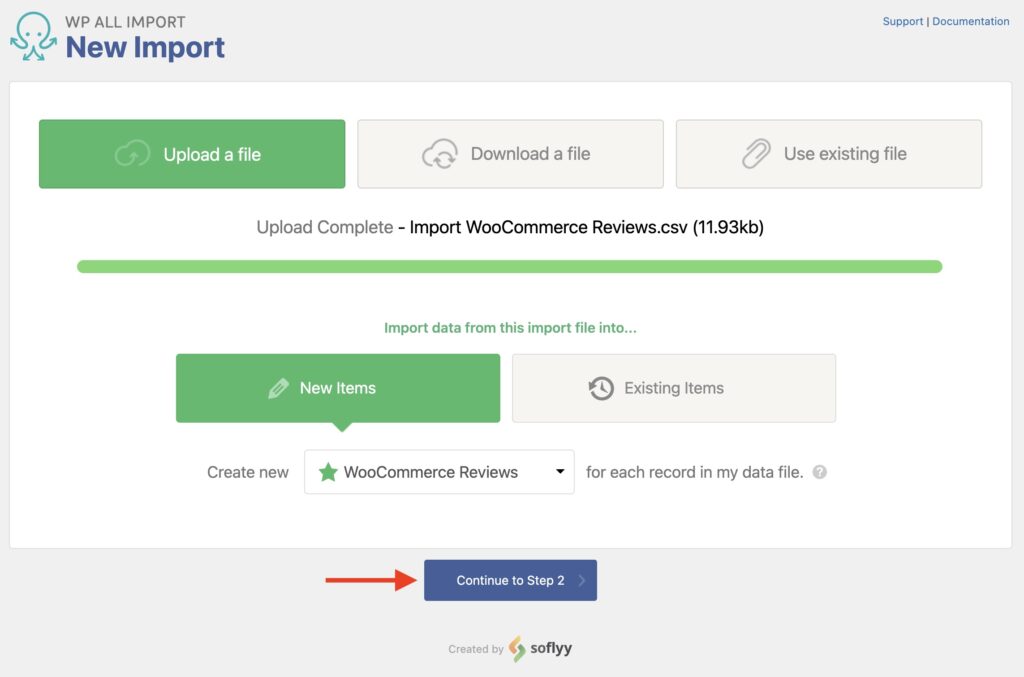
Click Continue to Step 2.
Step 2: Review the Import File
The Review Import File screen lets you check the WooCommerce reviews data that you are about to import. If the data is not correct, fix the import file and try again.
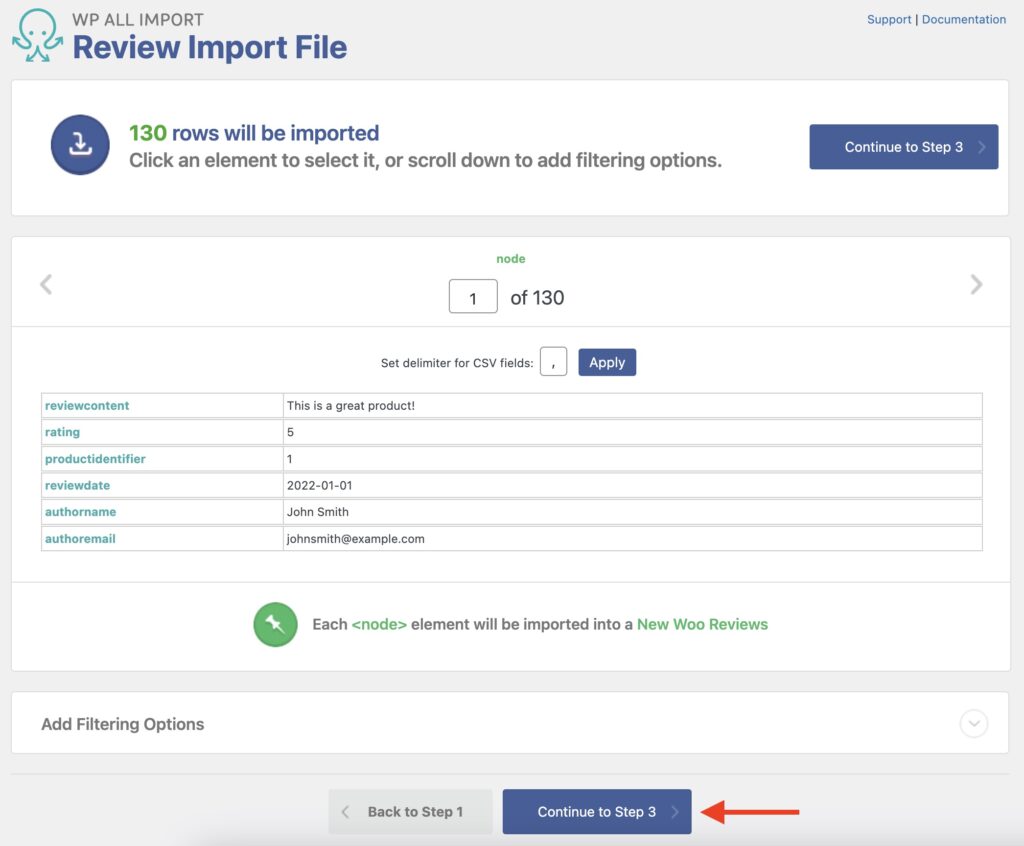
Near the bottom of this page, there's a section to add filters, Manage Filtering Options, where you can selectively choose which reviews to import.
After verifying your import file, click Continue to Step 3.
Step 3: Map Incoming Data Elements to the Review Fields
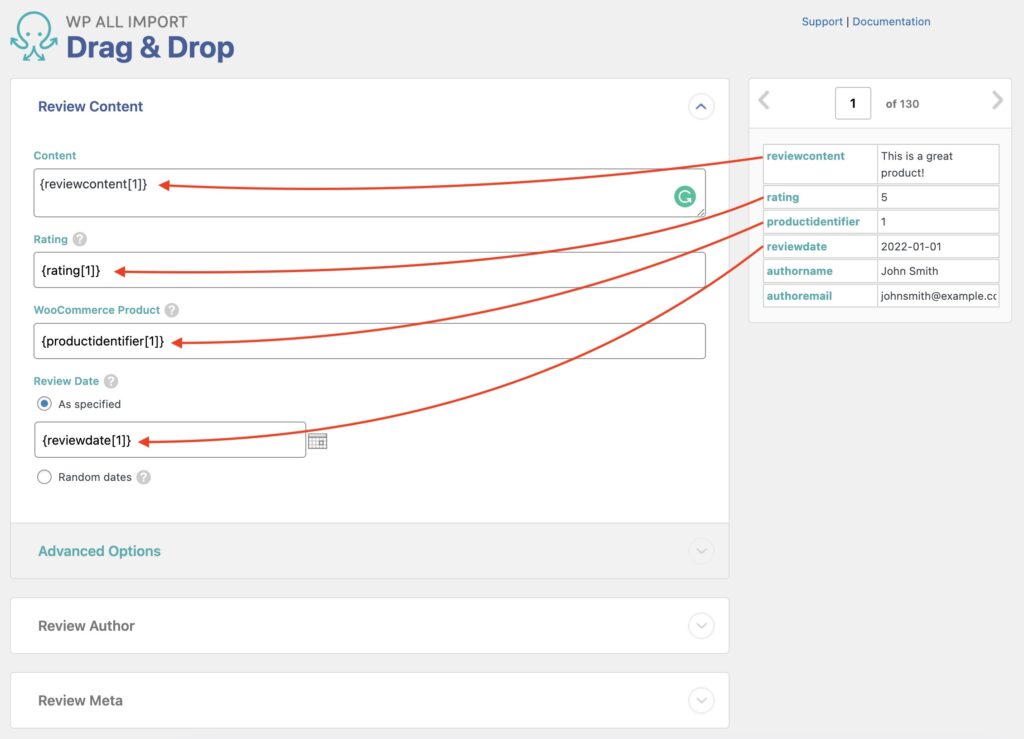
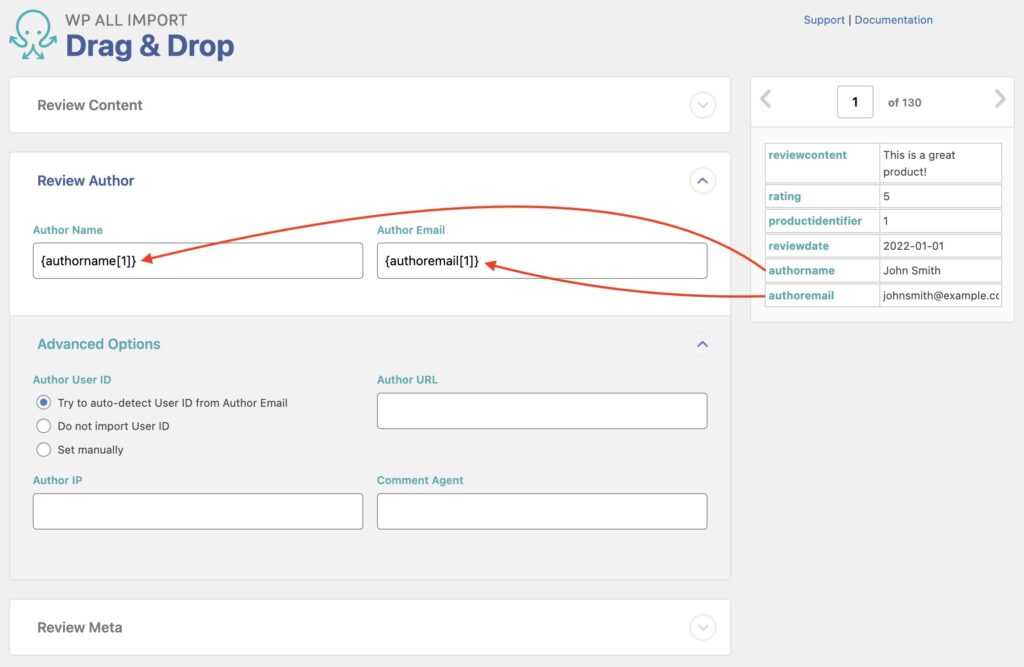
You'll now see the Drag & Drop interface, which lets you map the data elements from your import file to the WooCommerce reviews target fields. To do this, just drag the data elements from the right to the target fields on the left.
Review Content
You'll first need to map the review content, the rating, the product it's linked to, and the review date.
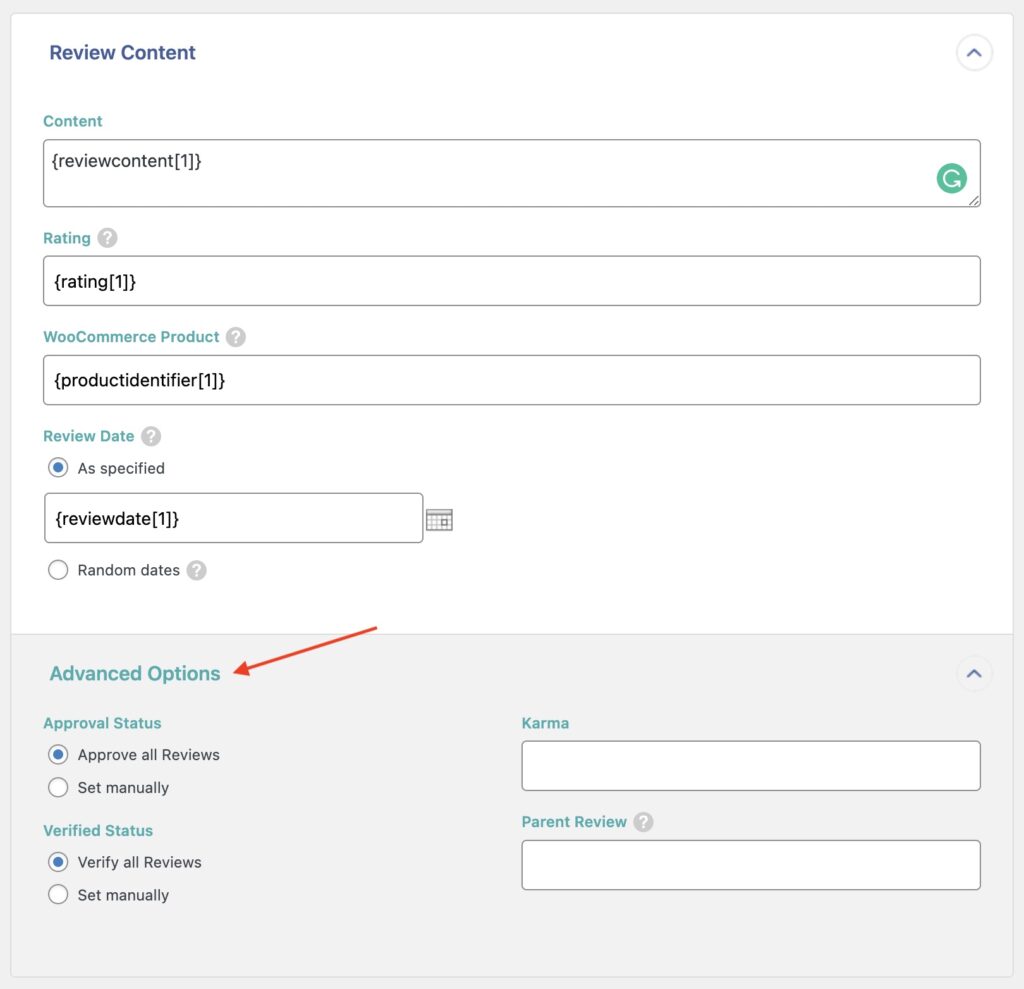
Below, you'll see the Advanced Options section, where you can handle Approval Status, Verified Status, Karma, and Parent Review.
Review Author
Here, you can map Author Name and Author Email. You can add additional author information under Advanced Options:
Review Meta
You can import review metadata (i.e., custom fields) using this section:

After mapping all the review import elements, click the Continue to Step 4 button at the bottom (not shown).
Step 4: Configure the Import Settings
The Import Settings interface appears next. This allows you to configure key import settings.
First, click on Auto-detect to generate a unique identifier. This identifier is used internally by WP All Import to keep track of your imported reviews.
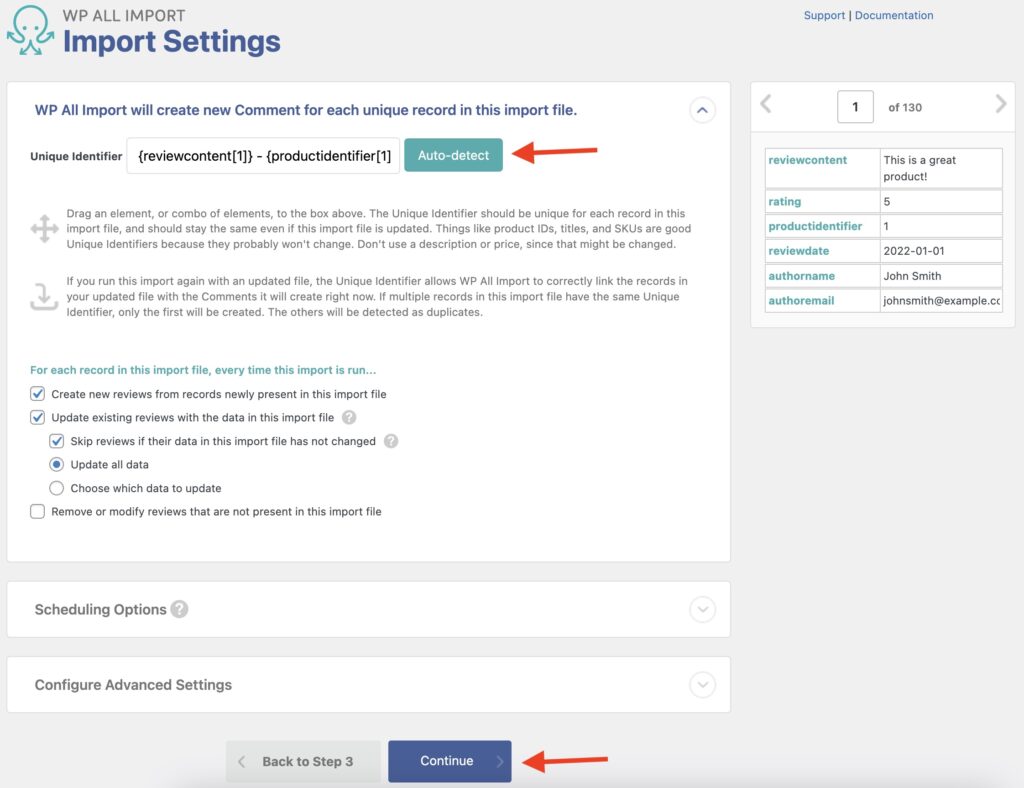
You can also modify the behavior that occurs whenever the import runs again, i.e., if it should create new records, remove existing ones, or update existing ones.
Below this, there are two other panels: Scheduling Options and Configure Advanced Settings, which you can leave alone for now.
Click Continue at the bottom to move on to the next step.
Step 5: Run the Import and Check the Imported Reviews
Next up is the Confirm & Run interface, where you can review the import with a summary:
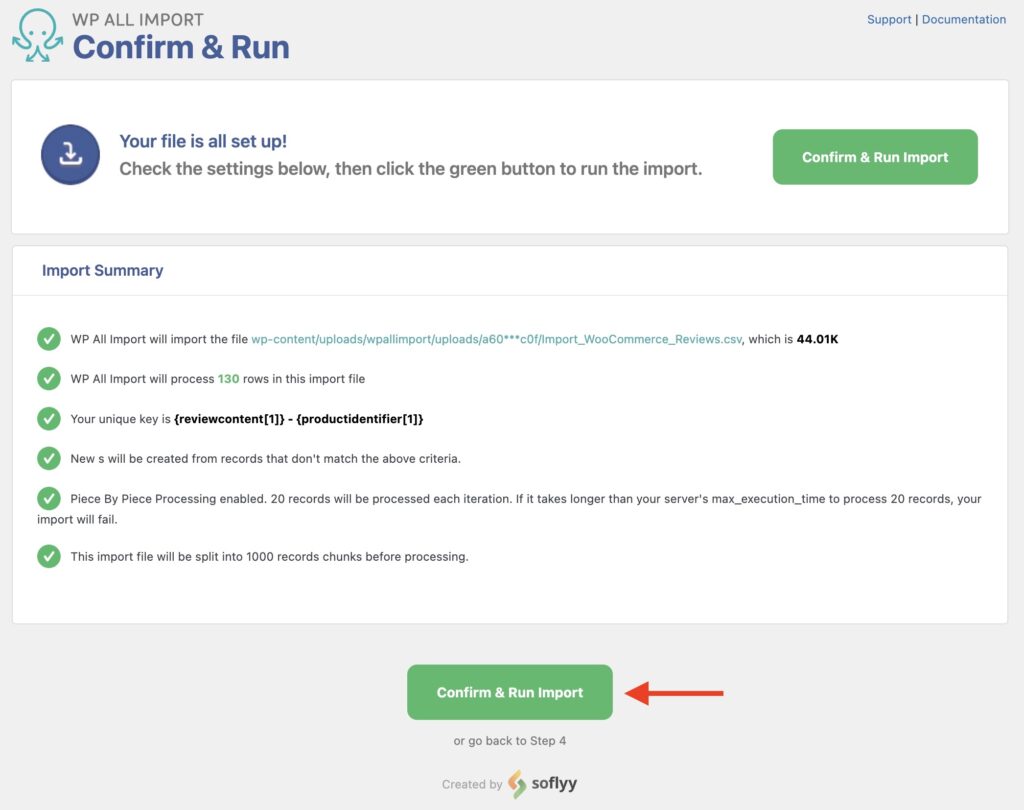
As long as everything looks correct, click on Confirm & Run Import to execute the import. This is the screen you'll see once the import is done:
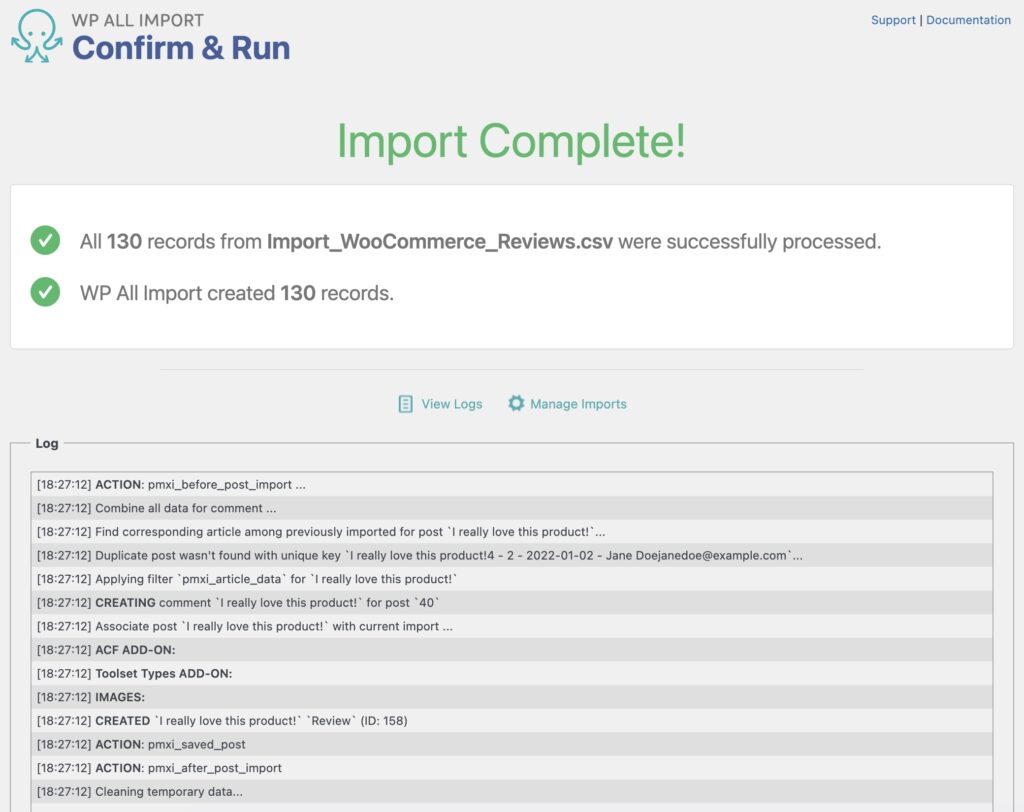
Make sure to check the reviews using the WooCommerce interface to ensure that the import worked as expected.

Import WooCommerce Products from CSV, XML, Excel
- Product variations & attributes
- Price & stock
- Images & galleries
- Scheduled imports
Import WooCommerce Reviews – Advanced Topics
Review Skipped Due to Product Match Not Found
If a review is skipped because no product match is found, you'll see a message like the following in the history logs:
[15:59:10] SKIPPED: Review product not found by id `ROSÉ FAVORI 2020 - FAVORI - IGP MEDITERANEE`
To solve this, you need to first verify that there is a valid and existing product available to match with your newly imported review. If the product exists, but the match still wasn't successful, you may have to change how you're matching to products.
Match Reviews Using Product SKUs
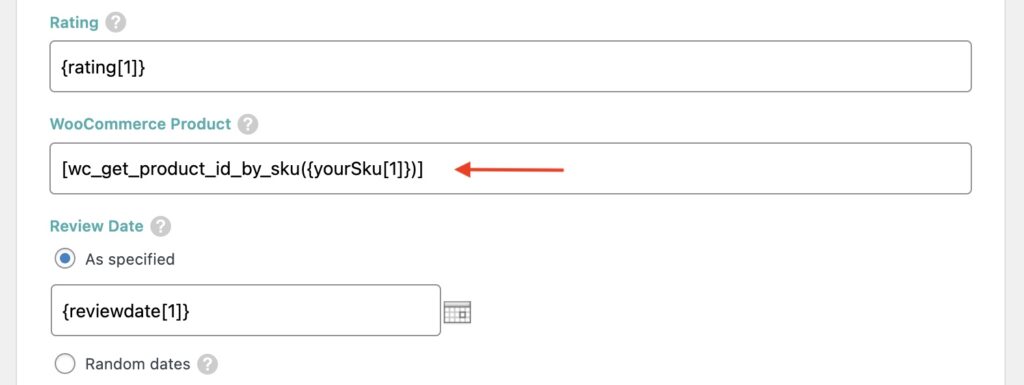
Even though there aren't options to match using the product's SKU, you can still use the SKU to pair reviews with products. You can do this by using custom code and an internal WooCommerce function that retrieves the product ID by using the SKU. See:
[wc_get_product_id_by_sku({yourSku[1]})]Here's that code in action:
Selectively Choose Which Reviews to Import
You can define which reviews should be included in the import by adding a filter. Filters are added when setting up the import process in Step 2 by clicking on Manage Filtering Options. In that section, you need to specify an element, a rule, and a value.

In the example above, we are creating a rule that says, "Only import reviews with a product identifier of 40."
To modify the filter for an existing import, simply locate that import in the Manage Imports page, go to Edit Template, and modify the existing filters under Manage Filtering Options.
We explain a bit more about filtering here: Filtering with XPath.
Import WooCommerce Reviews – Frequently Asked Questions
Where Are WooCommerce Reviews Stored?
WooCommerce reviews are stored in the wp_comments table along with other comments. Support for WooCommerce reviews is enabled via the WooCommerce Import Add-On. To import reviews, follow this guide.
How Do I Add Product Reviews Manually?
- Navigate to the target product in your WordPress site via Products › All Products.
- Locate the Reviews section.
- Click the Add button to input new reviews.
- Once added, the reviews will appear in this same section.
That's how you add WooCommerce reviews using the WordPress dashboard. If you have many reviews to add, it might be better to import them.
How Do I Add Bulk Reviews in WooCommerce?
To add bulk reviews in WooCommerce, just follow this guide. Our plugin doesn't care whether you're importing one review or 100,000 — the process for handling them is exactly the same. The only difference with a very large import is that you might want to take advantage of our advanced settings to control batch processing sizes.
How Do I Export Reviews in WooCommerce?
- Create a new export in All Export › New Export.
- Use the Manage Filtering Options to choose which reviews to export.
- Customize the export layout to include the desired columns.
- Run the export.
- Download the exported file.
You can create this export in any of our available formats to export (CSV, XML, or Excel). Read the full documentation at How To Export WooCommerce Reviews.
How Do I Migrate WooCommerce Reviews?
- On the source site, go to All Export › New Export.
- Choose WooCommerce Reviews from the dropdown list.
- Use the Migrate Reviews button and download the exported bundle file, which includes import instructions.
- On the destination site, go to All Import › New Import.
- Upload the bundle file and click Skip to Step 4.
- Run the import.
With our plugins, migrating WooCommerce reviews from one site to another is a simple task that requires only a couple of clicks. This process can also be used to bulk edit reviews.
What Add-Ons Do I Need to Import WooCommerce Reviews?
To import WooCommerce reviews, you need to have the WooCommerce Import Add-On active on your site, along with WP All Import.
Import WooCommerce Reviews – Related Docs
Learn how to import WooCommerce products into your WordPress site.
Shows you how to import WooCommerce customers to your site.
Provides instructions on exporting WooCommerce reviews from WordPress.