Import WooCommerce Products with Images
To import WooCommerce products with images, create a new import process via All Import › New Import. After choosing your import file, make sure to map your image fields in the Images section. You can choose different ways to import your images.
Table of Contents
- Step 1: Create a New Product Import
- Step 2: Review the Import File
- Step 3: Map the Incoming Data
- Step 4: Configure the Import Settings
- Step 5: Run the Import
Advanced Topics
- Import Extra Images to Variations
- Troubleshoot Import Product Images
- Import Images From FTP or SFTP
- Offload Images to Other Services
Step 1: Create a New Product Import
Navigate to All Import › New Import, upload or choose your import file, then select New Items > WooCommerce Products as the import type.
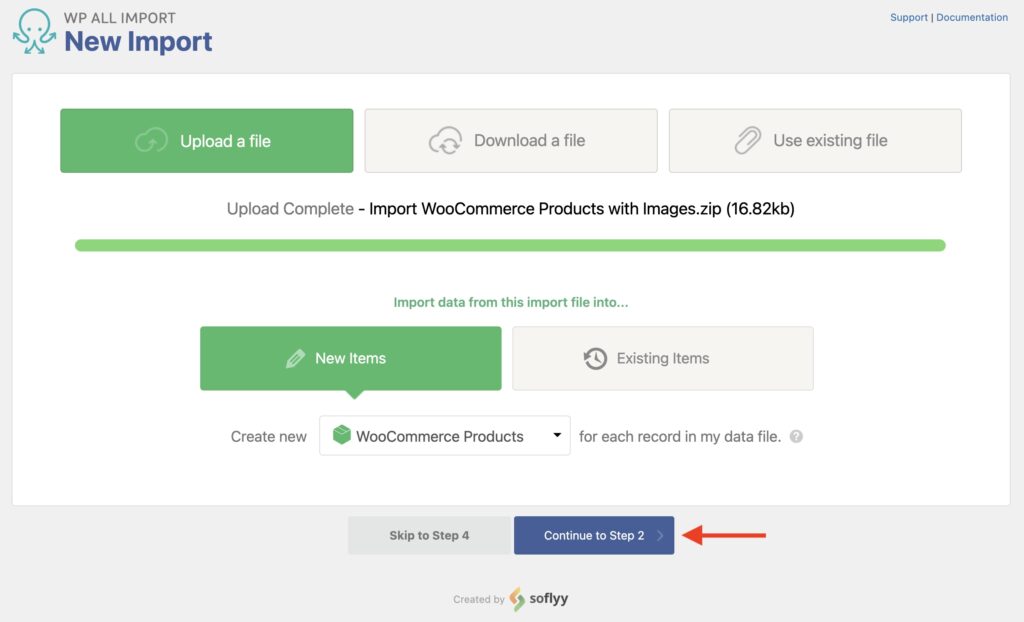
Click Continue to Step 2.
Step 2: Review the Import File
Here, you'll see the products and images that will be imported. You can choose a different node when importing XML or change the delimiter with CSV files.
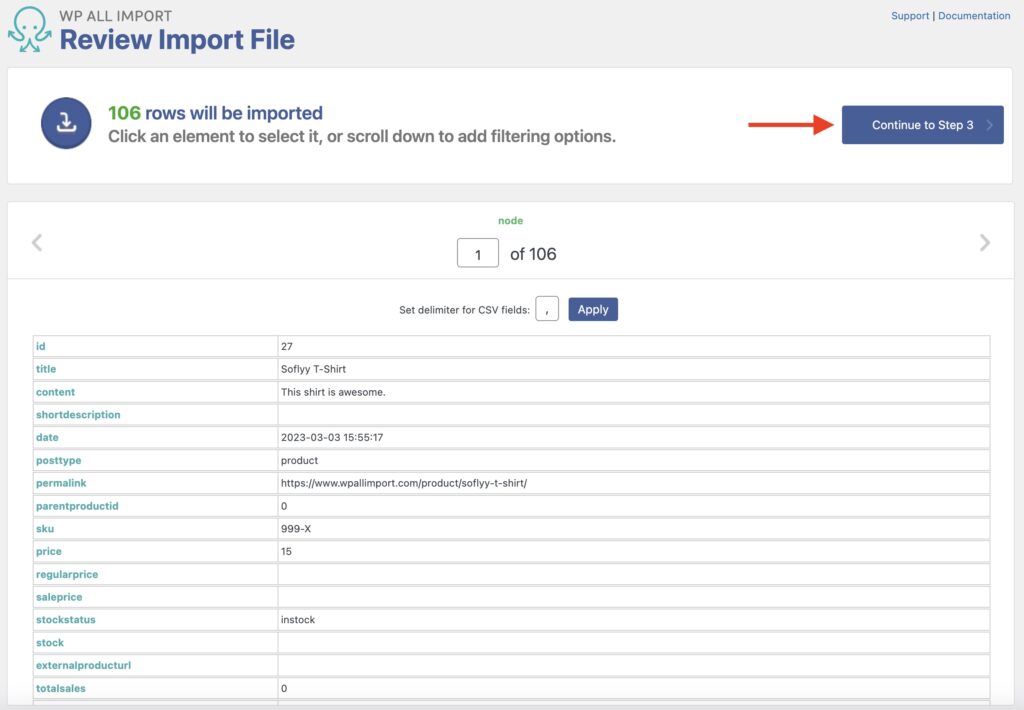
Near the end of the page, you can add filtering options using the Manage Filtering Options section (not shown). Once done, click on Continue to Step 3.
Step 3: Map the Incoming Data Elements to the Product Fields
You'll now see the Drag & Drop interface, where you can map the import data to WooCommerce fields. To do so, drag and drop the import data elements from the right panel to their appropriate fields in the left section.
Title & Description Section
Start by mapping the title and description for your WooCommerce products.
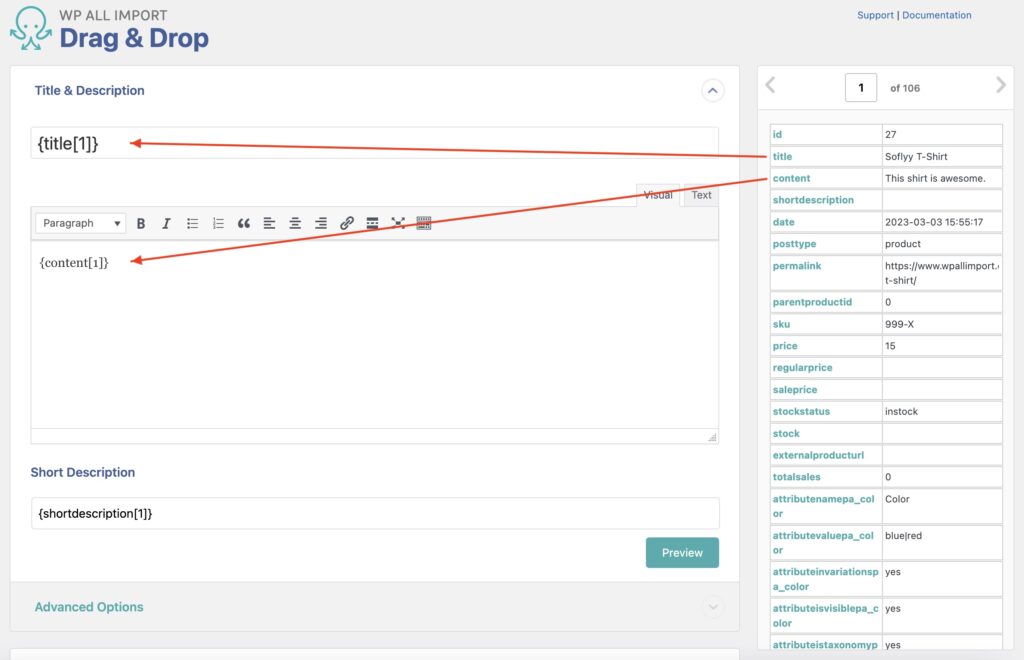
Next, expand the WooCommerce Add-On section.
WooCommerce Add-On Section
This section lets you define everything about the products you're importing. You first define the Product Type, though it can be left with its default selection.
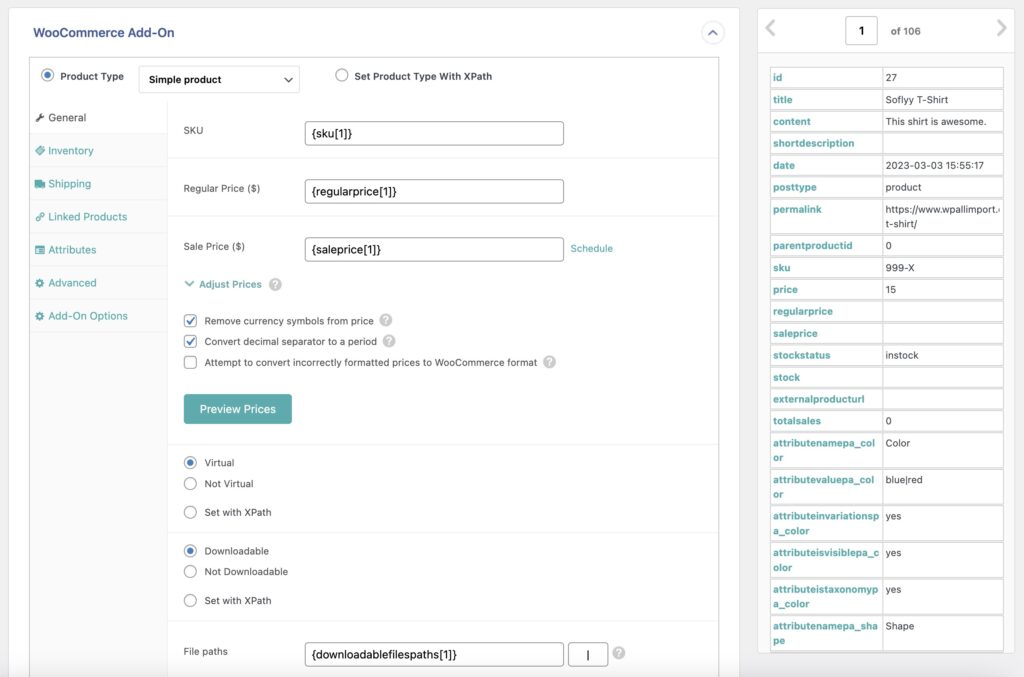
To learn in-depth how to set up this section, see WooCommerce Add-On Section.
Images Section
This is where you define how to import your products with images. Here's how this section looks:
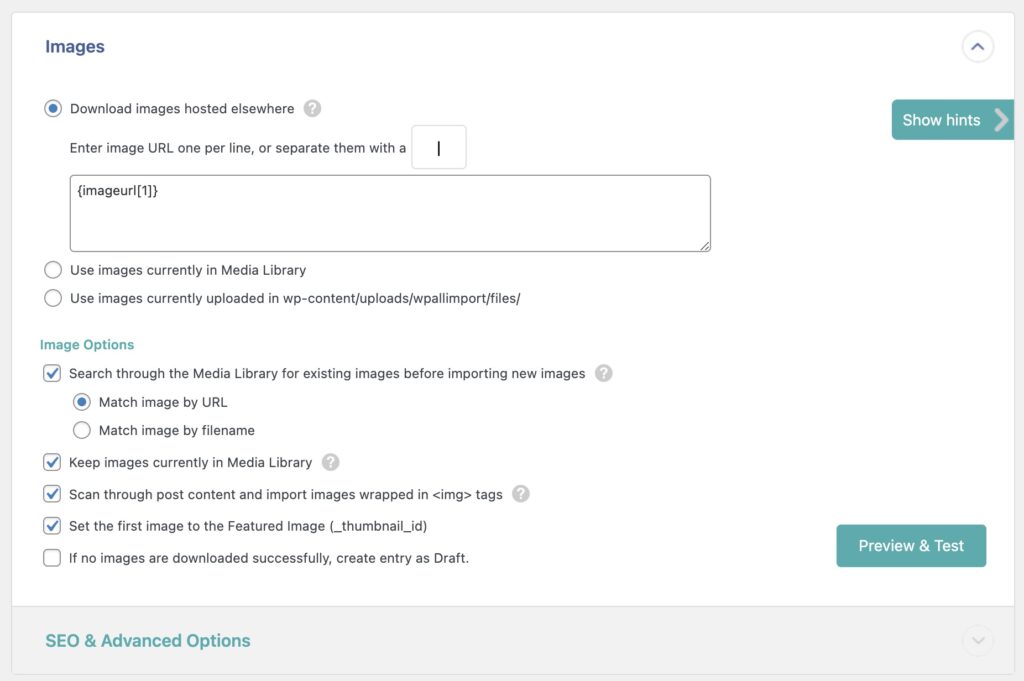
Download images hosted elsewhere
This option is selected by default. It lets you input an image URL, using either the HTTP or HTTPS protocol, to download and add to both your Media Library and your imported product. You can input one URL per line or separate multiple URLs with commas.
Use images currently in Media Library
This option lets you import image filenames to match with existing images in your Media Library.
Use images currently uploaded in wp-content/uploads/wpallimport/files/
This is the last option. It also lets you import image filenames to match with images, but you'll match the names found in the /wp-content/uploads/wpallimport/files/ folder. You can also use subfolders within this folder to keep images ordered.

Import WooCommerce Products from CSV, XML, Excel
- Product variations & attributes
- Price & stock
- Images & galleries
- Scheduled imports
Images Options
These options are available in the Images section and can be left alone if you don't want to modify the default behavior:
- Search through the Media Library for existing images before importing new images
- Keep images currently in Media Library
- Scan through post content and import images wrapped in <img> tags
- Set the first image to the Featured Image (_thumbnail_id)
- If no images are downloaded successfully, create entry as Draft.
If you're not certain what an option does, check its help tooltip.
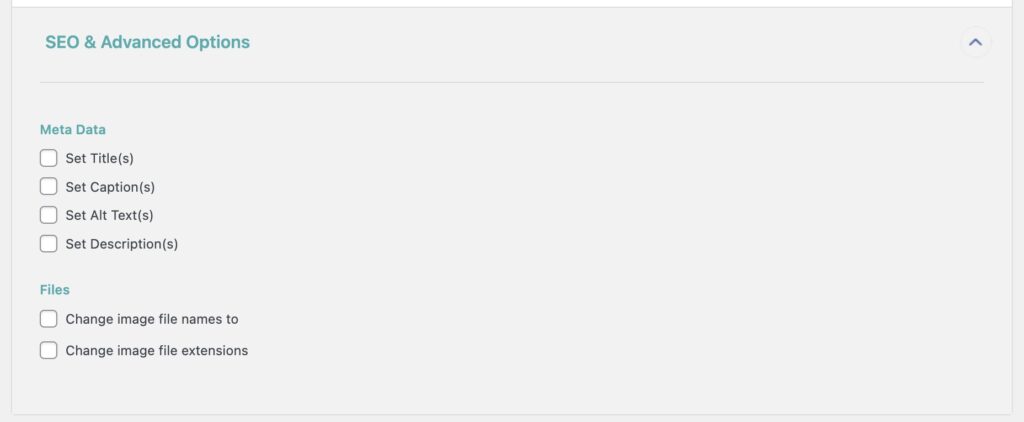
SEO & Advanced Options
This is found near the end of the Images section and lets you define the metadata for the imported images. You can also change the image filename and extension here:
Other Sections
There are other sections to fill in when setting up your import for products with images, such as Custom Fields, Other Product Options, etc. However, we won't cover them here.
Once all data elements have been mapped, click Continue to Step 4 at the bottom (not shown).
Step 4: Configure the Import Settings
The Import Settings screen appears now, where you can modify the import configuration. First, click on Auto-detect to generate a unique identifier automatically.
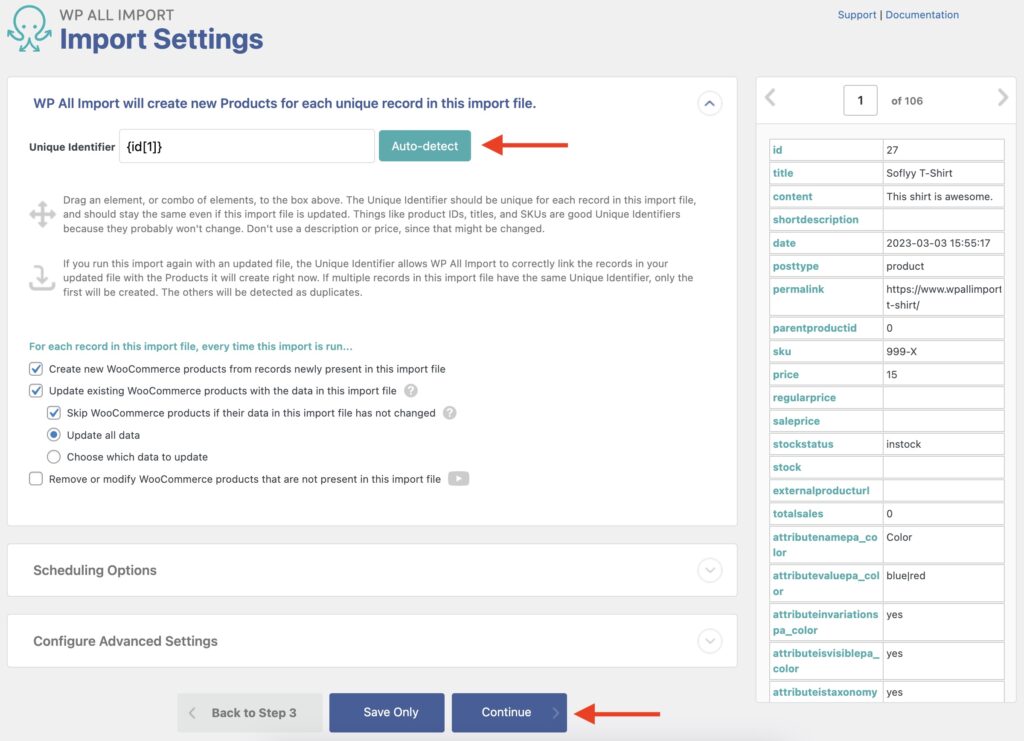
In the section below that, you can define how the import behaves when it runs again, i.e., to create, update, or delete existing records.
The next panels are Scheduling Options and Configure Advanced Settings. However, these can be left alone for now.
To proceed, click Continue.
Step 5: Run the Import and Verify the Imported Data
WP All Import will show the Confirm & Run screen next, which lets you review an import summary:
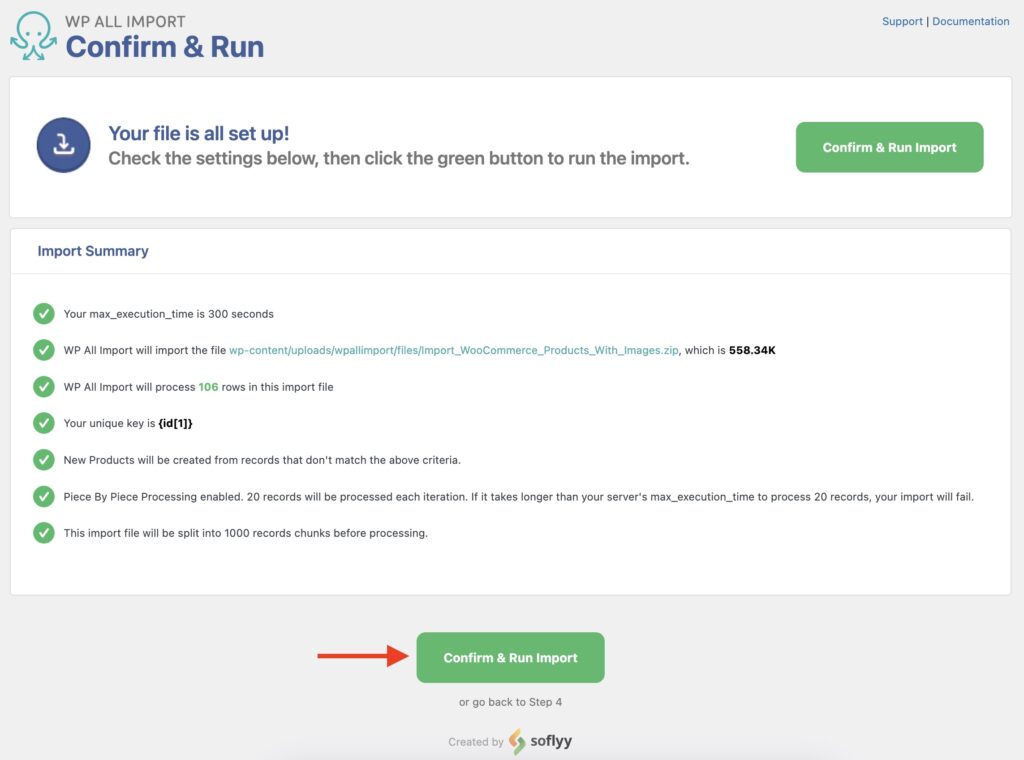
Once you confirm everything is okay, click Confirm & Run Import to run the import. The following notice will appear when the import completes:
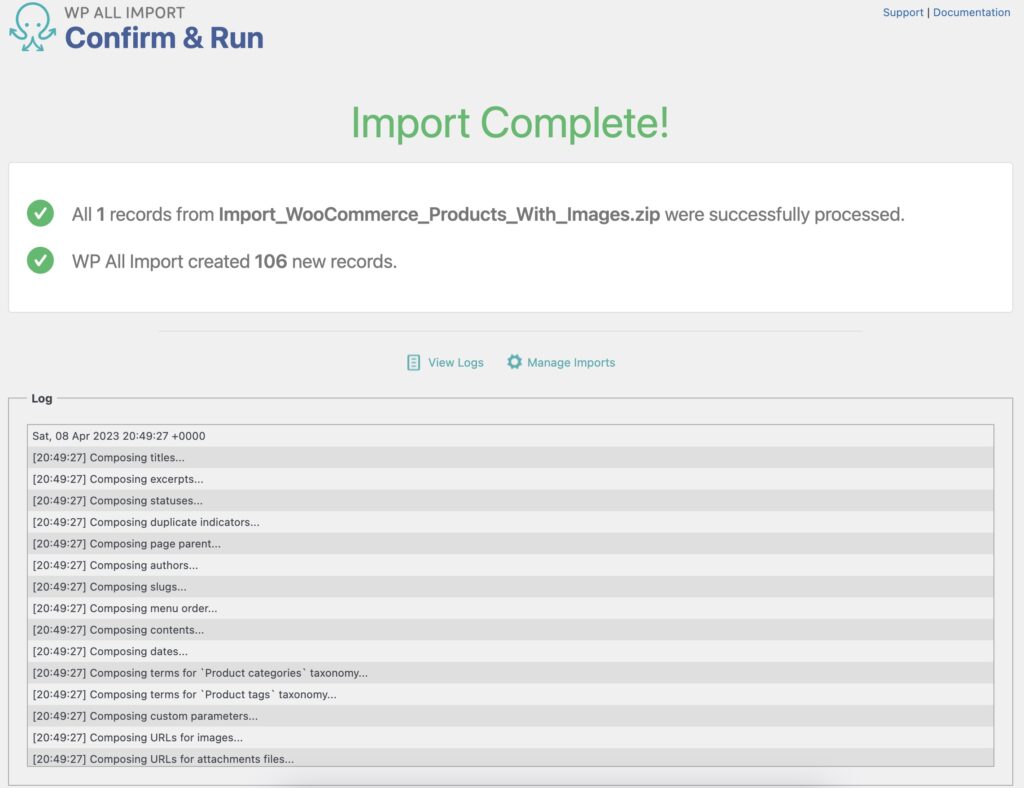
You should then navigate to Products › All Products to check that your import worked as expected:
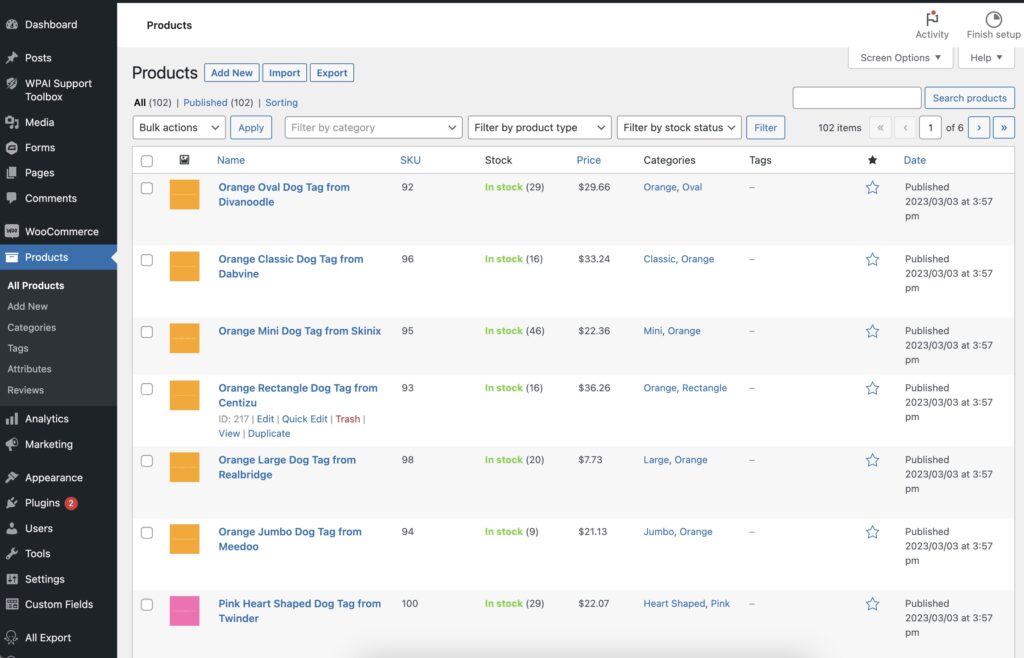
That's it!

Import WooCommerce Products from CSV, XML, Excel
- Product variations & attributes
- Price & stock
- Images & galleries
- Scheduled imports
Import Products With Images – Advanced Topics
Import Extra Images to Product Variations
Out of the box, variable products only allow one image per variation. However, there are plugins that modify this behavior. For example, when either of the following is installed:
To accommodate this situation, simply enable the Import additional variation images option:
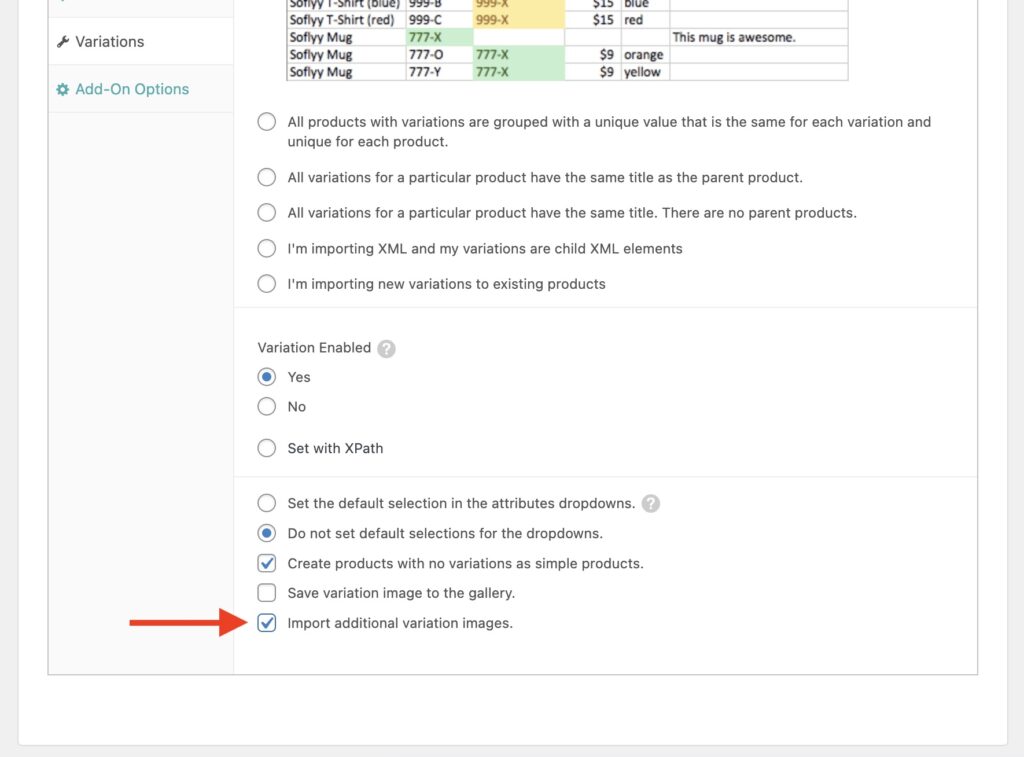
If you use a different plugin, you'll need to write some code that uses our pmxi_gallery_image hook to import the additional variation images into it.
Troubleshoot Import Product Images
If the product images don't import correctly, you can troubleshoot by doing the following:
- Check the History Log to understand the error and act accordingly.
- When importing from an URL, check that the image exists and can be downloaded programmatically.
- While editing the template, whatever option you choose to import images, use the Preview button to test that the images work as expected.
Import Images From an FTP or SFTP Source
You can import images stored in an FTP or SFTP source by using a custom code to fetch the images. For example, you can adapt the following code: Workaround for Importing from FTP to fetch the images from your FTP source:
[custom_file_download("http://example.com/full/path/to/image-file.jpg","jpg")]Here is the usage:
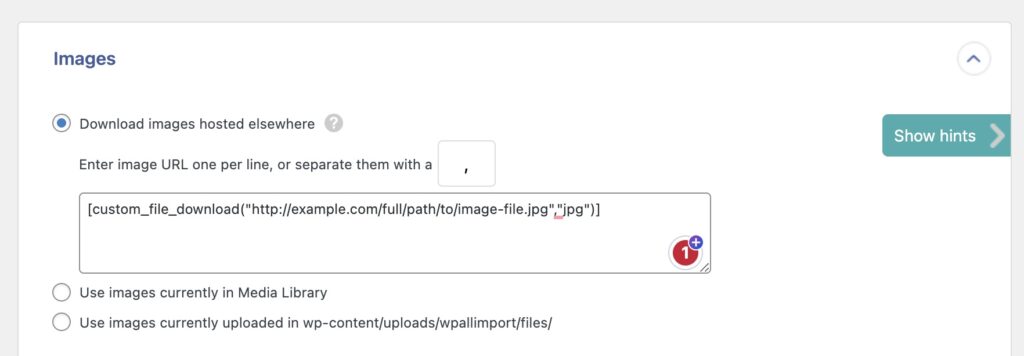
Offload Images From WordPress to Other Services
Out of the box, all images will be automatically downloaded to WordPress, and it's not possible to avoid this behavior. That said, there are third-party plugins capable of offloading imported images to another service, such as an Amazon S3 bucket. In other words, after the image has been imported to WordPress, then it gets offloaded.
Import Products With Images – Frequently Asked Questions
How Do I Import a Product Image into WooCommerce?
To import a product image into WooCommerce, follow the steps from this guide. You can import a single product with a single image, or you can import multiple products, each with multiple images.
How Do I Import Product Images from CSV to WooCommerce?
To import images from CSV to WooCommerce, just specify the CSV file as your import data source. Our plugin will automatically recognize the file format and adjust its interfaces accordingly.
How Do I Import Products with Multiple Images in WooCommerce?
To import products with multiple images, the Images section provides you with several options. For example, if an incoming data element contains multiple images per product, you can specify the character that our plugin should use to separate those images.
For more information, see Variable Number Of Images Per Post.
How Do I Bulk Upload Products with Images in WooCommerce?
- Go to All Import › New Import and upload your import file.
- Choose WooCommerce Products from the dropdown list.
- Map the incoming data elements to your product fields.
- Be sure to map the product image fields.
- Run the import and review your newly imported data.
To learn more about this process, please refer to the full guide above.
How Do I Export All Products From WooCommerce with Images?
- Navigate to All Export › New Export.
- Choose to export WooCommerce Products.
- Set up your export columns and include your product images.
- Run the export and download the export file.
Learn more about this process here: Export WooCommerce Products with Images.
What Add-Ons Do I Need to Import WooCommerce Products?
To import WooCommerce products, you need to have the WooCommerce Import Add-On active on your site, along with WP All Import.
Import Products With Images – Related Docs
Learn how to export WooCommerce products.
Learn how to import WooCommerce products.
Describes how to export WooCommerce variable products.
Describes how to import WooCommerce variable products.
Learn how to export WooCommerce products with images.
Describes how to bulk edit WooCommerce products.
Describes how to migrate WooCommerce products from one website to another.
Explains how to import images from URLs using WP All Import.