The best import export plugin for WordPress & WooCommerce.

Example Code To Simplify Your Imports and Exports
These snippets cover the more common cases where custom code is necessary during import. Unique plugin or theme requirements often necessitate such code. It can also be due to odd import file formats that aren't fully compatible with WP All Import or WP All Export on their own. You would place these snippets in WP All Import's or WP All Export's Function Editor.
Click here for more information.
Table of Contents
For Imports
- wp_all_import_get_import_id()
- Trigger the Next Import on Completion of an Import
- Retrieve Post Type of Current Import
- Markup Price with Minimum and Maximum Limits
- Reduce Stock for Imported Order Items
- Enable Rapid Add-On API Sections for User or Customer Import
- Workaround for Importing from FTP
- Reference Taxonomy Terms by Custom ID
- Find File Elements That Start with Certain Text
- Map File Values During Import
- Send Email After Import is Complete
- Count Number of Created Posts
- Only Import Existing Taxonomy Terms
- Do Not Remove Certain Categories During Import
- Apply wp_handle_upload Filter to Uploaded Files
- Set Password for Imported Posts
- Retrieve Import ID for Use in Template
- Generate Taxonomy Hierarchy from Child Terms
- Split String at Delimiter and Return One Value
- Retrieve URL from String
- Generate Dynamic Import URL
- Use XPath Query Based on Cyrillic Attribute Value
- Assign A Post Parent Programmatically
- Get Post ID By Custom Field
For Exports
- Export Total Number of Sales for Variations
- Get Parent Attributes When Exporting Variations to Google Merchant Center
- Export Parent SKU When Variation SKU is Blank
- Send Export File via Email
- Export Toolset Relationship Fields
- Filter Export Data with Multiple Filters
Custom Fields
- Delete a Custom Field If Another Field Has a Specific Value
- Enable Custom Fields Section in Post Admin
- Append Data to a Custom Field Instead of Overwriting
- Update Second Custom Field If First Field Has Specified Value
- Only Update Custom Field If New Value is Not Empty
- Only Update Custom Field If It's Currently Empty
- Find Post by Custom Field Value
- Only Create Post If Custom Field Value is Unique
Images and Galleries:
- Import Images to WP User Avatar Plugin
- Include Featured Image in Product Gallery
- Save Images to Your Theme's or Plugin's Custom Gallery
- Save Imported Images to a Custom Folder
- Bulk Attach Images to a Record's Custom Gallery
- Prepend URL to Multiple Images in a Single Element
- Save Imported Images to a Folder Based on the Post Date
- Store Images Using Source's Path
- Use the Second Image if the First Image Is Not Valid
WooCommerce
- List One 'Any Attribute' Variation for Variable Products
- Variations Not Updating When Selected on Frontend
- Custom Items Loop for WooCommerce Orders Exports
- Use Parent Prices for Variations
- Match By SKU When The SKUs on Your Site Contain Extra Characters
- Do Not Create Products With Duplicate SKU
- Round Imported Prices
- How to Increase Stock Instead of Replacing It
- Query Orders by Old ID
- Import Grouped Products
- Adjust Prices Based on The Price Range
- Update Variable Products Stock and Price by Title
- If No Variation Image, Export Parent Image as Fallback
Miscellaneous
- cURL Error 60
- Import Multisite Users to Multiple Subsites
- Add Entry to the Import Log
- Import Users With The Same Email
Theme and Plugin Integrations:
- Houzez - Linking Neighborhoods, Cities, States, and Countries
- Flatsome Theme - Taxonomy Top and Bottom Content
Data Manipulation for Imports:
- Append ACF Repeater Data
- Cancel Import If File Empty
- Delete Source File After Import
- Manually Set Import Feed Type
- Combine HTML Elements In XML Without CDATA Tags
- Modify Record Before It's Imported
- Access Data Outside of Element Chosen on Step 2
- Map Values to Element Name Based on Value
- Import ACF Post2Post Plugin Bidirectional Fields
- Import Data to Custom Database Table
- Use Custom Delimiter When Retrieving Multiple Values
- Only Update ACF Fields If Imported Values Are Not Empty
- Filter Posts by Date
- Only Update Posts with a Specific Status
- Only Update Products If the Stock Status Changed
- Only Update Product If Price Was Not Manually Changed
- Delete Orphaned Variations When Deleting Previously Imported Products
- Prevent Some Posts From Being Deleted by WP All Import
- Convert Comma-separated List into Serialized Array
- Merge Multiple XML Files
- Keep Old IDs When Migrating Products or Posts
- Keep Old IDs When Migrating Users or Customers
- Keep Old IDs When Migrating Categories and Other Taxonomy Terms
- Keep Old IDs When Migrating Comments
- Change Uploads Folder During Import
- Extract URL From a String
- Limit the Depth of Categories
Data Manipulation for Exports:
- Send Export File to FTP Destination
- Set Exported Order Status
- Filter Variations by Parent Status When Exporting to GMC
- Limit Records Exported to CSV by Date
- Limit Number of Records Exported When Exporting to XML
- Append Custom Line Endings to Export File
- Programmatically Add Elements to XML Exports
- Move Generated File After Export
- Run Cron Export with Only a Trigger Cron Job and 1 Processing Cron Job
- Prevent Certain Records from Being Updated
- Export Data From Custom Database Tables
Delete a Custom Field If Another Field Has a Specific Value
Here we use the pmxi_saved_post action, get_post_meta(), and delete_post_meta() to delete _my_custom_field if _my_update_check is set to 'yes'.
function conditional_delete( $id ) {

    // Retrieve check field's value.
    $check = get_post_meta( $id, '_my_delete_check', true );

    if ( $check === 'yes' ) {

        // If check value is 'yes' delete _my_field.
        delete_post_meta( $id, '_my_field' );

    }
}
add_action( 'pmxi_saved_post', 'conditional_delete', 10, 1 );
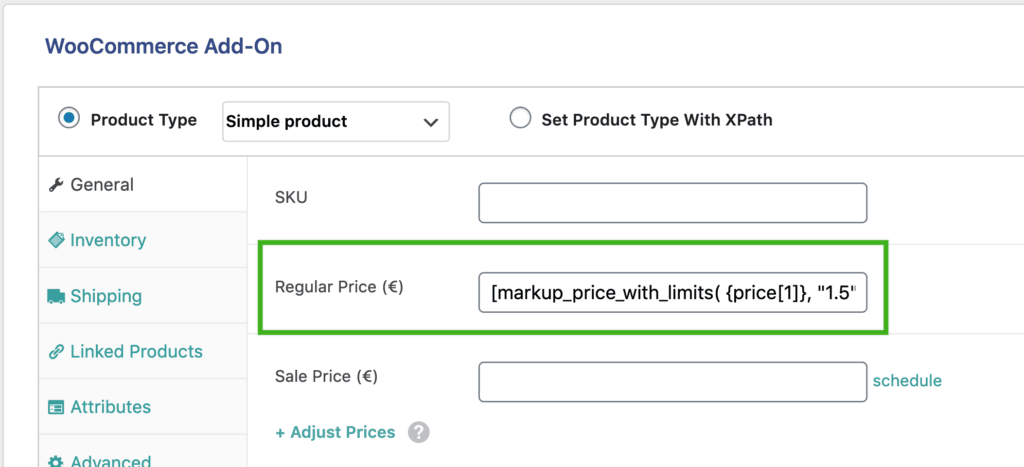
Markup Price with Minimum and Maximum Limits
Here we clean up the price in our file, add a markup, and ensure it's within our required minimum and maximum prices. The $price and $multiplier parameters are required. The others are optional and can be used to further customize the final price:
| Parameter | Description |
| $price | The original price. |
| $multiplier | Multiply the original price by this number. |
| $nearest | Round to the nearest value (0.01 by default). |
| $minus | Subtract this value from the rounded price. |
| $map | The minimum price that can be returned. |
| $msrp | The maximum price that can be returned. |
We call the function from any field that needs a marked up price:
function round_price_with_limits( $price = null, $multiplier = 1, $nearest = .01, $minus = 0, $map = 0, $msrp = 9999999999) {

    // Ensure a price was provided.
    if ( !empty( $price ) ) {

        // Remove unwanted characters from price.
        $price = preg_replace("/[^0-9,.]/", "", $price);

        // Remove unwanted characters from min price.
        $map = preg_replace("/[^0-9,.]/", "", $map);

        // Remove unwanted characters from max price.
        $msrp = preg_replace("/[^0-9,.]/", "", $msrp);

        // Calculate price with markup and round it.
        $rounded_price = ( round ( ( $price * $multiplier ) / $nearest ) * $nearest ) - $minus;

        // If price is less than minimum, return minimum.
        if($rounded_price < $map){

            return $map;

        }
        // If price is greater than maximum, return maximum.
        elseif($rounded_price > $msrp){

            return $msrp;

        } else {

            // Return price otherwise.
            return $rounded_price;

        }

    }
}
Trigger the next Import on Completion of an Import
Here we use the pmxi_after_xml_import action to redirect the connection to the next import's 'trigger' URL. We are able to ensure the first import will always complete before the next is started. This is especially helpful when our second import depends on data provided by the first.
All imports still require the 'processing' cron jobs or they won't run.
function after_xml_import($import_id, $import) {

	// Only run for import ID 5.
	if ($import_id == 5) {

		// Call the next import's trigger URL.
		wp_remote_get("yourtriggerURLhere");
    }
}
add_action('pmxi_after_xml_import', 'after_xml_import', 10, 2);
Reduce Stock for Imported Order Items
Here we use the pmxi_saved_post action and wc_reduce_stock_levels() to deduct ordered items from product stock. This is necessary since WP All Import doesn't touch product stock when importing Orders by default.
function decrease_order_item_stock($post_id, $xml_node, $is_update) {

    // Retrieve the import ID.
    $import_id = ( isset( $_GET['id'] ) ? $_GET['id'] : ( isset( $_GET['import_id'] ) ? $_GET['import_id'] : 'new' ) );

    // Only run for imports 899, 898, and 895.
    if ( in_array( $import_id, [899, 898, 895] ) ) {

        // Decrease stock for order items if it hasn't already
        // been decreased.
        wc_reduce_stock_levels( $post_id );

     }
}
add_action('pmxi_saved_post', 'decrease_order_item_stock', 10, 3);
Import Multisite Users to Multiple Subsites
Here we use our Custom Fields capability to assign Users to more than one subsite on WordPress Multisite. This workaround is required due to the way Multisite stores Users.
Custom fields are used to identify which subsite each User is authorized to use. Our example Multisite install uses the prefixes below for each subsite:
wp_
wp_2_
wp_3_
A user must have these three Custom Fields defined to be authorized on all of our subsites:
wp_capabilities
wp_2_capabilities
wp_3_capabilities
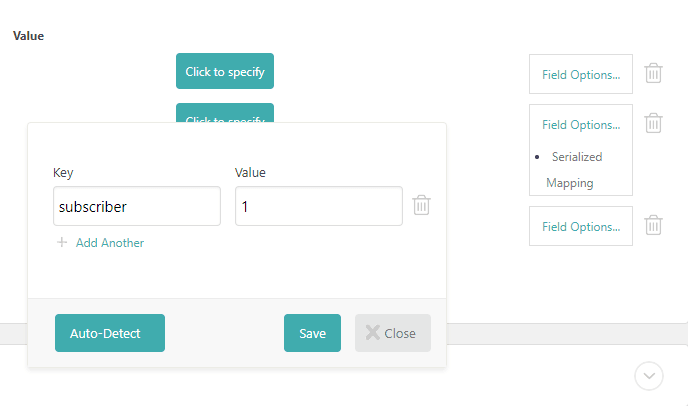
Each field must contain a serialized array of User Roles:
a:1:{s:10:"subscriber";b:1;}
For example:
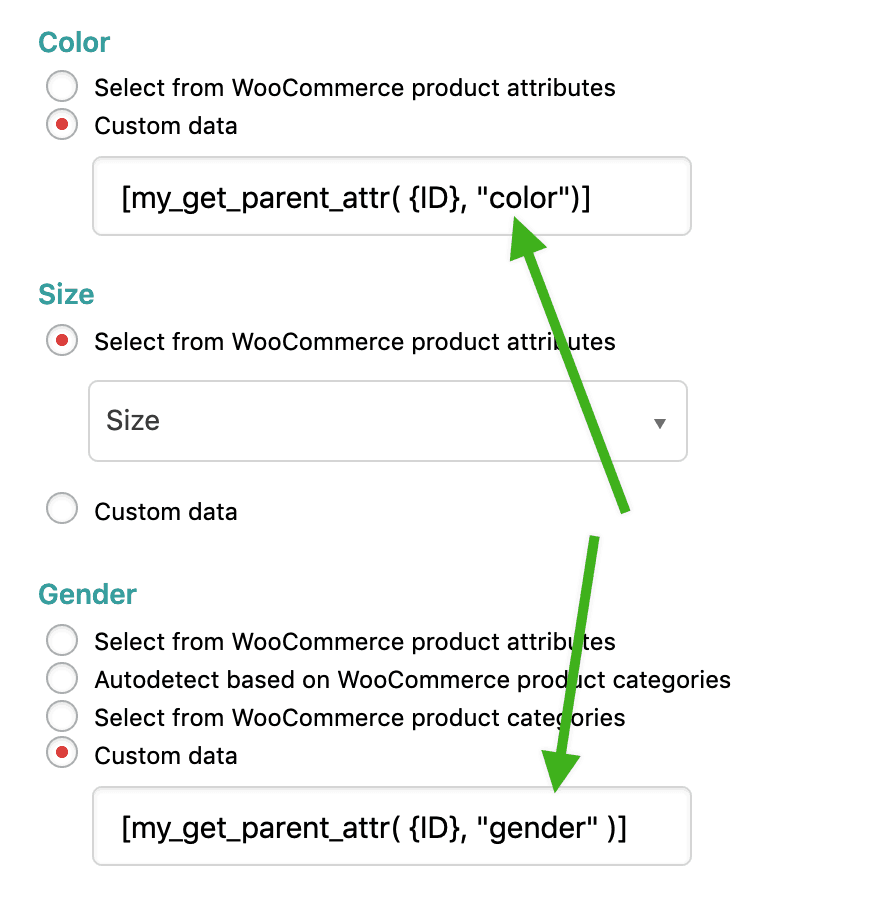
Get Parent Attributes When Exporting Variations to Google Merchant Center
Here we use wc_get_product to retrieve the WC_Product object for each exported record. This lets us retrieve attributes that are directly assigned to the parent products. By default, when exporting to GMC only the attributes attached to the variations themselves are exported.
// $attr must be the name of the attribute to be retrieved.
function my_get_parent_attr( $id, $attr ){

    // Get product object.
    $prod = wc_get_product( $id );

    // Check product type.
    if( $prod->is_type('variation') ){

        // Retrieve parent product's ID.
        $parent = wc_get_product( $prod->get_parent_id() );

        // Return parent's attribute value.
        return $parent->get_attribute($attr);

    } else {

        // Return attribute value for simple products.
        return $prod->get_attribute($attr);

    }
}
Here it is in use:
Enable Rapid Add-On API Sections for User or Customer Import
Here we use the pmxi_visible_template_sections filter to display our add-ons section. This allows it to show up for Users and Customers. We use the wp_all_import_is_images_section_enabled filter to hide the Images section as it's not normally displayed for Users and Customers.
// Enable our custom add-on's section.
function show_addon_section_users_customers( $sections, $post_type ) {

    // Enable add-on section for Users.
    if ( 'import_users' == $post_type )
        $sections[] = 'featured';

    // Enable add-on section for Customers.
    if ( 'shop_customer' == $post_type )
        $sections[] = 'featured';

    return $sections;
}
add_filter( 'pmxi_visible_template_sections', 'show_addon_section_users_customers', 11, 2 );

// Disable the Images section.
function hide_images_users_customers( $is_enabled, $post_type ){

    // Disable Images section for Users, return true to enable.
    if ( 'import_users' == $post_type )
        $is_enabled = false;

    // Disable Images section for Customers, return true to enable.
    if ( 'shop_customer' == $post_type )
        $is_enabled = false;

    return $is_enabled;

}
add_filter( 'wp_all_import_is_images_section_enabled', 'hide_images_users_customers', 10, 2 );
And, here's what the run() function would look like:
$wp_user_avatar_addon->run(
	array(
        "post_types" => array( "import_users", "shop_customer" )
	)
);
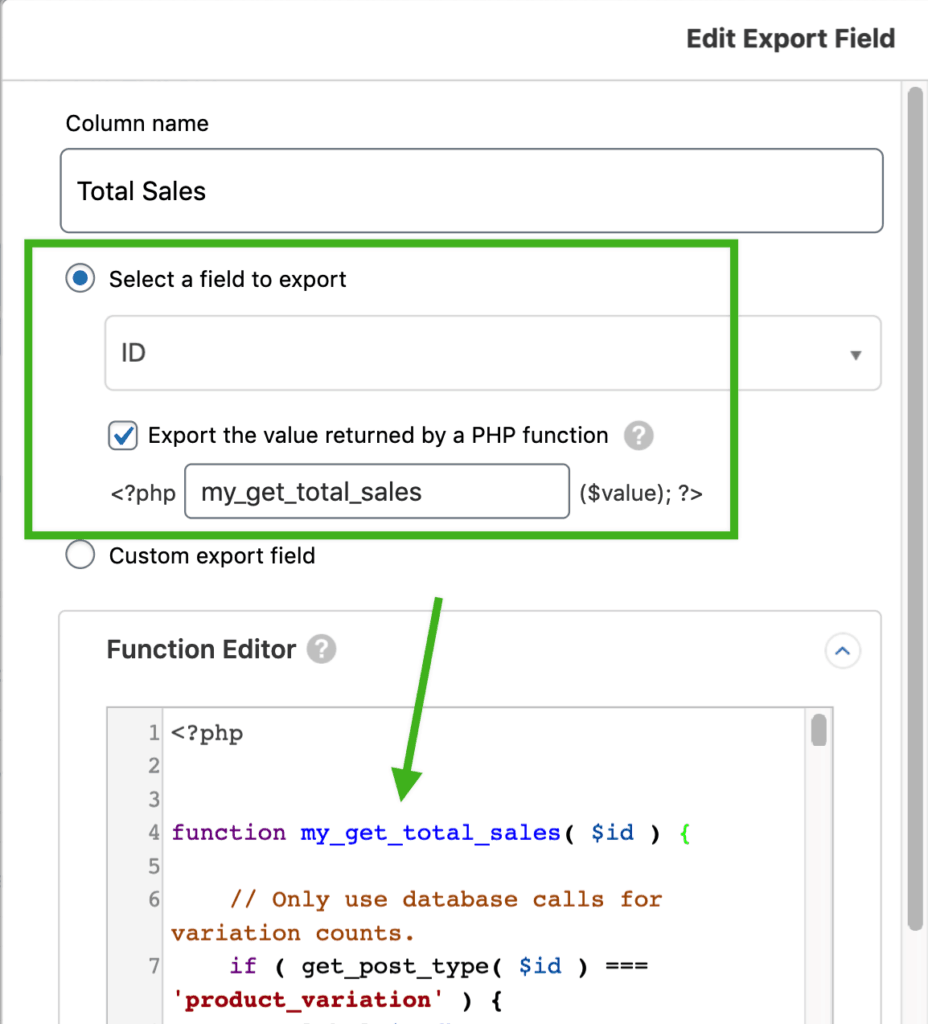
Export Total Number of Sales for Variations
Here we export the total sales for each of our variations using some custom code. We need this workaround because WooCommerce doesn't track total sales at the variation level.
We call it like this:
function my_get_total_sales( $id ) {

    // Only use database calls for variation counts.
    if ( get_post_type( $id ) === 'product_variation' ) {
        global $wpdb;
        $table = $wpdb->prefix . 'woocommerce_order_itemmeta';
        $count = array();
        $total_count = 0;
        $itemmeta = $wpdb->get_results( "SELECT `order_item_id` FROM `$table` WHERE `meta_key` = '_variation_id' AND `meta_value` = '$id'" );

        // Ensure item meta was returned.
        if ( ! empty( $itemmeta ) ) {

            // Process each item.
            foreach ( $itemmeta as $result ) {

                // Ensure the order quantity was retrieved.
                if ( $qty = $wpdb->get_row( "SELECT `meta_value` FROM `$table` WHERE `meta_key` = '_qty' AND `order_item_id` = '{$result->order_item_id}'" ) ) {

                // Save the quantity ordered.
                $count[ $result->order_item_id ] = $qty->meta_value;

                }
            }

            // Switch to order items table.
            $table = $wpdb->prefix . 'woocommerce_order_items';

            // Process each item meta record.
            foreach ( $itemmeta as $item_obj ) {

                // Retrieve Order ID for each ordered item.
                $order_id_results = $wpdb->get_row( "SELECT `order_id`,`order_item_id` FROM `$table` WHERE `order_item_id` = '{$item_obj->order_item_id}'" );

                // Only continue if order was returned.
                if ( ! empty( $order_id_results ) ) {

                    // Retrieve the order status.
                    $status = get_post_status( $order_id_results->order_id );

                    // Check if order is completed.
                    if ( $status == 'wc-completed' ) {

                        // If it was add that item's count to total.
                        $total_count = $total_count + $count[ $item_obj->order_item_id ];

                    }
                }
            }
        }

    // Return total sales for variation.
    return $total_count;

    } else {

        // Get product object.
        $product = wc_get_product( $id );

        // If the product isn't varible, return total sales.
        return $product->get_total_sales();

   }
}
Workaround for Importing from FTP
Here we call a custom function in the 'Download from URL' field to import from FTP. The code must be placed outside of WP All Import's Function Editor - your theme's functions.php file is a good place. We make use of wp_upload_dir() when saving the retrieved file.
The file is saved in the uploads directory, it's up to you to take any security precautions you deem necessary.
We call the function from the 'Download from URL' option on Step 1:
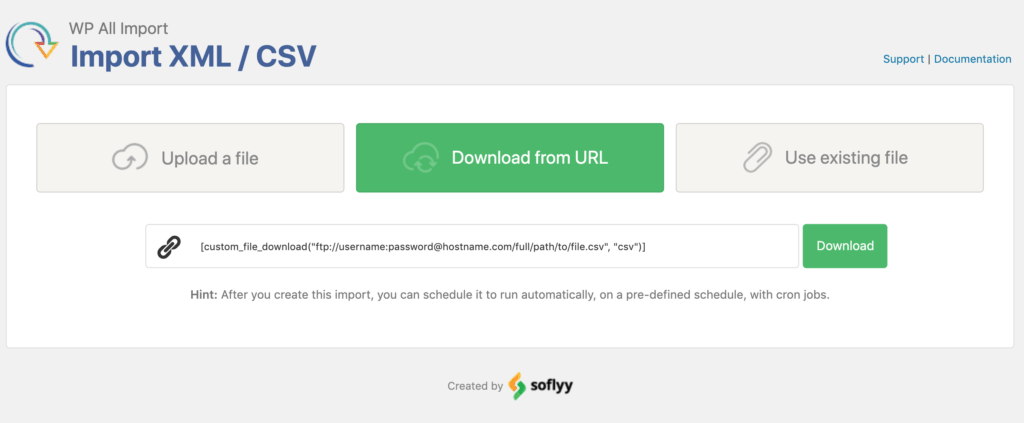
If your FTP requires a username and password, it would look something like this:
[custom_file_download("ftp://username:[email protected]/full/path/to/file.csv","csv")]Otherwise, you can omit that part:
[custom_file_download("http://example.com/full/path/to/file.csv","csv")]function custom_file_download( $url, $type = 'xml' ) {
// Set our default cURL options.
$ch = curl_init();
curl_setopt( $ch, CURLOPT_URL, $url );
curl_setopt( $ch, CURLOPT_RETURNTRANSFER, 1 );
curl_setopt( $ch, CURLOPT_CUSTOMREQUEST, "GET" );
/* Optional: Set headers if needed.
* $headers = array();
* $headers[] = "Accept-Language: de";
* curl_setopt($ch, CURLOPT_HTTPHEADER, $headers);
*/
// Retrieve file from $url.
$result = curl_exec( $ch );
// Return error if cURL fails.
if ( curl_errno( $ch ) ) {
exit( 'Error:' . curl_error( $ch ) );
}
curl_close( $ch );
// Identify the upload directory path.
$uploads = wp_upload_dir();
// Generate full file path and set extension to $type.
$filename = $uploads['basedir'] . '/' . strtok( basename( $url ), "?" ) . '.' . $type;
// If the file exists locally, mark it for deletion.
if ( file_exists( $filename ) ) {
@unlink( $filename );
}
// Save the new file retrieved from FTP.
file_put_contents( $filename, $result );
// Return the URL to the newly created file.
return str_replace( $uploads['basedir'], $uploads['baseurl'], $filename );
}Variations Not Updating When Selected on Frontend
Here we use the woocommerce_ajax_variation_threshold filter to enable 150 variations to be loaded via AJAX on the frontend. This enables the product options to update when selecting each attribute from the dropdown. By default, those updates only work for products with 30 or fewer variations and products with more only have the selected options validated when adding them to the cart.
function soflyy_change_threshold( $amount, $product ) {

    // The max number of variations to load via AJAX.
    return 150;

}
add_filter( 'woocommerce_ajax_variation_threshold', 'soflyy_change_threshold', 10, 2 );
Retrieve Post Type of Current Import
Here we use the wp_all_import_is_post_to_create filter to retrieve the Post Type being imported. This code works with any of our hooks.
function get_import_post_type($continue_import, $current_xml_node, $import_id){

    // Retrieve import object.
    $import = new PMXI_Import_Record();
    $import->getById($import_id);

    // Ensure import object is valid.
    if ( ! $import->isEmpty() ) {

        // Retrieve post type.
        $post_type = $import->options['custom_type'];

        // Use post type in your code.

    }
}
add_filter('wp_all_import_is_post_to_create', 'get_import_post_type', 10, 3);
Houzez - Linking Neighborhoods, Cities, States, and Countries
Here we use the pmxi_saved_post action to link Neighborhoods, Cities, and States for the Houzez theme. This is necessary because the Houzez Add-On for WP All Import doesn't handle it currently. You must use a Taxonomies import for these examples.
The neighborhoods are linked to cities by entries in the Options table. You'll need to set a 'parent_city' Custom Field:
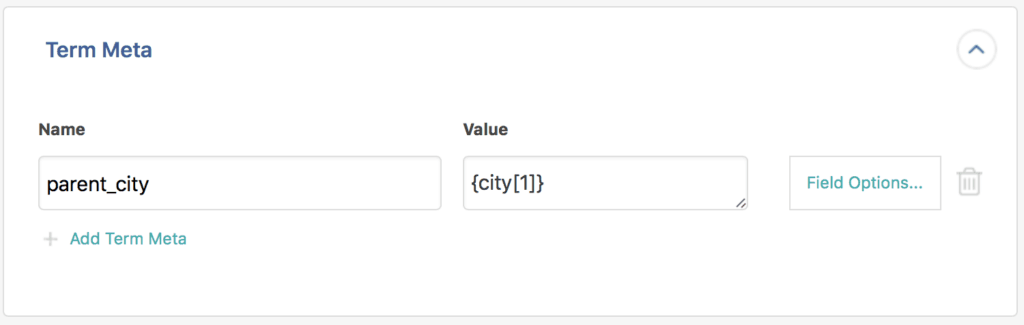
Then add the code below to the Function Editor:
function link_houzez_city( $id, $xml, $is_update ) {

    // Retrieve 'parent_city' and use it to find that City.
    $term = get_term_by( "name", get_term_meta($id, "parent_city", true), "property_city" );

    // Retrieve the City's slug.
    $slug = $term->slug;

    // Generate the appropriate Option name.
    $option_name = '_houzez_property_area_' . $id;

    // Set the option to link this Neighborhood to its City.
    update_option($option_name, array("parent_city"=>$slug));

}
add_action( 'pmxi_saved_post', 'link_houzez_city', 10, 3 );
When adding Cities to States you must set the 'parent_state' Custom Field ( instead of parent_city ):
function link_houzez_state( $id, $xml, $is_update ) {

    // Retrieve 'parent_state' and use it to locate that State.
    $term = get_term_by( "name", get_term_meta($id, "parent_state", true), "property_state" );

    // Retrieve the State's slug.
    $slug = $term->slug;

    // Generate the Option name.
    $option_name = '_houzez_property_city_' . $id;

    // Set the Option to link the City and State.
    update_option($option_name, array("parent_state"=>$slug));

}
add_action( 'pmxi_saved_post', 'link_houzez_state', 10, 3 );
When adding States to Countries the Custom Field must be named 'parent_country' and must contain the 2 character Country Code ( e.g. US, CA, GB, IE, etc )
function link_houzez_country( $id, $xml, $is_update ) {

    // Retrieve 'parent_country' and use it as the slug.
    $slug = get_term_meta($id, "parent_country", true);

    // Generate the Option name.
    $option_name = '_houzez_property_state_' . $id;

    // Set the Option to link State and Country.
    update_option($option_name, array("parent_country"=>$slug));

}
add_action( 'pmxi_saved_post', 'link_houzez_country', 10, 3 );
Flatsome Theme - Taxonomy Top and Bottom Content
Here we use a custom function to import data to the Top and Bottom Content fields of the Flatsome Theme. This is necessary due to the format required for those fields.
The bottom content and top content are stored in a serialized array in the 'cat_meta' field. You must tell WPAI to update that field ( Manage Imports > Import Settings ):
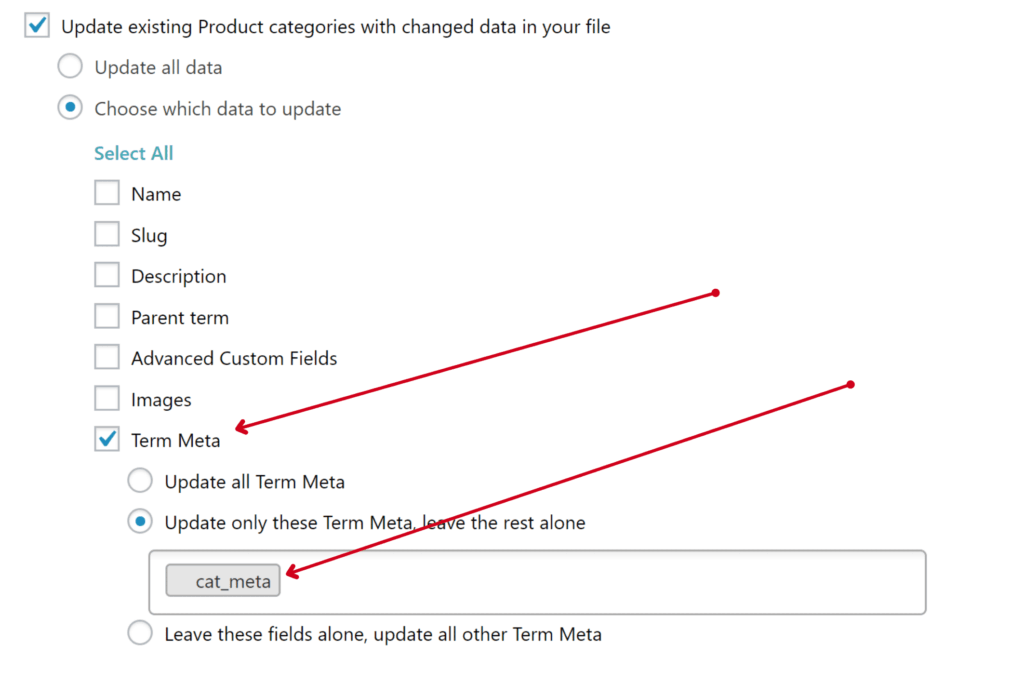
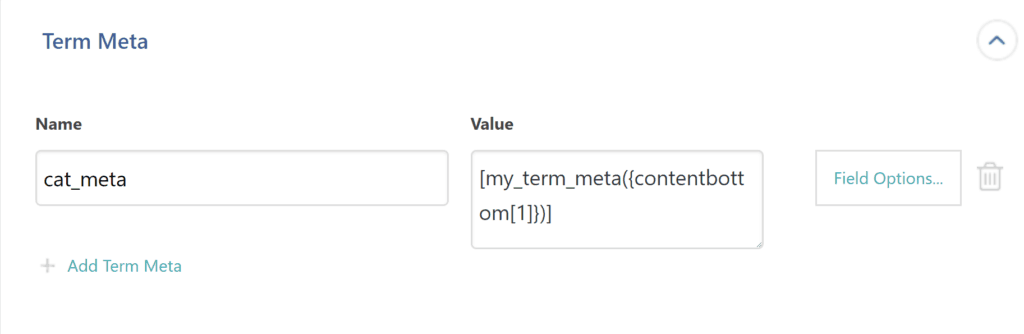
Here's an example snippet to use in the Function Editor that accepts your Bottom and Top Content values as parameters. It returns the serialized array as required by Flatsome:
function my_term_meta( $bottomContent, $topContent = '' ) {

	$meta = array('cat_header' => $topContent, 'cat_footer' => $bottomContent);
	return serialize($meta);

}
Here's the code in action:
Add Entry to the Import Log
Here we are using the pmxi_saved_post action to add an entry to the import log every time a post is successfully imported or updated. You can use a different action to add log entries at a different time, such as whenever an image is imported, or a custom field updated, etc.
function my_custom_log_entry($id) {
	$logger = function($m) {printf("[%s] $m", date("H:i:s"));flush();};

	// Define your log entry here
	call_user_func($logger, "This is my log message.");

}
add_action('pmxi_saved_post', 'my_custom_log_entry', 10, 1);
Reference Taxonomy Terms by Custom ID
Here we use get_terms() to retrieve previously imported categories by the _my_old_id custom field. This is necessary when using import files that only reference categories by ID.
Here's an example category file:
| name | description | id_parent | id_category |
| Parent | An example parent category. | 1 | |
| Child | An example child category. | 1 | 2 |
Here's an example product file:
| name | price | id_category_default |
| Apples | 1.25 | 2 |
We start with a Taxonomies > Product Categories import. On Step 3, we save our ID to a custom field named _my_old_id:
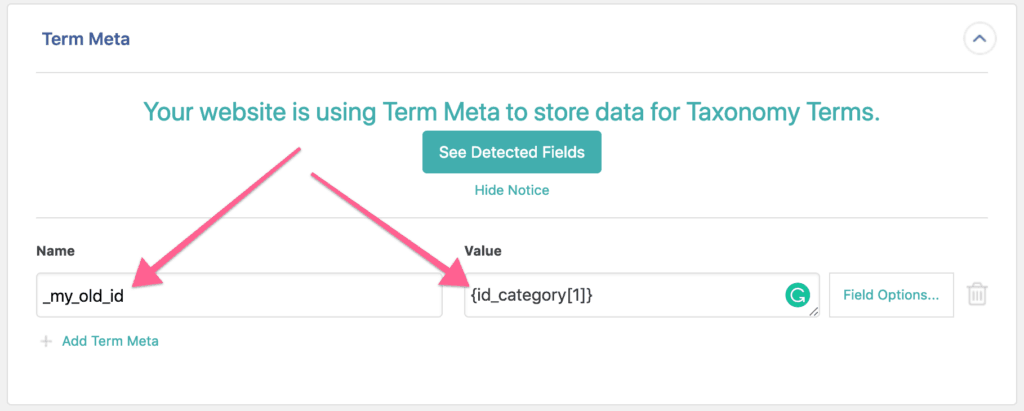
The code below is placed in the Function Editor:
function my_get_cat_slug( $old_id, $id = true ) {
    $args = array(
        'hide_empty' => false,

        // Specify what field to search for the ID.
        'meta_query' => array(
            array(
            'key'       => '_my_old_id',
            'value'     => $old_id,
            'compare'   => '='
            )
        )
    );

    // Search the Product Category taxonomy for our term.
    $terms = get_terms( 'product_cat', $args );

    if( $id === true ){

        // By default we return the term's WordPress ID.
        return $terms[0]->term_id;

    }else{

        // If $id is false we return the term's slug instead.
        return $terms[0]->slug;

    }
}
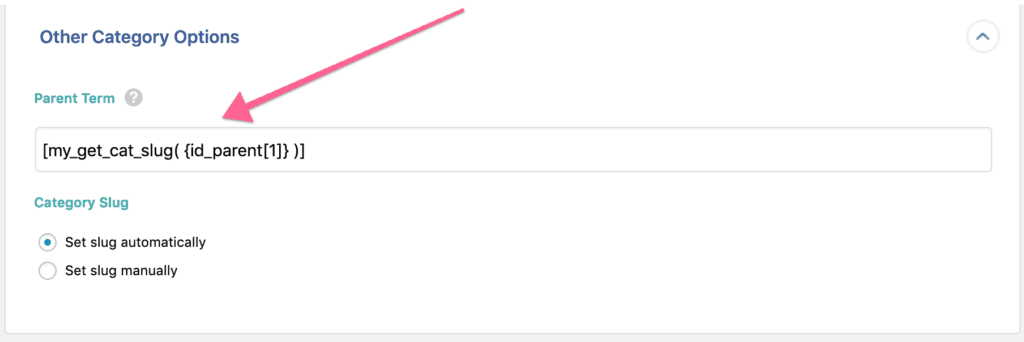
Here we use our code to specify the Parent Term:
If all Parent Terms are listed before their children in the file, the records per iteration can be set to 1 to ensure they're linked (Manage Imports > Import Settings):
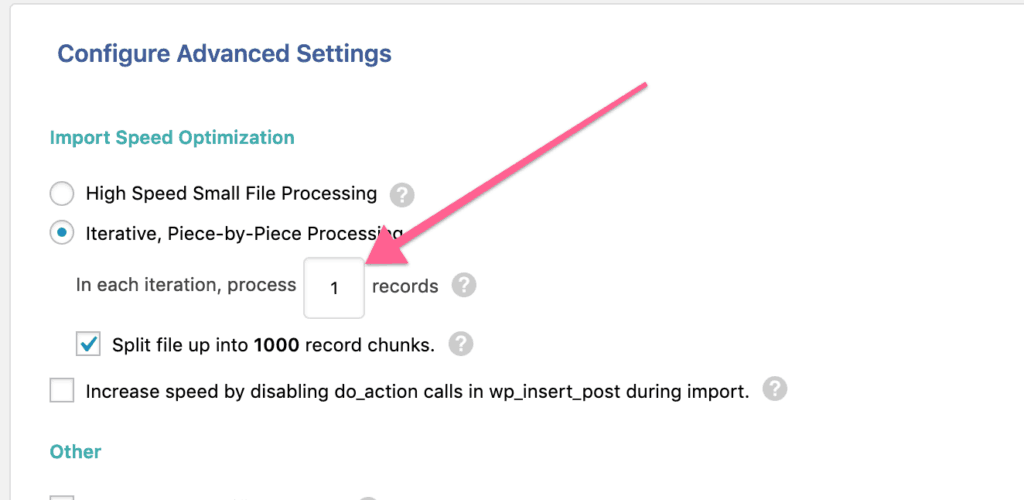
Otherwise, the import must be run twice to link the Parent Terms.
Now the imported Product Category terms are available to use when importing our products. We need each term's slug so we set the second parameter to false when calling our code:

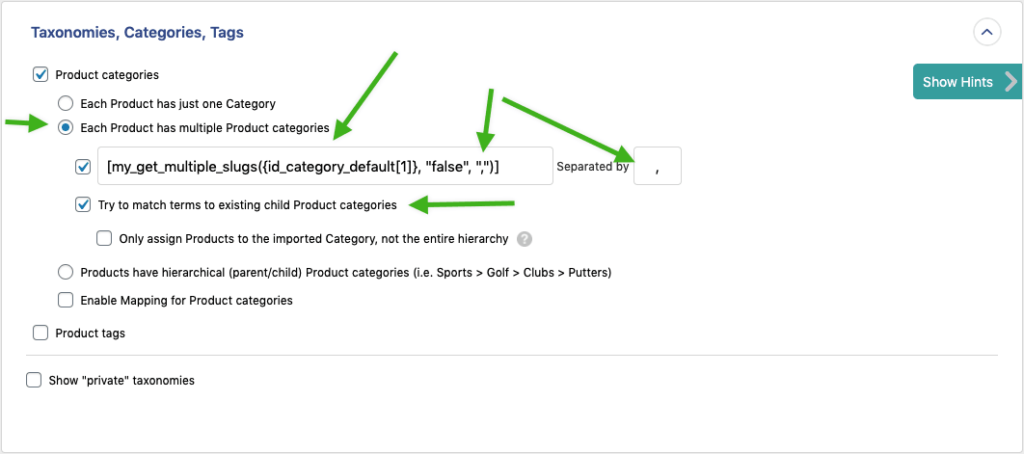
If you need to reference multiple categories per record, you'll need some additional code in the Function Editor:
function my_get_multiple_slugs( $old_id, $id = true, $delimiter = ',' ){

    // Split the category references on the given delimiter.
    $values = explode($delimiter, $old_id);
    // Declare a variable for our located categories.
    $cat_list = [];

    // Process each category reference.
    foreach( $values as $value ){
        // Call our other function to process each category.
        $cat_list[] = my_get_cat_slug( $value, $id );
    }

    // Return a list of the located categories using the defined delimiter.
    return implode($delimiter, $cat_list);
}
The taxonomies section should be updated to something like below, making sure the delimiter provided matches that used in your file:
Find File Elements That Start with Certain Text
Here we use an XPath expression to return values for all elements in the file that start with 'image'. The values are returned separated by commas.
{./*[starts-with(local-name(), 'image')]}
Map File Values During Import
Here we use a custom function to map an amenity code in our file to its description. This allows us to match our imported values with those on our site. The code expects either a single amenity or a comma-separated string of values.
function soflyy_map_amenities($amenities) {

    // Convert comma separated list to array.
    $amenities = explode(",",$amenities);

    // Define your mappings.
    $map_values = array(
        'BA'         => 'Balcony',
        'SP'         => 'Shared Pool',
        'SS'         => 'Shared Spa',
        'file value' => 'returned value');

    // Declare a new array for our mapped values.
    $mapped_amenities = array();

    // Process each amenity.
    foreach($amenities as $amenity)
    {

        // Check if we have a mapping for this amenity.
        if(array_key_exists($amenity, $map_values)){

            // If we do, use that value.
            $mapped_amenities[] = $map_values[$amenity];

        } else {
            // If we don't have a value mapping you
            // can perform some other action.
        }

    }

    // Return the mapped values as a comma-separated string.
    return implode(",",$mapped_amenities);

}
Here's how we call the function with our amenities element:
[soflyy_map_amenities({amenities[1]})]
Enable Custom Fields Section in Post Admin
Here we use the acf/settings/remove_wp_meta_box filter to re-enable the Custom Fields section when editing posts. The code must be outside of the Function Editor - your theme's functions.php file is a good place.

add_filter('acf/settings/remove_wp_meta_box', '__return_false');
Here are the details from the ACF developer: https://www.advancedcustomfields.com/blog/acf-pro-5-6-0-ui-ux/
cURL Error 60
Here we use the http_api_curl to temporarily disable cURL's peer SSL verification. This allows us to download from HTTPS links that don't have a valid certificate chain. However, it's a potential security issue and only used as an emergency measure while the source site is fixed. The code must be placed outside the Function Editor - such as in your theme's functions.php file.
function curl_error_60_workaround( $handle, $r, $url ) {

    // Disable peer verification to temporarily resolve error 60.
    curl_setopt($handle, CURLOPT_SSL_VERIFYPEER, false);

}
add_action( 'http_api_curl', 'curl_error_60_workaround', 10, 3 );
Here is a useful site for checking the validity of SSL certificates: https://www.sslshopper.com/ssl-checker.html
Send Export File to FTP Destination
Here we use the pmxe_after_export action to transfer our export file via FTP. We also make use of get_attached_file() to retrieve the export file when WP All Export's Secure Mode is off.
// Parts of this code were based on code from PHP Documentation Group, which is licensed under the Creative Commons Attribution 3.0 License.
//
// You can read the Creative Commons Attribution 3.0 License here: https://creativecommons.org/licenses/by/3.0/
//
// Also, hat tip to Daniel Stenberg for some additional code inspiration: https://curl.haxx.se/libcurl/php/examples/ftpupload.html
function wpae_after_export( $export_id ) {

    // Retrieve export object.
    $export = new PMXE_Export_Record();
    $export->getById($export_id);

    // Check if "Secure Mode" is enabled in All Export > Settings.
    $is_secure_export = PMXE_Plugin::getInstance()->getOption('secure');

    // Retrieve file path when not using secure mode.
    if ( !$is_secure_export) {
        $filepath = get_attached_file($export->attch_id);

    // Retrieve file path when using secure mode.
    } else {
        $filepath = wp_all_export_get_absolute_path($export->options['filepath']);
    }

    // Path to the export file.
    $localfile = $filepath;

    // File name of remote file (destination file name).
    $remotefile = basename($filepath);

    // Remote FTP server details.
    // The 'path' is relative to the FTP user's login directory.
    $ftp = array(
        'server' => 'enter-hostname-here',
        'user' => 'enter-user-here',
        'pass' => 'enter-password-here',
        'path' => '/enter/path/to/folder/here'
    );

    // Ensure username is formatted properly
    $ftp['user'] = str_replace('@', '%40', $ftp['user']);

    // Ensure password is formatted properly
    $ftp['pass'] = str_replace(array('#','?','/','\\'), array('%23','%3F','%2F','%5C'), $ftp['pass']);

    // Remote FTP URL.
    $remoteurl = "ftp://{$ftp['user']}:{$ftp['pass']}@{$ftp['server']}{$ftp['path']}/{$remotefile}";

    // Retrieve cURL object.
    $ch = curl_init();

    // Open export file.
    $fp = fopen($localfile, "rb");

    // Proceed if the local file was opened.
    if ($fp) {

        // Provide cURL the FTP URL.
        curl_setopt($ch, CURLOPT_URL, $remoteurl);

        // Prepare cURL for uploading files.
        curl_setopt($ch, CURLOPT_UPLOAD, 1);

        // Provide the export file to cURL.
        curl_setopt($ch, CURLOPT_INFILE, $fp);

        // Provide the file size to cURL.
        curl_setopt($ch, CURLOPT_INFILESIZE, filesize($localfile));

        // Start the file upload.
        curl_exec($ch);

        // If there is an error, write error number & message to PHP's error log.
        if($errno = curl_errno($ch)) {
            if (version_compare(phpversion(), '5.5.0', '>=')) {

                // If PHP 5.5.0 or greater is used, use newer function for cURL error message.
                $error_message = curl_strerror($errno);

            } else {

                // Otherwise, use legacy cURL error message function.
                $error_message = curl_error($ch);
            }

            // Write error to PHP log.
            error_log("cURL error ({$errno}): {$error_message}");

        }

        // Close the connection to remote server.
        curl_close($ch);

    } else {

        // If export file could not be found, write to error log.
        error_log("Could not find export file");

    }
}
add_action('pmxe_after_export', 'wpae_after_export', 10, 1);
Send Email After Import is Complete
Here we use the pmxi_after_xml_import action to email the results of our import to [email protected]. We make use of the WPDB class to retrieve the import stats and wp_mail() to send the email.
function wpai_send_email($import_id) {
    // Only send emails for import ID 1.
    if($import_id != "1")
        return;

    // Retrieve the last import run stats.
    global $wpdb;
    $table = $wpdb->prefix . "pmxi_imports";

    if ( $soflyyrow = $wpdb->get_row( $wpdb->prepare( "SELECT * FROM `" . $table . "` WHERE `id` = '%d'", $import_id ) ) ) {

        $count = $soflyyrow->count;
        $imported = $soflyyrow->imported;
        $created = $soflyyrow->created;
        $updated = $soflyyrow->updated;
        $skipped = $soflyyrow->skipped;
        $deleted = $soflyyrow->deleted;

    }

    // Destination email address.
    $to = '[email protected]';

    // Email subject.
    $subject = 'Import ID: '.$import_id.' complete';

    // Email message.
    $body = 'Import ID: '.$import_id.' has completed at '. date("Y-m-d H:m:s"). "\r\n" . 'File Records:' .$count."\r\n".'Records Imported:'.$imported."\r\n".'Records Created:'.$created;
    $body .= "\r\n" . 'Records Updated:'. $updated . "\r\n" . 'Records Skipped:' . $skipped . "\r\n" . 'Records Deleted:' . $deleted;

    // Send the email as HTML.
    $headers = array('Content-Type: text/html; charset=UTF-8');

    // Send via WordPress email.
    wp_mail( $to, $subject, $body, $headers );
}
add_action('pmxi_after_xml_import', 'wpai_send_email', 10, 1);
Append ACF Repeater Data
Here we use the pmxi_saved_post action to append a row to the repeater_text field of our basic_repeater. This workaround is required since our source file has repeater data spread across multiple rows. We use the add_row() function to save our new repeater row.
We use an Existing Items import since our ACF posts already exist. Then we store our value to append in the my_repeater_data custom field:
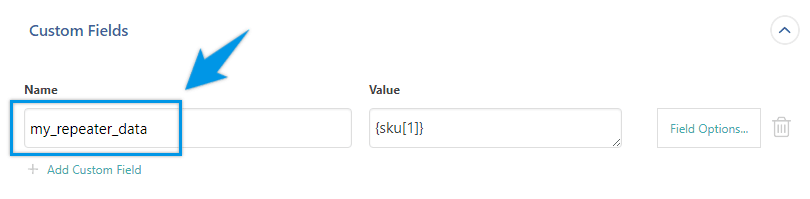
We tell WP All Import to update the my_repeater_data field:

function soflyy_add_data( $id, $xml, $update ) {

    // Parent field name.
    $selector = 'basic_repeater';

    // The field to be appended.
    $subfield1 = 'repeater_text';

    // Only continue if my_repeater_data contains a value.
    if ( $value = get_post_meta( $id, 'my_repeater_data', true ) ) {

        // Format data for repeater.
        $row = array( $subfield1 => $value );

        // Add new repeater row.
        add_row( $selector, $row, $id );

    }
    delete_post_meta( $id, 'my_repeater_data' );
}
add_action( 'pmxi_saved_post', 'soflyy_add_data', 10, 3 );
Custom Items Loop for WooCommerce Orders Exports
Here we use custom code to modify the format of exported Order items. In this case, we need one product per item element instead of all products in items directly. Here's our Custom XML template:
<items>
  <ProductID>{Product ID}</ProductID>
  <SKU>{SKU}</SKU>
  <Quantity>{Quantity}</Quantity>
  <ItemCost>{Item Cost}</ItemCost>
</items>
The output would look like this:
<items>
  <ProductID>197</ProductID>
  <ProductID>195</ProductID>
  <SKU>KEYB3</SKU>
  <SKU>KEYB2</SKU>
  <Quantity>1</Quantity>
  <Quantity>5</Quantity>
  <ItemCost>30.00</ItemCost>
  <ItemCost>30.00</ItemCost>
</items>
To achieve the desired format, we need to reconfigure our export template to instead call our custom function:
<items>
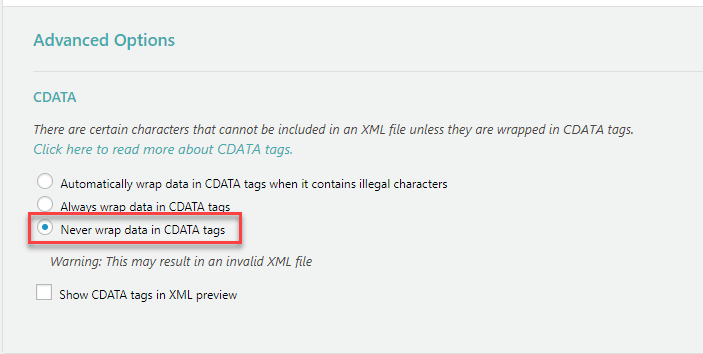
[my_output_items({SKU},{Product ID},{Quantity},{Item Cost})]
</items>And disable the automatic use of CDATA tags:
Then our exported format becomes:
<items>
  <item>
    <ProductID>197</ProductID>
    <SKU>KEYB3</SKU>
    <Quantity>1</Quantity>
    <ItemCost>30.00</ItemCost>
  </item>
  <item>
    <ProductID>195</ProductID>
    <SKU>KEYB2</SKU>
    <Quantity>5</Quantity>
    <ItemCost>30.00</ItemCost>
  </item>
</items>
We save this code to WP All Export's Function Editor:
function my_output_items( $skus = '', $ids = '', $qty = '', $cost = '' ) {
// Declare our variable to store the new XML.
$xml = '';
// Ensure $skus isn't empty and that it's an array.
if ( !empty( $skus ) && is_array( $skus ) ) {
// Process each SKU in the array.
foreach ( $skus as $key => $value ) {
// Add the opening item tag.
$xml .= "**LT**item**GT**";
// Add the Product ID tags and value.
$xml .= "**LT**ProductID**GT**" . ( empty( $ids[ $key ] ) ? '' : $ids[ $key ] ) . "**LT**/ProductID**GT**";
// Add the SKU tags and value.
$xml .= "**LT**SKU**GT**" . ( empty( $value ) ? '' : $value ) . "**LT**/SKU**GT**";
// Add the Quantity tags and value.
$xml .= "**LT**Quantity**GT**" . ( empty( $qty[ $key ] ) ? '' : $qty[ $key ] ) . "**LT**/Quantity**GT**";
// Add the ItemCost tags and value.
$xml .= "**LT**ItemCost**GT**" . ( empty( $cost[ $key ] ) ? '' : $cost[ $key ] ) . "**LT**/ItemCost**GT**";
// Add the closing item tag.
$xml .= "**LT**/item**GT**";
}
// If $skus isn't an array handle it here.
} else {
// Add the opening item tag.
$xml .= "**LT**item**GT**";
// Add the ProductID tags and value.
$xml .= "**LT**ProductID**GT**" . ( empty( $ids ) ? '' : $ids ) . "**LT**/ProductID**GT**";
// Add the SKU tags and value.
$xml .= "**LT**SKU**GT**" . ( empty( $skus ) ? '' : $skus ) . "**LT**/SKU**GT**";
// Add the Quantity tags and value.
$xml .= "**LT**Quantity**GT**" . ( empty( $qty ) ? '' : $qty ) . "**LT**/Quantity**GT**";
// Add the ItemCost tags and value.
$xml .= "**LT**ItemCost**GT**" . ( empty( $cost ) ? '' : $cost ) . "**LT**/ItemCost**GT**";
// Add the closing item tag.
$xml .= "**LT**/item**GT**";
}
return $xml;
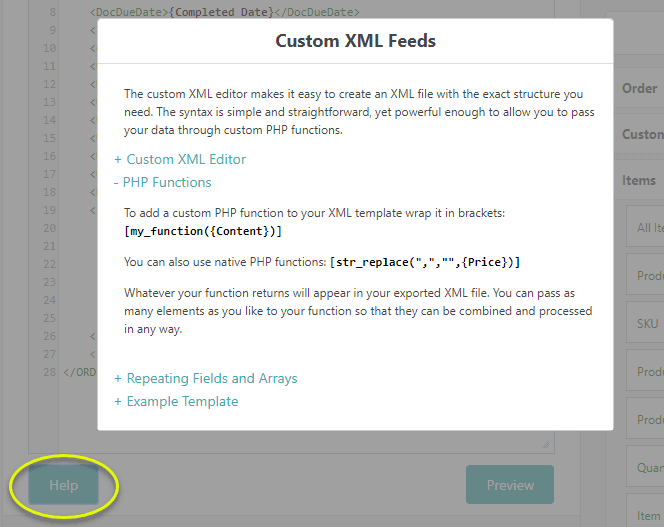
}You can learn more about PHP functions in custom XML exports via the "Help" button:
Count Number of Created Posts
Here we use the pmxi_after_xml_import action to count the number of posts created during the import. Using that number we can selectively perform other tasks.
function count_created_posts( $import_id ){

    // Only count created posts for import ID 1.
    if( $import_id == 1 ){

        // Query the database directly.
        global $wpdb;
        $import = $wpdb->get_row( $wpdb->prepare( "SELECT * FROM `" . $wpdb->prefix . "pmxi_imports` WHERE ID = %d;", $import_id ) );

        // Define the number of created posts.
        $created = $import->created;

        if ( $created > 0 ) {

            // Do something if posts were created during import.

        }
    }
}
add_action('pmxi_after_xml_import', 'count_created_posts', 10, 1);
Cancel Import If File Empty
Here we use the pmxi_before_xml_import action to cancel the import if less than 100 records are in the file. This is especially important if using the 'Delete posts that are no longer present in your file' option (Step 4 or Manage Imports > Import Settings). When using that option, this keeps the previously imported records intact if the feed fails to return data.
function cancel_empty_import( $importID ) {

    // Retrieve import object.
    $import = new PMXI_Import_Record();
    $import->getById($importID);

    // Ensure object is valid and check if less than 100
    // records are in the file.
    if ( !$import->isEmpty() && $import->count < 100 ) {

        // Load history file object.
        $history_file = new PMXI_File_Record();
        $history_file->getBy( 'import_id', $importID );

        // Ensure object is valid.
        if ( !$history_file->isEmpty() ) {

            // Retrieve import file path.
            $file_to_import = wp_all_import_get_absolute_path( $history_file->path );


            // If file is empty or has less than 100 records,
            // cancel import.
            if ( file_exists( $file_to_import ) and filesize( $file_to_import ) === 0 or $import->count < 100 ) {


                // Reset import stats to 0.
                $import->set( array(
                    'queue_chunk_number' => 0,
                    'processing' => 0,
                    'imported' => 0,
                    'created' => 0,
                    'updated' => 0,
                    'skipped' => 0,
                    'deleted' => 0,
                    'triggered' => 0,
                    'executing' => 0
                ))->update();

            // Display the reason the import was cancelled.
            echo 'Import skipped because of empty file / < 100 records';

            // Stop the import.
            die();
            }
        }
    }
}
add_action( 'pmxi_before_xml_import', 'cancel_empty_import', 10, 1 );
Delete Source File After Import
Here we use the pmxi_after_xml_import action to delete the source file once imported. This can prevent the same import file from being imported twice. It's also helpful if you're pushing the import file to your server via FTP and need to know when it has been processed.
function delete_import_file( $import_id ) {

    // Retrieve import object.
    $import = new PMXI_Import_Record();
    $import->getById( $import_id );

    // Confirm import object is valid.
    if ( ! $import->isEmpty() ) {

        // Retrieve file information.
        $history_file = new PMXI_File_Record();
        $history_file->getBy( 'import_id', $import_id );

        // Confirm file isn't empty.
        if ( !$history_file->isEmpty() ) {

            // Retrieve file path.
            $import_file = wp_all_import_get_absolute_path( $history_file->path );

            // Mark file for deletion.
            @unlink( $import_file );

		}
	}
}
add_action( 'pmxi_after_xml_import', 'delete_import_file', 10, 1 );
Manually Set Import Feed Type
Here we use the wp_all_import_feed_type filter to specify we are importing an XML feed. This may be necessary if your feed URL doesn't end with the type - csv, xml, json, etc. This code must be called outside of WP All Import's Function Editor in a place such as your theme's functions.php file.
function set_feed_type( $type, $url ){

    // Specify Feed URL.
    if ($url == 'https://www.example.com/feedurl'){

        // Set feed type.
        $type = 'xml';

    }

    // If URL doesn't match our feed return the default type.
    return $type;

}
add_filter( 'wp_all_import_feed_type', 'set_feed_type', 10, 2 );
Combine HTML Elements In XML Without CDATA Tags
Here we use custom code to copy the HTML in our XML file to its own element. This is required to import that HTML since it wasn't encoded or wrapped in CDATA tags. Otherwise, the individual HTML tags will be processed as XML tags by WP All Import. It's best to have a properly formed XML file, but we can fix it with code.
Our HTML is stored in the content element in our file. Our code loads that element and ensures it's not empty. Then keywords in our HTML are replace with their HTML tag equivalents. Finally, we write the HTML to its own element, content_html, so we can use it in our import.
function parse_content($node){

    // Our element containing the HTML to process.
    $result = $node->xpath('content');

    // Ensure a value was returned.
    if (!empty($result[0])) {

        // Replace keywords with HTML equivalents.
        $find_xml = array('section_title','section_content','section', 'texteparagraphe','titreparagraphe');
        $replace_html = array('h1','p','div','p','h2');
        $html = str_replace($find_xml, $replace_html, $result[0]->asXML());

        // Save the HTML to its own 'content_html' element.
        $node->addChild('content_html', $html);
    }

    return $node;

}
add_filter('wpallimport_xml_row', 'parse_content', 10, 1);
Modify Record Before It's Imported
Here we use the wpallimport_xml_row filter to check the Blue element for a value. If it has one, we create an element named Color and set it to Blue. We do the same for the Red element. This works for all file types, not just XML.
Here's our starting CSV file:
| Name | Size | Blue | Red |
| Large Blue Hat | Large | Yes | |
| Small Red Hat | Small | Yes | |
| Medium Red and Blue Hat | Medium | Yes | Yes |
Here's the CSV equivalent of how WP All Import sees it after our code runs:
| Name | Size | Blue | Red | Color | Color |
| Large Blue Hat | Large | Yes | Blue | ||
| Small Red Hat | Small | Yes | Red | ||
| Medium Red and Blue Hat | Medium | Yes | Yes | Blue | Red |
Doing this allows the {color} XPath to return all of the Color values separated by commas. Here's what's returned for each row above:
| Blue, |
| ,Red |
| Blue,Red |
function add_property_type( $node ) {
    // Element to be located
    $blue = $node->xpath( 'blue[1]' );

    // Check if Blue element has value
    if ( ! empty( $blue ) ) {
        if ( ! empty( $blue[0]->__toString() ) ) {
            // add Color node with value 'Blue'
            $node->addChild( 'color', 'Blue' );
        }
    }

    // Element to be located
    $red = $node->xpath( 'red[1]' );

    // Check if Red element has value
    if ( ! empty( $red ) ) {
        if ( ! empty( $red[0]->__toString() ) ) {
            // add Color node with value 'Red'
            $node->addChild( 'color', 'Red' );
        }
    }
    return $node;
}
add_filter( 'wpallimport_xml_row', 'add_property_type', 10, 1 );
Append Data To A Custom Field Instead Of Overwriting
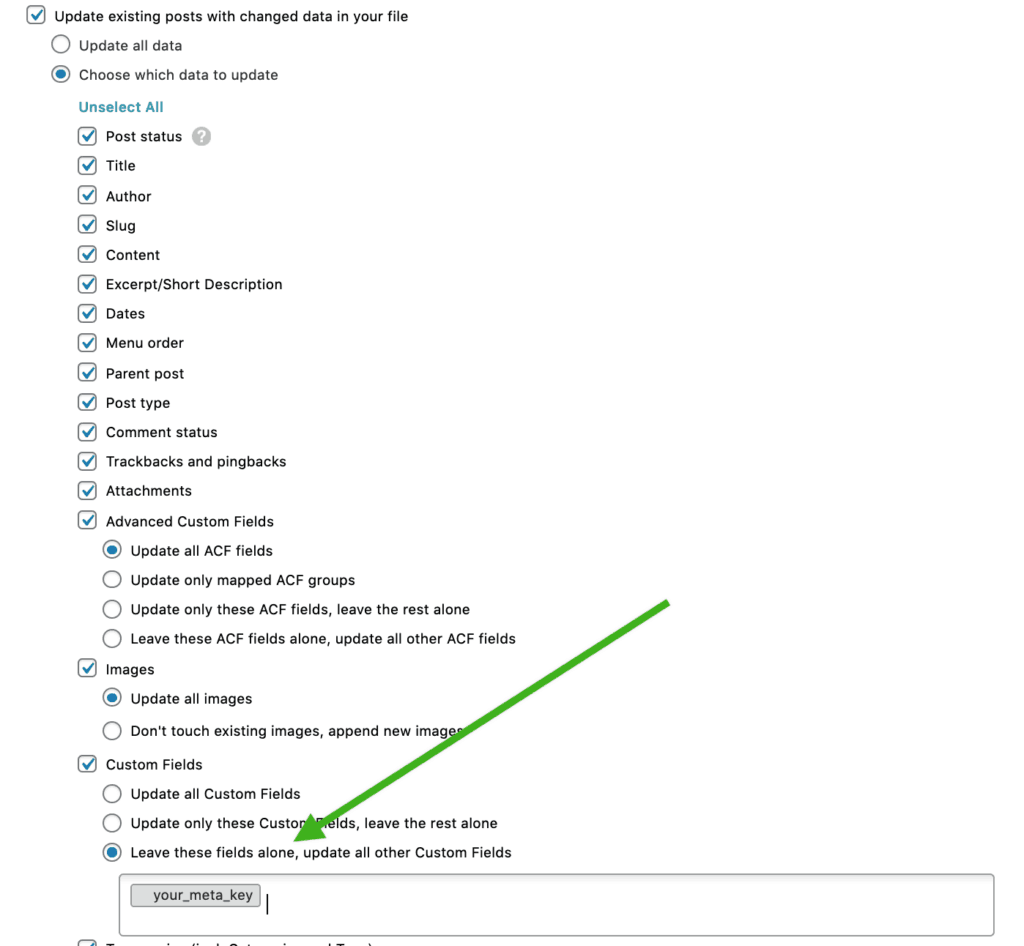
Here we are using the pmxi_saved_post action to append an additional value to the your_meta_key field. This allows importing values from multiple rows in our file to a single post's custom field. We must import the new value to the _temp custom field first:
The field you append must not be updated by WP All Import or the original value will be lost (Step 4 or Manage Imports > Import Settings):
function custom_field_append($id) {
    // Get the current value of your meta key.
    $value = get_post_meta($id, 'your_meta_key', true);

    // Get the temp value we imported.
    $temp = get_post_meta($id, '_temp', true);

    // Append the temp value to the original value and
    // save it to your meta key
    update_post_meta($id, 'your_meta_key', $value . $temp);

    // Delete the temp field.
    delete_post_meta($id, '_temp');

}
add_action('pmxi_saved_post', 'custom_field_append', 10, 1);
Update Second Custom Field If First Field Has Specified Value
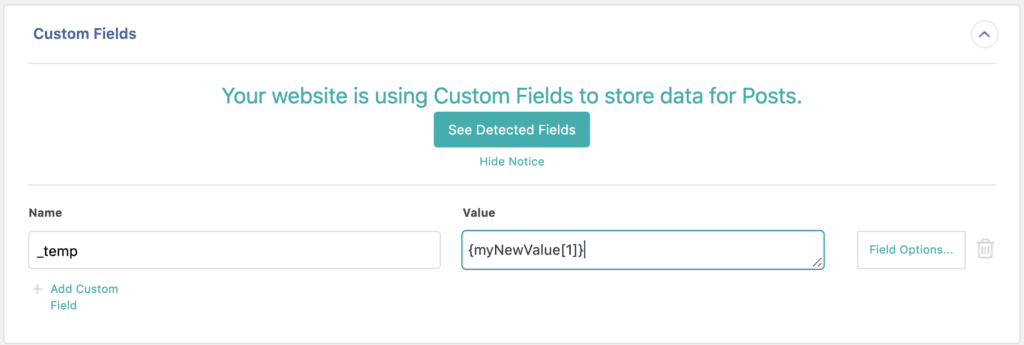
Here we use the pmxi_saved_post action, get_post_meta(), and update_post_meta() to only update _my_custom_field if _my_update_check is set to 'yes'. The new value is stored in _my_new_value during import and copied to _my_custom_field as needed.
function conditional_update($id) {

    // Retrieve field to check.
    $check = get_post_meta($id, '_my_update_check', true);

    // Check field's value and update _my_custom_field if 'yes'.
    if ($check === 'yes') {

        // Retrieve the new value.
        $new_value = get_post_meta($id, '_my_new_value', true);

        // Save the new value to the target field.
        update_post_meta($id, '_my_custom_field', $new_value);
    }
}
add_action('pmxi_saved_post', 'conditional_update', 10, 1);
Use Parent Prices For Variations
Here we use the pmxi_saved_post action to assign the _parent_price value to each variation. This is necessary because our file only lists parent prices. The get_post_meta() function is used to retrieve _parent_price. Then wc_get_product() is used to get the product's object
If you're trying to use a price update import and only have a file with prices for the parent products, you'll need some custom code to apply those prices to the variations.
Be sure to set the price to a custom field named '_parent_price'. Then the code below should be helpful:
function my_set_price($post_id) {

    // Get the parent price.
    $parent_price = get_post_meta($post_id, "_parent_price", true);

    // Get the parent product object.
    $parent = wc_get_product($post_id);

    // Check if it's a variable product.
    if( $parent && 'variable' == $parent->get_type() ){

        // Get product's variations.
        $variations = $parent->get_children();
        // Loop through the variations and set the price
        foreach ($variations as $variation) {
            $single_variation = wc_get_product($variation);
	    $variation_id = $single_variation->get_variation_id();
	    update_post_meta($variation_id, "_price", $parent_price);
	    update_post_meta($variation_id, "_regular_price", $parent_price);
	}
    delete_post_meta($post_id, "_parent_price");

    }
}
add_action( 'pmxi_saved_post', 'my_set_price', 10, 1 );
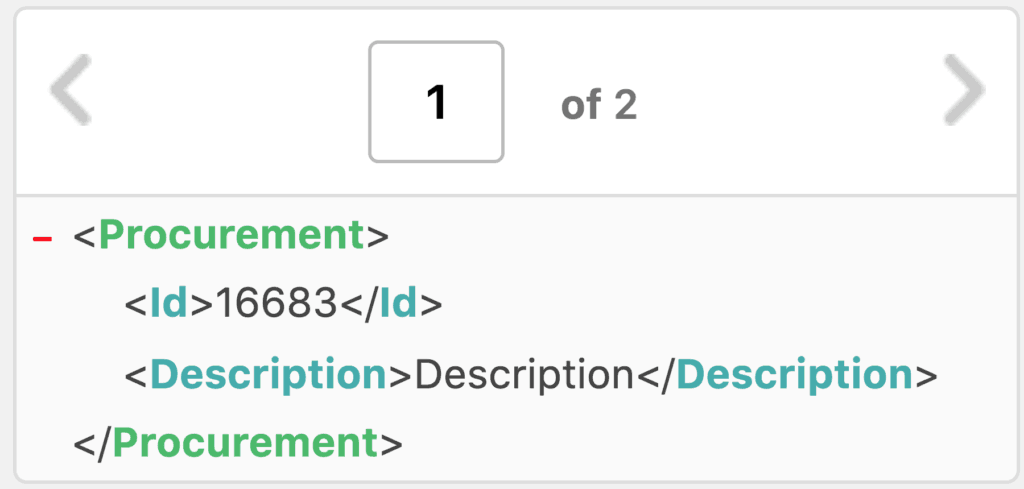
Access Data Outside of Element Chosen on Step 2
Here we use the pmxi_before_xml_import action to add Status as a child to each Procurement element, allowing it to be selected on Step 3. Note that this workaround only works for XML imports.
Here is the original XML structure:
<Apartment>
    <Key>32434</Key>

    <!-- Status element is outside of Procurement elements -->
    <Status>On</Status>
    <Procurements>
        <Procurement>
            <Id>16683</Id>
            <Description>
                Description
            </Description>
        </Procurement>
        <Procurement>
            <Id>16684</Id>
            <Description>
                Description 2
            </Description>
        </Procurement>
    </Procurements>
</Apartment>
On Step 3 we can't select Status since it's not a child of the element chosen on Step 2, Procurement:
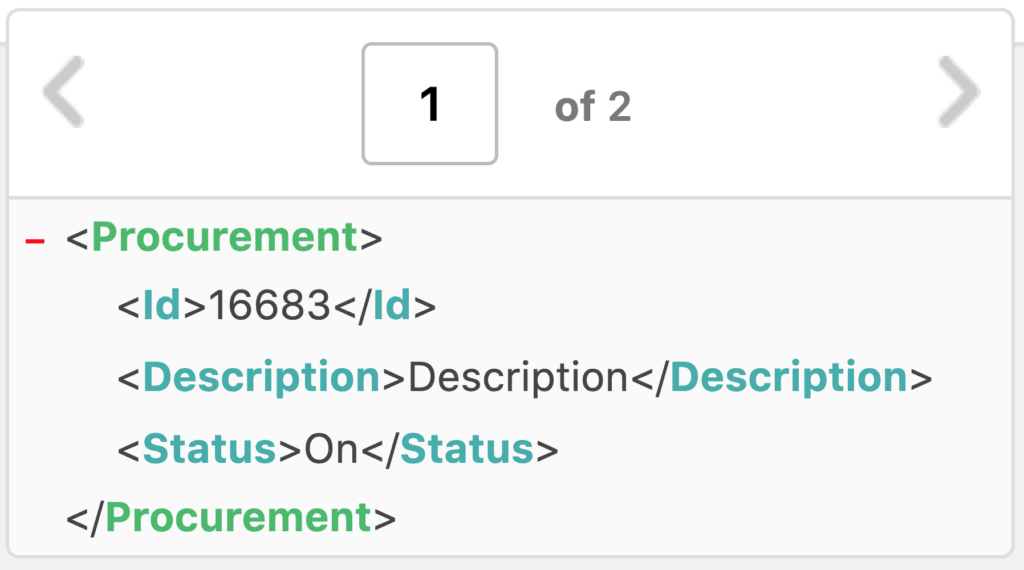
After the code runs, the file looks like this:
<Apartment>
    <Key>32434</Key>
    <Status>On</Status>
    <Procurements>
        <Procurement>
            <Id>16683</Id>
            <Description>
                Description
            </Description>

            <!-- Status has been copied to each Procurement element -->
            <Status>On</Status>
        </Procurement>
        <Procurement>
            <Id>16684</Id>
            <Description>
                Description 2
            </Description>

            <!-- Status has been copied to each Procurement element -->
            <Status>On</Status>
        </Procurement>
    </Procurements>
</Apartment>
Making Status available on Step 3:
Note: Status won't show up in the list until the import first runs. But, it can be typed in manually and used: {Status[1]}
function wpai_pmxi_before_xml_import( $importID ) {

    // Retrieve import object.
    $import = new PMXI_Import_Record();
    $import->getById( $importID );

    // Ensure import object is valid.
    if ( ! $import->isEmpty() ) {

        // Retrieve history file object.
        $history_file = new PMXI_File_Record();
        $history_file->getBy( 'import_id', $importID );

        // Ensure history file object is valid.
        if ( ! $history_file->isEmpty() ) {

            // Retrieve import file path.
            $file_to_import = wp_all_import_get_absolute_path( $history_file->path );

            // Load import file as SimpleXml.
            $file = simplexml_load_file( $file_to_import );

            // Check if Status is a child of Procurement.
            $query = $file->xpath( "//Apartment/Procurements[1]/Procurement[1]/Status[1]" );
            if ( ! empty( $query ) ) {

                // If it is, do nothing.
                return;

            }

            // Get Status value.
            $iquery = $file->xpath( "//Apartment/Status[1]" );

            // Ensure value isn't empty.
            if ( ! empty( $iquery ) ) {

                // Value of status as string.
                $status = $iquery[0]->__toString();

                // Target path.
                $new_query = $file->xpath( "./Procurements/Procurement" );

                // Ensure path is valid.
                if ( ! empty( $new_query ) ) {

                    // Process each Procurement element.
                    foreach ( $new_query as $record ) {

                        // Ensure this element doesn't have Status.
                        if ( ! isset( $record->Status ) ) {

                        // Add {Status[1]} as child node.
                        $record->addChild( 'Status', $status );

                        }
                    }

                    // Save updated file.
                    $updated_file = $file->asXML( $file_to_import );

                }
            }
        }
    }
}
add_action( 'pmxi_before_xml_import', 'wpai_pmxi_before_xml_import', 10, 1 );
Map Values to Element Name Based on Value
Here we use the wpallimport_xml_row filter to map our boolean fields to a new element with string values. This is needed since our file contains one element for each feature with a value of either 0 or 1. All fields with a value of 1 must have their name copied to a new element for import.
Here's an example of our file:
| Name | pool | patio | basement | deck | airconditioning |
| Villa | 1 | 1 | 0 | 0 | 0 |
| House | 0 | 1 | 1 | 1 | 1 |
| Apartment | 1 | 0 | 0 | 0 | 1 |
We can handle this mapping with some custom code. The end result represented as CSV is below:
| Name | pool | patio | basement | deck | airconditioning | mycustomfeatures |
| Villa | 1 | 1 | 0 | 0 | 0 | Pool, Patio |
| House | 0 | 1 | 1 | 0 | 1 | Patio, Basement, Air Conditioning |
| Apartment | 1 | 0 | 0 | 0 | 1 | Pool, Air Conditioning |
That allows using the {mycustomfeatures[1]} element in our import configuration as needed (Step 3 or Manage Imports > Edit Import).
function add_feature_node( $node ) {
// Our mappings from element name to string.
$fields = array(
"pool" => "Pool",
"patio" => "Patio",
"basement" => "Basement",
"deck" => "Deck",
"airconditioning" => "Air Conditioning"
);
// Process each element.
foreach ( $fields as $key => $field ) {
// Retrieve the field's value.
$result = $node->xpath( $key . '[1]' );
// Check if element doesn't exist or contains an empty value
if ( !isset( $result[0] ) || empty( $result[0]->__toString() ) ) {
// If so, don't list that feature.
unset( $fields[ $key ] );
}
}
// Add the comma separated features to our new element.
$node->addChild( 'mycustomfeatures', implode( ",", $fields ) );
return $node;
}
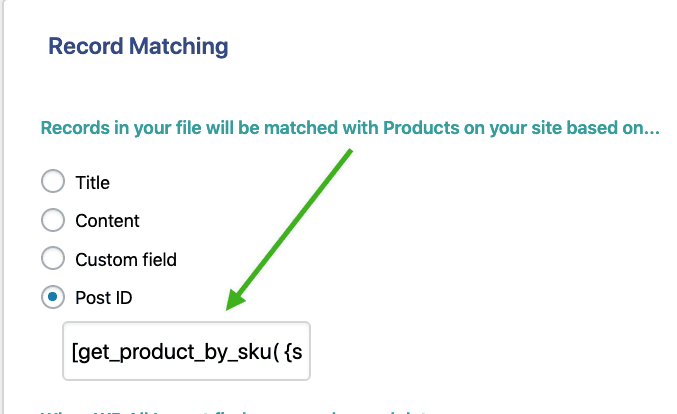
add_filter( 'wpallimport_xml_row', 'add_feature_node', 10, 1 );Match By SKU When The SKUs On Your Site Contain Extra Characters
Here we use the WPDB class' get_var() method to retrieve the products matching our SKUs. Using REPLACE we ignore an unwanted slash that's used in each SKU on the site, but not in our file: my/sku vs mysku
function get_product_by_sku( $sku ) {

    // Access WPDB object.
    global $wpdb;

    // Match by our files SKU and ignore slashes in the database.
    $product_id = $wpdb->get_var( $wpdb->prepare( "SELECT post_id FROM $wpdb->postmeta WHERE meta_key='_sku' AND REPLACE(meta_value, '/', '')='%s' LIMIT 1", $sku ) );

    // If a match was found return its ID.
    if ( $product_id ) return $product_id;

    return null;
}
We call our function on Step 4 of an Existing Items import. Our files SKU element is passed as the only parameter:
Import ACF Post2Post Plugin Bidirectional Fields
Here we use the pmxi_acf_custom_field filter to allow the ACF Post2Post plugin to link Bidirectional fields.
function import_set_bidiretional_fields( $value, $post_id, $name ) {

	// Get ACF field object by name.
	$field = get_field_object($name, $post_id);

	// Take no action if field is empty.
	if( empty($field) ) {
		return $value;
	}

	// Apply update_value filter to trigger acf-post2post plugin.
	if ( $field['type'] == 'relationship' ) {
		$value = apply_filters( "acf/update_value/type={$field['type']}", $value, $post_id, $field );
	}

	// Return the original field value.
	return $value;
}
add_filter( 'pmxi_acf_custom_field', 'import_set_bidiretional_fields', 10, 3 );
Import Images to WP User Avatar Plugin
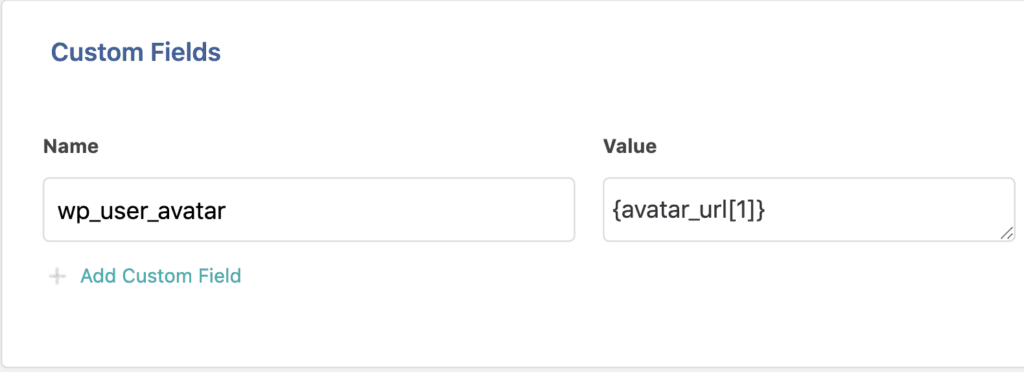
Here we use the pmxi_saved_post action to save images to the WP User Avatar plugin. Using get_user_meta() we retrieve the avatar URL from the custom field. The media_sideload_image() function saves the image to WordPress. We make use of add_action() and remove_action() to call my_get_id() which links the avatar to the User with update_user_meta(). This works when importing Users or Customers.
The link to each image must be saved in wp_user_avatar when importing:
function my_import_avatar_image ($id) {

    // Get the URL for the avatar image.
    $image_url = get_user_meta($id, "wp_user_avatar", true);

    // Set the my_get_id function to run when attachments added.
    add_action( 'add_attachment', 'my_get_id' );

    // Sideload the avatar image.
    $new_url = media_sideload_image($image_url, $id, null, "src");

    // Remove the my_get_id function from add_attachment action.
    remove_action( 'add_attachment', 'my_get_id' );
}

function my_get_id( $att_id ) {

    // Get the post object for the attachment.
    $img = get_post( $att_id );

    // Get the attachment's parent.
    $user = $img->post_parent;

    // Set wp_user_avatar to the image's ID.
    update_user_meta( $user, "wp_user_avatar", $att_id );
}
add_action('pmxi_saved_post', 'my_import_avatar_image', 10, 3);
This code has been derived from the following example: http://wordpress.stackexchange.com/a/46365/108630
Import Data to Custom Database Table
Here we use the pmxi_saved_post action to save data to a custom database table while importing to a defined post type. The value for the custom database table is saved to _your_temp_field. Then retrieved using get_post_meta() and written to the database using the wpdb object. To cleanup, we remove the temporary custom field using delete_post_meta().
function save_data_to_custom_database_table($id) {
    // Make wpdb object available.
    global $wpdb;

    // Retrieve value to save.
    $value = get_post_meta($id, '_your_temp_field', true);

    // Define target database table.
    $table_name = $wpdb->prefix . "your_table_name";

    // Insert value into database table.
    $wpdb->insert($table_name, array('post_id' => $id, 'column_name' => $value), array('%s','%s'));

    // Delete temporary custom field.
    delete_post_meta($id, '_your_temp_field');
}
add_action('pmxi_saved_post', 'save_data_to_custom_database_table', 10, 1);
Include Featured Image in Product Gallery
Here we use the wp_all_import_variable_product_imported action to prepend the featured image to the product's gallery. We use get_post_meta() to retrieve current gallery images and get_post_thumbnail_id()for the featured image. It's added to the list of gallery images, duplicates are removed, then update_post_meta() saves the updates.
function copy_featured_img_to_gallery($post_id) {

    // Retrieve the Product Gallery image IDs.
    $gallery = explode(",",get_post_meta($post_id, "_product_image_gallery", true));

    // Add the Featured Image to the Gallery IDs.
    array_unshift($gallery, get_post_thumbnail_id( $post_id ));

    // Ensure no image IDs are duplicated in the Gallery.
    $gallery = array_unique($gallery);

    // Save the updated list of Gallery image IDs.
    update_post_meta($post_id, "_product_image_gallery", implode(",",$gallery));

}
add_action('wp_all_import_variable_product_imported', 'copy_featured_img_to_gallery', 10, 1);
List One 'Any Attribute' Variation for Variable Products
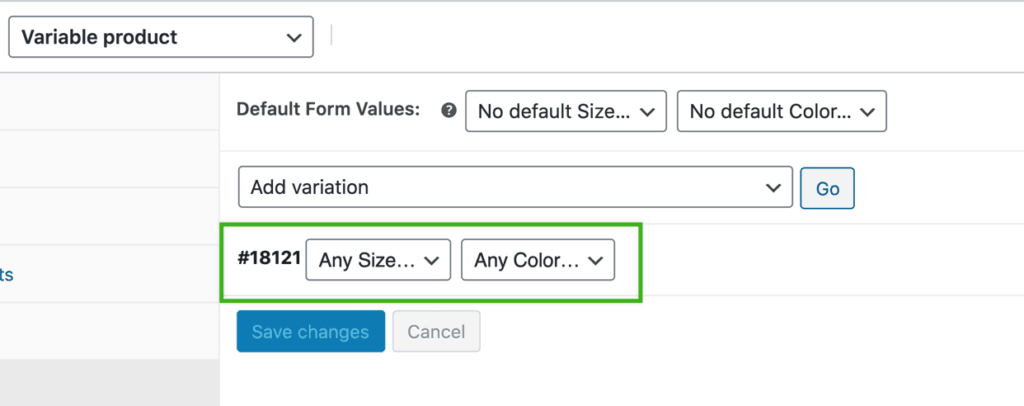
Here we use the wp_all_import_variable_product_imported action to delete all but one variation and set its attributes to 'any'. This may be useful if you have a large number of Attribute options, but each variation's details ( price, stock, etc ) are all the same and don't need to be tracked separately.
The updated products look something like below:
function set_attributes_to_any( $post_parent ){
    global $wpdb;
    $table = $wpdb->posts;

    // Retrieve all variations for this product.
    $variations = $wpdb->get_results("SELECT * FROM $table WHERE post_parent = " . $post_parent );
    if ( ! empty($variations)){

        // Keep one variation.
        $empty_variation = array_shift($variations);
        if ( ! empty($variations)){

            // Delete all other variations for this product.
            foreach($variations as $variation){
                wp_delete_post($variation->ID);
            }
        }
        $table = _get_meta_table('post');

        // Find all Attributes set for our remaining variation.
        $post_meta = $wpdb->get_results("SELECT meta_key, meta_value FROM $table WHERE post_id = " . $empty_variation->ID . " AND meta_key LIKE 'attribute%';" );

        // Make Attributes show as 'any'.
        if ( ! empty($post_meta)){
            foreach ($post_meta as $meta) {
                update_post_meta($empty_variation->ID, $meta->meta_key, '');
            }
        }
    }
}
add_action( 'wp_all_import_variable_product_imported', 'set_attributes_to_any', 10, 1 );
Only Import Existing Taxonomy Terms
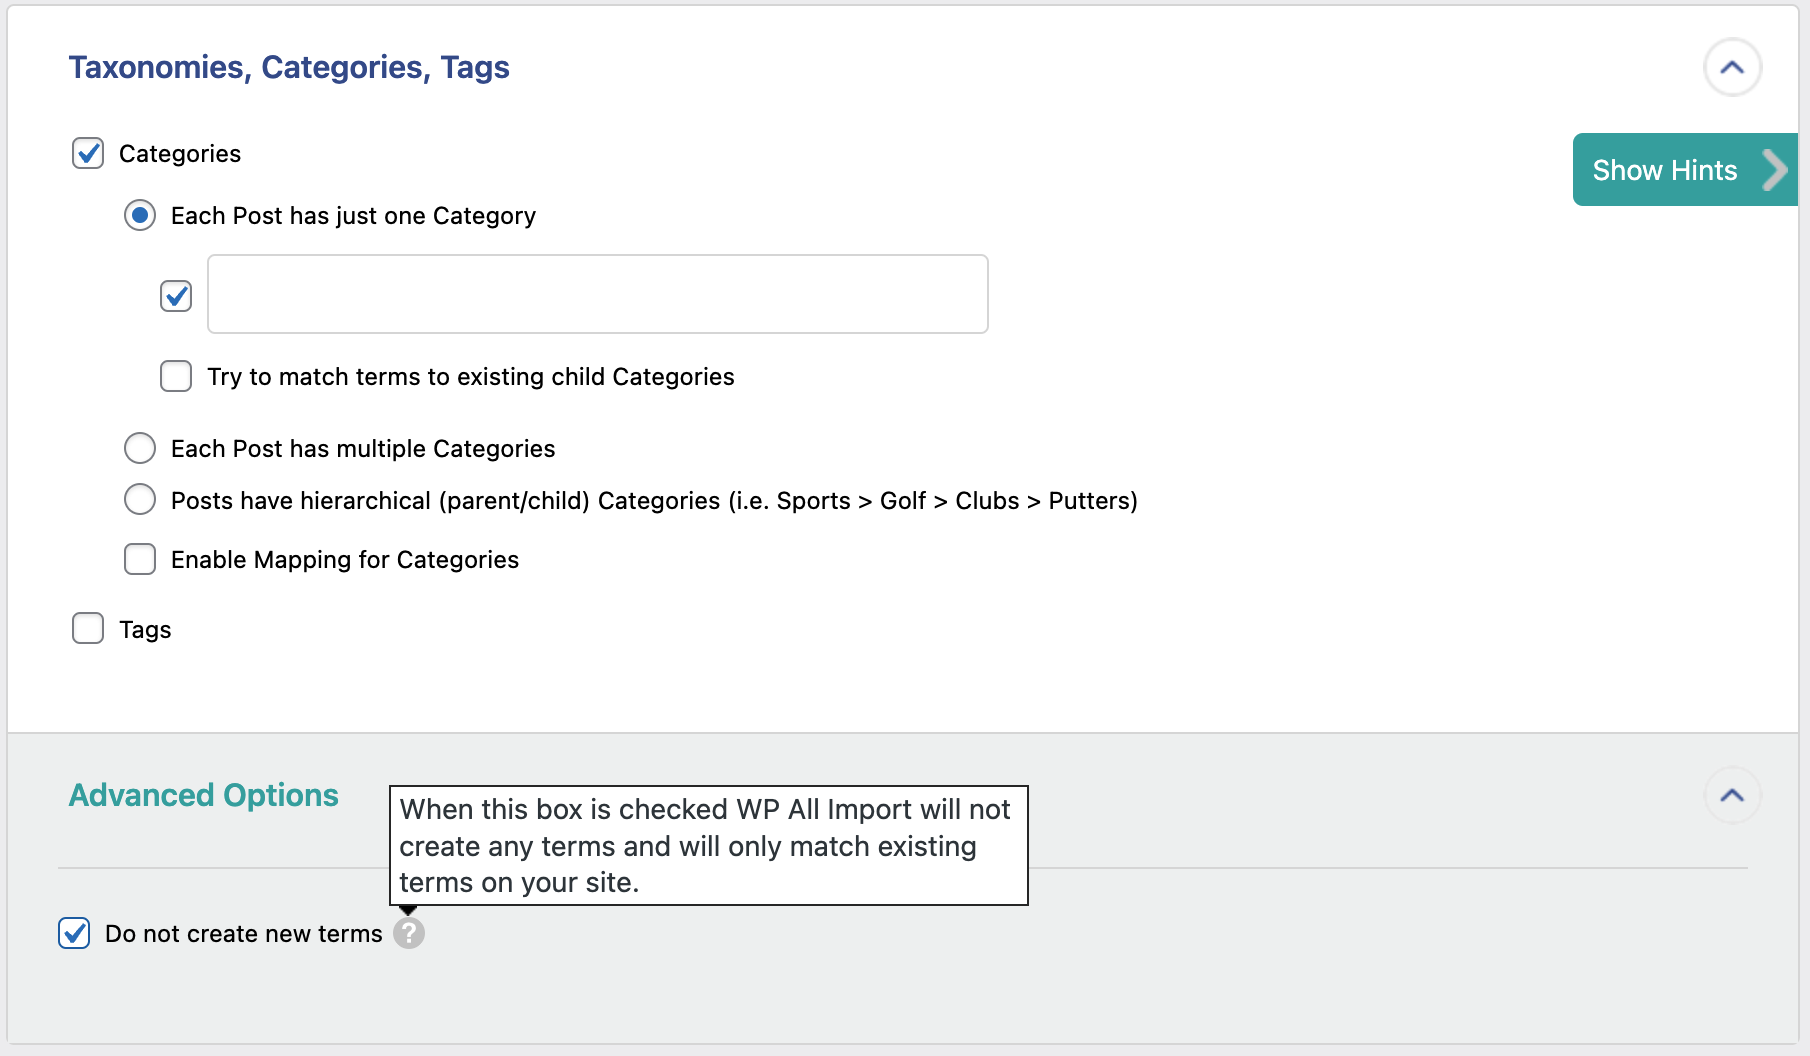
Since version 4.8.2 Beta 1.6 of WP All Import, this snippet is no longer necessary. We've now added the "Do not create new terms" option, which can be found inside the Advanced Options of the Taxonomies, Categories, Tags section:
Do Not Remove Certain Categories During Import
Here we use the wp_all_import_set_post_terms filter and get_the_terms() to ensure the 'Featured' category remains for any product that had it manually assigned. This allows WP All Import to add and remove other categories without losing our manual assignments.
function dont_remove_featured_category( $term_taxonomy_ids, $tx_name, $pid, $import_id ) {

    // Only check Product Categories.
    if ( $tx_name == 'product_cat' ){

        // Retrieve all currently assigned categories.
        $txes_list = get_the_terms($pid, $tx_name);

        // Do nothing if no categories are set.
        if ( ! empty($txes_list) ){
           foreach ($txes_list as $cat){

                // If category name is 'Featured' add it to import.
                if ($cat->name == 'Featured'){
                    $term_taxonomy_ids[] = $cat->term_taxonomy_id;
                    break;
                }
            }
        }
    }

    // Return the updated list of taxonomies to import.
    return $term_taxonomy_ids;

}
add_filter( 'wp_all_import_set_post_terms', 'dont_remove_featured_category', 10, 4 );
Use Custom Delimiter When Retrieving Multiple Values
Here we use the wp_all_import_multi_glue filter to separate multiple returned values with pipes instead of commas.
Here's an example CSV file:
| Name | Size | Color | Color |
| Red and Blue Shirt | Medium | Red | Blue |
If we retrieve both Color elements using a single XPath statement such as {Color}, by default they will be returned comma-delimited: Red, Blue
The example code will change that comma to a pipe: Red|Blue
add_filter( 'wp_all_import_multi_glue', function( $delimiter ) {
    return '|';
}, 10, 1 );
Only Update Custom Field If New Value Is Not Empty
Here we use the pmxi_custom_field filter to only overwrite _my_custom_field if the new value isn't empty. This is helpful if the field should always have a value and your file doesn't always provide it.
function keep_existing_if_empty($value, $post_id, $key, $original_value, $existing_meta, $import_id) {

    // Only check _my_custom_field.
    if ($key == '_my_custom_field') {

        // Check if it has a value.
        if (empty($value)) {

            // If empty, use the existing value.
            $value = isset($original_value) ? $original_value : $value;

        }
    }

    return $value;

}
add_filter('pmxi_custom_field', 'keep_existing_if_empty', 10, 6);
Only Update Custom Field If It's Currently Empty
Here we use the pmxi_custom_field filter to only update _my_custom_field if it's currently empty. This allows for making manual changes to fields that won't be overwritten during import.
function update_existing_if_empty($value, $post_id, $key, $original_value, $existing_meta_keys, $import_id) {

	// Only process import ID 1.
	if ($import_id == 1) {

		// Only check _my_custom_field.
		if ($key == '_my_custom_field') {

			// Check if field exists and if it's empty.
			if (!isset($existing_meta_keys[$key][0]) || empty($original_value)) {

				// Use existing value only if currently empty.
				$value = $original_value;

			}
		}
	}

	return $value;

}
add_filter('pmxi_custom_field', 'update_existing_if_empty', 10, 6);
Only Update ACF Fields If Imported Values Are Not Empty
Here we use the pmxi_acf_custom_field filter and get_post_meta() to prevent writing empty values to existing ACF fields.
function wp_all_import_pmxi_acf_custom_field( $value, $pid, $name ) {

    // Retrieve existing ACF field value.
    $existing = get_post_meta( $pid, $name, true );

    if ( empty( $value ) ) {

        // If the new value is empty, use existing value.
        $value = $existing;

    }

    return $value;

}
add_filter( 'pmxi_acf_custom_field', 'wp_all_import_pmxi_acf_custom_field', 10, 3 );
Filter Posts by Date
Here we use the wp_all_import_is_post_to_create and wp_all_import_is_post_to_update filters to create or update records based on a date in our file. Such code is necessary since the visual filters won't work with date fields.
We retrieve the date from column_4 in our file. Then we specify 2018-10-10 as our target date before converting it to a Unix timestamp. We include those newer than our target date in the import.
function filter_by_date( $continue_import, $data, $param3, $param4 = null ) {

    // Determine available parameters.
    if( $param4 === null ){ // wp_all_import_is_post_to_create
        $import_id = $param3;
    }else{ // wp_all_import_is_post_to_update
        $import_id = $param4;
        $data = $param3;
    }

    // Only apply to import ID 3
    if ( $import_id == 3 ) {

        // Change 'column_4' to your file's date field.
        $date_in_file = strtotime( $data['column_4'] );

        // Change '2018-10-10' to your real target date.
        $date = "2018-10-10";

        // Convert specified date to Unix timestamp.
        $target_date = strtotime($date);

        // Compare file date with target date.
        if ( $date_in_file >= $target_date ) {

            // Create or update record if file date >= target date.
            return true;

        } else {

            // Do not create or update the record otherwise.
            return false;

        }
    }

    // Take no action for other import IDs.
    return $continue_import;

}

// Apply the code to posts set to be created.
add_filter('wp_all_import_is_post_to_create', 'filter_by_date', 10, 3);

// Apply the code to posts set to be updated.
add_filter('wp_all_import_is_post_to_update', 'filter_by_date', 10, 4);
Only Create Post If Custom Field Value Is Unique
Here we use the wp_all_import_is_post_to_create filter to only create records if they have a unique value for my_custom_field. This prevents duplicates when importing overlapping records using multiple 'New Items' imports. We use WP_Query to check for existing posts with the same value.
function create_only_if_unique_custom_field( $continue_import, $data, $import_id ) {
    // Only run for import ID 1.
    if ($import_id == 1) {

        // The custom field to check.
    	$key_to_look_up = "my_custom_field";

        // The value to check where 'num' is the element name.
    	$value_to_look_up = $data['num'];

        // Prepare the WP_Query arguments
        $args = array (

            // Set the post type being imported.
            'post_type'  => array( 'post' ),

            // Check our custom field for our value.
            'meta_query' => array(array(
            'key'        => $key_to_look_up,
            'value'      => $value_to_look_up,
            )),
        );

        // Run the query and do not create post if custom
        // field value is duplicated.
	$query = new WP_Query( $args );
	return !($query->have_posts());

    } else {

        // Take no action if a different import ID is running.
       return $continue_import;

    }
}
add_filter('wp_all_import_is_post_to_create', 'create_only_if_unique_custom_field', 10, 3);
Do Not Create Products With Duplicate SKU
Here we use the wp_all_import_is_post_to_create filter to avoid creating products with duplicate SKUs. This helps when the same product may appear in multiple 'New Items' imports. For fields other than SKU use this snippet.
function dont_duplicate_skus( $continue_import, $data, $import_id ) {

    // Get the SKU from the import file.
    // Change 'sku' to the column name that contains your SKU.
    $sku = $data['sku'];

    // Enable access to global wpdb object.
    global $wpdb;

    // Check if the SKU already exists.
    $product_id = $wpdb->get_var( $wpdb->prepare( "SELECT post_id FROM $wpdb->postmeta WHERE meta_key='_sku' AND meta_value='%s' LIMIT 1", $sku ) );

    if ( $product_id ) {

        // If product ID exists then skip importing.
        return false;

    } else {

        // Else, import the product.
        return true;

    }
}
add_filter('wp_all_import_is_post_to_create', 'dont_duplicate_skus', 10, 3);
Only Update Posts with a Specific Status
Here we use the wp_all_import_is_post_to_update filter to only update records that are set to 'draft'. We use get_post_status() to retrieve the current status of each record to determine if it should be updated.
function my_check_post_status ($continue_import, $post_id, $data, $import_id ) {

    // Only process import ID 1.
    if ($import_id == 1) {

	// Retrieve post status.
	$my_post_status = get_post_status($post_id);

	// Check if status is set to draft.
        if ($my_post_status == "draft") {

            // Tell WP All Import to update post if it's draft.
            return true;
        }

        // Do not update post if it's not set to draft.
        return false;

    }
    else {

        // Do nothing if it's not our specified import ID.
        return $continue_import;

    }
}
add_filter( 'wp_all_import_is_post_to_update', 'my_check_post_status', 10, 4 );
Only Update Products If The Stock Status Changed
Here we use the wp_all_import_is_post_to_update filter and get_post_meta to compare each product's _stock_status with the status in our file. If they match the product won't be updated.
function only_update_if_stock_status_changed ( $continue_import, $post_id, $data, $import_id ) {

    // Only run for import ID 1.
    if ($import_id == 1) {

        // Get stock status from the import file.
        // Our file element is named 'stock_status'.
        $import_stock_status = $data["stock_status"];

        // Retrieve product's current stock status.
        $woo_stock_status = get_post_meta($post_id, "_stock_status", true);

        // Check if import_stock_status and
        // woo_stock_status match.
        if ($import_stock_status !== $woo_stock_status) {

            // Update the product if they don't.
            return true;

        }else{
            // Otherwise, don't update the product.
            return false;
        }
    }

    // Do nothing if it's not our target import.
    return $continue_import;

}
add_filter( 'wp_all_import_is_post_to_update', 'only_update_if_stock_status_changed', 10, 4 );
Only Update Product If Price Was Not Manually Changed
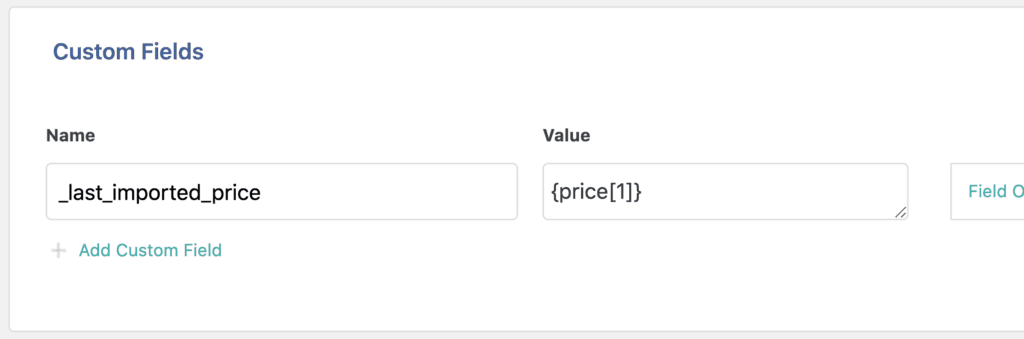
Here we use the wp_all_import_is_post_to_update filter and get_post_meta() to check if _last_imported_price matches the currently set price. This prevents updating the product if the price was manually changed. The _last_imported_price custom field must be set to your price element:
function do_not_update_if_price_hand_modified( $continue_import, $post_id, $data, $import_id ) {

    // Only run for import ID 1.
    if ($import_id == 1) {

        // Retrieve last imported price.
        $imported_price = get_post_meta($post_id, "_last_imported_price", true);

        // If price isn't greater than zero update the product.
        if ($imported_price <= 0)
            return true;

        // Update product if the new prices matches that
        // last imported.
        if ($imported_price === get_post_meta($post_id, "_price", true))
            return true;

        // Do not update product otherwise.
        return false;
    }

    else {

        // Take no action if it's not our import ID.
        return $continue_import;

    }
}
add_filter( 'wp_all_import_is_post_to_update', 'do_not_update_if_price_hand_modified', 10, 4 );
Delete Orphaned Variations When Deleting Previously Imported Products
Here we use the wp_all_import_is_post_to_delete filter to only delete variations created by WP All Import that have been orphaned. This is needed as our import file won't always list all of the variations. Also, we need to make sure we don't leave orphaned variations after deleting a parent product. The 'Delete products that are no longer present in your file' option must be checked or the code does nothing (Manage Imports > Import Settings).
function is_post_to_delete_orphans($to_delete, $pid, $import) {

    // Only process products.
    if ($import->options['custom_type'] == 'product') {

        // Retried product post object.
        $post_to_delete = get_post($pid);

        // Check if parent or variation.
        switch ($post_to_delete->post_type) {

            // Mark to delete if parent.
            case 'product':
                $to_delete = true;
                break;

            // Process variations.
            case 'product_variation':
                $parent_product = get_post($post_to_delete->post_parent);

                // Only delete variation if orphaned.
                $to_delete = empty($parent_product) ? true : false;
                break;
        }
    }

    return $to_delete;

}
add_filter('wp_all_import_is_post_to_delete', 'is_post_to_delete_orphans', 11, 3);
Prevent Some Posts From Being Deleted By WP All Import
Here we use the wp_all_import_is_post_to_delete filter and get_post_meta() to avoid deleting records that have a do_not_delete custom field. This allows manually specifying that some products should not be deleted even if they're missing from your file.
It only works when using the 'Delete products that are no longer present in your file' option (Step 4 or Manage Imports > Import Settings).
function is_post_to_delete_on_meta($is_post_to_delete, $pid, $import)
{

    // Check if a custom field named 'do_not_delete' exists and
    // do not delete record if it does.
    return $var =  ( get_post_meta($pid, 'do_not_delete', true) ) ? false : true;

}

add_filter('wp_all_import_is_post_to_delete', 'is_post_to_delete_on_meta', 10, 3);
Save Images To Your Theme's or Plugin's Custom Gallery
Here we use the pmxi_gallery_image action to add images to a few common gallery field configurations. We use get_post_meta() to retrieve the existing gallery fields and update_post_meta() to save the new updated galleries. When working with named key arrays we use wp_get_attachment_image_src() to retrieve the image URLs.
We import our images using the Images section (Step 3 or Manage Imports > Edit Import).
Named Key Arrays ([image_id_1 => "image_url_1"]):
function gallery_id_url($post_id, $att_id, $filepath, $is_keep_existing_images = '')
{

    // The custom field used by the gallery.
    $key = '_gallery';

    // The image size to list in the gallery.
    $size = 'full';

    // Retrieve the current gallery value.
    $gallery = get_post_meta($post_id, $key, TRUE);

    // If it's empty declare a new array.
    if (empty($gallery)) {
        $gallery = array();
    }

    // Check if image is already in the gallery.
    if (!isset($gallery[$att_id])) {

        // If not, retrieve the image's URL.
        $src = wp_get_attachment_image_src($att_id, $size);

        // Add the image ID and URL to our gallery.
        $gallery[$att_id] = $src[0];

        // Save the gallery.
        update_post_meta($post_id, $key, $gallery);

    }
}

add_action('pmxi_gallery_image', 'gallery_id_url', 10, 4);
Numeric Array Keys ([0 => image_id_1, 1 => image_id_2]):
function gallery_n_id($post_id, $att_id, $filepath, $is_keep_existing_images = '')
{

    // The custom field used for the gallery.
    $key = '_gallery';

    // Retrieve existing gallery values.
    $gallery = get_post_meta($post_id, $key, TRUE);

    // If gallery is empty declare a new array.
    if (empty($gallery)) {
        $gallery = array();
    }

    // Check if the image is in the gallery.
    if (!in_array($att_id, $gallery)) {

        // If not, add it.
        $gallery[] = $att_id;

        // Save the new gallery.
        update_post_meta($post_id, $key, $gallery);

    }
}

add_action('pmxi_gallery_image', 'gallery_n_id', 10, 4);
Individual Post Meta (custom field) per image:
function gallery_meta_id($post_id, $att_id, $filepath, $is_keep_existing_images = '')
{

    // The custom field used for the gallery.
    $key = '_gallery'; // Edit this: Set meta key for gallery array here

    // Retrieve the current gallery values.
    $result = get_post_meta($post_id, $key, FALSE);

    // Check if the image is already in the gallery.
    if (is_array($result)) {

        // If not, add it.
        if (!in_array($att_id, $result)) {
            add_post_meta($post_id, $key, $att_id);
        }

    }
}

add_action('pmxi_gallery_image', 'gallery_meta_id', 10, 4);
Comma-separated image IDs (23,25,31):
function gallery_ids_in_string($post_id, $att_id, $filepath, $is_keep_existing_images = '')
{
    // The custom field used by gallery.
    $key = '_gallery';

    // The separator to use between each ID.
    $separator = ",";

    // Retrieve the current values in the gallery field.
    $gallery = get_post_meta($post_id, $key, true);

    // Ensure gallery is valid.
    if (is_string($gallery) || is_empty($gallery) || ($gallery == false)) {

        // Split value into array.
        $gallery = explode($separator, $gallery);

        // Add image if it's not in the gallery.
        if (!in_array($att_id, $gallery)) {

            // Ensure array doesn't start with empty value.
            if ($gallery[0] == '') unset($gallery[0]);

            // Add image ID to array.
            $gallery[] = $att_id;

            // Save updated gallery field.
            update_post_meta($post_id, $key, implode($separator, $gallery));

        }
    }
}

add_action('pmxi_gallery_image', 'gallery_ids_in_string', 10, 4);
Save Imported Images To A Custom Folder
Here we use the wp_all_import_images_uploads_dir filter to save our images to the uploads/customfolder directory. This can prevent saving a large number of images in a single folder when they're imported the same day.
function wpai_set_custom_upload_folder($uploads, $articleData, $current_xml_node, $import_id) {

    // Change our upload path to uploads/customfolder.
    $uploads['path'] = $uploads['basedir'] . '/customfolder';
    $uploads['url'] = $uploads['baseurl'] . '/customfolder';

    // Check if the target directory exists.
    if (!file_exists($uploads['path'])) {

        // If not, create the directory.
        mkdir($uploads['path'], 0755, true);

    }

    return $uploads;

}

add_filter('wp_all_import_images_uploads_dir', 'wpai_set_custom_upload_folder', 10, 4);
Apply wp_handle_upload Filter to Uploaded Files
Here we use wp_all_import_handle_upload to apply the wp_handle_upload filter to all imported attachments and images. It's normally fired when uploading files to WordPress. However, it's disabled during imports to increase speed. Firing this filter allows plugins such as Imsanity to work for imported files.
add_filter('wp_all_import_handle_upload', function( $file ){

    return apply_filters( 'wp_handle_upload', $file, 'upload');

}, 10, 1);
Set Exported Order Status
Here we use the pmxe_exported_post action to mark exported Orders as completed. We use the WC_Order method update_status() which can set any desired order status.
function set_order_status_on_export($post_id, $exportObject)
{

    // Retrieve export ID.
    $export_id = ( isset( $_GET['id'] ) ? $_GET['id'] : ( isset( $_GET['export_id'] ) ? $_GET['export_id'] : 'new' ) );

    // Only run for export 1.
    if ($export_id == "1") {

        // Retrieve Order object.
        $order = new WC_Order($post_id);

        // Set Order status to completed.
        $order->update_status('completed', 'export_completed');

     }
}

add_action('pmxe_exported_post', 'set_order_status_on_export', 10, 2);
Filter Variations by Parent Status When Exporting to GMC
Here we use the wp_all_export_csv_rows filter to only export variations whose parents are not set to 'draft', and only export products in other product types that are not drafts. This is especially useful for Google Merchant Center exports as they apply Status filters directly to variations by default.
function exclude_products_from_gmc_export( $articles, $options, $export_id ) {

    // Target GMC exports only
    if ( $options['xml_template_type'] !== 'XmlGoogleMerchants' ) {
        return $articles;
    }

    // Iterate through exported products
    foreach ( $articles as $key => $article ) {

        if ( ! empty( $article['id'] ) ) {
            $post_id = $article['id'];
            $parent_id = wp_get_post_parent_id( $post_id );

            // Check for draft status (both product and parent)
            if ( get_post_status( $post_id ) === 'draft' ||
                 ( $parent_id && get_post_status( $parent_id ) === 'draft' ) ) {

                unset( $articles[ $key ] );
            }
        }
    }

    // Ensure proper array return
    return ! empty( $articles ) ? $articles : [];
}

add_filter( 'wp_all_export_csv_rows', 'exclude_products_from_gmc_export', 10, 3 );
Limit Records Exported to CSV by Date
Here we use the wp_all_export_csv_rows filter to only export records where _my_time is older than tomorrow. This helps when you need more control than the visual filters offer. The example works for CSV, Excel, and Google Merchant Center exports only. You must include _my_time when configuring the export.
function filter_export_by_date($articles, $options, $export_id)
{

    // Process each record to be exported.
    foreach ($articles as $key => $article) {

        // Set target date as Unix timestamp.
        $target_date = strtotime("tomorrow");

        // Convert _my_time element's time to Unix timestamp.
        $my_time = strtotime($article["_my_time"]);

        // Check if $my_time is older that $target_date
        if ($my_time < $target_date) {

            // Do not export records older than $target_date.
            unset($articles[$key]);

        }
    }
    // Return updated array of records to export.
    return isset($articles[0]) ? $articles : $articles[0] = [];
}

add_filter('wp_all_export_csv_rows', 'filter_export_by_date', 10, 3);
Limit Number of Records Exported When Exporting to XML
Here we use the wp_all_export_xml_rows filter to limit the number of records exported to XML. We use get_posts() to handle retrieving only the records we want to export. Our example further limits exported records to those with a specific taxonomy term set.
add_filter('wp_all_export_xml_rows', function($shouldExport, $record, $exportOptions, $exportId) {

    // The Export ID to be filtered.
    $exportToApplyFilterTo = 3;

    // The number of records to be exported.
    $lastNumberOfPostsToExport = 200;

    // Do nothing if it's not our defined export ID running.
    if($exportId == $exportToApplyFilterTo) {

        // Retrieve the records we want to export.
        $posts = get_posts(
            array(
            'numberposts' => $lastNumberOfPostsToExport,

            // Only export published records.
            'post_status' => 'publish',

            // START TAXONOMY QUERY, REMOVE IF NOT FILTERING BY TAXONOMY
            'tax_query' => array(
                array(

                    // The taxonomy to check.
                    'taxonomy' => 'property_status',

                    // Search by Term ID.
                    'field' => 'term_id',

                    // The term_id of the taxonomy term.
                    'terms' => 575,
                    'include_children' => false
                )
            ),
            // END TAXONOMY QUERY

            'fields' => 'ids',
            'order' => 'desc',
            'orderby' => 'ID',
            'post_type' => $record->post_type
            )
        );

        // Only export records found by get_posts() above.
        if(in_array($record->ID, $posts)) {
            return true;
        } else {
            return false;
        }
    }

    // Do nothing if our defined export ID isn't running.
    return $shouldExport;
}, 11, 4);
Append Custom Line Endings to Export File
Here we use the wp_all_export_after_csv_line filter to append a newline character to each row in our CSV file during export.
function custom_line_ending( $stream, $export_id ){

    // Define character for line ending.
    fwrite( $stream, "n" );
    return $stream;

}

add_filter( 'wp_all_export_after_csv_line', 'custom_line_ending', 10, 2 );
Programmatically Add Elements To XML Exports
Here we use the wp_all_export_additional_data filter to add an element named created_at to our exported XML file.
function wpae_additional_data_field($add_data, $options)
{

    // Add 'created_at' element and set its value to
    // the current date and time.
    $add_data['created_at'] = date("Y-m-d H:i:s");


    return $add_data;

}

add_filter('wp_all_export_additional_data', 'wpae_additional_data_field', 10, 2);
Move Generated File After Export
Here we use the pmxe_after_export action to move our export file to /wp-content/uploads. The get_attached_file() function allows us to retrieve the export file path when Secure Mode is enabled. The WordPress uploads directory is located using wp_get_upload_dir().
function move_export_file ($export_id, $exportObj){

    // Get WordPress's upload directory.
    $upload_dir = wp_get_upload_dir();

    // Check whether "Secure Mode" is enabled in All Export > Settings
    $is_secure_export = PMXE_Plugin::getInstance()-> getOption('secure');


    if ( !$is_secure_export ) {

        // Get filepath when 'Secure Mode' is off.
        $filepath = get_attached_file($exportObj->attch_id);

    } else {

        // Get filepath with 'Secure Mode' on.
        $filepath = wp_all_export_get_absolute_path($exportObj->options['filepath']);

    }

    // Get the filename.
    $filename = basename( $filepath );

    // Move export file into /wp-content/uploads.
    rename( $filepath,  $upload_dir['basedir'] . DIRECTORY_SEPARATOR . $filename );

}

add_action('pmxe_after_export', 'move_export_file', 10, 2);
Run Cron Export With Only A Trigger Cron Job and 1 Processing Cron Job
Here we use the pmxe_after_iteration action to avoid the need for multiple 'processing' cron jobs. However, if something fails on one of the iterations the export will hang. It will also hang if the process calling the 'trigger' or 'processing' URL closes the connection before the export is complete.
function wpae_continue_cron( $export_id, $exportObj ) {

    // Only run for export ID 12.
    if ( $export_id == '12' ) {

        // Import 12's 'processing' URL.
        $cron_processing_url = 'http://lame-addax-cat.w6.wpsandbox.pro/wp-cron.php?export_key=g99mni1B6Kpu&export_id=12&action=processing';

        // Redirect the connection to the 'processing' URL.
        header( "Location: " .  $cron_processing_url . "" );
    }
}

add_action( 'pmxe_after_iteration', 'wpae_continue_cron', 10, 2 );
Set Password for Imported Posts
Here we use the pmxi_saved_post action to set the password for each post as it's imported. In this case our posts all have a different password, each defined in the import file:
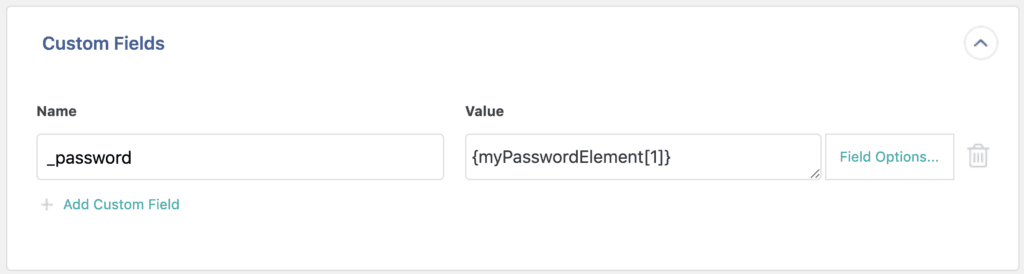
Every time a post is successfully imported or updated our code will retrieve the custom field's value with get_post_meta() and pass it to wp_update_post(), which will actually set the passwords.
function set_post_password( $pid ) {
    wp_update_post( array(

        // Specify post to update.
        'ID' => $pid,

        // Set password to value of custom field.
        'post_password' => get_post_meta( $pid, '_password', true )
    ) );

}

add_action( 'pmxi_saved_post', 'set_post_password', 10, 1 );
Retrieve Import ID for Use in Template
Here we use some custom code to retrieve the import ID. It can be saved to a custom field to track the records updated by each import. Also, the $import_id definition can be used with our various hooks that don't provide the Import ID as a parameter.
function get_import_id(){

    // Retrieve the import ID while the import is running.
    $import_id = wp_all_import_get_import_id();
    return $import_id;
}
Convert Comma-separated List into Serialized Array
Here we use custom code to convert our list element's value into a serialized array. Our theme requires this field to only contain serialized values.
Original value: red, green, blue, yellow
Value after our code: a:4:{i:0;s:3:"red";i:1;s:6:" green";i:2;s:5:" blue";i:3;s:7:" yellow";}
We call the code like this:
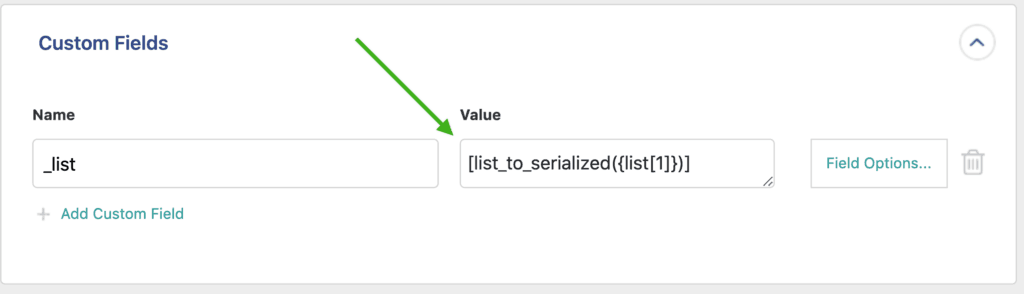
function list_to_serialized( $value ){

    // Split the list at the commas.
    $value = explode(',', $value);

    // Return the serialized list.
    return serialize( $value );

}
Generate Taxonomy Hierarchy from Child Terms
Here we generate a full taxonomy hierarchy for each of our terms using custom code. Our import file only contains the child terms and we don't yet have the full hierarchy on our site.
The field with our terms looks like this:2.1.1. | 2.1.4. | 2.1.5. | 3.1.1. | 3.1.2.
Our code takes our element's value and outputs the hierarchical version:2.>2.1.>2.1.1. | 2.>2.1.>2.1.4. | 2.>2.1.>2.1.5. | 3.>3.1.>3.1.1. | 3.>3.1.>3.1.2.
We must configure our import to accept that hierarchical string:
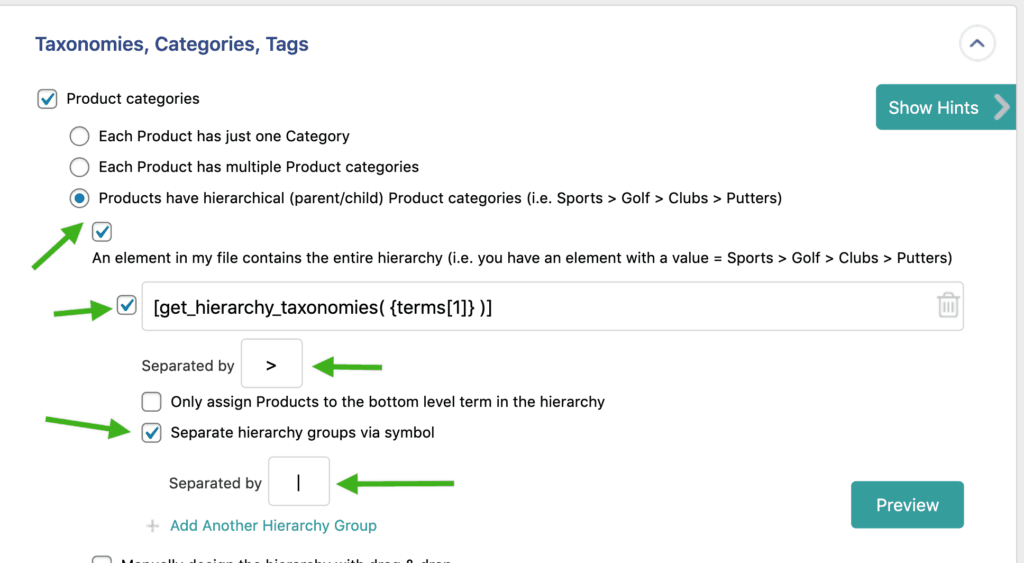
function get_hierarchy_taxonomies( $tax_str ) {

    // Convert our list of terms to an array.
    $tax_array = explode("|", $tax_str);

    // Process each term.
    foreach( $tax_array as $val ){

        // Generate the top level term.
    	$temp = substr( trim( $val ), 0, 2 ) . '>'

        // Generate the second level term.
        $temp .= substr( trim( $val ), 0, 4 ) . '>'

        // Add the original term to the hierarchy.
        $temp .= trim( $val );

  }

    // Return our updated term hierarchies separated by pipes.
    return implode( "|", $tax_hierarchy_array );

}
Prevent Certain Records from Being Updated
Here we use the wp_all_import_is_post_to_update filter to prevent updating records we've manually modified. This is accomplished by setting the do_not_update custom field on any record we don't want to update. We use get_post_meta() to check if do_not_update exists. If it does, we tell WP All Import not to update that record by returning false.
function is_post_to_update( $continue_import, $pid ) {

    // Retrieve custom field value.
    $do_not_update = get_post_meta( $pid, 'do_not_update', true );

    // Update post if do_not_update field not set.
    return ( !empty( $do_not_update ) ) ? false : $continue_import;

}

add_filter( 'wp_all_import_is_post_to_update', 'is_post_to_update', 10, 2 );
Bulk Attach Images to a Record's Custom Gallery
Here we use the pmxi_saved_post action to link all of our images for each property at once. This can be faster than using pmxi_gallery_image when there are many images per property (or any other post type using custom galleries).
The get_attached_media() function is used to retrieve a list of all the images attached to the property. We then confirm a value was returned and process each of those images. Once we have our list of image IDs, we save them to _image_field using update_post_meta().
add_action( 'pmxi_saved_post', 'update_gallery_ids', 10, 3 );

function update_gallery_ids( $id ) {

    // Declare our variable for the image IDs.
    $image_ids = array();

    // Retrieve all attached images.
    $media = get_attached_media( 'image', $id );

    // Ensure there are images to process.
    if( !empty( $media ) ) {

        // Process each image.
        foreach( $media as $item ) {

            // Add each image ID to our array.
            $image_ids[] = $item->ID;

        }

        // Convert our array of IDs to a comma separated list.
        $image_ids_str = implode( ',',$image_ids );

        // Save the IDs to the _image_field custom field.
        update_post_meta( $id, '_image_field', $image_ids_str );

    }
}
Split String at Delimiter and Return One Value
Here we use a custom function to divide our string at each comma. Say we have one element in our file that contains all of our Attributes like 5, Red where the first value is Size and the second is Color.
We can use our function to return each value as needed like this:
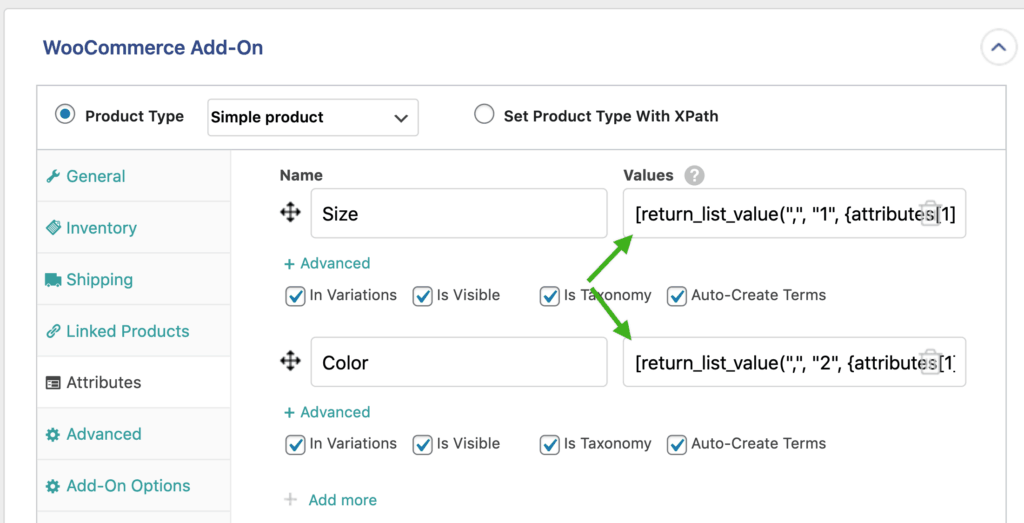
function return_list_value( $needle, $index, $string ) {

    // Expect index to start at 1 instead of 0.
    $index -= 1;

    // Split string by $needle value.
    $split = explode($needle, $string);

    // Return the value at $index.
    return $split[$index];

}
Retrieve URL from String
Here we use a custom function to retrieve a URL from a string. This can help if your image element has text other than the URL itself.
For example: <img src='https://my-image-url.com/image.jpg' />
The function is called like this:
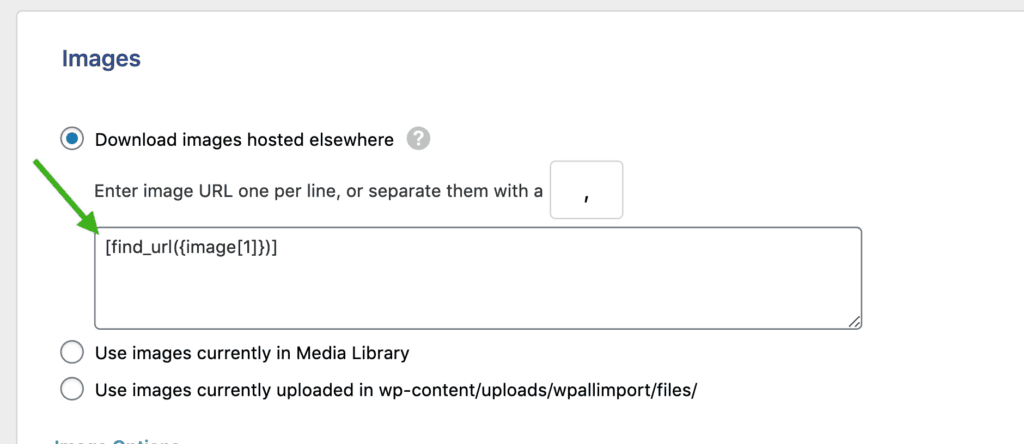
function find_url( $string ) {

    // Find the URL.
    preg_match_all('#\bhttps?://[^\s()<>]+(?:\([\w\d]+\)|([^[:punct:]\s]|/))#', $string, $match);

    // Return the first found URL.
    return  $match[0][0];

}
Round Imported Prices
Here we use a custom function to round our prices. The $price parameter is required and the others are optional. Any unwanted characters are removed from the price - anything other than 0-9, period, and comma.
It's called like this:
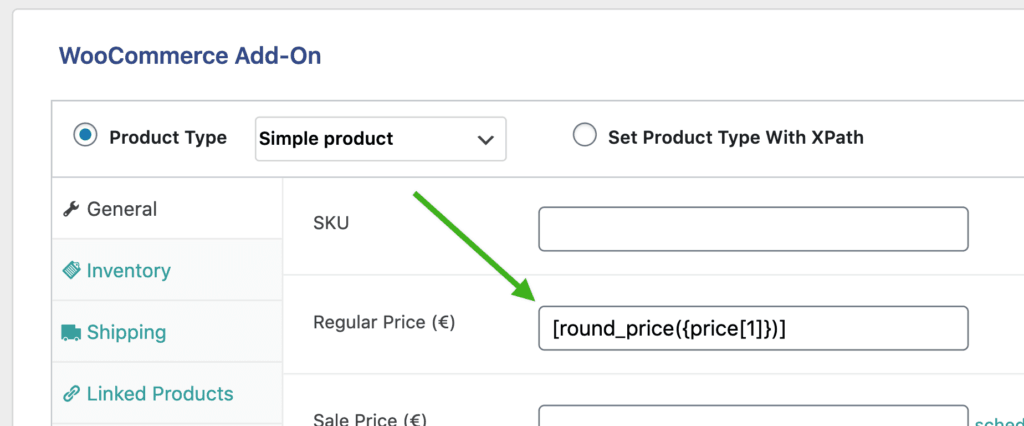
function round_price( $price = null, $multiplier = 1, $nearest = .01, $minus = 0 ) {

    if ( !empty( $price ) ) {

        // Remove any extra characters from price.
        $price = preg_replace("/[^0-9,.]/", "", $price);

        // Perform calculations and return rounded price.
        return ( round ( ( $price * $multiplier ) / $nearest ) * $nearest ) - $minus;

    }
}
Merge Multiple XML Files
This is a basic example script showing how to merge multiple XML files into 1 file before importing them with WP All Import. This script would be saved in a .php file and placed on your server, then you would point WP All Import to the script URL when setting up the import.
WPAI_Example_Merge_XML_Function parameters:
| Parameter | Description |
| $file1 | The full URL/path/filename to the main file |
| $file2 | The full URL/path/filename to the file you want to merge into $file1 |
| $root_node | The root node that wraps all of the post nodes |
| $items_node | The repeating post node (i.e. the one you'd choose to import on step 2 of WP All Import). |
| $filename | The file that the merged data will be saved into |
Code:
<?php
function WPAI_Example_Merge_XML_Function( $file1, $file2, $root_node, $items_node, $filename = 'merged.xml' ) {
    $main_doc = new DOMDocument();
    $main_doc->load( $file1 );

    $merge_doc = new DOMDocument();
    $merge_doc->load( $file2 );

    // Get root element from file1
    $root = $main_doc->getElementsByTagName( $root_node )->item(0);

    // Get post elements from file2
    $items = $merge_doc->getElementsByTagName( $items_node );

    for ( $i = 0; $i < $items->length; $i++ ) {
        $node = $items->item( $i );
        $import = $main_doc->importNode( $node, true );
        $root->appendChild( $import );
    }

    $file = $main_doc->save( $filename );
}

$final_file_name = 'merged.xml';
WPAI_Example_Merge_XML_Function( 'd1.xml', 'd2.xml', 'data', 'post', $final_file_name );
WPAI_Example_Merge_XML_Function( $final_file_name, 'd3.xml', 'data', 'post', $final_file_name );
echo file_get_contents( $final_file_name );
?>
Once you've saved the script in a .php file and uploaded it to your server, you'll point WP All Import to the URL for the script in the "Download from URL" field, e.g.:
https://example.com/mergexmlscript.php
For reference, these are the XML files that this snippet example works with:
d1.xml
<?xml version="1.0" encoding="utf-8"?>
<data>
	<post>
		<title>Post 1</title>
	</post>
</data>
d2.xml
<?xml version="1.0" encoding="utf-8"?>
<data>
	<post>
		<title>Post 2</title>
	</post>
</data>
d3.xml
<?xml version="1.0" encoding="utf-8"?>
<data>
	<post>
		<title>Post 3</title>
	</post>
</data>
Export parent SKU when variation SKU is blank
If your WooCommerce variations are inheriting the Parent SKU, then they will have blank SKUs in your export file. To get around this, you can use the following function on a new instance ("Add Field") of the "ID" export field:
function my_get_sku( $id ) {
	$prod = wc_get_product( $id );
	if ( ! $prod ) return;

	if ( ! empty( $prod->get_sku() ) ) {
		return $prod->get_sku();
	}

	if ( ! empty( $prod->get_parent_id() ) ) {
		$parent = wc_get_product( $prod->get_parent_id() );
		if ( ! $parent ) return;
		return $parent->get_sku();
	}
}
Find post by custom field value
This is a helper function that can query products, posts, custom post types, users and taxonomy terms by looking up a custom field value.
Example uses are below. Learn how to call PHP functions in imports in our inline PHP doc.
Examples
Find post with the value from {id[1]} inside the "_old_post_id" custom field:
[sf_helper_meta_query_lookup("_old_post_id",{id[1]})]Find WooCommerce Product with value from {ean[1]} in the "_custom_ean" custom field:
[sf_helper_meta_query_lookup("_custom_ean",{ean[1]},"product")]Find user with value from {id[1]} in the "_old_user_id" custom field (user meta field):
[sf_helper_meta_query_lookup("_old_user_id",{id[1]},"user")]Find taxonomy term (WooCommerce Product Category in this example) with value from {cat_id[1]} in "_custom_term_id" custom field (term meta field):
[sf_helper_meta_query_lookup("_custom_term_id",{cat_id[1]},"term","product_cat")]Code:
function sf_helper_meta_query_lookup( $meta_key = '', $meta_value = '', $object_type = 'post', $taxonomy = '', $return_field = 'ID', $compare = '=', $custom_args = array() ) {
    if ( empty( $object_type ) || empty( $meta_key ) || empty( $meta_value ) ) return;
	$func = 'get_posts';

	switch ( $object_type ) {
		case 'user':
			$func = 'get_users';
			break;
		case 'term':
			$func = 'get_terms';
			if ( $return_field == 'ID' ) {
				$return_field = 'term_id';
			}
			break;
		default:
			$func = 'get_posts';
			break;
	}

	if ( ! empty( $custom_args ) ) {
		$objects = $func( $custom_args );
		if ( ! empty( $objects ) ) {
			return $objects[0]->$return_field;
		} else {
			return false;
		}
	}

	$args = array();

	$meta_query = array( array(
		'key'     => $meta_key,
		'value'   => $meta_value,
		'compare' => $compare
	) );

	if ( $func == 'get_terms' ) {
		$args = array(
			'taxonomy'   => $taxonomy,
			'hide_empty' => false,
			'meta_query' => $meta_query
		);
	} elseif ( $func == 'get_users' ) {
		$args = array(
			'meta_query' => $meta_query
		);
	} else {
		$args = array(
			'post_type'  => $object_type,
			'meta_query' => $meta_query
		);
	}

    if ( $objects = $func( $args ) ) {
        return $objects[0]->$return_field;
    } else {
		return false;
	}
}
Keep old IDs when migrating products or posts
This snippet attempts to keep the old post/product ID when you migrate posts/products from one site to another. It should be saved on the import site via All Import › Settings › Function Editor.
Important note: if a post of any type exists on the new site with an ID that you're attempting to use from the old site, then this snippet won't work and a new ID will be generated for the imported post.
This workaround does not work for WooCommerce orders.
For users and customers see Keep old IDs when migrating users or customers.
function my_pmxi_article_data( $articleData, $import, $post_to_update, $current_xml_node ) {
    // Turn the XML node into an array.
    $xml_data = json_decode( json_encode( (array) $current_xml_node ), 1 );

    // Change 'id' if your ID exists in an element not named {id[1]}.
    $articleData['import_id'] = $xml_data['id'];

    // Return article data.
    return $articleData;
}
add_filter('pmxi_article_data', 'my_pmxi_article_data', 10, 4);
Keep Old IDs When Migrating Users or Customers
This snippet attempts to keep the old user/customer ID when you migrate users/customers from one site to another. It should be saved on the import site via All Import › Settings › Function Editor.
Important note: if a user/customer exists on the new site with an ID that you're attempting to use from the old site, then this snippet won't work and a new ID will be generated for the imported user/customer. Also, an ID will be auto-assigned when the user or customer is created. This snippet then tries to update that ID to the one specified.
For posts (or products) see Keep old IDs when migrating products or posts.
function my_set_user_id( $post_id, $xml_node, $is_update ) {

	global $wpdb;

	// Retrieve the import ID.
	$import_id = wp_all_import_get_import_id();

	// Only run for import 1 and only run when the user is first created.
	if ( $import_id == '1' && !$is_update) {

		// Convert SimpleXml object to array for easier use.
		$record = json_decode( json_encode( ( array ) $xml_node ), 1 );

		// ID to set for user, change 'userid' to your real file element name.
		$requested_id = $record['userid'];

		// Check if the requested ID is already used.
		$id_exists = $wpdb->get_var($wpdb->prepare('SELECT user_login FROM '.$wpdb->users.' WHERE ID = '.$requested_id));

		// If the requested ID is available...
		if( $id_exists === null ){

			// ...assign the user ID as desired...
			$wpdb->update($wpdb->users, ['ID'=> $requested_id], ['ID' => $post_id]);

			// ...update the user ID for the associated meta, so the association with the user isn't lost...
			$wpdb->update($wpdb->usermeta, ['user_id'=> $requested_id], ['user_id' => $post_id]);

			// ...and update the ID in the pmxi_posts table, so the import can still manage this user.
			$wpdb->update($wpdb->prefix . 'pmxi_posts', ['post_id'=> $requested_id], ['post_id' => $post_id, 'import_id' => $import_id]);
		}

	}

}
add_action( 'pmxi_saved_post', 'my_set_user_id', 10, 3 );
Keep old IDs when migrating categories and other taxonomy terms
This code tries to keep the old term ID when you migrate taxonomy terms from one site to another. It can be saved on the import site via All Import › Settings › Function Editor.
Important note: if a term in any taxonomy exists on the new site with an ID that you're attempting to use from the old site, then this code won't work and a new ID will be generated for the imported term.
For products or posts see Keep old IDs when migrating products or posts, and for users or customers see Keep old IDs when migrating users or customers.
function my_set_term_id( $post_id, $xml_node, $is_update ) {

	global $wpdb;

	// Retrieve the import ID.
	$import_id = wp_all_import_get_import_id();

	// Only run for import 1 and only run when the term is first created.
	if ( $import_id == '1' && !$is_update) {

		// Convert SimpleXml object to array for easier use.
		$record = json_decode( json_encode( ( array ) $xml_node ), 1 );

		// ID to set for term, change 'termid' to your real file element name.
		$requested_id = $record['termid'];

		// Check if the requested term_id is already used.
		$id_exists = $wpdb->get_var($wpdb->prepare('SELECT name FROM '.$wpdb->terms.' WHERE term_id = '.$requested_id));

		// If the requested term_id is available...
		if( $id_exists === null ){

			// ...assign the term ID as desired...
			$wpdb->update($wpdb->terms, ['term_id'=> $requested_id], ['term_id' => $post_id]);

			// ...update the term ID for the associated meta, so the association with the term isn't lost...
			$wpdb->update($wpdb->termmeta, ['term_id'=> $requested_id], ['term_id' => $post_id]);

			// ...update the term ID for the associated taxonomy, so the association isn't lost...
			$wpdb->update($wpdb->term_taxonomy, ['term_id'=> $requested_id], ['term_id' => $post_id]);

			// ...and update the ID in the pmxi_posts table, so the import can still manage this term.
			$wpdb->update($wpdb->prefix . 'pmxi_posts', ['post_id'=> $requested_id], ['post_id' => $post_id, 'import_id' => $import_id]);
		}

	}

}
add_action( 'pmxi_saved_post', 'my_set_term_id', 10, 3 );
Prepend URL to multiple images in a single element
If you have an import element with multiple image names, like this:
<images>img-name-1.jpg|img-name-2.jpg|img-name-3.jpg</images>And, you need to add a URL before each image name, like this:
https://example.com/images/img-name-1.jpg|https://example.com/images/img-name-2.jpg|https://example.com/images/img-name-3.jpgYou can use this function:
function my_output_images( $prepend_url, $separator = ',', $image_urls ) {
	// Turn the image URLs into an array.
	$image_urls = explode( $separator, $image_urls );

	// Remove empty entries.
	$image_urls = array_filter( $image_urls );

	// Prepend the URL to every image.
	foreach ( $image_urls as $key => $url ) {
		$image_urls[ $key ] = $prepend_url . trim( $url );
	}

	// Return a string of image URLs with the proper separator.
	return implode( $separator, $image_urls );
}
Example usage:
[my_output_images("https://example.com/images/","|",{images[1]})]Keep Old IDs When Migrating Comments
This snippet attempts to keep the old comment IDs when you migrate comments from one site to another. It should be saved on the import site via All Import › Settings › Function Editor.
Important note: if a comment exists on the new site with an ID that you're attempting to use from the old site, then this snippet won't work and a new ID will be generated for the imported comment. Also, an ID will be auto-assigned when the comment is created; this snippet then tries to update that ID to the one specified.
function my_set_comment_id( $post_id, $xml_node, $is_update ) {

	global $wpdb;

	// Retrieve the import ID.
	$import_id = wp_all_import_get_import_id();

	// Only run for import 1 and only run when the comment is first created.
	if ( $import_id == '1' && !$is_update) {

		// Convert SimpleXml object to array for easier use.
		$record = json_decode( json_encode( ( array ) $xml_node ), 1 );

		// ID to set for comment, change 'commentid' to your real file element name.
		$requested_id = $record['commentid'];

		// Check if the requested ID is already used.
		$id_exists = $wpdb->get_var($wpdb->prepare('SELECT comment_ID FROM '.$wpdb->comments.' WHERE ID = '.$requested_id));

		// If the requested ID is available...
		if( $id_exists === null ){

			// ...assign the comment ID as desired...
			$wpdb->update($wpdb->comments, ['comment_ID'=> $requested_id], ['comment_ID' => $post_id]);

			// ...update the comment ID for the associated meta, so the association with the comment isn't lost...
			$wpdb->update($wpdb->commentmeta, ['comment_id'=> $requested_id], ['comment_id' => $post_id]);

			// ...and update the ID in the pmxi_posts table, so the import can still manage this comment.
			$wpdb->update($wpdb->prefix . 'pmxi_posts', ['post_id'=> $requested_id], ['post_id' => $post_id, 'import_id' => $import_id]);
		}

	}

}
add_action( 'pmxi_saved_post', 'my_set_comment_id', 10, 3 );
Save Imported Images To A Folder Based On The Post Date
Here we use the wp_all_import_images_uploads_dir filter to save our images to folders based on imported post dates (in YYYY/MM format).
function wpai_set_upload_folder_by_post_date($uploads, $articleData, $current_xml_node, $import_id) {
	if ( ! empty($articleData['post_date'])) {
		$uploads['path'] = $uploads['basedir'] . '/' . date("Y/m", strtotime($articleData['post_date']));
		$uploads['url'] = $uploads['baseurl'] . '/' . date("Y/m", strtotime($articleData['post_date']));

		if (!file_exists($uploads['path'])) {
			mkdir($uploads['path'], 0755, true);
		}
	}
	return $uploads;
}

add_filter('wp_all_import_images_uploads_dir', 'wpai_set_upload_folder_by_post_date', 10, 4);
Send Export File via Email
Here we use the pmxe_after_export action to send our export file using wp_mail(). We also make use of get_attached_file() to retrieve the export file when WP All Export's Secure Mode is off.
function move_export_file_email($export_id, $exportObj)
{
	// Check whether "Secure Mode" is enabled in All Export > Settings.
	$is_secure_export = PMXE_Plugin::getInstance()->getOption('secure');
	if (!$is_secure_export) {
		// Get filepath when 'Secure Mode' is off.
		$filepath = get_attached_file($exportObj->attch_id);
	} else {
		// Get filepath with 'Secure Mode' on.
		$filepath = wp_all_export_get_absolute_path($exportObj->options['filepath']);
	}
	//Send email with the attachment
	wp_mail(
            '[email protected]', // email to send to
            'New Export ID ' . $export_id,
            'Attached is your latest export.',
            array(
                'From: Soflyy <[email protected]>',
                // 'Bcc: Webmaster <[email protected]>',
            ),
            array ( $filepath ),
        );
}
add_action('pmxe_after_export', 'move_export_file_email', 10, 2);
Generate Dynamic Import URL
Generating a dynamic import URL requires the use of a custom PHP function in Download a file › From URL in Step 1 of the import process. For example, if the filename is based on a date, you would need to write your function like this:
function get_dynamic_import_url() {
        return "http://www.site.com/". myfunction();
}
Where "myfunction" is a separate function you need to write to get the correct date for the feed.
Once you've written the necessary code, you would need to add the code to:
A) Your theme's functions.php file.
B) A plugin like Code Snippets.
And call it in the field like this:
[get_dynamic_import_url()]Please see the screenshot below:
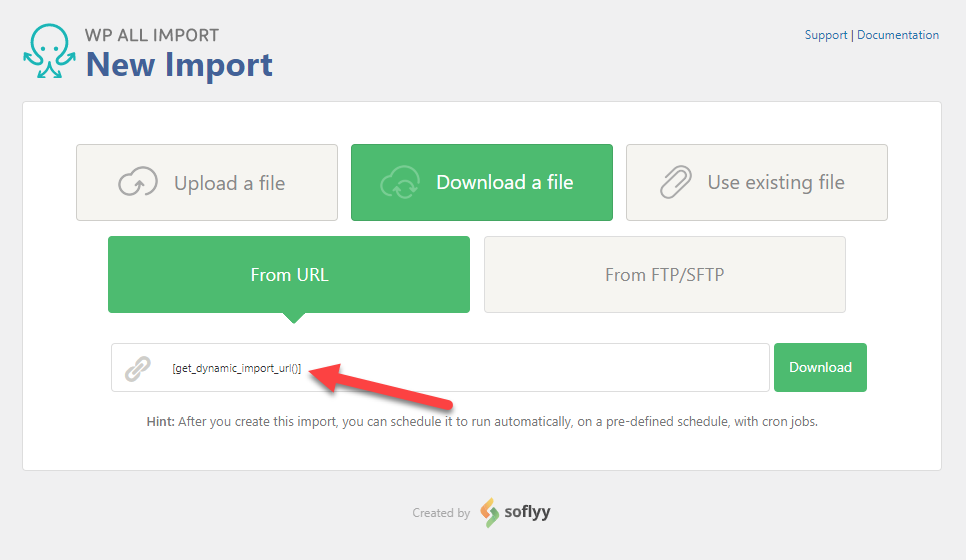
Export Toolset Relationship Fields
Toolset Types uses custom database tables. To export relationship fields, you can apply the example function below on a new instance of the "ID" field in the export. This example function returns related titles in a relationship with the slug 'post-page'. See:
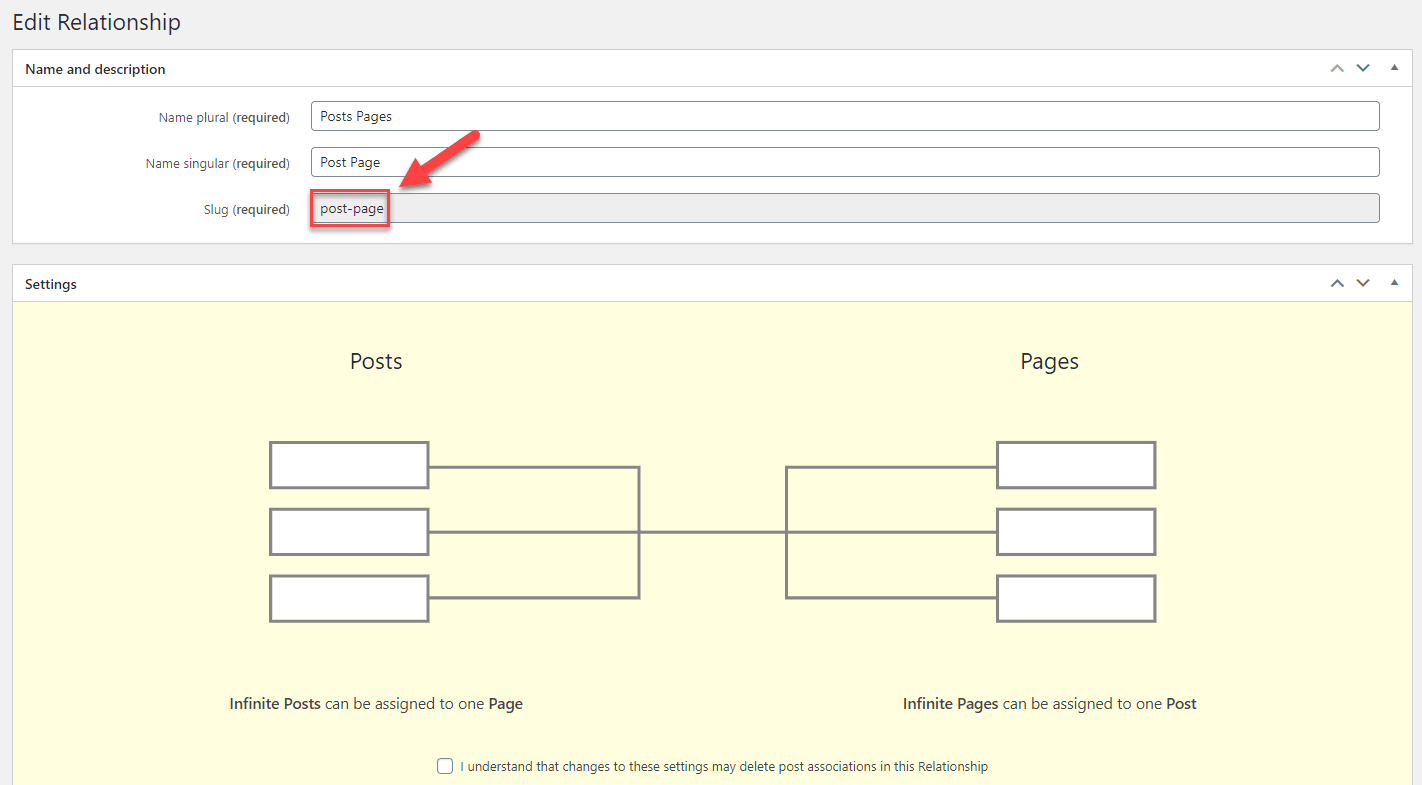
Here's the code:
function my_toolset_get_related_posts( $id ) {
	$related = toolset_get_related_posts( $id, 'post-page', array( 'query_by_role' => 'parent' ) );
	if ( ! empty( $related ) && is_array( $related ) ) {
		array_walk( $related, function( &$item ) {
			$item = get_post_field( 'post_title', $item );
		} );
		return implode( '|', $related );
	}
}
How to Increase Stock Instead of Replacing It
1. Create a new import that uses Manual Record Matching to update the products: https://www.wpallimport.com/documentation/manual-record-matching/.
2- In Step 3 of the import process, import the stock value into a custom field named something like "_my_new_stock":
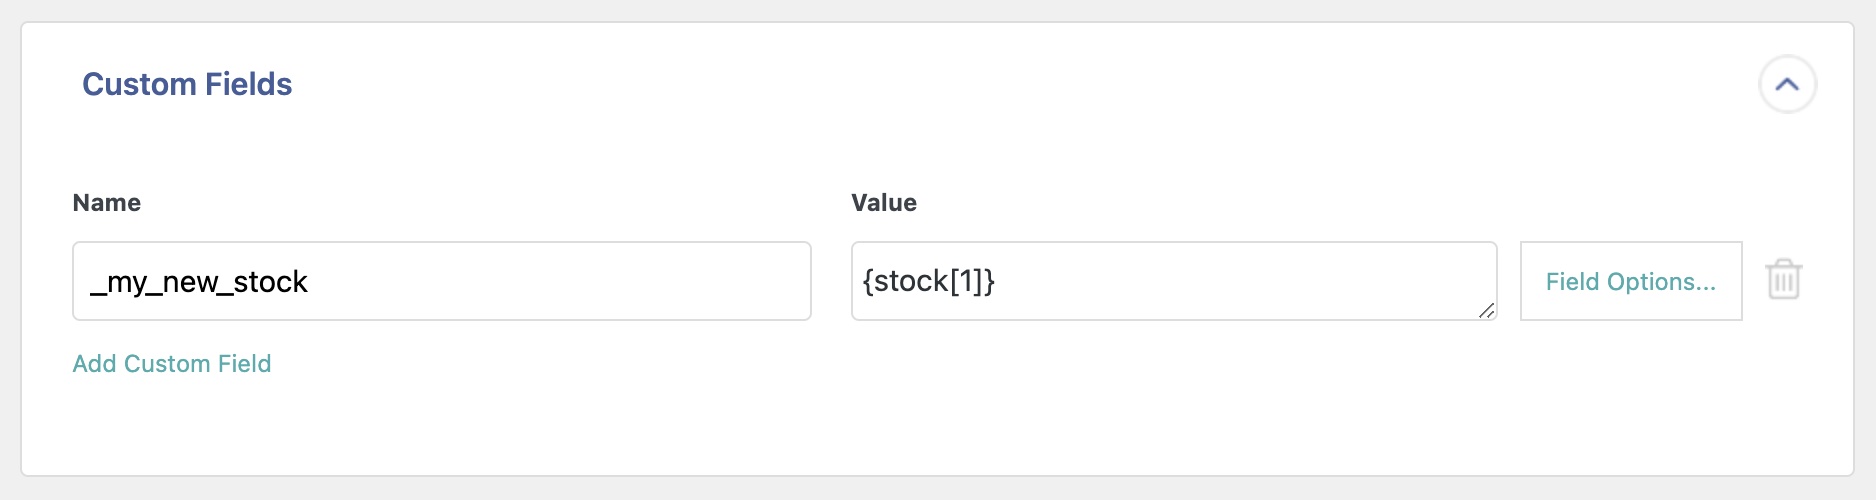
3. Save the following code inside the Function Editor (All Import › Settings):
function soflyy_add_stock( $product_id, $xml, $update ) {
	$new_stock = get_post_meta( $product_id, '_my_new_stock', true );
	wc_update_product_stock( $product_id, $new_stock, 'increase' );
}

add_action( 'pmxi_saved_post', 'soflyy_add_stock', 10, 3 );
4. In Step 4 of the import process, use the Choose which data to update option to make sure you're only updating the "_my_new_stock" field:
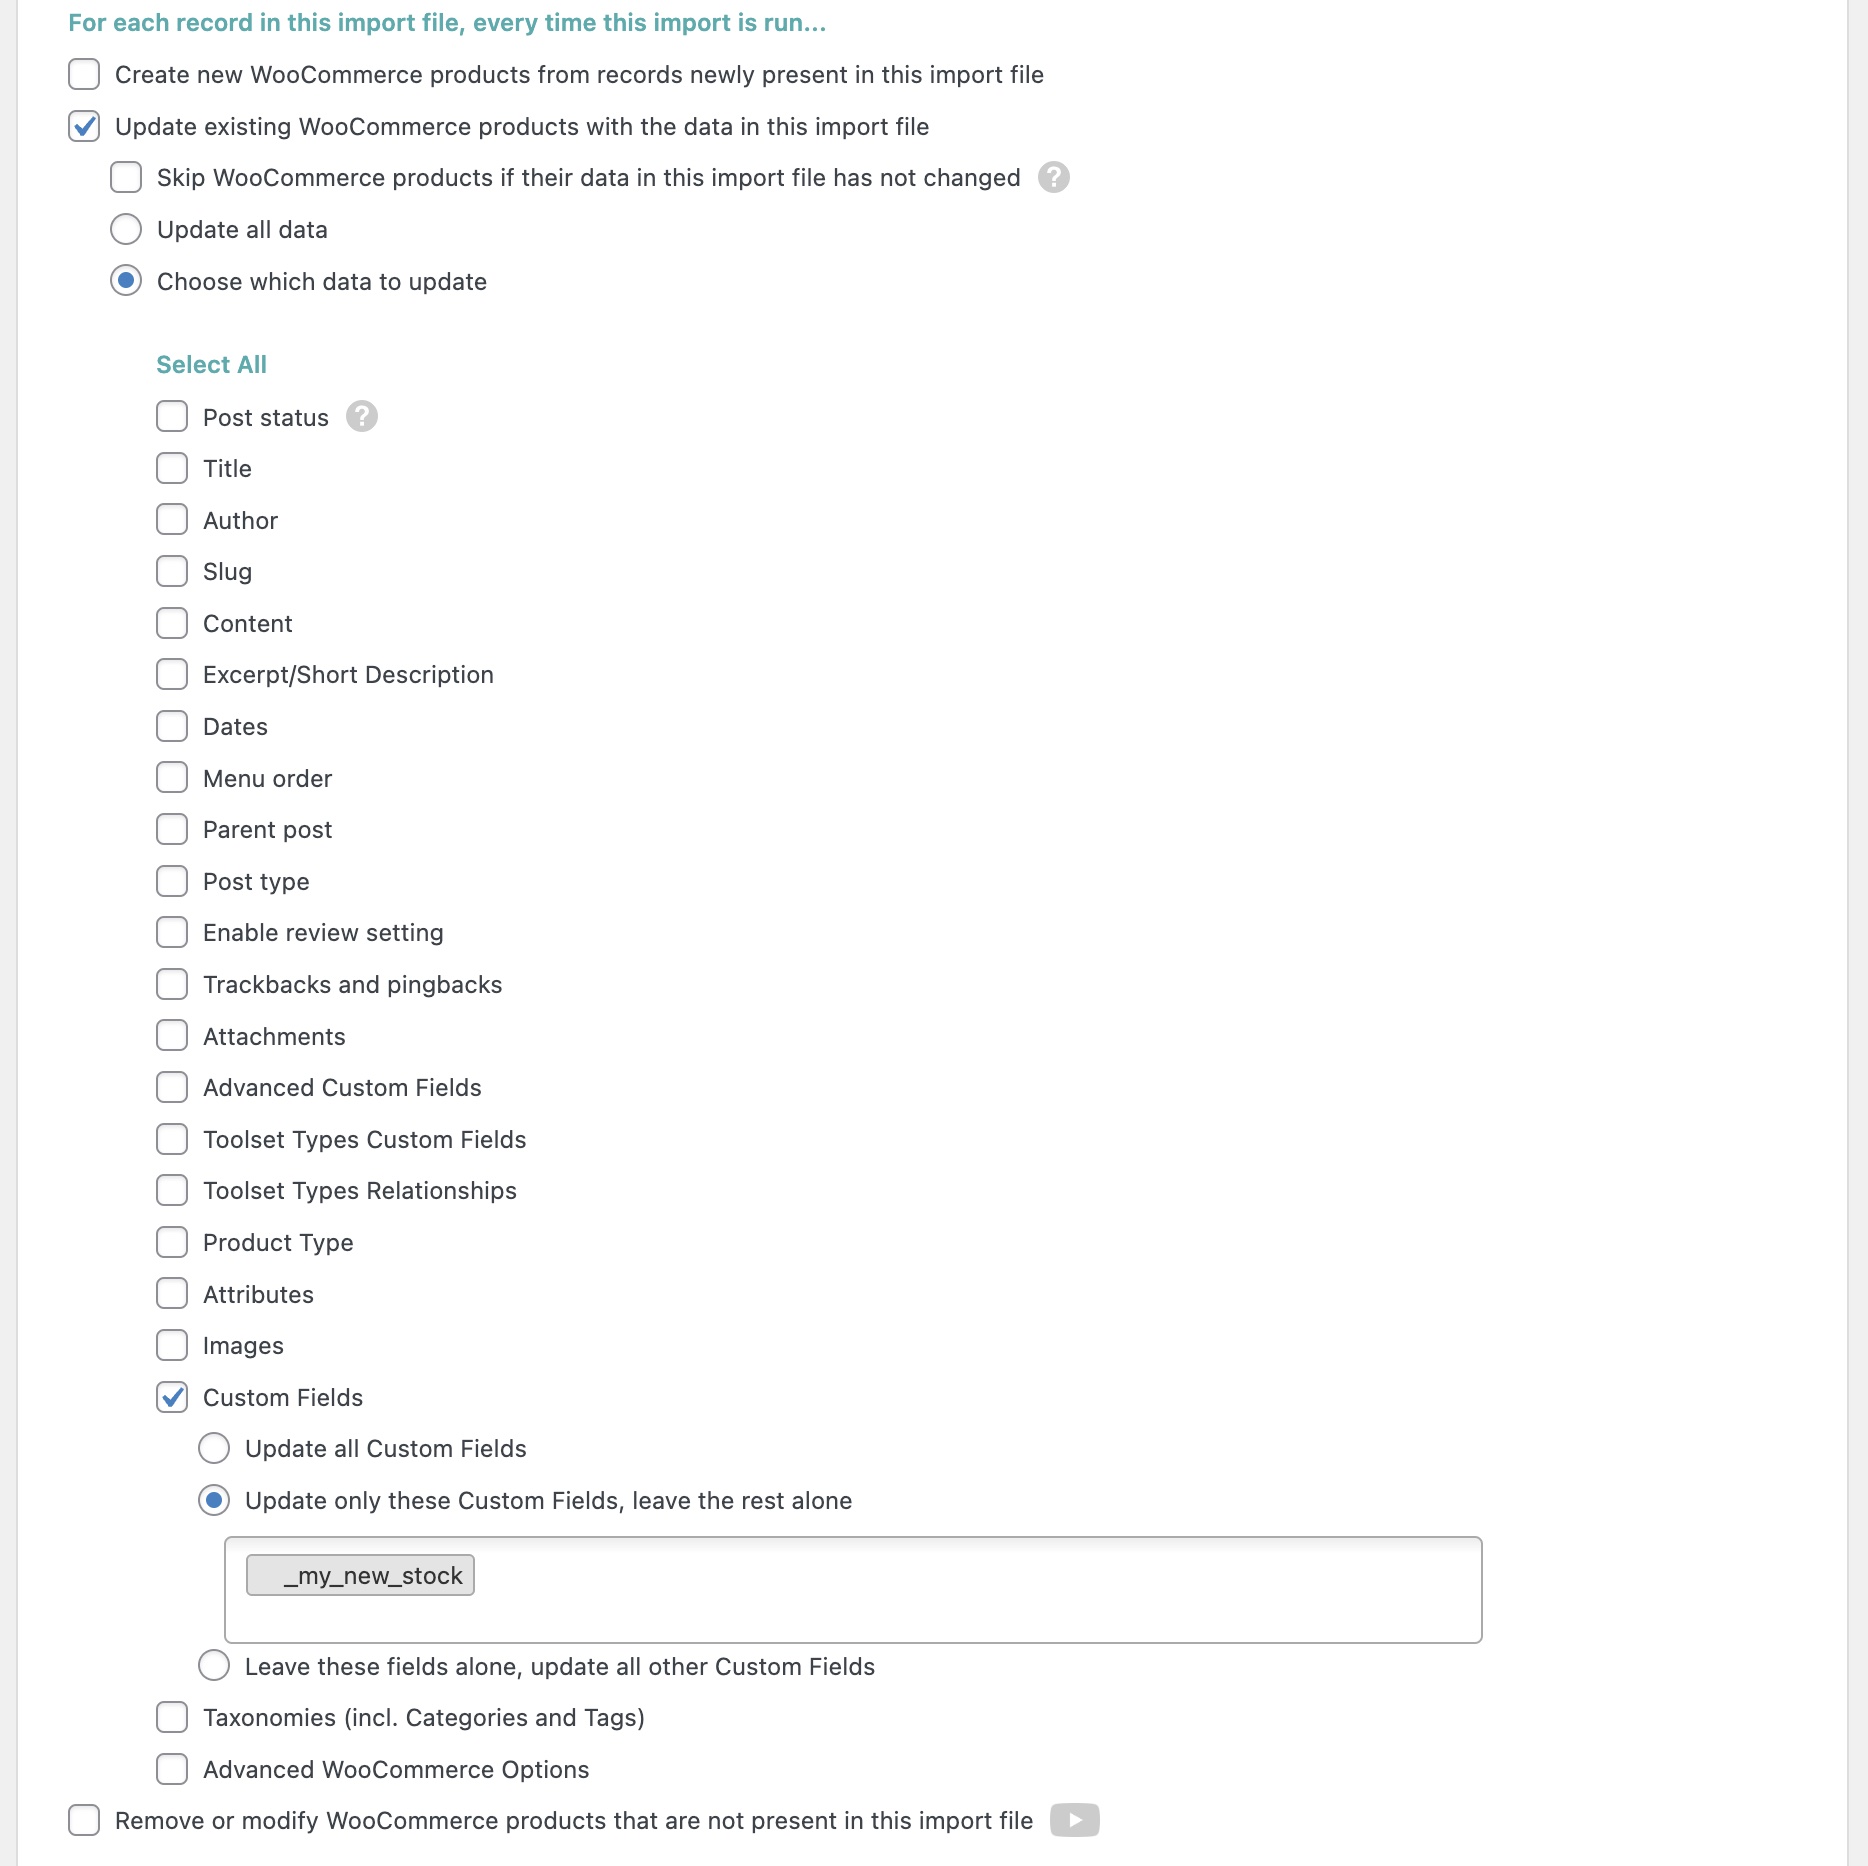
Some things to keep in mind with this workaround are:
- Re-running the import will increment the stock again.
- If the import terminates, ensure it starts back up at the record on which it terminated.
Query Orders by Old ID
Workaround 1: Plugin Solution
1. Install Booster for WooCommerce: https://wordpress.org/plugins/woocommerce-jetpack/.
2. Navigate to WooCommerce › Settings › Booster, then click on SHIPPING & ORDERS:

Click Settings for Order Numbers. Enable the Enable Module checkbox, then click Save changes at the bottom.
3. Now, when importing your orders, import the old order ID into the _wcj_order_number custom field:
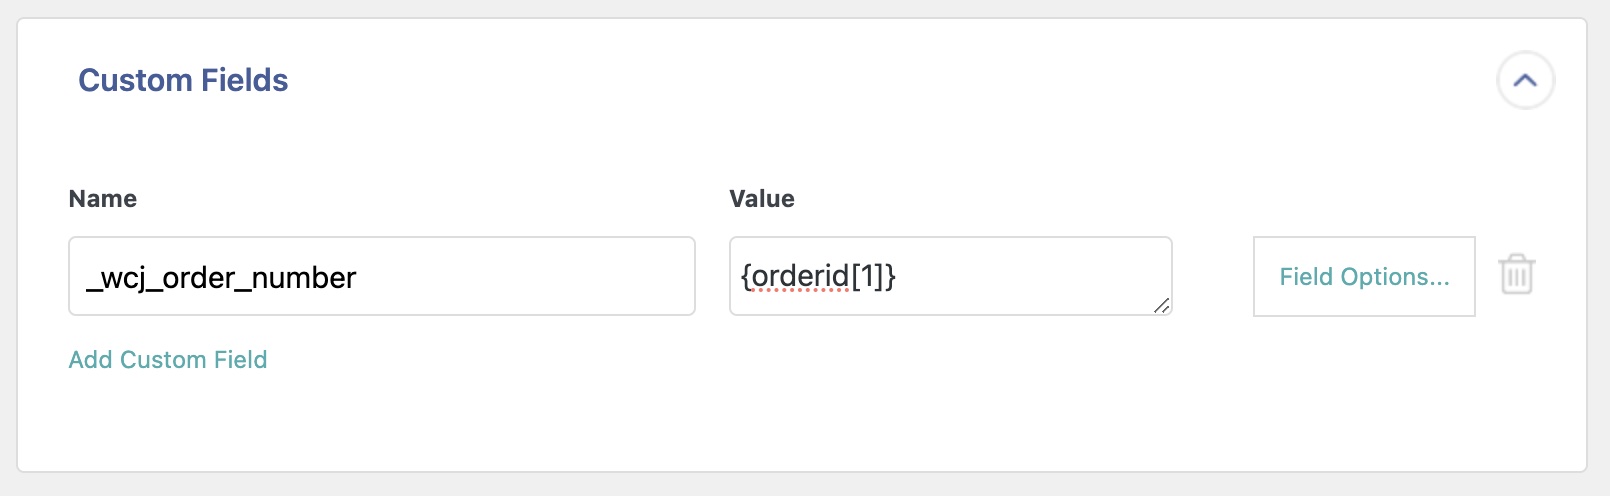
Workaround 2: Custom Solution
When migrating orders from one site to another using WP All Export & WP All Import, new order IDs will be generated by WordPress on the new site. If attempting to retain the old ID doesn't work (see Keep old IDs when migrating orders), you can instead query the orders by their old IDs with this workaround:
1. In your import template, import the {orderid[1]} element inside a custom field called _old_order_id:
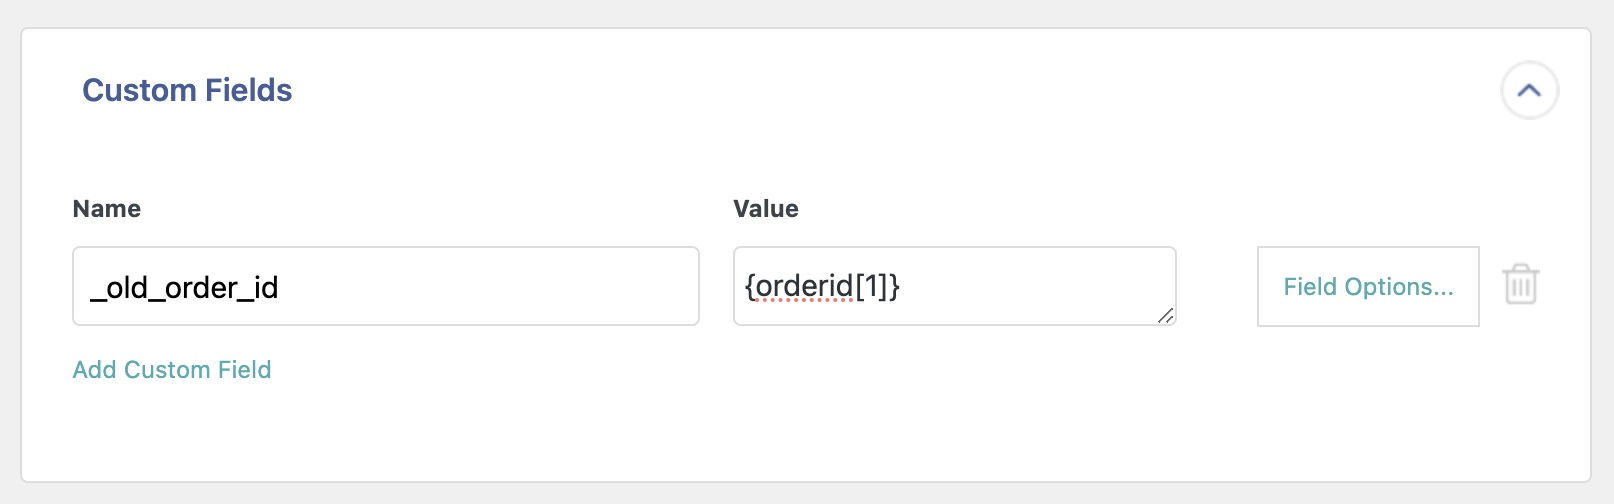
2. Add the following code to your site via a plugin like Code Snippets or in your child themes functions.php file:
add_filter( 'woocommerce_shop_order_search_fields', 'soflyyexample_shop_order_search_by_old_order_id', 10, 1 );

function soflyyexample_shop_order_search_by_old_order_id( $search_fields ) {
	$search_fields[] = '_old_order_id';
	return $search_fields;
}
Now, when you search via the WooCommerce › Orders page, it will also look inside the _old_order_id custom field. Optionally, you can add the following code to your site in order to display the old order ID on the Orders admin page:
add_filter( 'manage_edit-shop_order_columns', 'soflyy_example_add_old_order_id_column', 20 );
add_action( 'manage_shop_order_posts_custom_column', 'soflyyexample_add_old_order_id_column_content' );


function soflyy_example_add_old_order_id_column( $columns ) {

    $all_columns = array();

    foreach ( $columns as $name => $info ) {
        $all_columns[ $name ] = $info;
        if ( $name === 'order_status' ) {
            $all_columns['old_order_id'] = __( 'Old Order ID' );
        }
    }
    return $all_columns;
}

function soflyyexample_add_old_order_id_column_content( $column ) {
    global $post;

    if ( $column === 'old_order_id' ) {
        $old_order_id = get_post_meta( $post->ID, '_old_order_id', true );
        echo $old_order_id;
    }
}
Result:
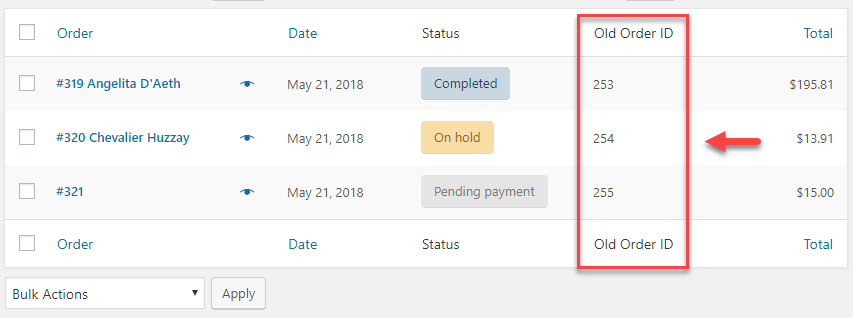
Use XPath Query Based on Cyrillic Attribute Value
XPath doesn't allow you to make queries with Cyrillic symbols unless you disable XML pre-processing by adding this code in your child themes functions.php file (or in a plugin like Code Snippets: https://wordpress.org/plugins/code-snippets/):
function wpai_is_xml_preprocess_enabled( $is_enabled ) {
	return false;
}
add_filter( 'is_xml_preprocess_enabled', 'wpai_is_xml_preprocess_enabled', 10, 1 );
Once that code is in place, upload your file to an import, and queries like this will be possible:
{param[@name="Тип снаряжения"]}
{param[@name="Рулевая колонка"]}
{param[@name="Педали"]}
If you need to keep pre-processing enabled, there are other solutions:
Scenario One
If the values that you're importing do not contain commas, you can use a PHP function to query them.
File Structure
<?xml version="1.0" encoding="utf-8"?>
<products>
	<product>
		<title>Product A</title>
		<sku>PRODA</sku>
		<price>10</price>
		<param name="Рулевая колонка">Example value here</param>
		<param name="Педали">Another value here</param>
	</product>
</products>
Function Code
function map_params( $names, $values, $key ) {
	if ( empty( $key ) ) return '';

	$result = '';
	$names_arr = explode( ",", $names );
	$values_arr = explode( ",", $values );

	if ( ! empty( $names_arr ) ) {
		foreach ( $names_arr as $i => $name ) {
			if ( trim( pmxi_convert_encoding( $name, "UTF-8" ) ) == $key ) {
				$result = isset( $values_arr[ $i ] ) ? trim( $values_arr[ $i ] ) : '';
				break;
			}
		}
	}
	return $result;
}
Usage example
[map_params({param/@name},{param},"Рулевая колонка")]
Scenario Two
If the values contain commas, you'll need to use the wpallimport_xml_row hook to query them.
File Structure
<?xml version="1.0" encoding="utf-8"?>
<products>
	<product>
		<title>Product A</title>
		<sku>PRODA</sku>
		<price>10</price>
		<param name="Рулевая колонка">Example, values, here</param>
		<param name="Педали">More, values, here</param>
	</product>
</products>
Code Example
function add_param_nodes( $node ) {
    $results = $node->xpath( 'param' );
	  $att = 'name';
    if ( !empty( $results ) ) {
        foreach( $results as $result ) {
			$atts = (string) $result->attributes();
			$atts = trim( pmxi_convert_encoding( $atts, "UTF-8" ) );
			if ( ! empty( $atts ) && $atts == 'Возраст' ) {
				$node->addChild( 'Возраст', $result->__toString() );
			} elseif ( ! empty( $atts ) && $atts == 'Пол' ) {
				$node->addChild( 'Пол', $result->__toString() );
			} elseif ( ! empty( $atts ) && $atts == 'Размер' ) {
				$node->addChild( 'Размер', $result->__toString() );
			}
		}
    }
    return $node;
}
add_filter( 'wpallimport_xml_row', 'add_param_nodes', 10, 1 );
Usage Example
This would add 2 new XPath elements that you can use in your import template:
{Рулеваяколонка[1]}
{Педали[1]}
Alternative Workaround
You could convert the attribute name to HTML entities and query it that way. For example, to query "Рулевая колонка", you'd use the following XPath:
{param[@name="Рулевая колонка"]}
Export Data From Custom Database Tables
Sometimes, you might need to export extra data from a custom database table. This is possible by using a custom PHP function in the export along with the wpdb {} class.
For example, let’s say that we are exporting Users from a BuddyPress installation, and we need to get the value of the Name field from the BuddyPress Extended Profile section:
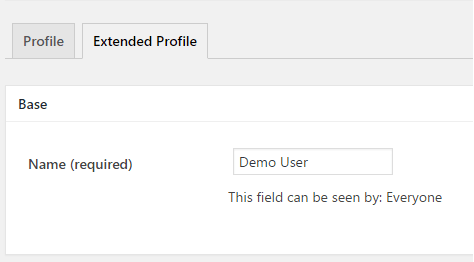
This information is stored inside the 'bp_xprofile_data' table:
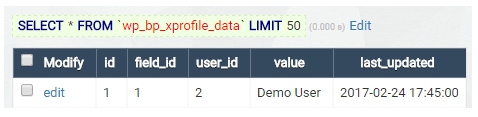
To export this, we'll want to:
- Click Add Field in our export, keep ID in the top drop-down.
- Name the field, for example, 'BuddyPress Name'.
- Click Export the value returned by a PHP function.
- Type in our function name, add the code to the Function Editor, and click Done.
Example:
Example code:
function soflyy_get_bp_name( $user_id ) {
	global $wpdb;
	$table = $wpdb->prefix . 'bp_xprofile_data';

	$results = $wpdb->get_row( $wpdb->prepare( "SELECT `value` FROM `" . $table . "` WHERE `user_id` = '%d' AND `field_id` = '1' LIMIT 1", $user_id ) );

	if ( !empty( $results->value ) ) {
		return $results->value;
	}
	return null;
}
Import Users With The Same Email
WordPress doesn't allow multiple users to share the same e-mail address, but there are certain plugins that change that behavior. These example snippets are supposed to be used along with those plugins. Here's a quick example of importing users with the same email address:
1. In the Email (required) field, use this function:
[my_random_email()]
The code that goes in the Function Editor is:
function my_random_email() {
	return substr( md5( rand( 1,99999 ) ), 0, 3 ) . substr( md5( rand( 1, 99999 ) ), 0, 7 ) . '@example.com';
}
2. In the Custom Fields section, import the actual email import element into a custom field called '_my_temp_email', e.g.:
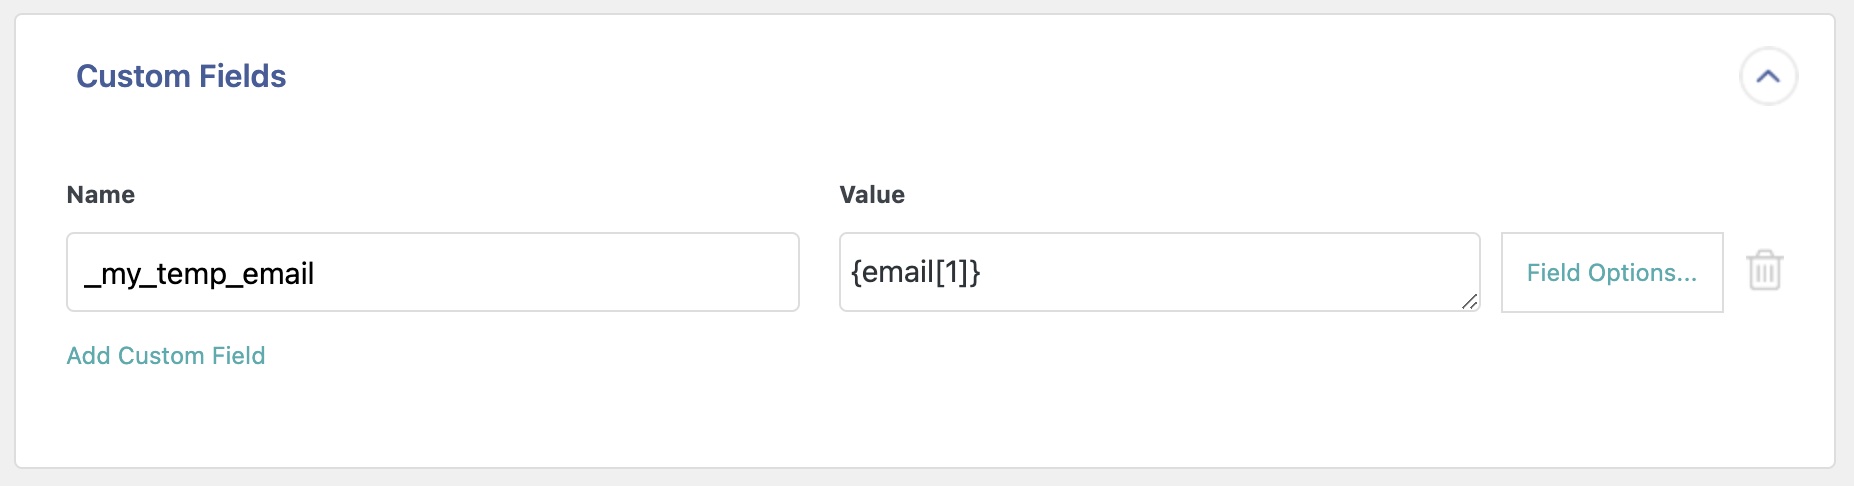
3. In the Function Editor, also save the following code to convert the random email to the actual email when the user is saved:
add_action( 'pmxi_saved_post', 'my_set_email', 10, 3 );

function my_set_email( $id, $xml, $update ) {
	$import_id        = wp_all_import_get_import_id();
	$check_type       = 'import_users';
	$import           = new PMXI_Import_Record();
	$import->getById( $import_id );
	$import_post_type = $import->options['custom_type'];

	if ( $import_post_type == $check_type ) {
		$email = get_user_meta( $id, '_my_temp_email', true );
		if ( ! empty( $email ) ) {
			$args = array(
				'ID'         => $id,
				'user_email' => $email
			);
			wp_update_user( $args );
		}
	}
	delete_user_meta( $id, '_my_temp_email' );
}
That’s it. Keep in mind that this code runs for all user imports, so you might consider wrapping it in an if conditional based on the import ID (which can be obtained using the wp_all_import_get_import_id() function, as done in the code example).
Import Grouped Products
To import Grouped Products and their grouped Simple Products in a single import, you will require some specific data in your import. This is a small guide to point you in the right direction.
Import File Requirements
Your import file will require 4 columns:
Column Name: Product Type
This will be used in the Set Product Type With XPath option, and the value will either be grouped or simple. Usage example:
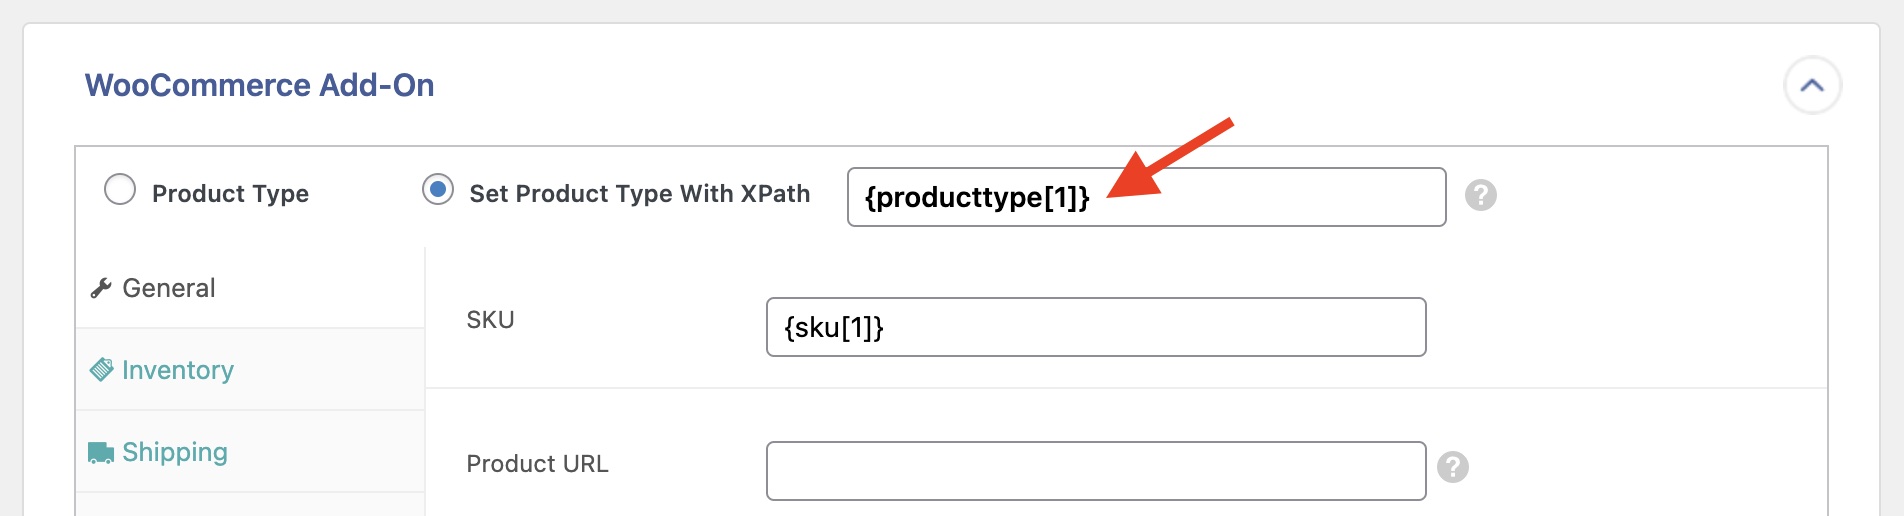
Column Name: Sub-Product Type
This will be used to determine whether the product should be grouped with a parent product, and the value will either be grouped or simple.
You will use the field with an XPath IF Statement in the Name field via Linked Products › Manual Grouped Product Matching › Match by Custom Field:
Here's the IF Statement (learn more):
[IF({subproducttype[1][.="grouped"]})]groupid[ELSE][ENDIF]Usage example:
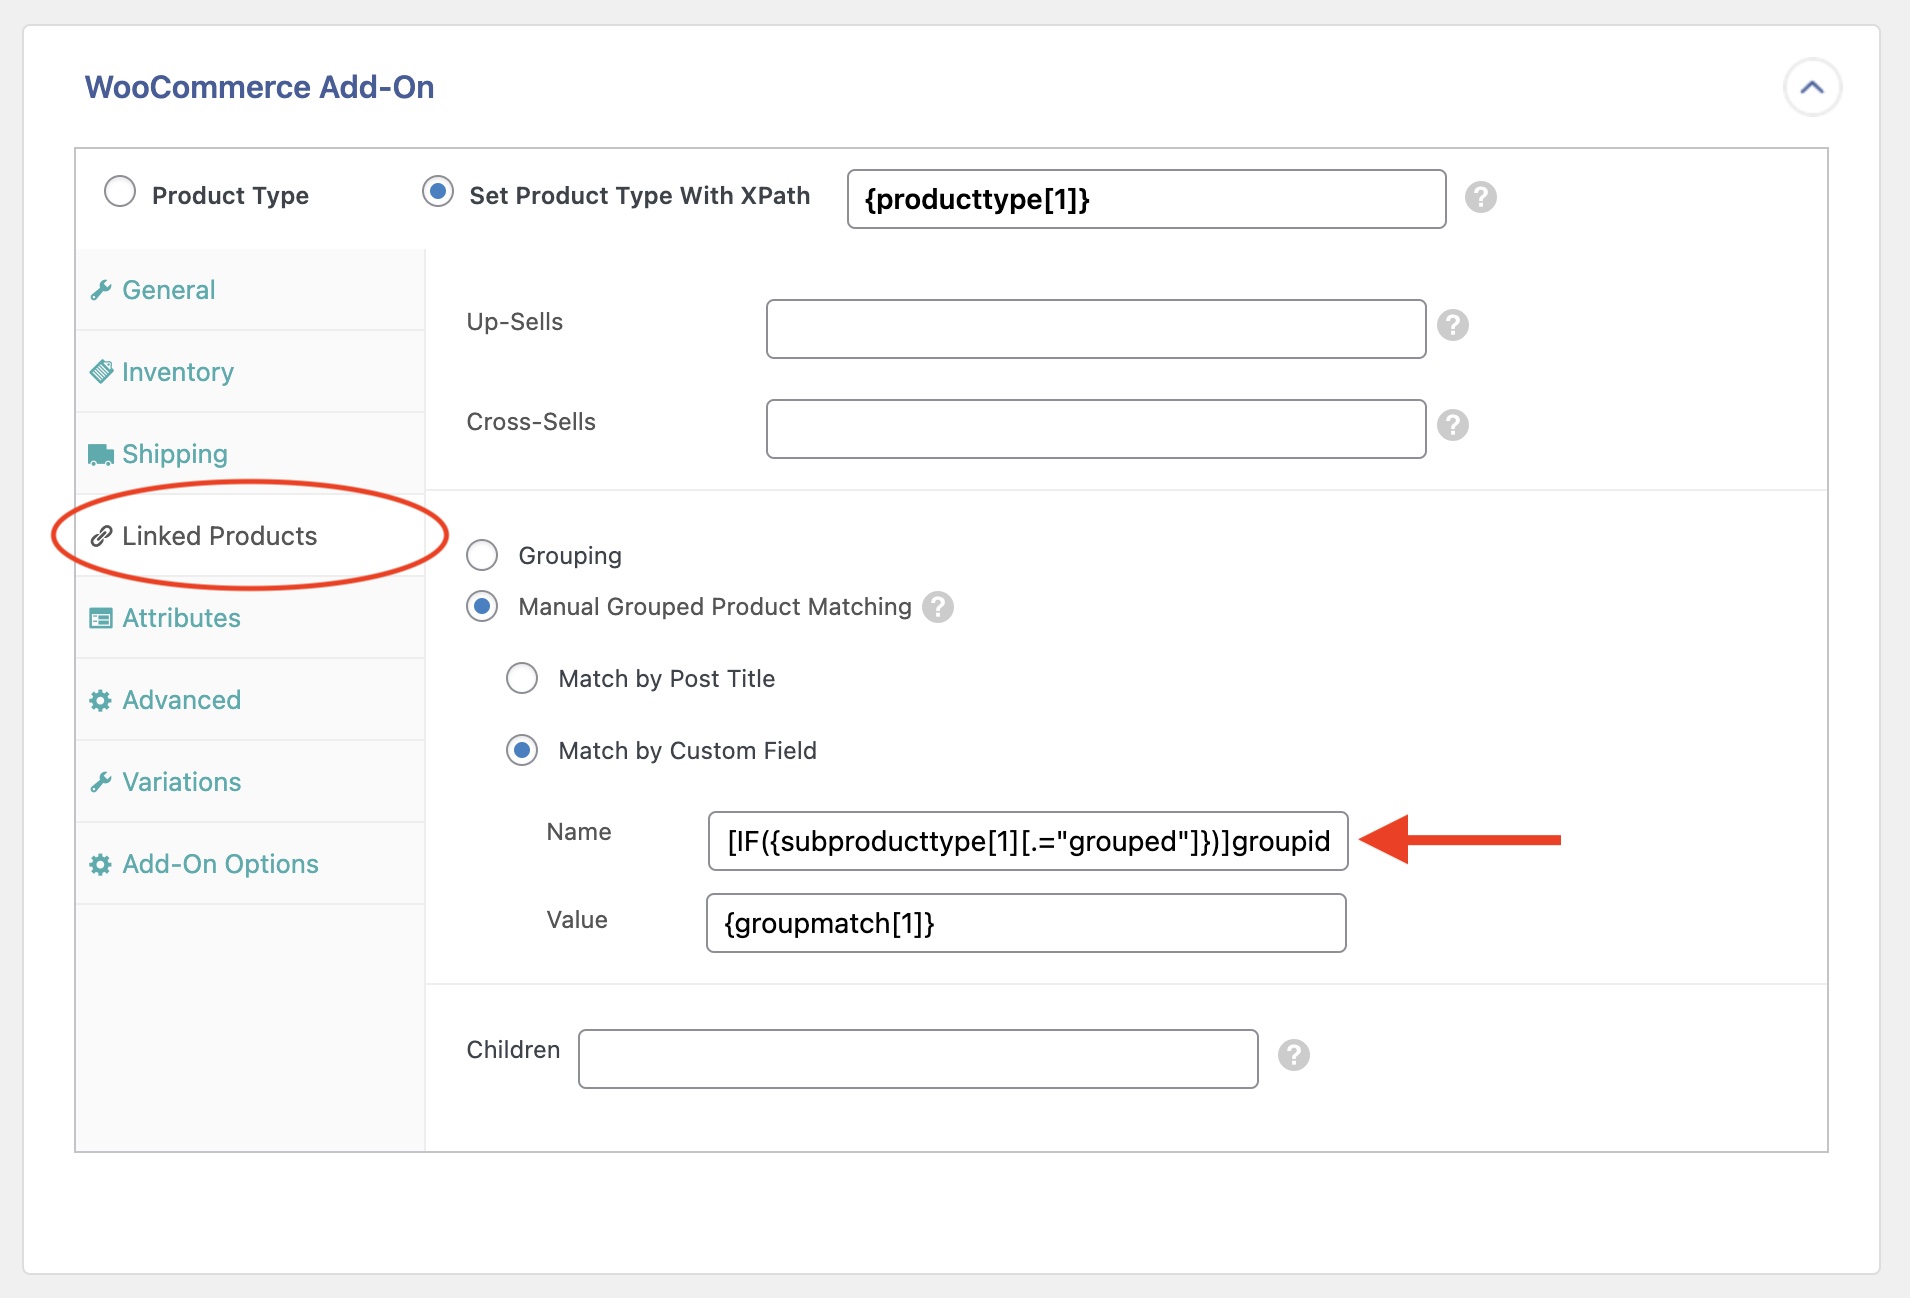
Column Name: Group ID
This should only have a value for Grouped products. It will be used to link Simple products to the group. You'll import the element into a Custom Field named "groupid". Usage example:
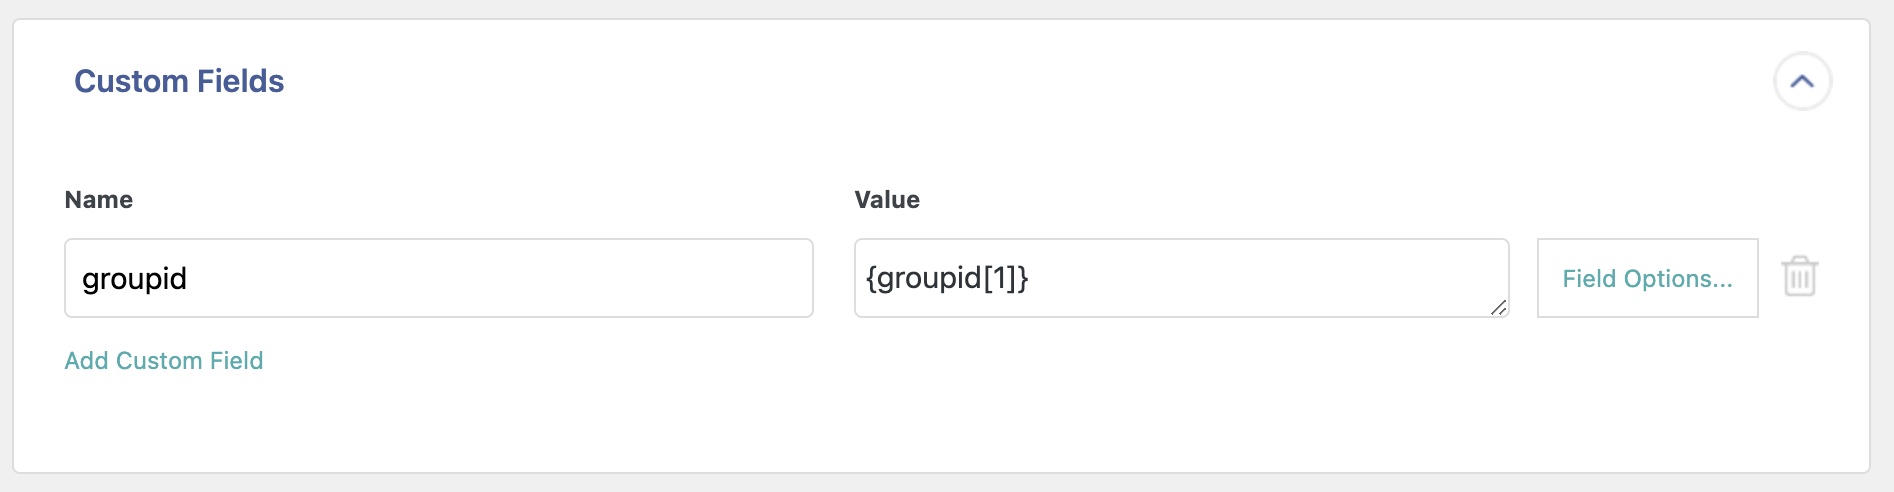
Column Name: Group Match
This should only have a value for simple products, and it should contain the group ID value for the parent (grouped) product that the current record belongs to.
You will use the field in the Value field via Linked Products › Manual Grouped Product Matching › Match by Custom Field. Usage example:
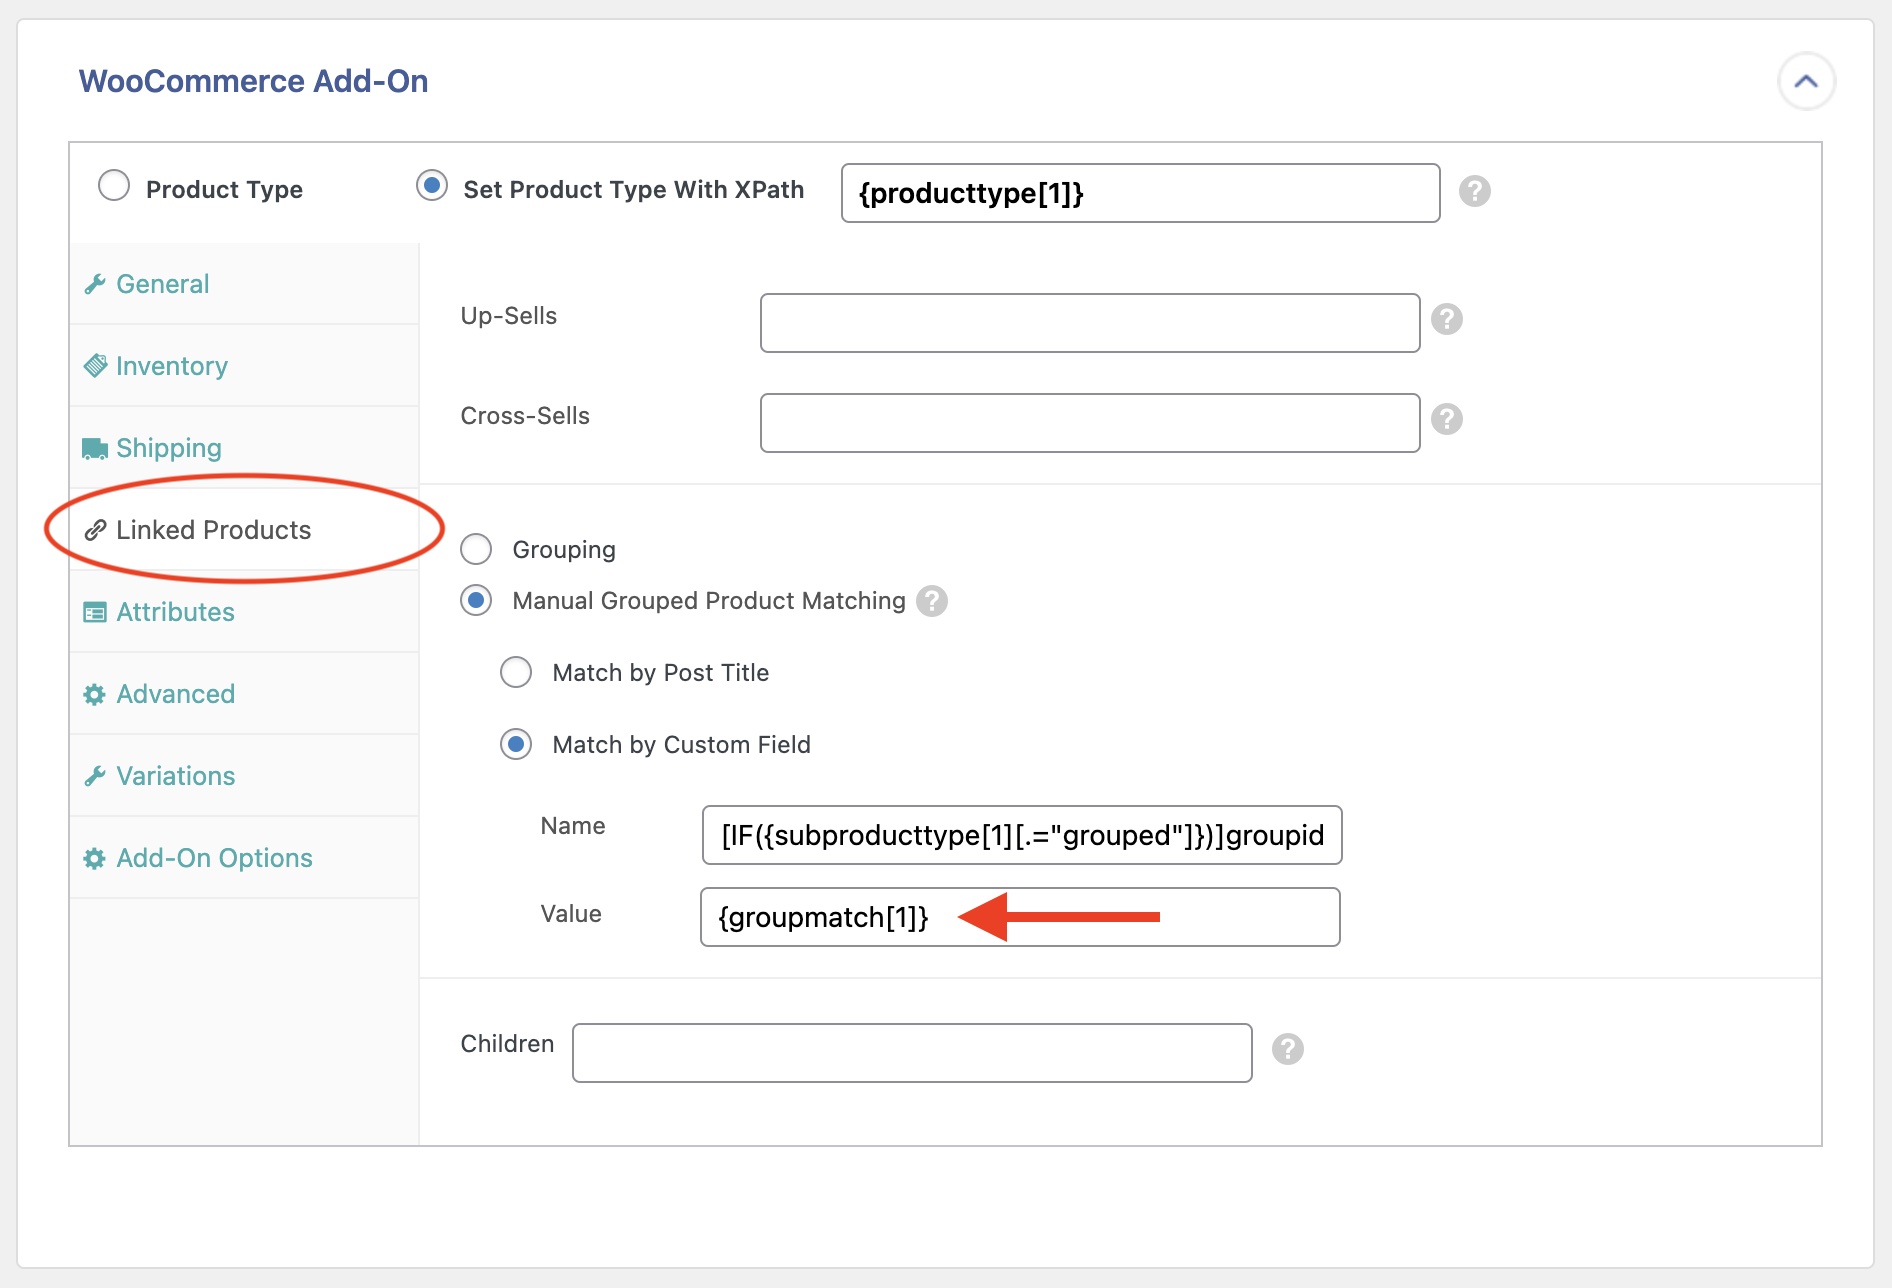
By setting up the import process like that, you'll be able to import both grouped products and their grouped simple products in the same import process.
Example Files and Import Template to Use
You can test the above steps on a free demo site at http://wpallimport.com/try/.
- Import Template (downloads a .ZIP file, unzip it, and install the .TXT via All Import › Settings): template.txt
- Import File: grouped_and_simple_products.csv
Adjust Prices Based on The Price Range
You can use a PHP function like this to adjust the prices based on a price range:
function my_adjust_range( $price ) {
    switch ( true ) {
        case ( $price >= 0 && $price <= 10 ):
            $adjustment = 1.7;
            break;
        case ( $price > 10 && $price <= 20 ):
            $adjustment = 1.6;
            break;
        case ( $price > 20 && $price <= 30 ):
            $adjustment = 1.5;
            break;
        default:
            $adjustment = 1;
            break;
    }
    return round( $price * $adjustment, 2 );
}
This is used in the regular price import field:
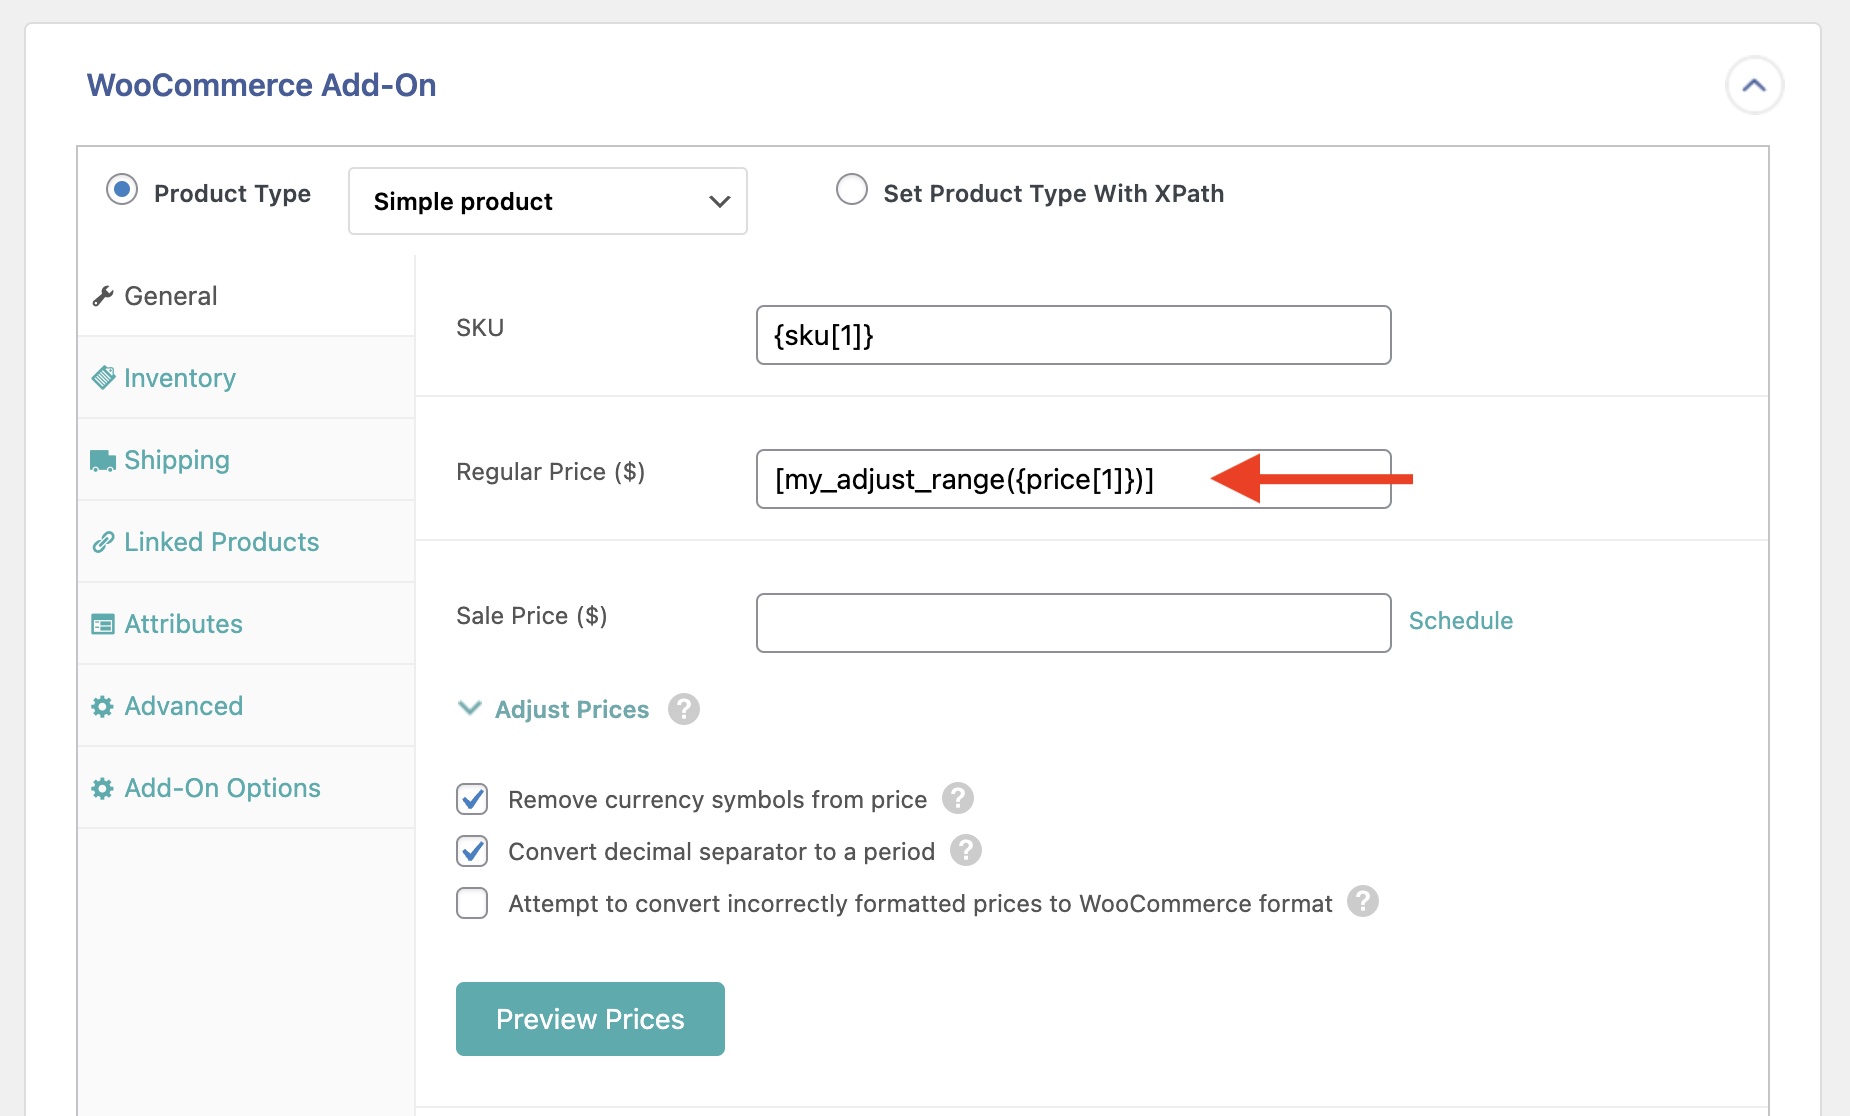
Store Images Using Source's Path
This snippet shows you how to store the downloaded images in a custom folder structure that matches the source's path.
Step 1:
Copy and paste the following code into your theme's child functions.php file, or use a plugin like Code Snippets (see https://wordpress.org/plugins/code-snippets/).
Here we use the wp_all_import_single_image_uploads_dir hook to get an external image's path and use it to store the downloaded images in that same path in the new site.
add_filter( 'wp_all_import_single_image_uploads_dir', 'wpai_wp_all_import_single_image_uploads_dir', 10, 6 );
function wpai_wp_all_import_single_image_uploads_dir( $uploads, $image_url, $articleData, $current_xml_node, $import_id, $post_id ) {
    $path = soflyy_extract_path($image_url);
    $uploads['path'] = $uploads['basedir'] . '/' . $path;
    $uploads['url'] = $uploads['baseurl'] . '/' . $path;
    wp_mkdir_p($uploads['path']);
    return $uploads;
}
Step 2:
Set up your import and paste the following code in the Function Editor:
function soflyy_extract_path($ftppath) {
    $parts = explode('/', $ftppath);
    // Change 'img' with your desired path part
    $index = array_search('img', $parts);

    if ($index !== false) {
        $path = implode('/', array_slice($parts, $index + 1));
        return $path;
    }

    return '';
}
Change 'img' with your desired path part. The function will look for this part and return everything that comes after it (e.g. if the image's source is '/img/test-1/test-child/image-1.jpg', then the path in the target site will be '/wp-content/uploads/test-1/test-child/').
Once your changes are done, call the function like this:
[soflyy_extract_path({your_image_element[1]})]
Update Variable Products Stock and Price by Title
This snippet helps you update price and stock values for WooCommerce variable products using only the product title and attributes. This is useful when you don't have a file with SKUs or variation IDs to match with your existing variations.
Before using this snippet, it is really important to back up your database so that you can roll back if needed.
This snippet loops through all variations finding a match between the record being imported and the variation. Then, it updates price and stock values for each variation, matching based on the provided color and size passed in the Custom Fields section.
If you have other variations with those same two attribute values, plus other attributes, those variations are updated as well.
First, create two custom fields for '_tmp_price' and '_tmp_stock_quantity', and '_tmp' custom fields for your attributes, and assign them the values from your file:
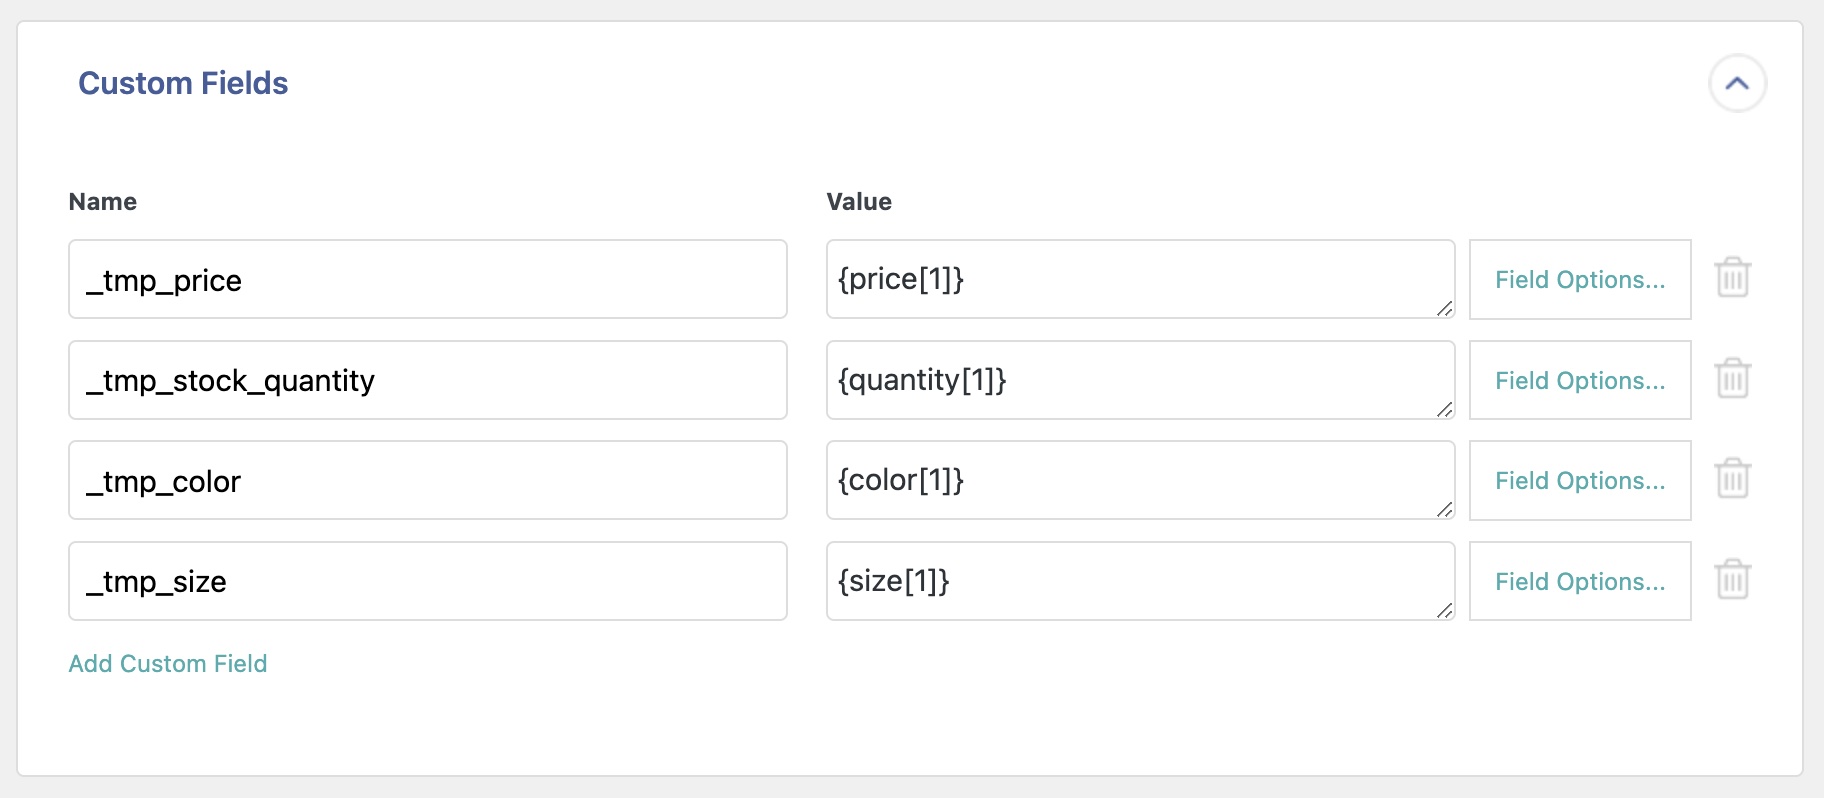
Then, change/add the attributes for your products in the code, as well as the import ID check.
function update_variation_prices_by_title( $post_id, $xml_node, $is_update ) {
	// Retrieve the import ID.
	$import_id = wp_all_import_get_import_id();
	// Only run for import 8.
	if ( $import_id == '8' ) {
		$product = wc_get_product($post_id);
		if ($product && $product->is_type('variable')) {
			$parent_title = $product->get_title();
			$variations = $product->get_children();

			// Retrieve the temporary color and size values from the import file
			// Change/add your attributes here
			$tmp_color = get_post_meta($import_id, '_tmp_color', true);
			$tmp_size = get_post_meta($import_id, '_tmp_size', true);

		foreach ($variations as $variation_id) {
			$variation = wc_get_product($variation_id);

			if ($variation && $variation->get_title() == $parent_title) {
				// Get the color and size attributes of the current variation
				// Change/add your attributes here
				$variation_color = $variation->get_attribute('color');
				$variation_size = $variation->get_attribute('size');

			// Check if the variation attributes match those in the import file
			// Change/add your attributes here
			if ($variation_color == $tmp_color && $variation_size == $tmp_size) {
				$tmp_price = get_post_meta($import_id, '_tmp_price', true);
				$tmp_stock_quantity = get_post_meta($import_id, '_tmp_stock_quantity', true);

			if ($tmp_price !== '') {
				update_post_meta($variation_id, '_price', $tmp_price);
				update_post_meta($variation_id, '_regular_price', $tmp_price);
				}

			if ($tmp_stock_quantity !== '') {
				update_post_meta($variation_id, '_stock', $tmp_stock_quantity);
				}
			}
			}
		}
		delete_post_meta($import_id, '_tmp_price');
		delete_post_meta($import_id, '_tmp_stock_quantity');
		delete_post_meta($import_id, '_tmp_color');
		delete_post_meta($import_id, '_tmp_size');
		}
	}
}
add_action('pmxi_saved_post', 'update_variation_prices_by_title', 10, 3);
If No Variation Image, Export Parent Image as Fallback
This code returns the parent image as a fallback if there is no variation image available.
To use the code, add a new ID field in your export, enable Export the value returned by a PHP function, and input the function name.
Here's the code to save in the Function Editor:
function my_soflyy_get_image($post_id) {
    $product = wc_get_product($post_id);

    // If there's no product for some reason, return null
    if (!$product) {
        return null;
    }

    $image_id = $product->get_image_id();

    // If the product is a variation and doesn't have an image, get the parent image
    if ($product->is_type('variation') && !$image_id) {
        $parent_product = wc_get_product($product->get_parent_id());
        $image_id = $parent_product->get_image_id();
    }

    // Get the image URL
    $image_url = wp_get_attachment_url($image_id);

    return $image_url;
}
Use the Second Image if the First Image Is Not Valid
This code checks if the first image is valid. If it is, it returns both images. If not, it returns only the second one.
function soflyy_check_images($image1, $image2) {

    $headers = @get_headers($image1);
    // Checks if the image URL is valid & if it is returns both image1 and image2
    if ($headers && strpos( $headers[0], '200')) {

        return $image1 . "," . $image2;
    // If not, returns image2
    } else {

        return $image2;
    }
}
Filter Export Data with Multiple Filters
This snippet helps you programmatically filter export data with multiple filters. Read the comments carefully and make the necessary adjustments for it to work on your site with your data.
/**
 * This function filters orders by multiple criteria:
 * - Only export orders that came in before the year 2018
 * - Only export orders with "wc-processing" or "wc-completed" as the status
 * - Only export orders that have at least 1 product in the "Heart Shaped" product category
 *
 * You need to make the following changes:
 * - Change "2" to your export ID.
 * - Change "Heart Shaped" to the category you want to be exported.
 * - Change "2018-01-01 00:00:00" and/or the date comparison to match the date(s) you want.
 *
 * !!! IMPORTANT NOTES !!!
 * - The "Display each product in its own row" option in the export template must be ENABLED.
 * - The "Fill in empty columns" option in the export template must be DISABLED.
 * - The "my_check_if_in_product_cat" helper function below must be saved in the function editor as well.
 * - The export count won't change, but only the filtered orders will be in the final export file.
 */
function my_wp_all_export_csv_rows( $articles, $options, $export_id ) {
    // Only run for export ID 2
    if ( $export_id != 2 ) {
        return $articles;
    }

    // Set up an array to store the orders that pass the filters.
	$allowed_orders = array();

    // Loop through each export record
    foreach ( $articles as $key => $article ) {
        // Get the data we need for our filters.
		$date   = $article['Order Date'];
		$status = $article['Order Status'];
		$in_cat = my_check_if_in_product_cat( $article['Product ID'], 'Heart Shaped' );

        // If status is not wc-processing or wc-completed, do not add to allowed orders.
		if ( $status != 'wc-processing' && $status != 'wc-completed' ) {
			continue;
		}

        // If product is not in the "Heart Shaped" category, do not add to allowed orders.
		if ( $in_cat == false ) {
			continue;
		}

        // If order date is in 2018 or newer, do not add to allowed orders.
		if ( strtotime( $date ) >= strtotime( '2018-01-01 00:00:00' ) ) {
			continue;
		}

        // If the code gets here, the order ID passed all of the checks, so we add it to allowed orders.
		$allowed_orders[] = $article['Order ID'];
	}

	// Remove all disallowed orders.
	foreach ( $articles as $key => $article ) {
		if ( ! in_array( $article['Order ID'], $allowed_orders ) ) {
			unset( $articles[ $key ] );
		}
	}

	// Return the allowed orders.
	return isset($articles[0]) ? $articles : $articles[0] = [];
}
add_filter( 'wp_all_export_csv_rows', 'my_wp_all_export_csv_rows', 10, 3 );

// Checks if a product is in a specified category.
function my_check_if_in_product_cat( $item_id = array(), $category = '' ) {
	if ( empty( $category ) || empty( $item_id ) ) {
		return false;
	}

	$terms = get_the_terms( $item_id, 'product_cat' );

	foreach ( $terms as $term ) {
		if ( $category == $term->name ) {
			return true;
		} else {
			continue;
		}
	}
	return false;
}
Change Uploads Folder During Import
This is a standalone snippet that can be used to change where things are uploaded during the import. The code would need to be added to a Code Snippets plugin.
$import_id = wp_all_import_get_import_id();

if ( $import_id == '1' ) {
	add_filter('upload_dir', 'add_to_uploads_dir');

	function add_to_uploads_dir( $param ) {
    	    $dir = '/somecustomfolder';
    	    $param['path'] = $param['path'] . $dir;
    	    $param['url'] = $param['url'] . $dir;
    	    return $param;
	}
}
wp_all_import_get_import_id()
At times, you may need to have the import ID in your import template. This is specifically handy for debugging an import setup with a large number of imports, to know which post was generated from which import. The simplest way to do this is to use the wp_all_import_get_import_id() function. It can be used in an import template like this:
[wp_all_import_get_import_id()]
Assign A Post Parent Programmatically
The code below will look for a parent to match, so the parent posts should be imported first.
You should add a Custom Field named "_tmp_parent_value", the value should either be the Post ID or the exact title.
add_action( 'pmxi_saved_post', 'set_parent_page', 10, 1 );

function set_parent_page( $pid ) {
	$page = get_post( $pid );
	if ( ! empty( $page ) ) {
		$parent_page = get_post_meta( $pid, '_tmp_parent_value', true );
		if ( ! is_numeric( $parent_page ) ) {
			$parent = get_page_by_title( $parent_page );
			if ( ! empty( $parent ) ) {
				$parent_page = $parent->ID;
			}
		}
		if ( is_numeric( $parent_page ) ) {
			wp_update_post( array(
				'ID' => $page->ID,
				'post_parent' => $parent_page
			) );
		}
		delete_post_meta( $pid, '_tmp_parent_value' );
	}
}
Get Post ID By Custom Field
This code lets you obtain a post ID by passing a custom field's name and value to this function.
function get_post_id_by_meta_key_and_value( $key, $value ) {
	global $wpdb;
	$meta = $wpdb->get_results( "SELECT * FROM `" . $wpdb->postmeta . "` WHERE meta_key='" . $wpdb->escape( $key ) . "' AND meta_value='" . $wpdb->escape( $value ) . "'" );
	if ( is_array( $meta ) && !empty( $meta ) && isset( $meta[0] ) ) {
		$meta = $meta[0];
	}
	if ( is_object( $meta ) ) {
		return $meta->post_id;
	} else {
		return false;
	}
}
Extract URL From a String
This function is used to extract or pull a URL from a text string.
function echo_url( $string ) {
    preg_match_all('#\bhttps?://[^\s()]+(?:\([\w\d]+\)|([^[:punct:]\s]|/))#', $string, $match);
    return  $match[0][0];
}
Used like so:
[echo_url({import_element[1]})]
Limit the Depth of Categories
This function can be used when importing categories to limit how much depth the taxonomy hierarchy should have.
function stripCat( $input = null, $depth = 2, $sep = '>' ) {
	if ( $input != null ) {
		$pieces = explode( $sep, $input );
		$i = 0;
		$output = $pieces[$i];
		if ( count( $pieces ) < $depth ) {
			$depth = count($pieces);
		}
		while ( $i  ' . $pieces[$i];
		}
		return $output;
	}
}
Calculate Order Totals Based on Product Price
Instructions:
- Use this code in your Function Editor and leave the Totals field empty.
Disclaimer:
- This will work with your import using the current tax rates, it won't work for any past rates.
- Keep in mind that this is an example function, and you may need to modify it to work on your site.
function my_recalc_order( $post_id, $xml_node, $is_update ) {

    // Retrieve the import ID.
    $import_id = wp_all_import_get_import_id();

    // Change '1' to your import ID.
    if ( $import_id == '1' ) {
        $order = new \WC_Order( $post_id );
        $order->calculate_totals( );
    }
}
add_action( 'pmxi_saved_post', 'my_recalc_order', 10, 3 );
Export ACF Nested Repeaters
Here's example code that lets you export ACF nested repeaters. Example field:
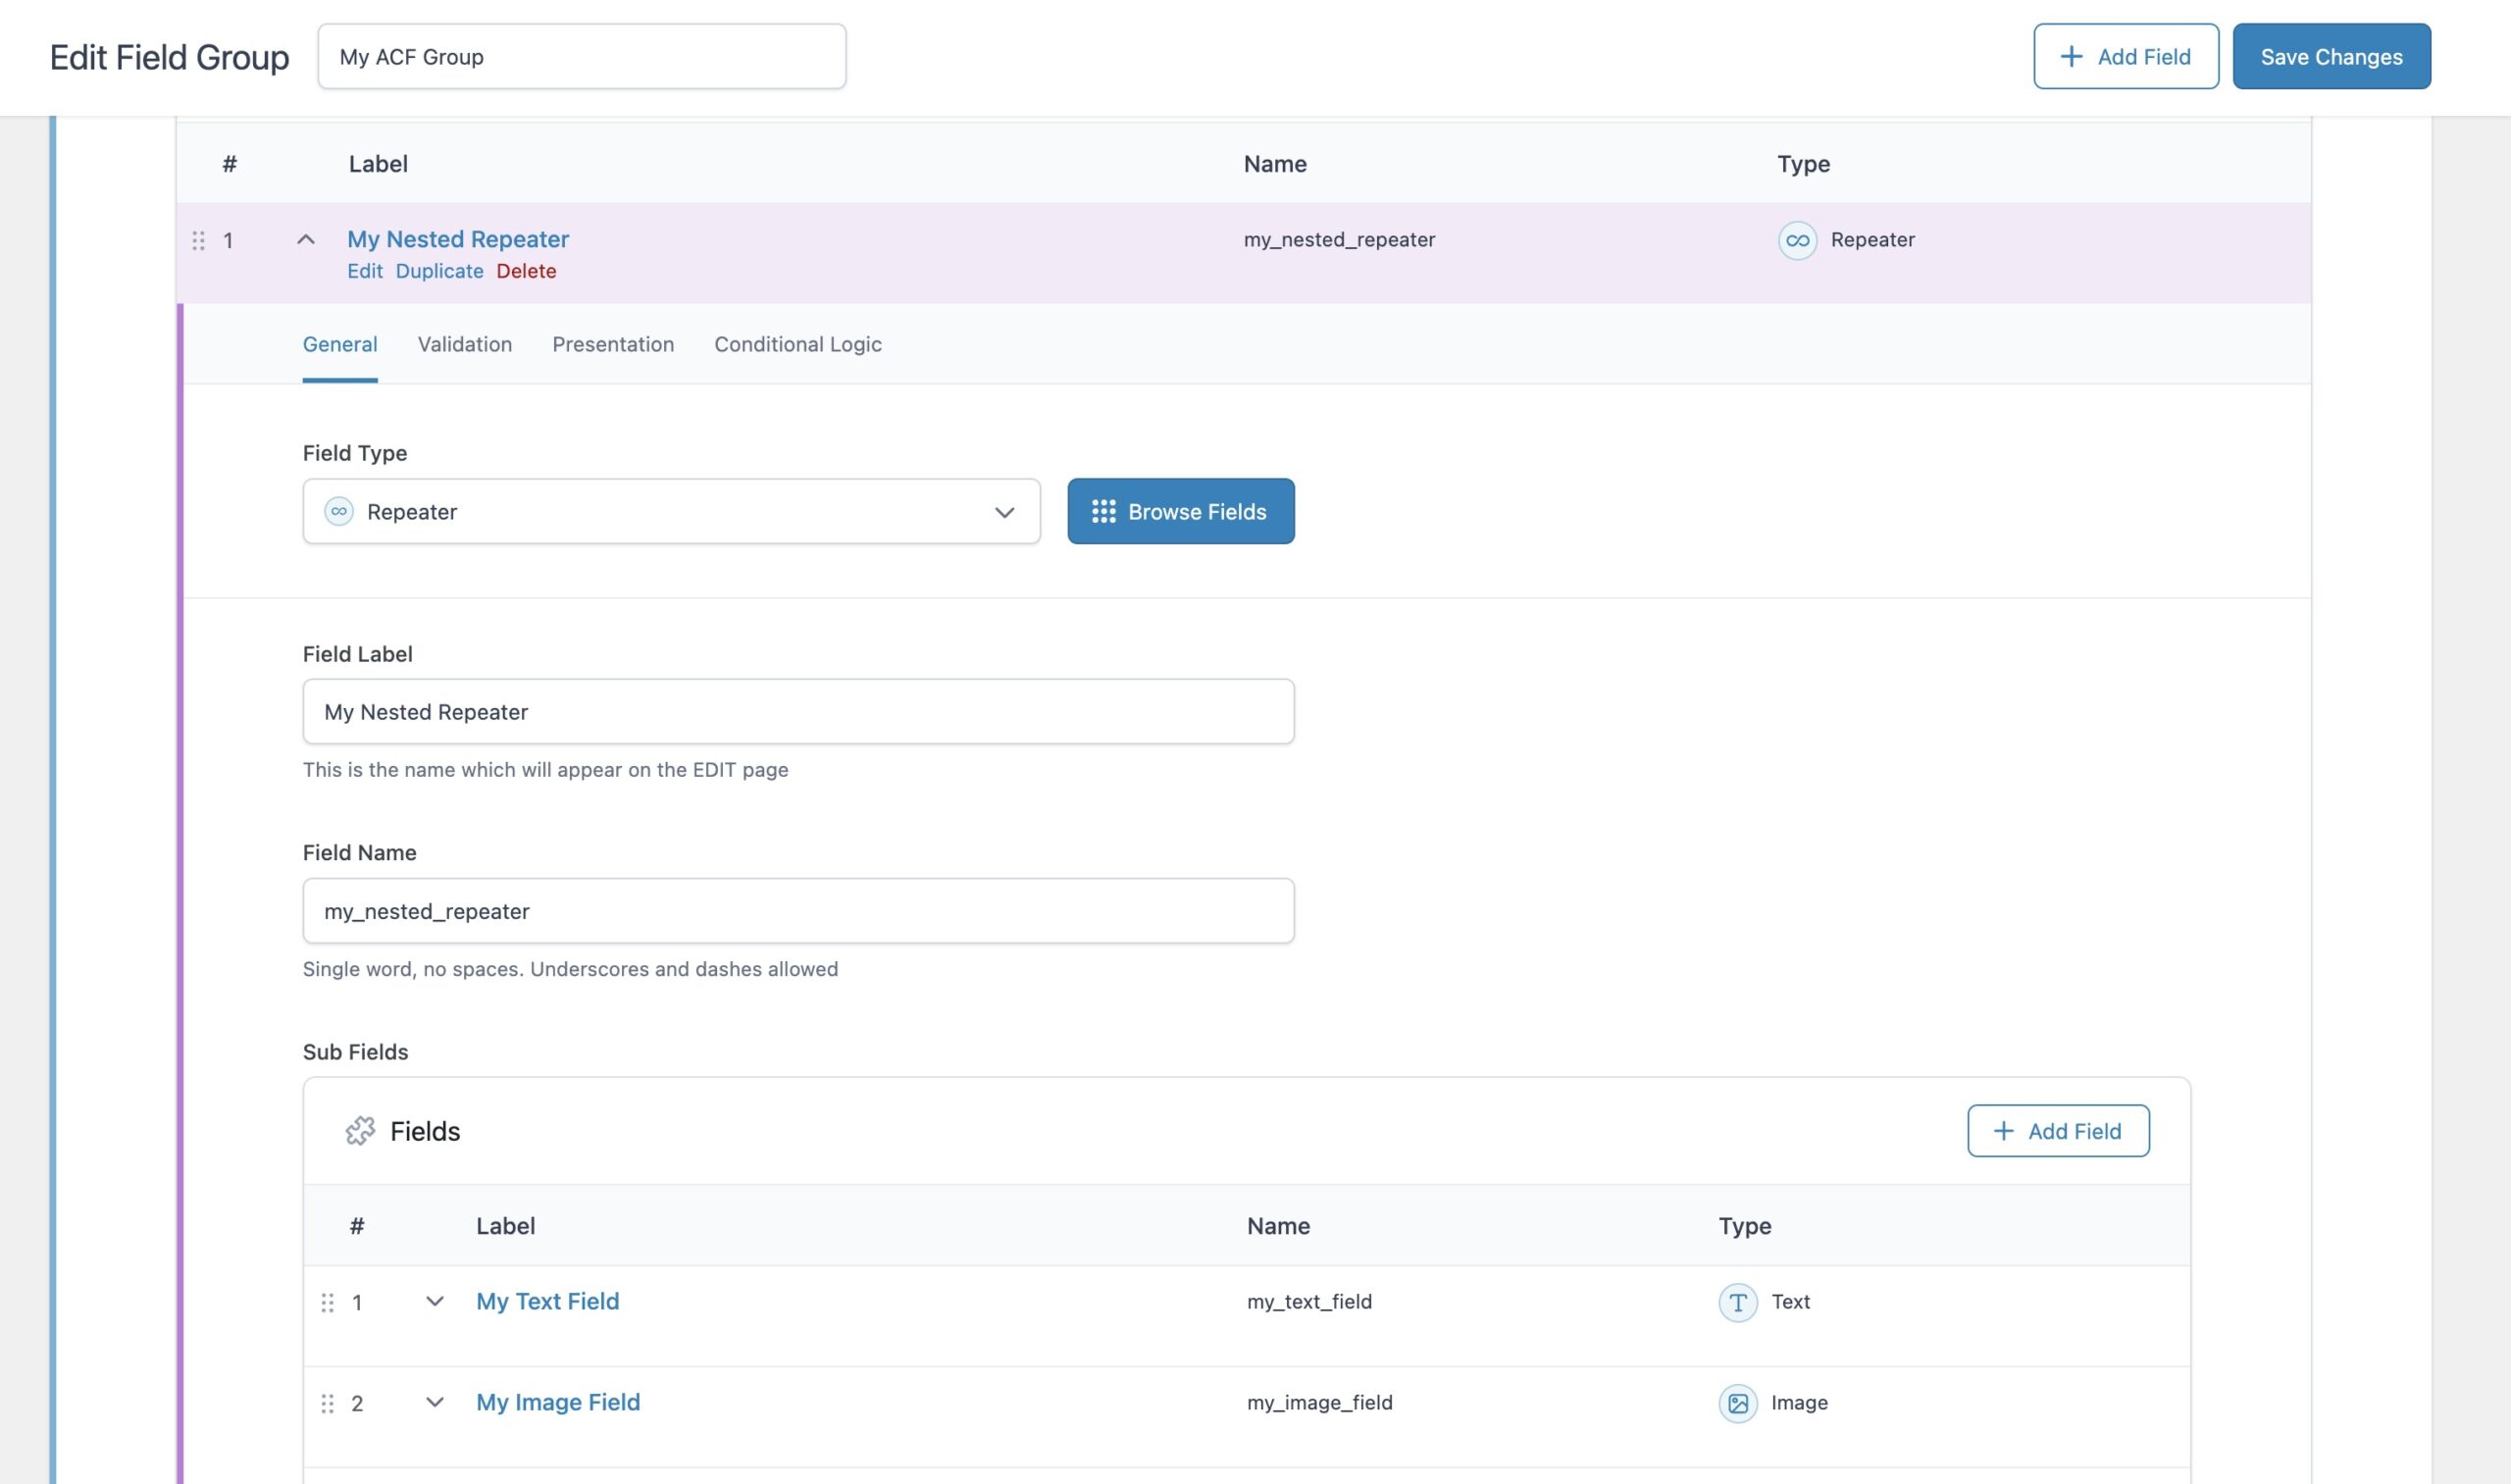
Example data:

Example code:
function my_nested_data($parent_repeater_name = "", $nested_repeater_name = "", $field_name = "", $post_id = null, $image = false, $separator = "|") {
    $output = [];
    if( have_rows($parent_repeater_name, $post_id) ) {
        while( have_rows($parent_repeater_name, $post_id) ) {
            the_row();
            $nested_output = []; // Initialize an array to hold nested repeater field data
            if( have_rows($nested_repeater_name, $post_id) ) {
                while( have_rows($nested_repeater_name, $post_id) ) {
                    the_row();
                    $field_data = get_sub_field($field_name);
                    if ($image && filter_var($field_data, FILTER_VALIDATE_URL) === FALSE) {
                        $field_data = (is_array($field_data) && isset($field_data['url'])) ? $field_data['url'] : $field_data;
                    }
                    $nested_output[] = $field_data; // Add to the nested output array
                }
            }
            $output[] = implode(';', $nested_output); // Implode nested data with ';' and add to the main output array
        }
    }
    return implode($separator, $output); // Implode the main output array with '|'
}
Used like so in a Custom Export Field:
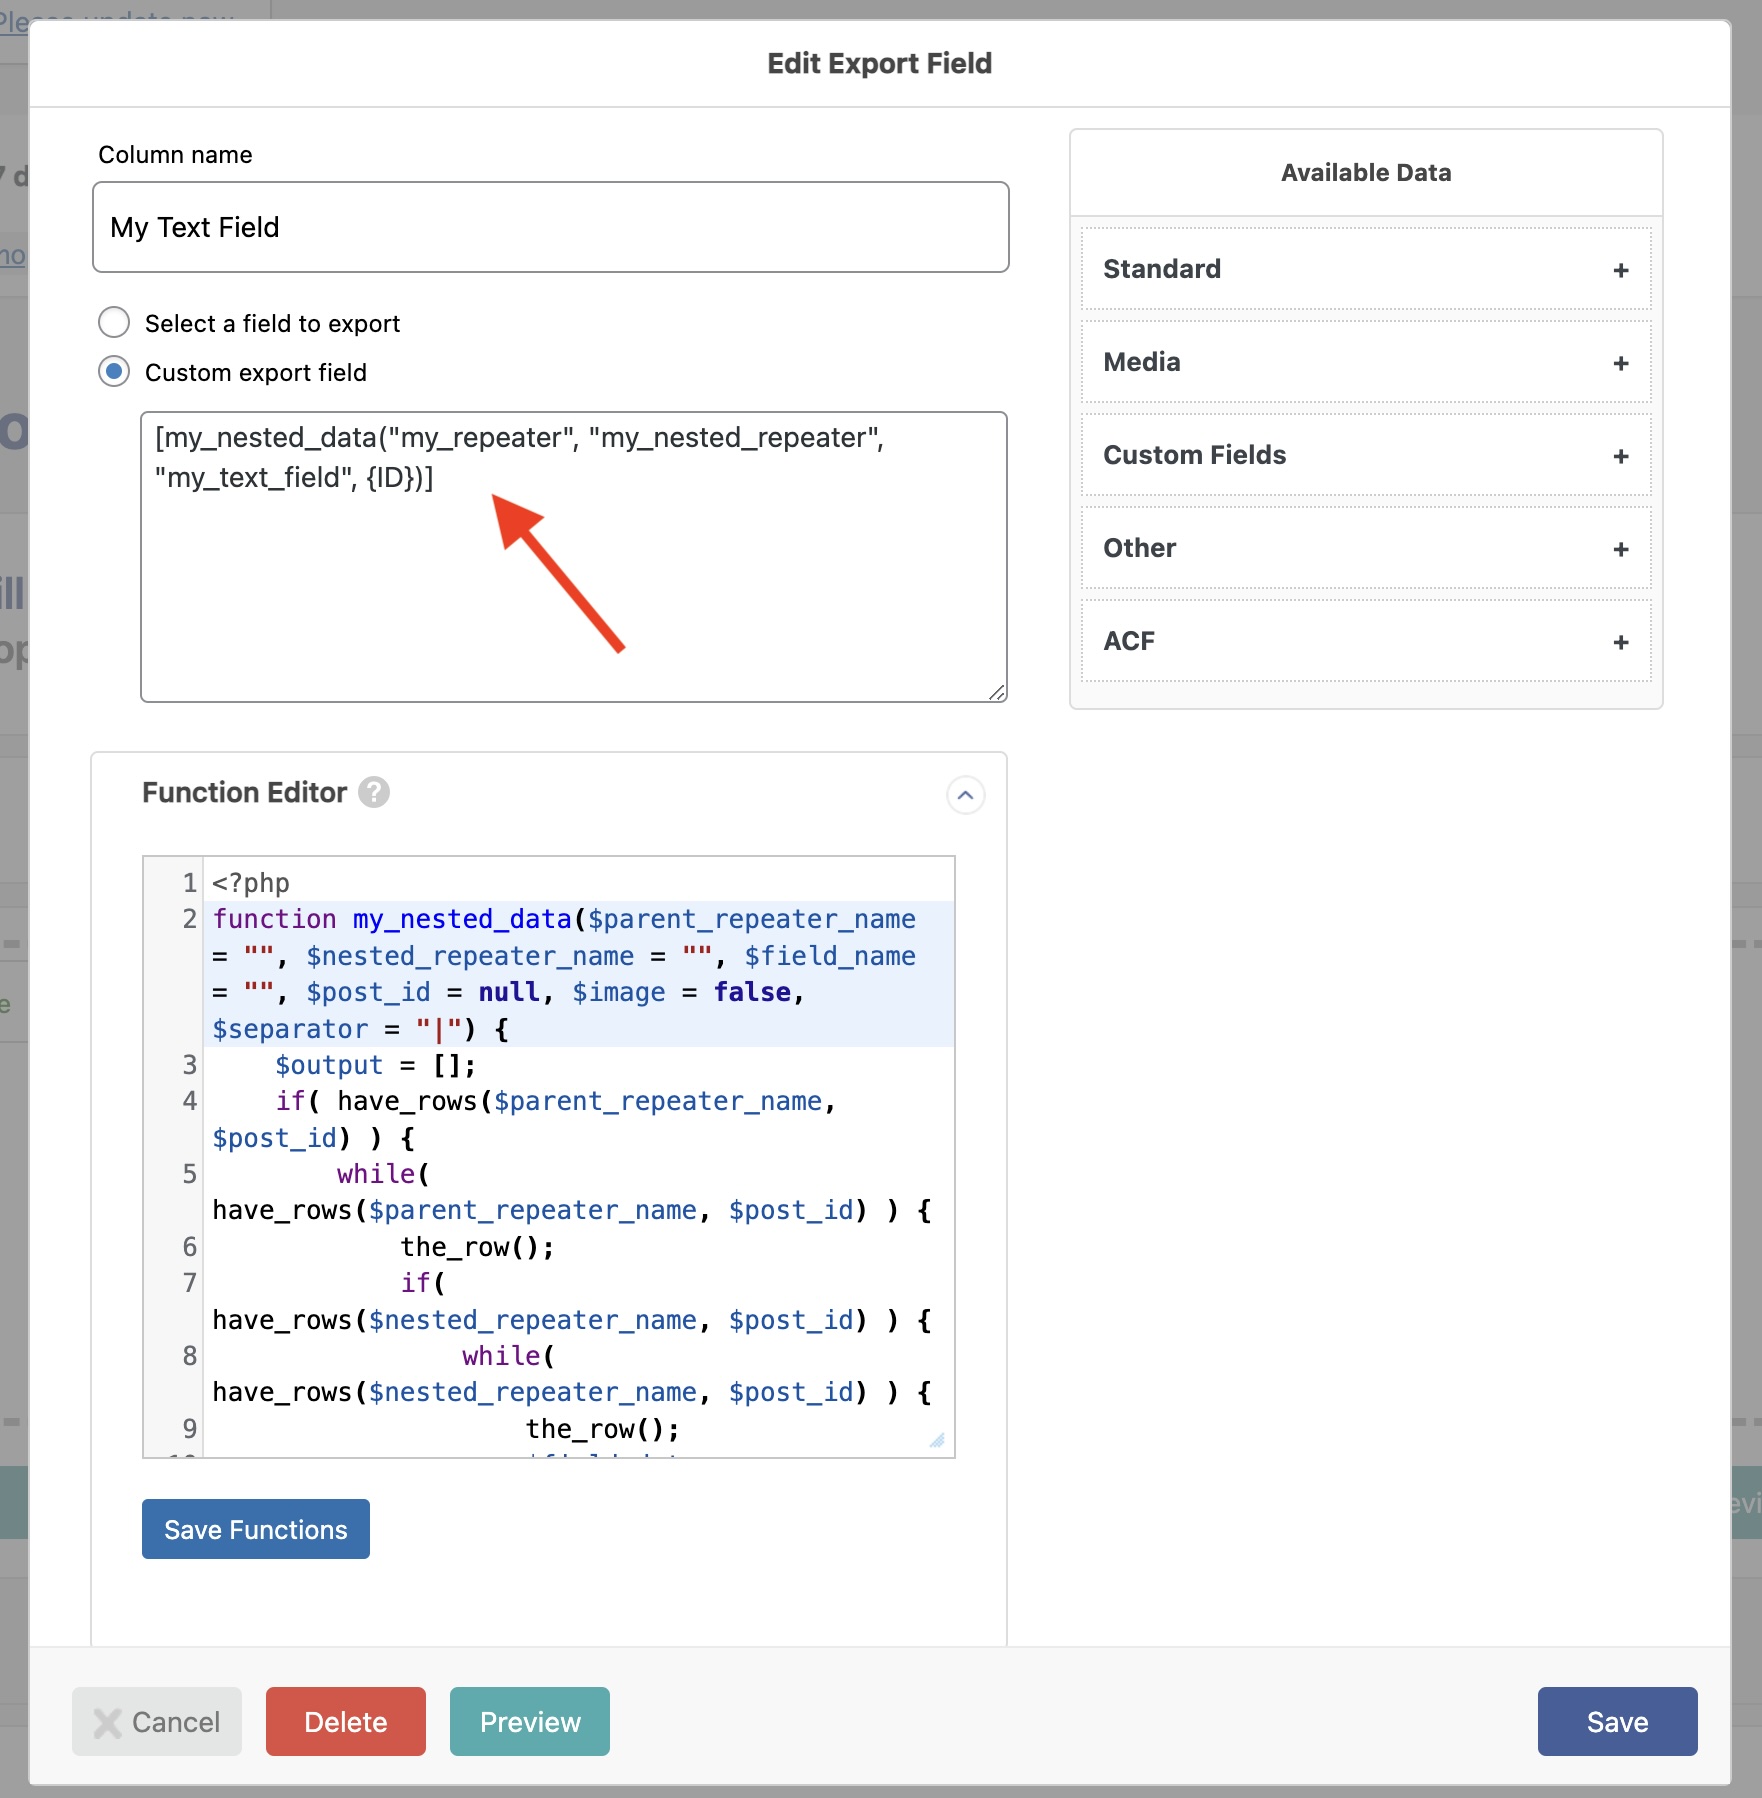
Here's the code used:
[my_nested_data("my_repeater", "my_nested_repeater", "my_text_field", {ID})]
[my_nested_data("my_repeater", "my_nested_repeater", "my_image_field", {ID}, true)]
Use Existing Variation Prices for Variations without Price
This function uses the 'wp_all_import_before_variable_product_import' action to import/update variations that have no price by using the price of an existing variation within the same parent product.
Just paste the code below in the Function Editor:
function my_before_variable_product_import($product_id) {
    global $wpdb;

    $product = wc_get_product($product_id);
    if ($product && $product->is_type('variable')) {
        $children = $product->get_children();

        // Query to get the first variation with a price
        $price_query = "SELECT meta_value FROM {$wpdb->postmeta} WHERE post_id IN (" . implode(',', $children) . ") AND meta_key = '_price' AND meta_value > '' ORDER BY meta_id ASC LIMIT 1";
        $price = $wpdb->get_var($price_query);

        // Check if a price is found
        if (!empty($price)) {
            // Loop through each child and set the price
            foreach ($children as $child_id) {
                update_post_meta($child_id, '_price', $price);
                update_post_meta($child_id, '_regular_price', $price);

                // Update the product object and save it
                $child_product = wc_get_product($child_id);
                if ($child_product) {
                    $child_product->set_price($price);
                    $child_product->set_regular_price($price);
                    $child_product->save();
                }
            }
        }
    }
}

add_action('wp_all_import_before_variable_product_import', 'my_before_variable_product_import', 10, 1);
Related Docs
Explains how to run PHP functions in your import when using WP All Import.
Learn about the different filters, hooks, and actions available in WP All Import and WP All Export.
Shows you how to run PHP functions when exporting data with WP All Export.
