Are you looking to export your WooCommerce orders directly to Excel?
While many plugins offer order exports in CSV format, they often require manual formatting to convert to Excel format. This can be a time-consuming task and lead to errors.
Exporting your orders directly to Excel can help preserve formatting and make your data more readable and easier to share.
In this article, we'll show you how to use the WP All Export plugin to effortlessly export your WooCommerce orders in true Excel format.
To follow along, you can use our convenient sandbox feature and select WooCommerce Store as the demo type.
Benefits of Exporting Orders in Excel Format
Many WooCommerce plugins export data in CSV format, requiring you to manually open the file in Excel, clean up the data, adjust formatting, and then save the file in the desired Excel format (.xls or .xlsx). This process is far from ideal and can lead to errors.
Exporting your orders directly to Excel format offers many benefits, such as:
- It allows you to maintain the formatting of your data throughout the export and import process.
- Excel comes with powerful data manipulation tools like Pivot tables, charts, and conditional formatting. These features enable you to create detailed reports and gain insights with just a few clicks.
- Excel is a widely supported file format that is easy to share and collaborate on with others.
Now that we understand how exporting directly to Excel format can save time and reduce the risk of errors, let's explore how to do it using the WP All Export plugin.
How To Create a WooCommerce Order Export to Excel using WP All Export
WooCommerce does not offer a built-in method for exporting orders in Excel format. This is where third-party plugins like WP All Export come in handy. It is the best WooCommerce export plugin, giving you complete control over which order data to export.
WP All Export can export orders to a variety of file formats, including Microsoft's popular spreadsheet program, Excel. The plugin supports both the .xls and .xlsx Excel file formats.
After purchasing the premium version of the plugin and installing it on your website, let's dive into the export process in detail.
Step 1: Create a WooCommerce Order Export
To start your export, go to All Export › New Export and select “WooCommerce Orders”.
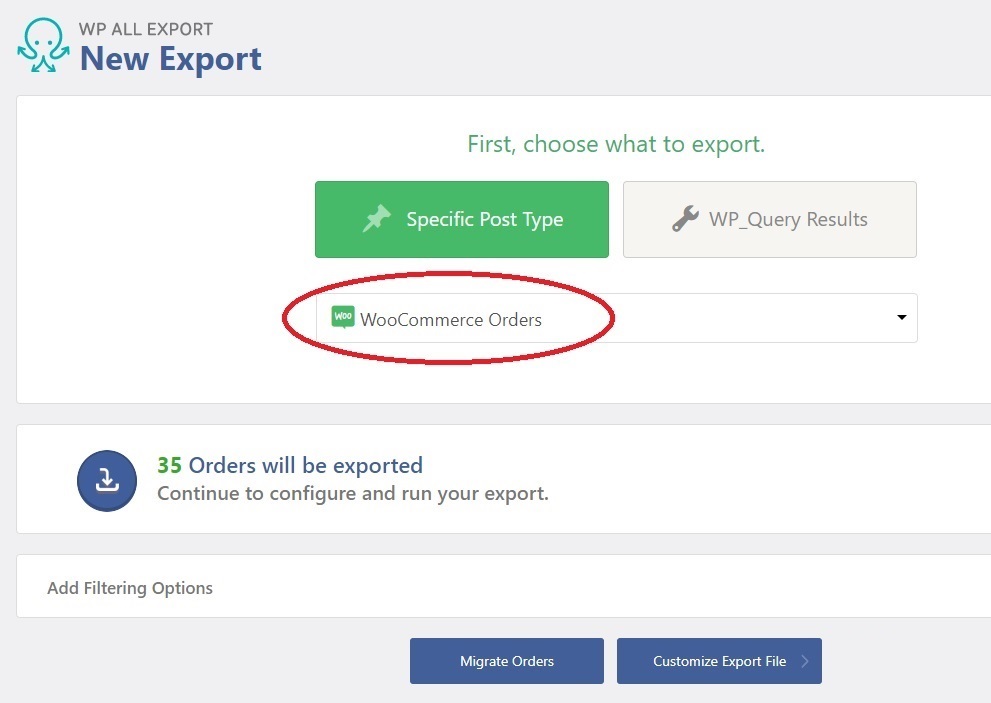
WP All Export will scan your database and show you the number of orders available for export.
Step 2: Filter WooCommerce Orders for Excel Exports
Often, you want to export only a subset of your orders. For example, you may want to export orders from a specific country, or orders for specific products or date ranges. WP All Export lets you decide exactly which WooCommerce orders to export thanks to a simple but powerful filter tool.
You can easily set export filters as follows:
- Expand the Add Filtering Options panel near the bottom of the page.
- For each rule, you'll need to add three components: Element, Rule, and Value.
- An Element consists of specific order details you want to filter, such as order total, product, and more.
- The rule is the condition you want to apply to the filter.
- The value is the criteria you want to match, like minimum order amount, product SKU, and more.
After you've added all three components, your filter should look like this.
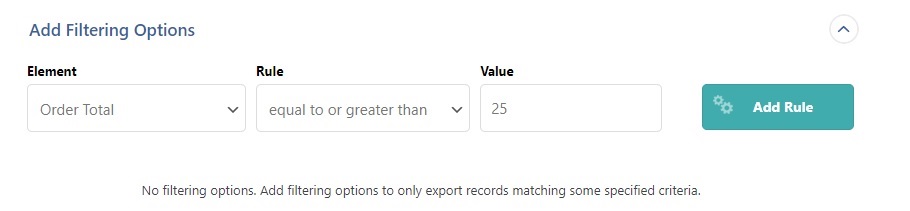
Next, click the Add Rule button to configure the system to select all orders with an Order Total of $25 dollars or more.
WP All Export also lets you create complex filters by combining rules using AND or OR logic.
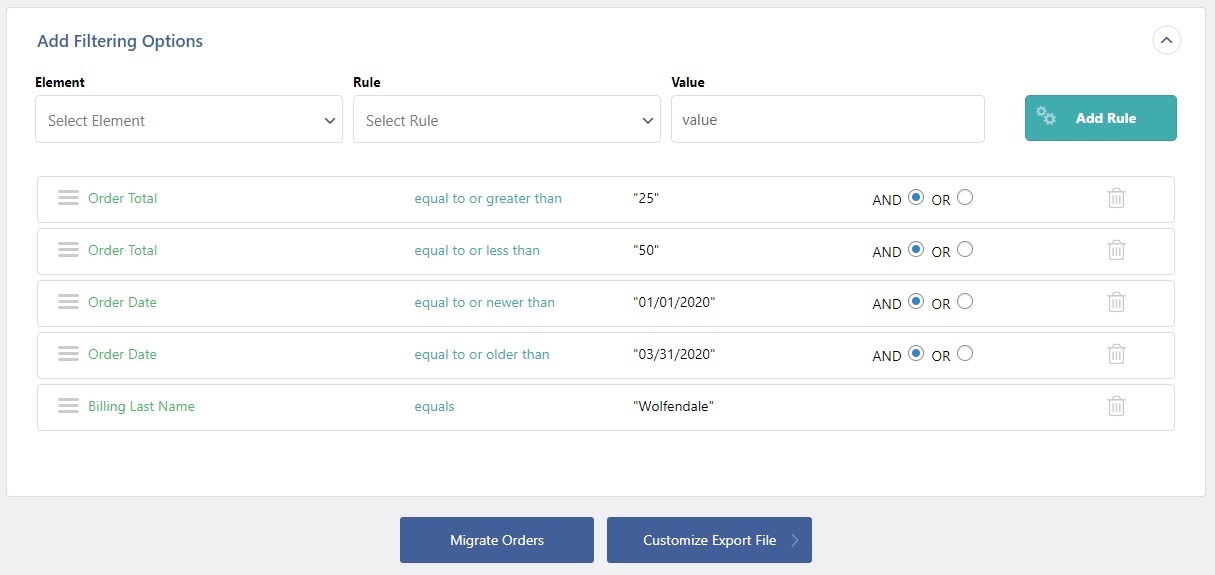
For example, the filters we added in the screenshot select all orders with an Order Total between $25 and $50, an Order Date between January 01, 2020, and March 31, 2020, and a Billing Last Name of “Wolfendale”.
After you have set your filters, click the Customize Export File button to move to the next step.
Step 3. Use the Drag and Drop Interface To Select Order Export Columns
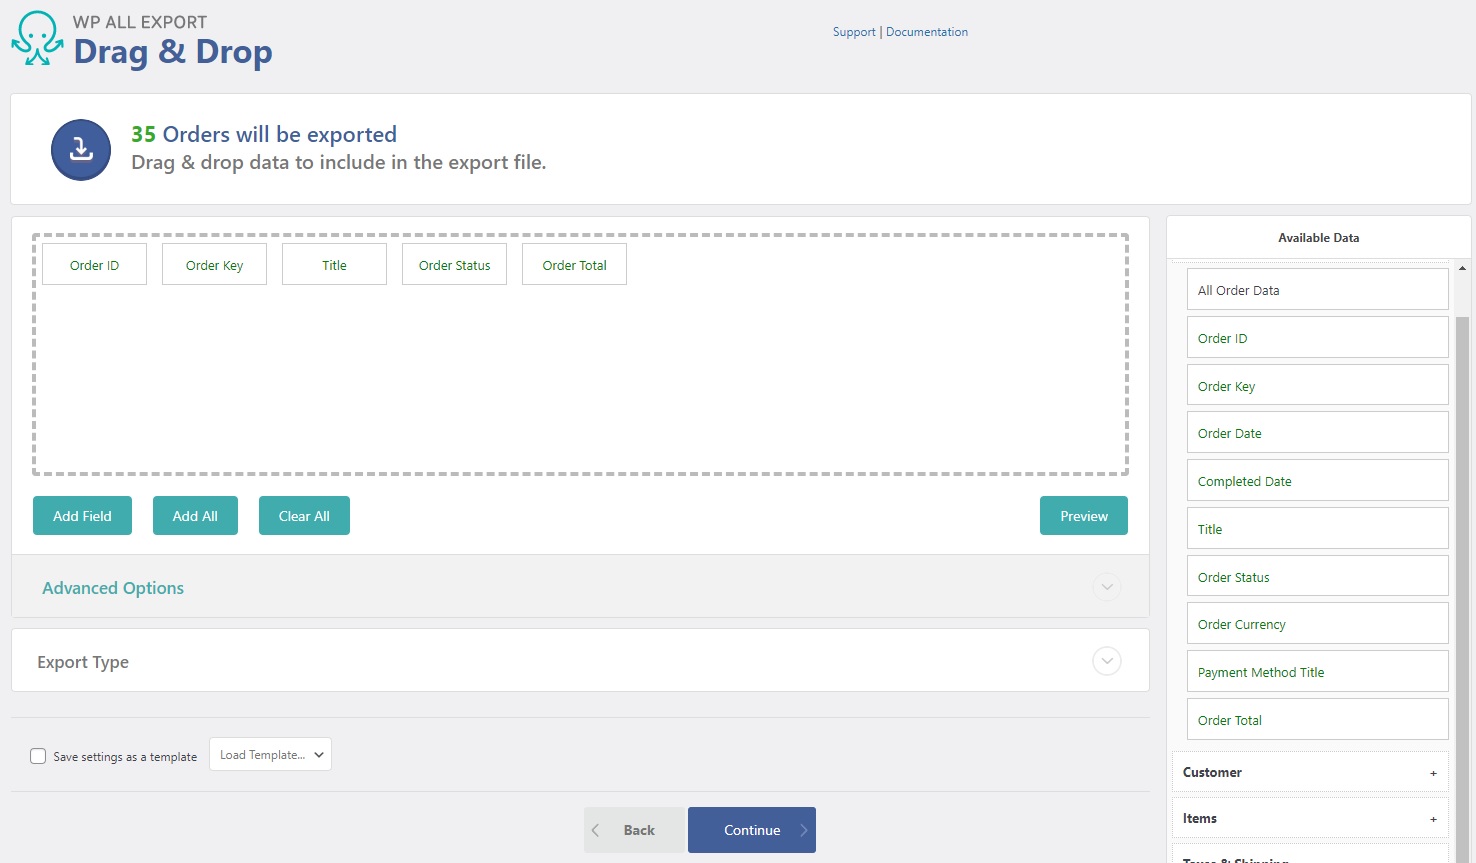
WP All Export provides a Drag & Drop interface that allows you to quickly add, remove, rename, and reorder the columns in your Excel export.
By default, WP All Export adds a few fields to the selection area to get you started.

You can easily add various order-related fields from the Available Data panel on the right. The categories include:
- Order
- Customer Details
- Items
- Taxes & Shipping
- Fees & Discounts
- Notes
- Refunds
- Custom fields
Even fields from WooCommerce product options plugins or add-ons will appear in this panel.
To add a column to your Excel export, expand one of the tabs and drag the field into the selection area. For example, we have expanded the Order tab and added the Order Total and Order Status fields below.
You can reorder columns simply by dragging them to the desired position. To remove a column, drag it out of the selection area.
Step 4: Customize Order Export Columns
Despite its ease of use, the Drag & Drop interface is more powerful than it appears. For example, it includes advanced order export features such as combining two fields into one column or presenting multi-value fields in separate columns.
Let's look at how to combine two fields into one column.
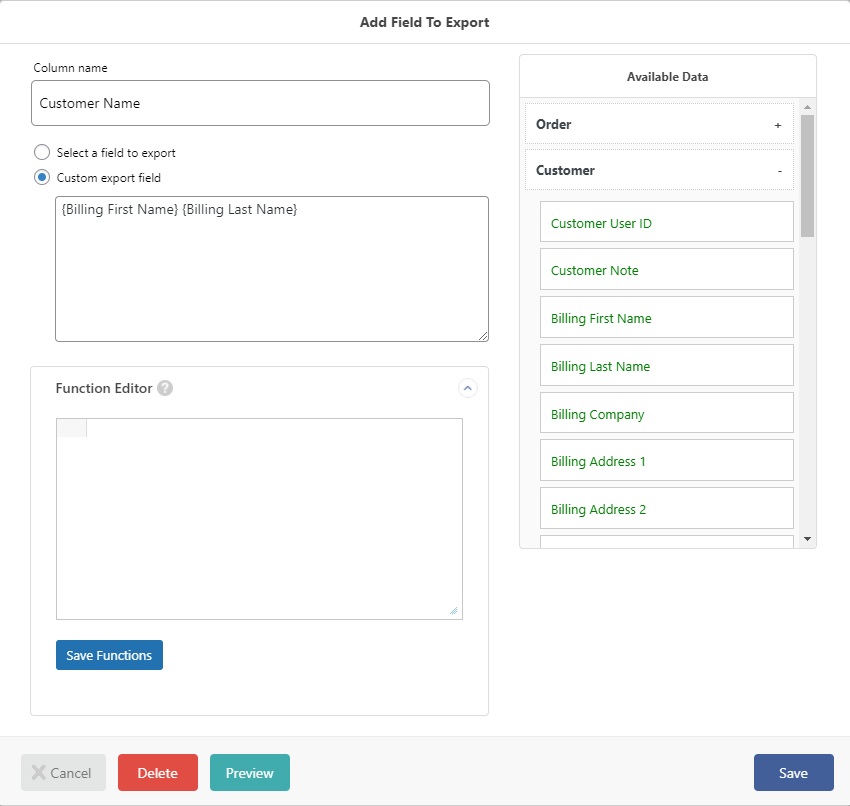
- Click the green Add Field button below the column selection area. This will bring up the Add Field to Export form.
- Click the Custom export field option. This will bring up the Available Data panel on the right.
- In the panel, expand the Customer tab.
- Drag the [Billing First Name] and [Billing Last Name] in the Custom export field area.
- Put a space between the two fields.
- Type “Customer Name” in the Column name box.
The Add Field to Export form should now look like this.
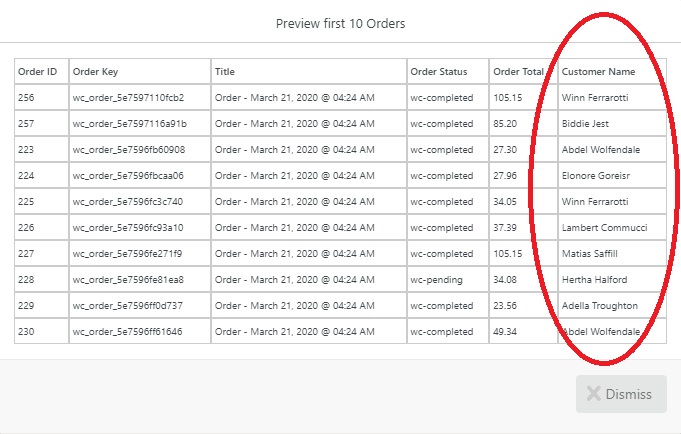
Click the green Preview button near the bottom of the form. Your new Customer Name field should appear on the right-hand side of the preview window:
Close the preview and click the Save button to add the field to the export file.
This is not the only form of customization that WP All Export supports. The same Add Field to Export form also has a PHP function editor that allows you to create more sophisticated custom fields, including the use of conditional logic, PHP operators, and calculations. You can learn more about these advanced order export features from our documentation article.
Step 5: Change the Order Export Type to Excel
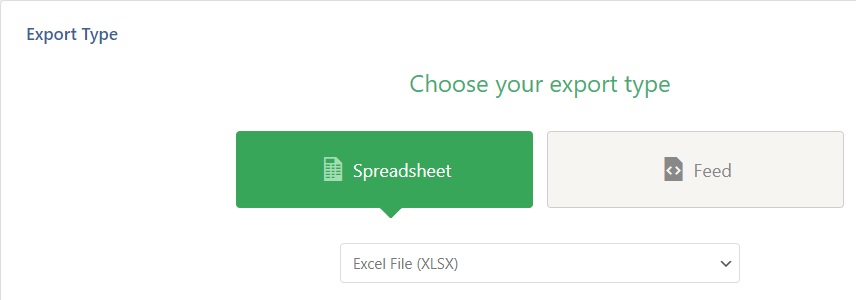
On the same page, expand the Export Type panel near the bottom of the Drag & Drop interface.
WP All Export can export orders to a variety of file formats, including Excel, CSV, and XML format. The default type is a CSV file, but you can easily change it to an Excel File (XLSX or XLS).
In the Export Type panel, click the Spreadsheet option and choose either Excel File (XLSX) or Excel File (XLS) from the dropdown depending upon the format you want to export.
Click the Continue button at the bottom to proceed to the next step.
Step 6: Schedule WooCommerce Order Exports
WP All Export also lets you easily create recurring exports to automatically send new order data without any manual intervention.
To schedule an Excel report, follow these steps:
- Expand the Scheduling Options panel on the Export Settings screen.
- You can either use the paid Automatic Scheduling option or set up cron jobs on your server. Select the Automatic Scheduling option, then set the schedule to run every week or every month.
- Next, choose the time and select the timezone for performing automatic exports.
Your scheduling options should look like this.
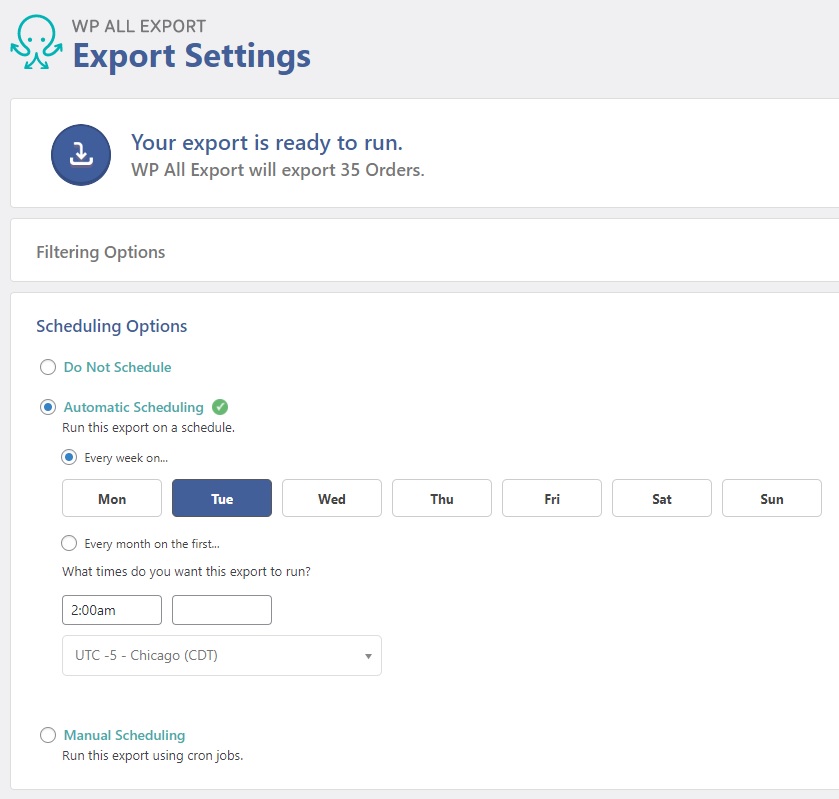
This schedule means that your order export will run at 2:00 a.m. Chicago time (UCT -5) every Tuesday.
Many users schedule order exports to integrate their order data with other systems. To support this, WP All Export is fully compatible with Zapier.
This means that you can automatically trigger an action in Zapier every time your order export runs. For example, you can have Zapier copy your Excel file to another location for automatic processing by an external system. We have covered this process in detail in one of our YouTube videos.
Step 7: Finish Your WooCommerce Order Export to Excel
To finish your Excel export, click the green Confirm & Run Export button on the right-hand side of the Export Settings screen. After the export has finished processing, click the XLSX button in the Click to Download section.
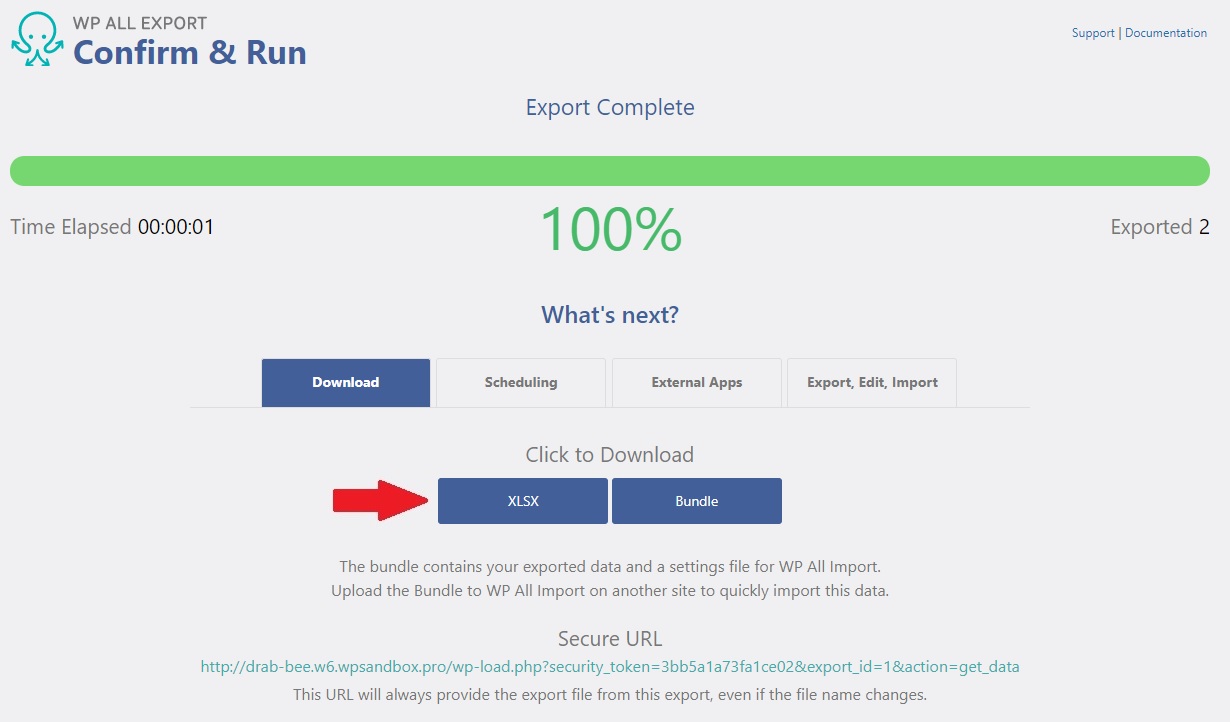
That's it — you've successfully exported your Woocommerce orders to an Excel spreadsheet!
Next: Use Excel Order Exports for Migration
WP All Export works seamlessly with its sister plugin, WP All Import, to migrate data from one WordPress site to another. This includes migrating data between WooCommerce stores.
To prepare an export for migration, click the Bundle button instead of the XLSX button on the Click to Download screen.
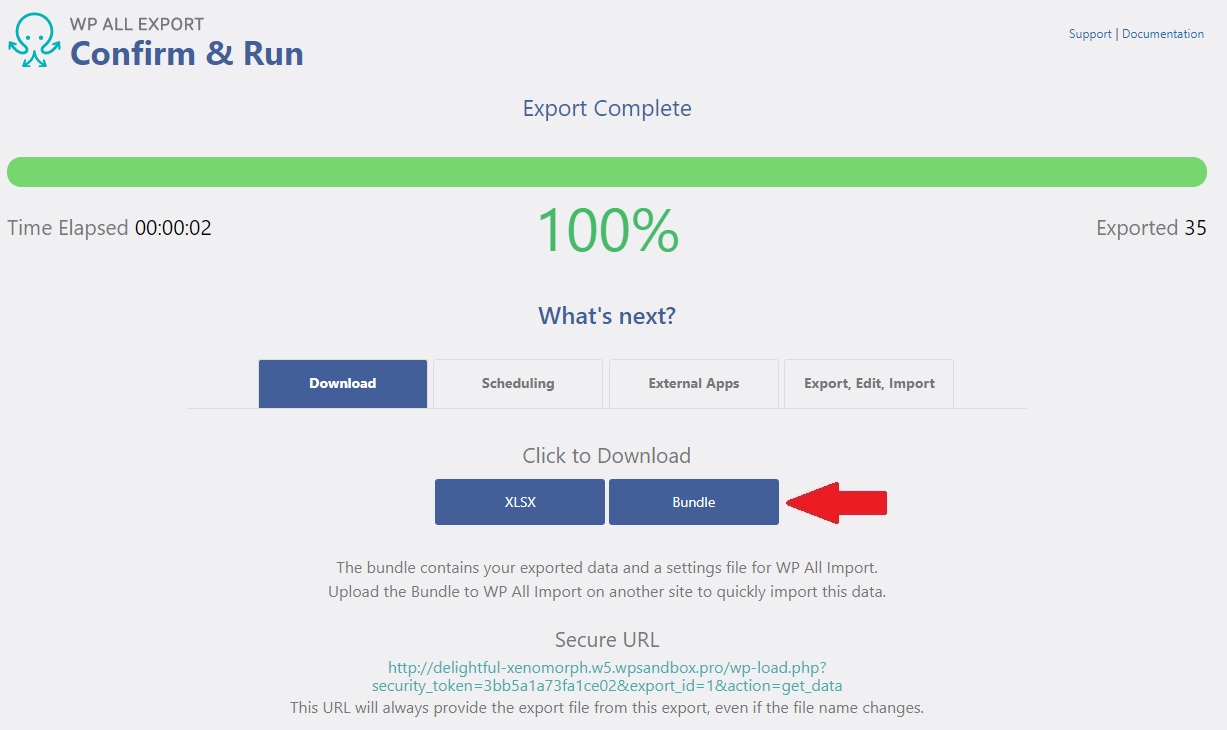
The Bundle zip file will contain all of the information that WP All Import needs to automatically configure the data import on your new site.
This means that migrating orders from one WooCommerce store to another is as simple as:
- Use the Bundle option to download the export file from the source site.
- Import your orders on your target site with WP All Import using the Bundle zip file as your data source.
Ready to effortlessly export your WooCommerce order data? Download and install the WP All Export Plugin today!
Related Information
WooCommerce Export Orders to CSV
Best WooCommerce Shipping Plugins
8 Best Photography Plugins for WooCommerce
Best WooCommerce Multilingual Plugins
WooCommerce How to Add Products
Advanced Order Export for WooCommerce

