WooCommerce Products – The Heart of Every Online Store
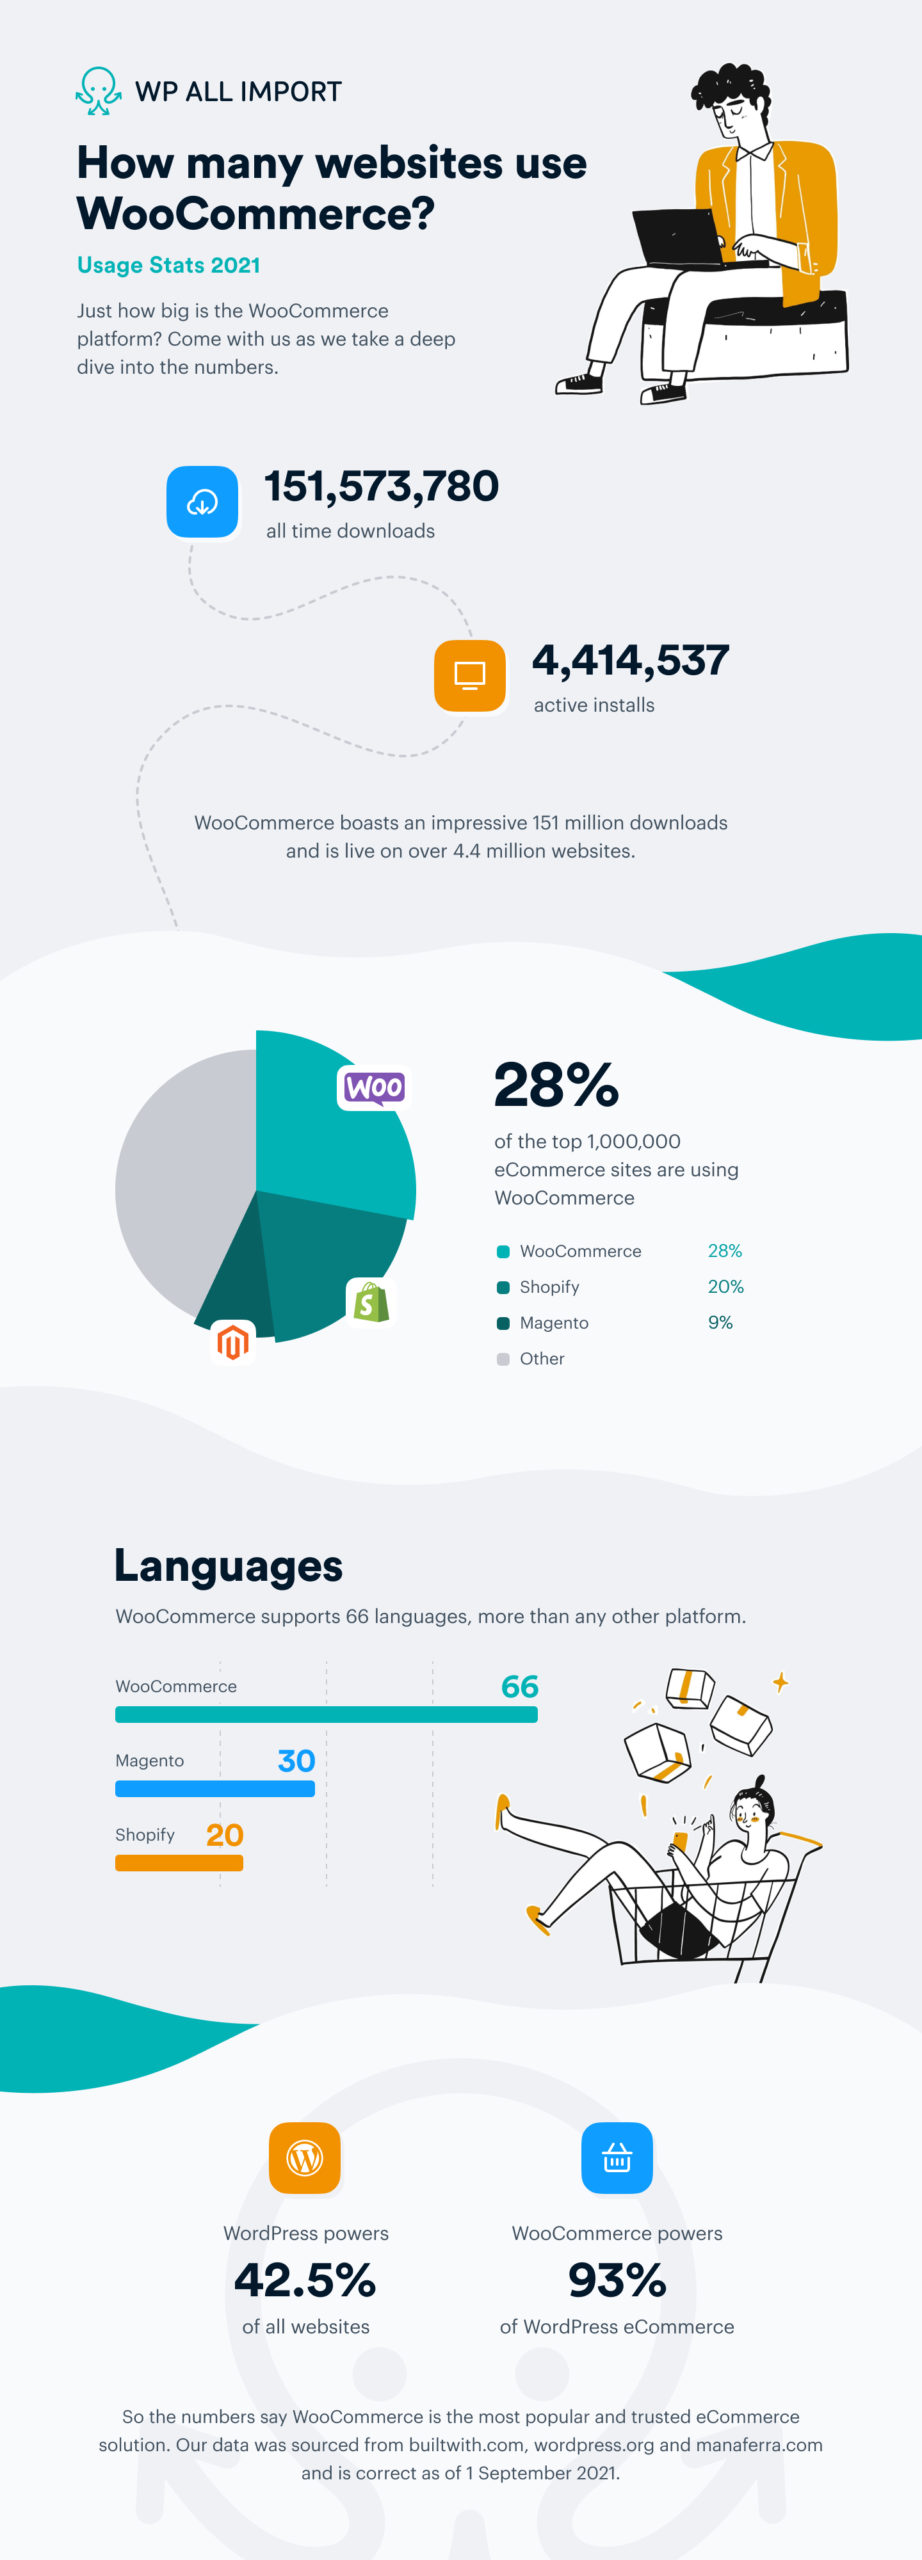
So you’ve decided to create your own online business. By choosing WooCommerce as your e-commerce platform, you’ve already made a smart choice because WooCommerce is the most successful e-commerce platform in the world:
Choosing the best WooCommerce host and the best WooCommerce theme are your next big decisions, as one will dictate your online store’s website performance and the other its appearance.
But let’s face it: the real heart of any online store is its products. That’s why people go to your store in the first place and what they ultimately purchase.
Fortunately, adding products to WooCommerce is easy. But you do need to understand a few key issues including:
How to Add Product Basic Information
How to Add Product Inventory Details
How to Add Product Shipping Details
WooCommerce Product Advanced Settings
Importing WooCommerce Simple Products
Importing WooCommerce Variable Products
Bulk Editing WooCommerce Product Information
Types of WooCommerce Products
There are seven types of WooCommerce Products. Each one of these deserves its own in-depth tutorial, so we’re going to cover just the basics here:
Product Type
Description
Simple Products
The basic WooCommerce product type, which also happens to be the most used type. This represents a simple physical product that can be bought and shipped on its own, such as a purse.
Virtual Products
These are non-physical simple products that do not require shipping and usually represent a service or subscription.
Downloadable Products
Simple products that can be downloaded, such as songs, movies, ebooks, etc.
Grouped Products
Grouped products consist of two or more simple products that are related in some way, such as a computer keyboard and mouse or a broom and dustpan. Grouped products do not have prices or shipping information on their own but are more like named lists of other products. When a customer chooses a grouped product, all of the individual products in the group are automatically added to the shopping cart. This is not only a convenience feature for the customer — it also helps you increase your cross-sells.
Product Bundles
Products bundles are combinations of WooCommerce products that can be purchased together as one unit. As such, bundles do have their own prices and stock numbers and are sometimes used to offer bulk discounts. Common examples include things like a set of garden chairs or a package of six drinking glasses.
External/Affiliate Products
Products that are available from your WooCommerce store but instead are sold and delivered by another company. The motivation for listing these products is generally to earn an affiliate fee (i.e. a commission) from the sale, though they can also be a courtesy link to help your customers find something that you don't provide. Note, because these products are shipped by someone else, they do not require shipping information.
Variable Products
These are products that have variations such as size, color, etc. For example, a t-shirt that comes in different sizes and colors. This introduces a level of complexity beyond that of simple products.
Rather than get bogged down in the details of each WooCommerce product type, we'll walk you through the steps involved in adding product information, differentiating by type where necessary.
How to Add WooCommerce Product Basic Information
To add WooCommerce products, go to Products->Add New in the WordPress main menu. Fill in the top and bottom sections of the screen, followed by General tab of the Product data section.
Here is the top section of this screen with the data already filled in:
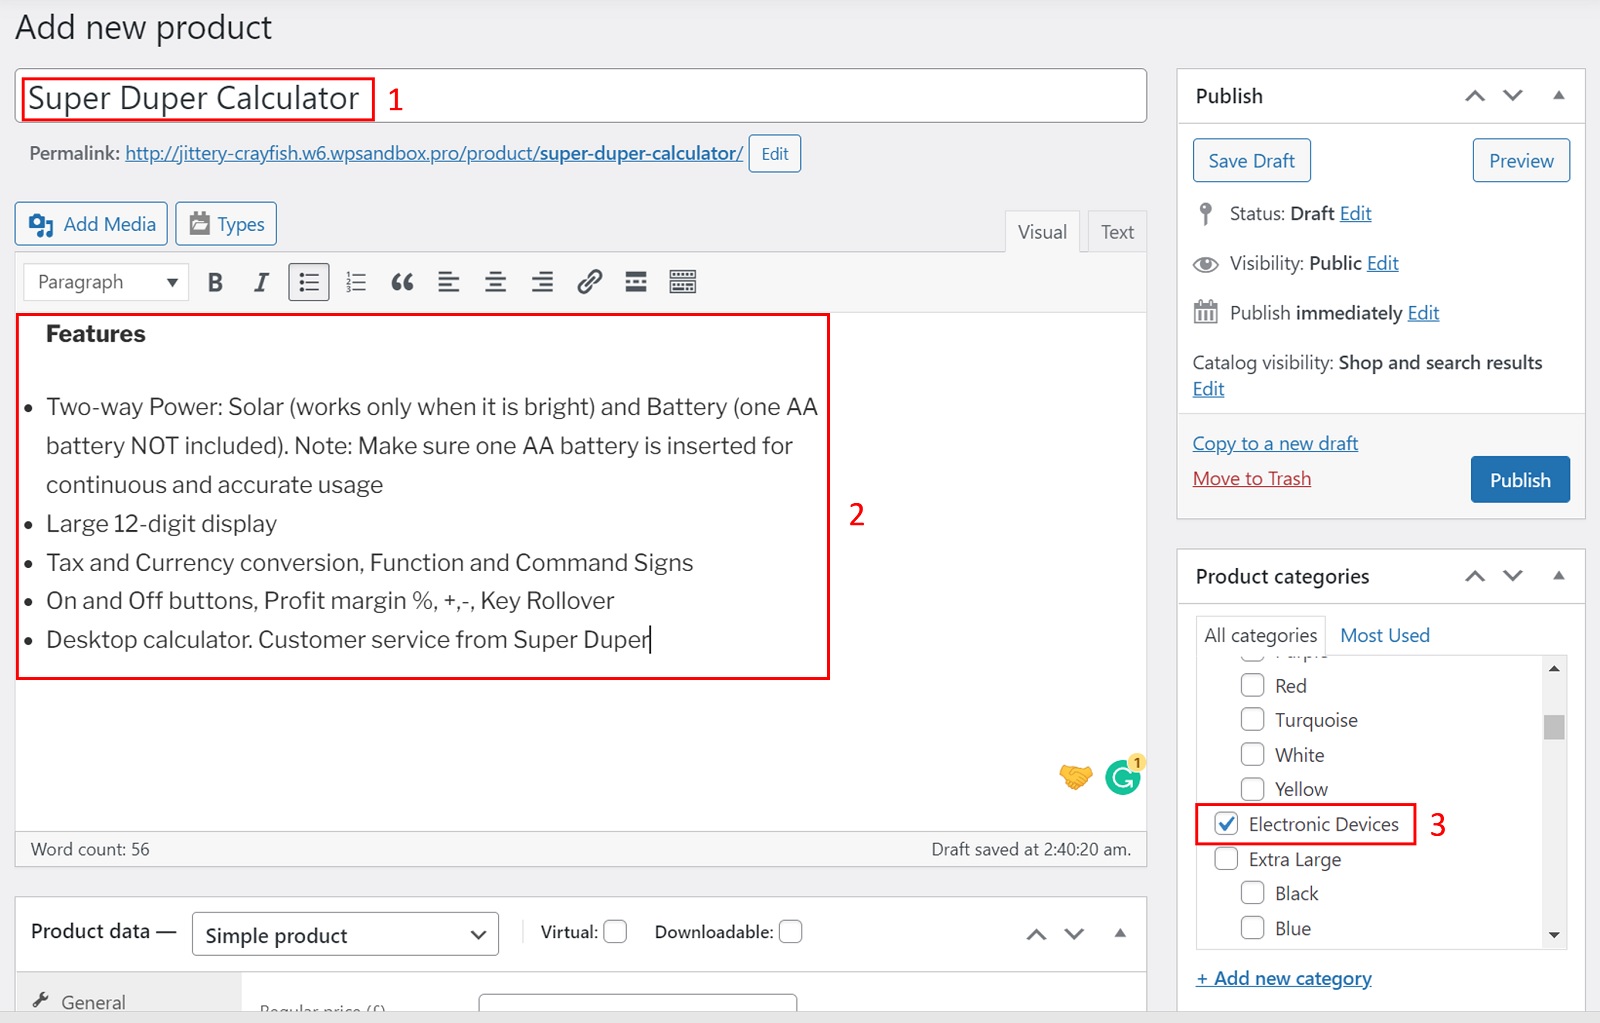
- Name of the new product
- Long description
- WooCommerce product category
Here is the bottom section of the screen:

- Short description
- Product’s feature image
- Although we don’t do so here, an opportunity to add a gallery of product images
Note that we ignored the Product data section near the top of this image. This is not because it is unimportant. On the contrary, it is arguably the most important section of a product’s definition.
Let’s have a closer look at it now:
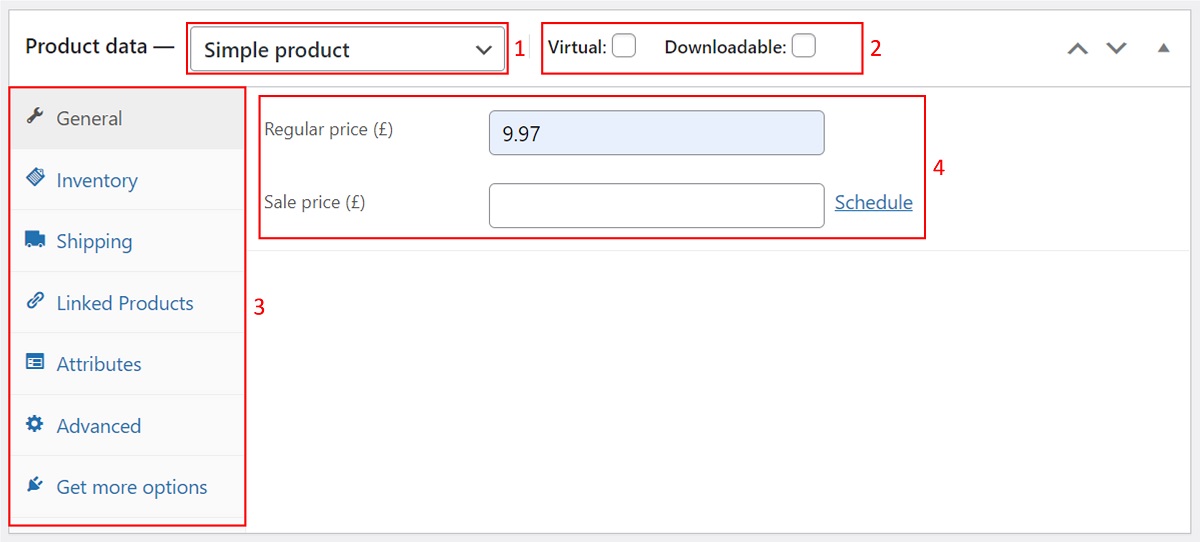
- Sets the product type. The options in the selection list are:
- Simple product
- Grouped product
- External/Affiliate product
- Variable product
- The Virtual and Downloadable product types. Note that these options are only available when you select Simple product. In other words, the Virtual and Downloadable product types are in some ways subtypes of the Simple product.
- A set of tabs that contains the various fields, etc., that make up the majority of a product definition. Note that these tabs can vary by product type. For a Simple product type, the default tab selected is the General tab.
- The fields that make up the tab selected on the left — in this case, the General tab for the Simple product type. Of the two fields shown, only the Regular price field is populated.
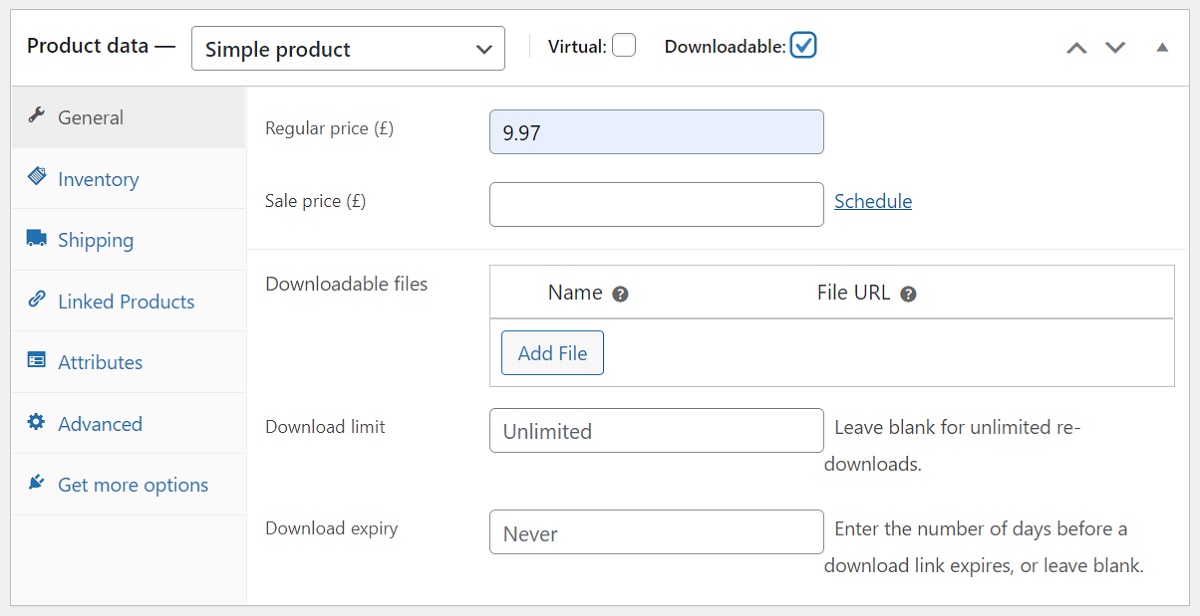
The General tab is visible for the Simple, Virtual, Downloadable, and External/Affiliate product types. However, it can change depending on the product type. For example, here is what it looks like for the Downloadable product type. Note the Downloadable files, Downloadable limit, and Download expiry fields, which allow you to specify the download information:
And here is what the General tab looks like for External/Affiliate products:
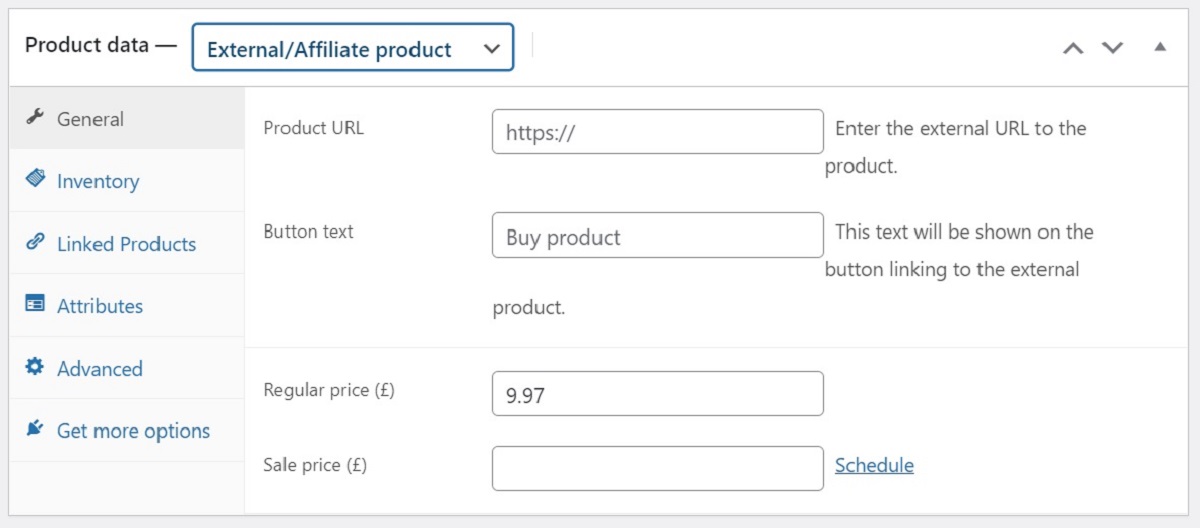
Note the Product URL and Button text fields, which allow you to specify the link to the external supplier and button text for that link.
How to Add WooCommerce Product Inventory Details
Set the product type back to Simple product, then click the Inventory tab:
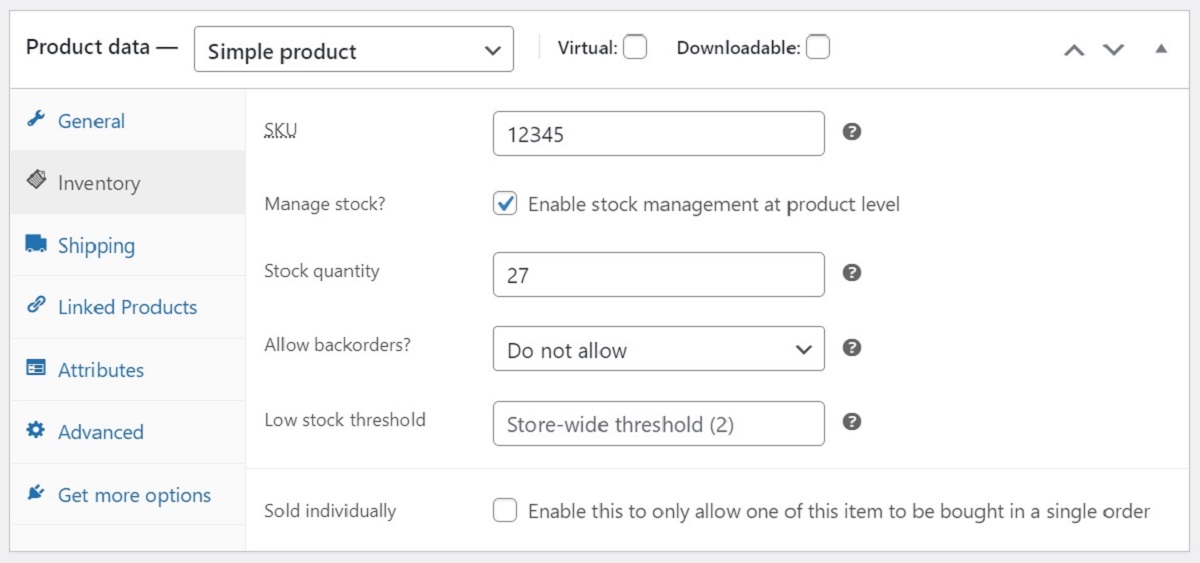
This tab has six fields if you select Manage stock? Here’s a description of all six:
SKU
Allows you to assign an SKU (Stock Keeping Unit) number, which is the unique identifier for the product.
Manage stock?
When set, allows you to enter a stock quantity for the product and also to set a low-stock threshold.
Stock quantity
The current stock quantity for the product. This field appears only if Manage stock? is selected.
Allow backorders?
If enabled, allows orders even if there are no items in stock. In this case, an order will reduce the stock quantity to a negative value (or further decrease an existing negative value). Otherwise, orders cannot be placed if there is insufficient stock to fill them.
Low stock threshold
If set, WooCommerce will notify the user when the inventory level for the product reaches the threshold. This can be set at the product level or for each variation individually. A default can be set for the entire store at Settings > Products > Inventory. Note, this field appears only if Manage stock? is selected.
Sold individually
If set, restricts the user to only one item for the product in a single order.
If you don’t select Manage stock?, the Stock quantity, Allow backorders?, and Low stock threshold fields disappear and are replaced by a Stock status field, which simply allows you to indicate whether a product is in stock, out of stock, or on backorder. Note that you have to set this status manually.
How does the Inventory tab change for other product types?
For Grouped products and the External/Affiliate products, only the SKU field is present on the Inventory tab, as there is no inventory to manage.
For Variable products, the same six fields are present when Manage stock? is selected. If Manage stock? is not selected, then only the SKU, Manage stock?, and Sold individually settings are available, as Stock status is managed at the variation level.
How to Add WooCommerce Product Shipping Details
As mentioned, there is no Shipping tab for the Virtual, Grouped, or External/Affiliate product types because these don’t exist as shippable products from your store. Here is what the Shipping tab looks like for the Simple, Downloadable, and Variable product types:

Weight (lbs)
Self-explanatory. You choose your default weight unit when you set up your store.
Dimensions (cm)
This consists of three values: length, width, and height, in that order. Again, the unit of measure is set at the store level.
Shipping Class
The shipping class that applies to this product. You set up different shipping classes to define different shipping rules.
How to Add WooCommerce Linked Products
The Linked Products tab helps you promote your products by encouraging your customers to either buy more products or to buy other, more expensive products. Here is what the Linked Products tab looks like for a Simple product:
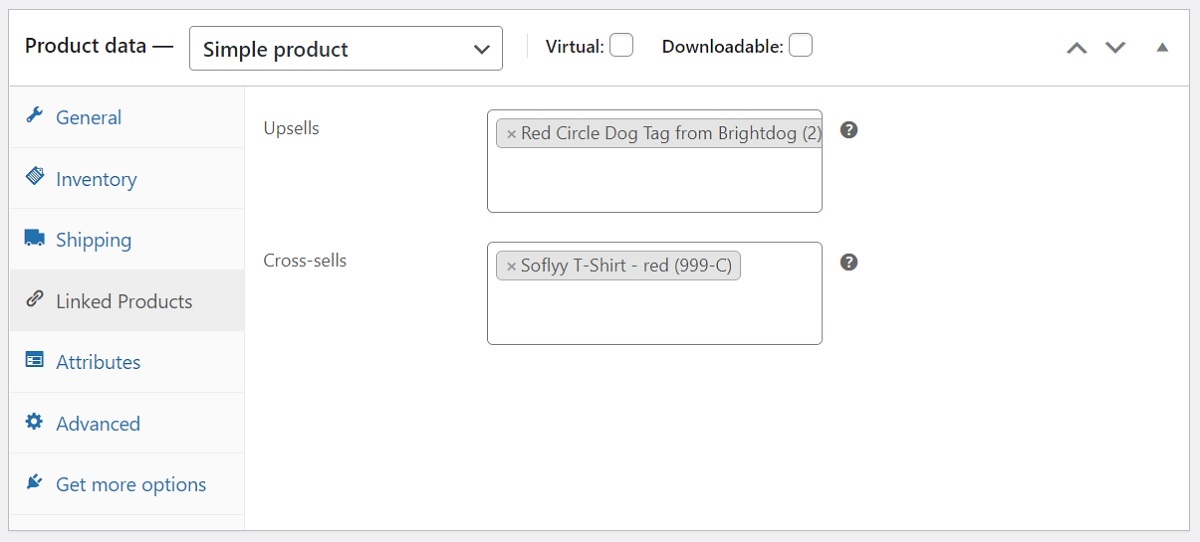
Upsells
These are alternative products that you typically suggest because they are more profitable. Note, these products are displayed on your product page, though the location and presentation may vary depending on your theme.
Cross-sells
Related products that the customer might like to buy. For example, a golf cap if the customer has purchased a golf shirt, or cleaning products for a new pair of dress shoes. Note, cross-sell products are displayed on the cart page instead of the product page.
The examples shown in the image above are not very good ones, as a dog tag and a t-shirt are poor choices as linked products for a calculator. But, alas, there is only so much time that one can devote to demo data!
Note, the Linked Products tab is the same for all product types except External/Affiliate products, which allow only upsells.
How to Add WooCommerce Product Attributes
Product attributes help you group products with common traits or specifications. For example, most t-shirts come in multiple sizes and colors. In this situation, size and color are the attributes.
Attributes, in turn, have terms. A size attribute might have terms like “Small”, “Medium”, and “Large”, while a color attribute might have terms like “Red”, “Blue”, and “Green”.
The Attributes tab lets you assign attributes to your product. For example, in this sample image, we have already added the Color attribute with terms “blue”, “Green”, and “red”. We have also specified that we want this attribute and its terms visible on the product page.

Note that the Attributes tab appears the same for all product types at first, but if you add an attribute for a variable product, a Used for variations checkbox will appear, as shown here:

You check the Used for variations checkbox if you want to use the attribute in question to define your product variations.
WooCommerce Product Advanced Settings
The Advanced tab isn’t all that advanced. A better name for it might be “Miscellaneous”:
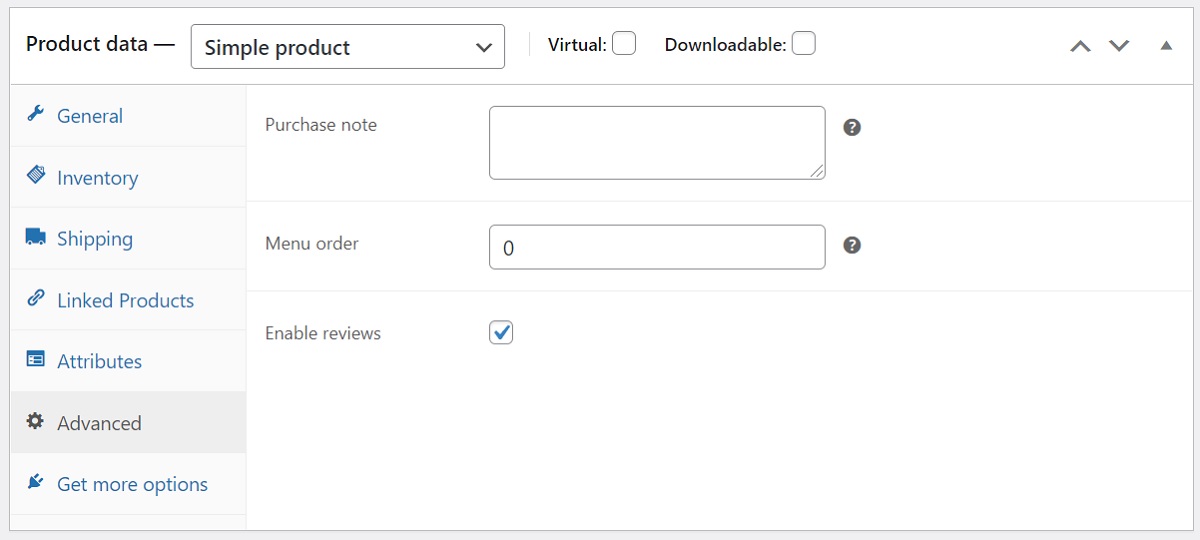
As you can see from this image, the Advanced tab consists of three fields:
Purchase note
An optional note to be sent to customers after a purchase.
Menu order
Allows you to control the order in which products appear in product lists.
Enable reviews
Determines whether reviews are enabled for this product page.
Note that the Advanced tab options are the same for all product types except the Grouped and External/Affiliate types, which do not allow you to attach a purchase note.
How to Add WooCommerce Variable Products
As we stated in the section on Types of WooCommerce Products, variable products are products that have variations, such as size, color, etc. This introduces a significant level of complexity compared to simple products.
For example, if a product has multiple attributes, and all of these attributes are used for variations, we end up with all the possible combinations of those attributes.
Drawing on our earlier examples, a t-shirt that comes in the sizes “Small”, “Medium”, and “Large”, and also the colors “Red”, “Green”, and “Blue”, might have all of these combinations:
- Small Red, Small Green, Small Blue
- Medium Red, Medium Green, Medium Blue
- Large Red, Large Green, Large Blue
These are not just simple definitions, either. Each variation can have its own:
- SKU
- product image
- description
- weight and dimensions
- pricing
- stock levels and settings
…and more.
Given how unique each variation can be, it is perhaps better to think of variations as individual products that share certain traits.
The Variations Tab
The Variations tab only appears if you select the Variable product type. Furthermore, its appearance will differ depending on whether you have defined attributes for the product and specified that they are to be used for variations. If you have not, the Variations tab will appear as follows:

In other words, the tab will be of no use.
However, if you have defined attributes and specified that they are to be used for variations, you will see this instead:
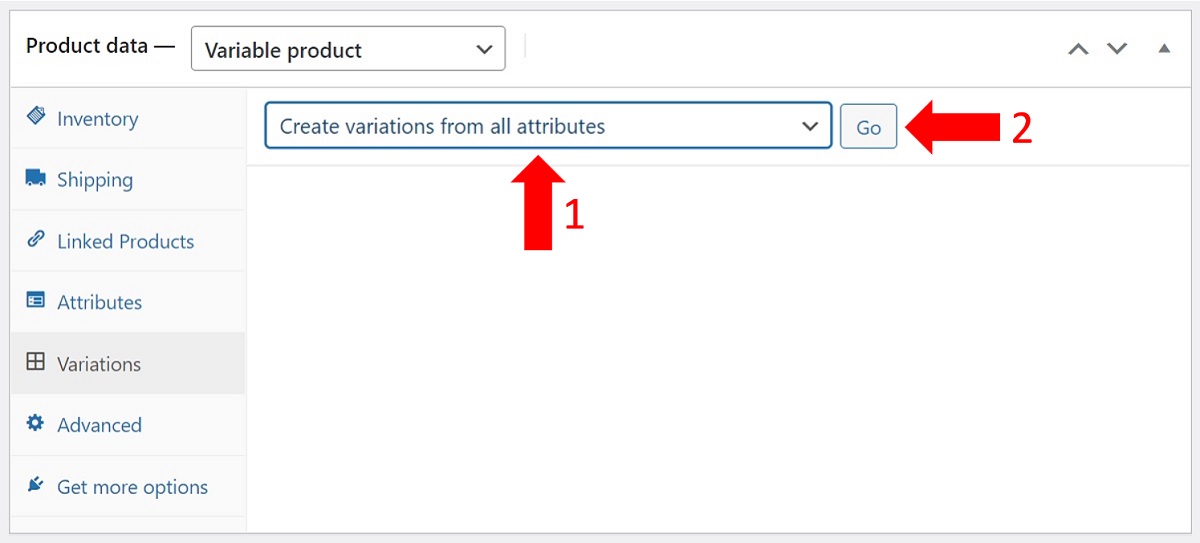
Well, this isn’t quite what you’ll see. First, you must select Create variations from all attributes, as shown above, then click the Go button. WooCommerce will then generate your product variations based on your attribute settings. In this case, it will generate one variation for each of the three colors (“red”,”Green”,”blue”).
We have expanded the “blue” variation so that you can see its details:

As this image suggests, you can set the values for any of the fields shown, thereby overriding any identical fields that were defined at the product level. Note, for example, how we have dropped the regular price from 9.97 to 8.50 for the blue variation. Otherwise, we have left the default values from the product level intact.
Note, also, the blue picture icon near the top. This allows you to supply a product image for the individual variation, e.g. the picture of a blue t-shirt as compared to the image used for the parent product.
The Process for Adding Variable Products and Their Variations
As you likely noticed, there are multiple steps involved in setting up a variable product. Here's a summary of the typical steps:
- Create the required attributes and attribute terms. This is done using the Products -> Attributes link in the main WordPress menu.
- Create a product with a Variable product type.
- Add the desired attributes and attribute terms to your product.
- Generate the desired variations.
- Edit the fields that need to be changed for individual variations, if necessary.
- Set the default variation. If you look at the preceding image, you will see a Default Form Values field near the top. This allows you to specify which attribute terms will be automatically selected when the customer first arrives on the product page.
WooCommerce Product Bundles
Product bundles are more powerful versions of grouped products. To refresh your memory, grouped products allow you to create named lists of related products. When a customer chooses a grouped product, all the individual products in the group are added to the shopping cart. As mentioned, this is merely a convenience feature for customers.
Product bundles take things a step further by allowing you to create a new product that consists of other products. Because this is an actual product and not just a list, a product bundle can have its own SKU and price. This is an ideal way to create package deals or to offer bulk discounts.
Product bundles are not a built-in feature of WooCommerce. They are instead a WooCommerce Addon:

Because of this, we will not describe their functionality here. For more information, please see https://woocommerce.com/products/product-bundles/.
Importing WooCommerce Simple Products
The ability to manually add and edit individual products to a WooCommerce store is great but many online stores do not operate this way. Instead, they import lists of products from their various suppliers.
The best way to do this in WooCommerce is to use a third-party plugin like WP All Import, which can import products from any CSV or XML file using any file layout. Here are the general steps involved:
- Create a new WooCommerce Products import with WP All Import and select the desired import file.
- Review the product import file.
- Match the data fields in the import file to the WooCommerce product fields.
- Specify whether to import new WooCommerce products, update existing ones, or both.
- Run the import to create products, import images, categories, etc.
We'll now walk you through the details of this process for a simple product.
To start, download this file to your local drive: https://drive.google.com/file/d/1JboTr7rFQUX0OfaAPiqbZ4e5UAkm_y1e/view?usp=sharing.
It contains four new products and should look like this:

Note that it consists of mainly simple, self-explanatory columns except for two:
- The Content column contains HTML to present the main description for each product.
- The Image URL column contains a URL path pointing to an online image.
To follow along with the rest of this tutorial, use WP All Import’s free sandbox tool at: http://www.wpallimport.com/try/.
Create a New WooCommerce Product Import
Go to All Import -> New Import in the WordPress main menu:
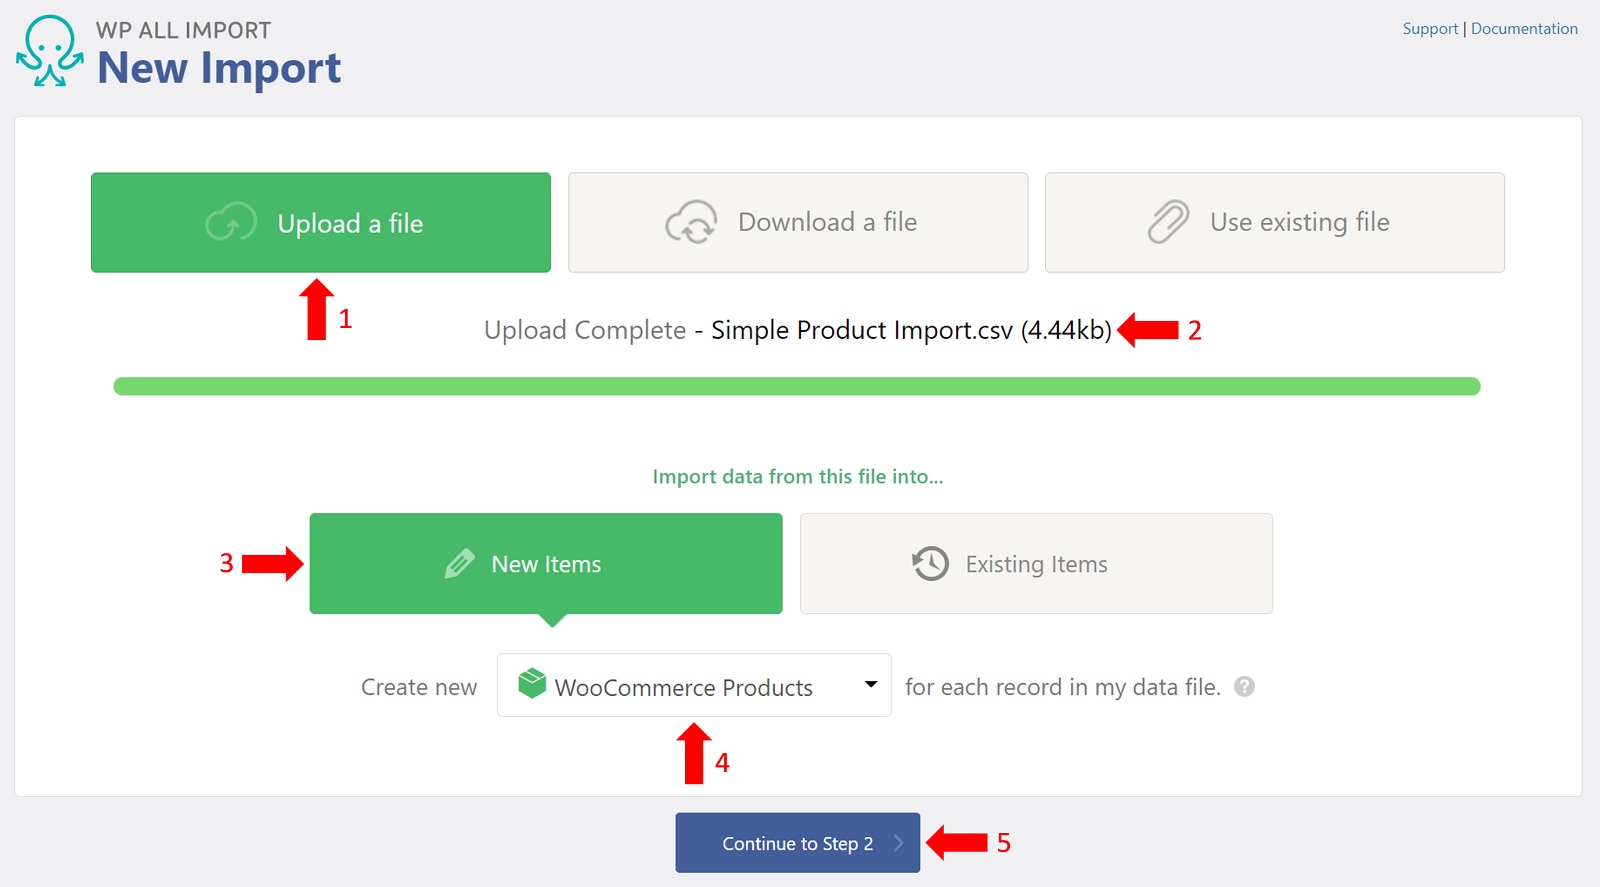
- Select Upload a File.
- Specify the file that you just downloaded, i.e. Simple Product Import.csv.
- Select New Items.
- Choose WooCommerce Products from the selection list.
- Click the blue Continue to Step 2 button.
Review the Product Import File
The Review Import File screen lets you verify that WP All Import has parsed the import file correctly:
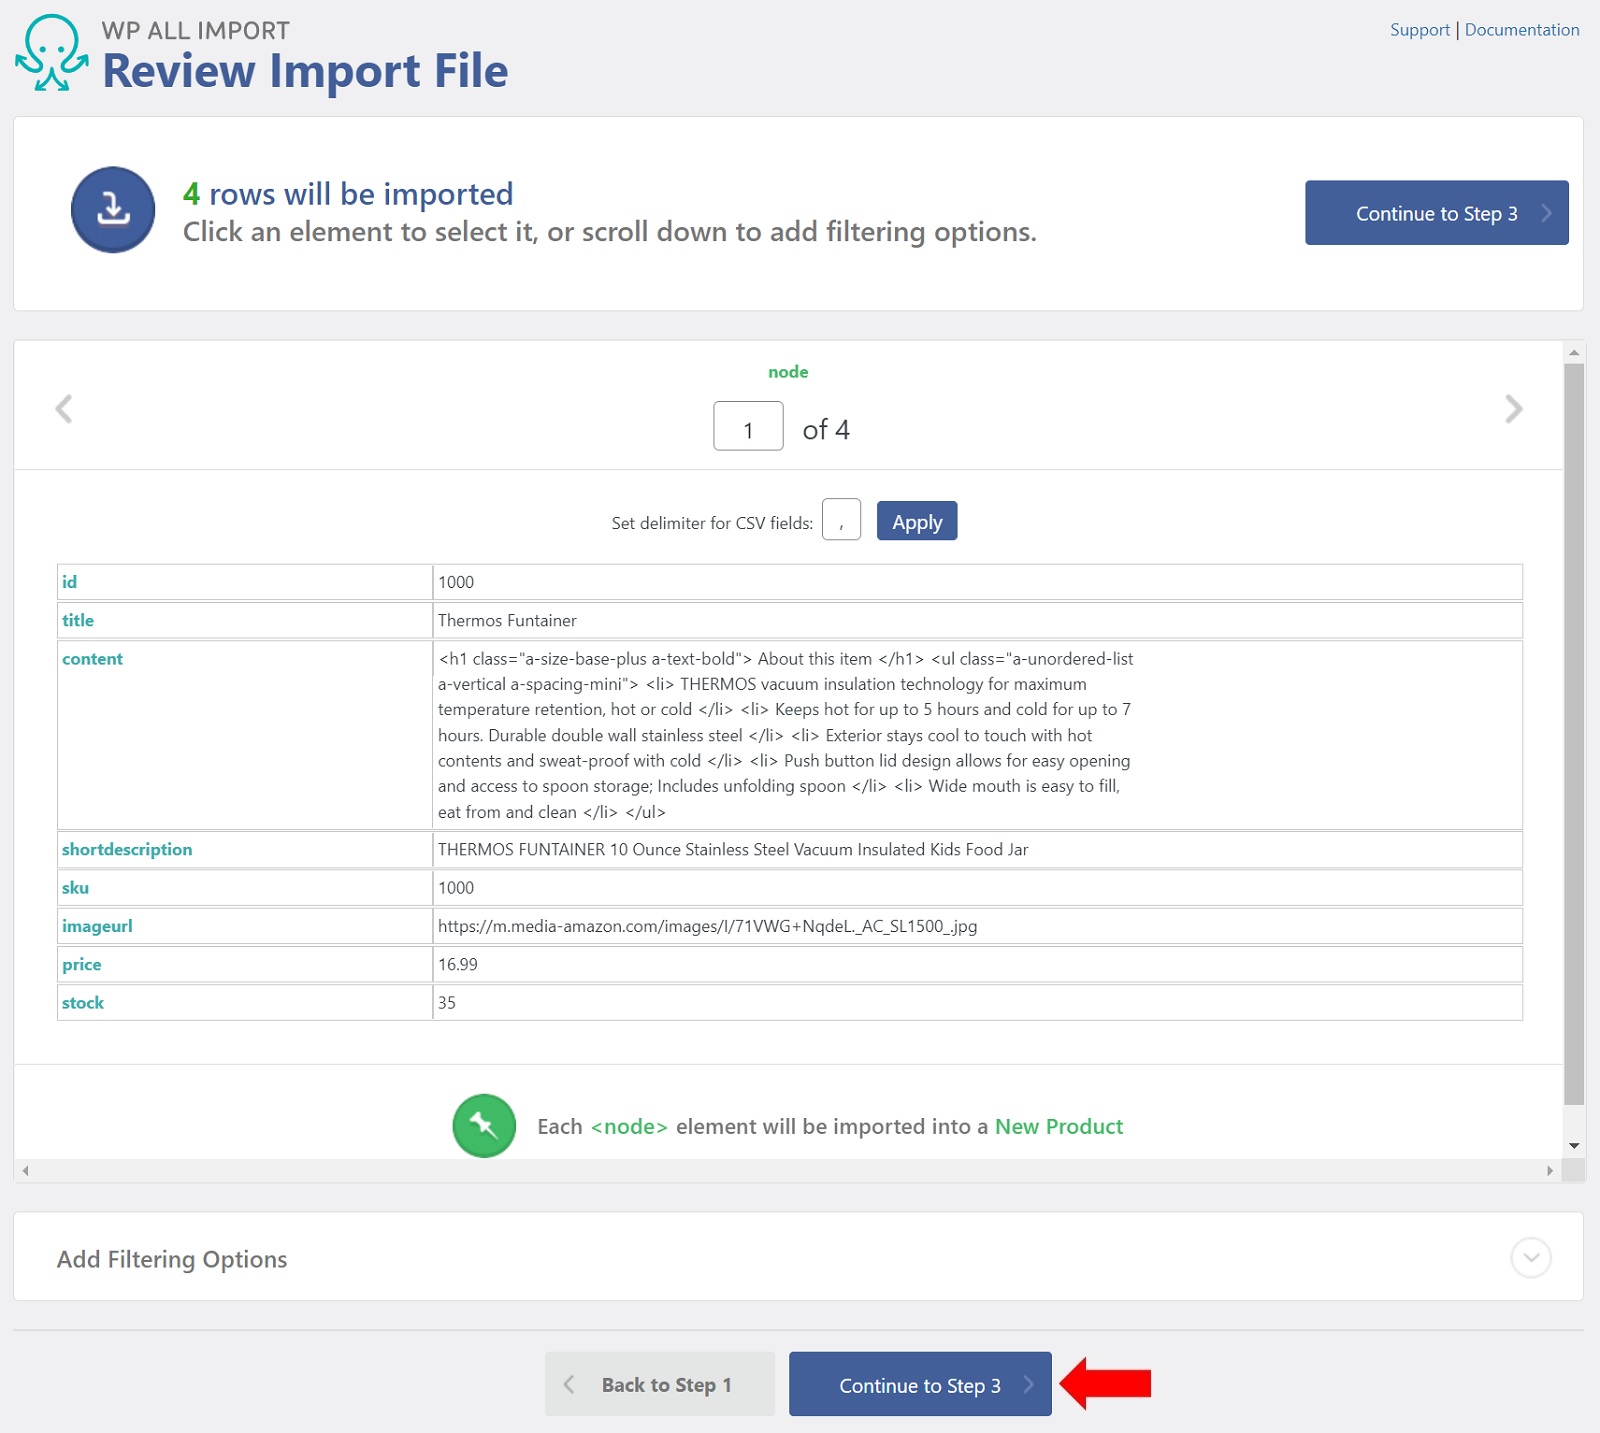
As you can see from the count in the top left, there are four records in this file and they appear to be structured as expected.
Click the blue Continue to Step 3 button.
Match the Incoming Data Fields to the WooCommerce Product Fields
The Drag & Drop screen lets you map incoming data to the WooCommerce product fields:
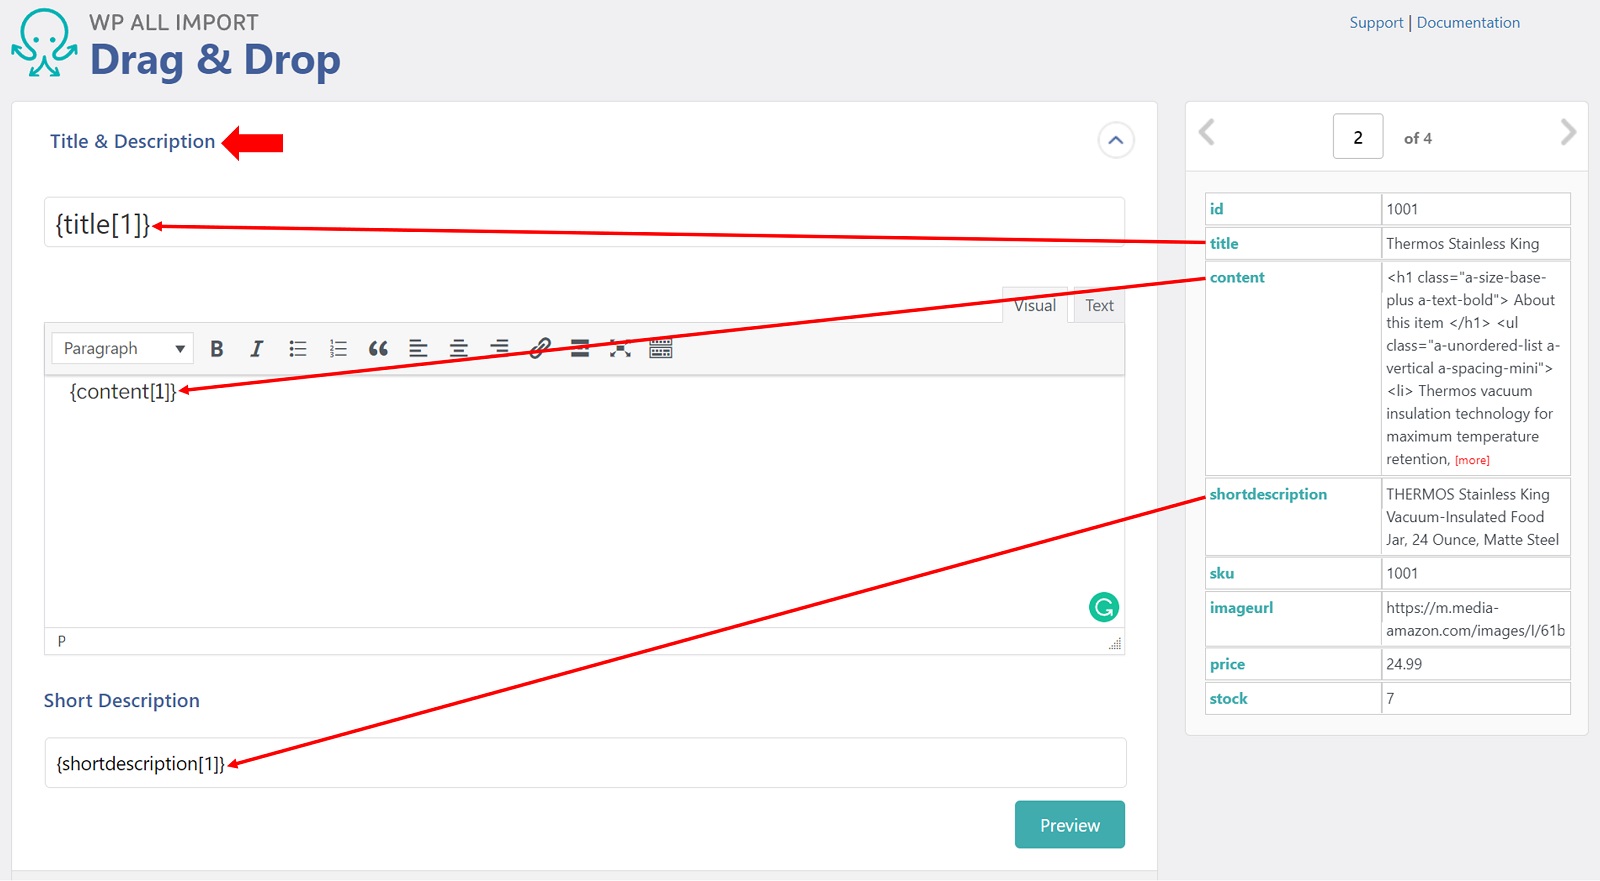
- Expand the Title & Description panel.
- Drag the title, content, and shortdescription incoming fields to their WooCommerce field targets as shown above. Note that the names of the incoming fields don’t matter. It’s the mapping that counts.
When you have completed these steps, close the Title & Description panel and…
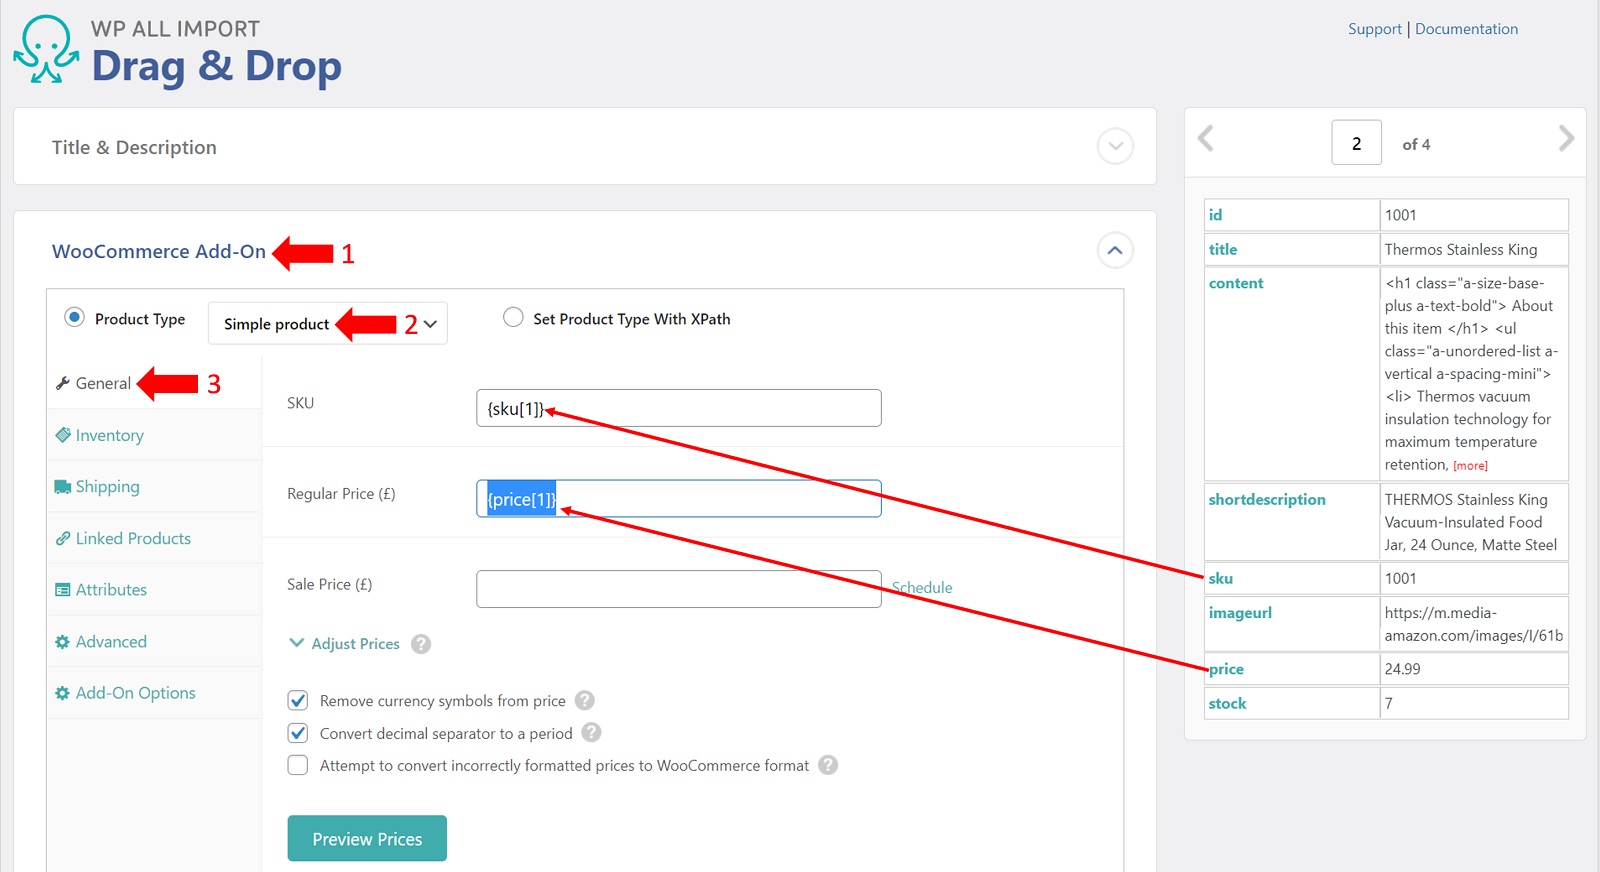
- Expand the WooCommerce Add-On panel.
- Make certain that the Product Type is set to Simple product.
- Select the General tab.
- Drag the sku and price incoming fields to their WooCommerce field targets as shown above.
Next…
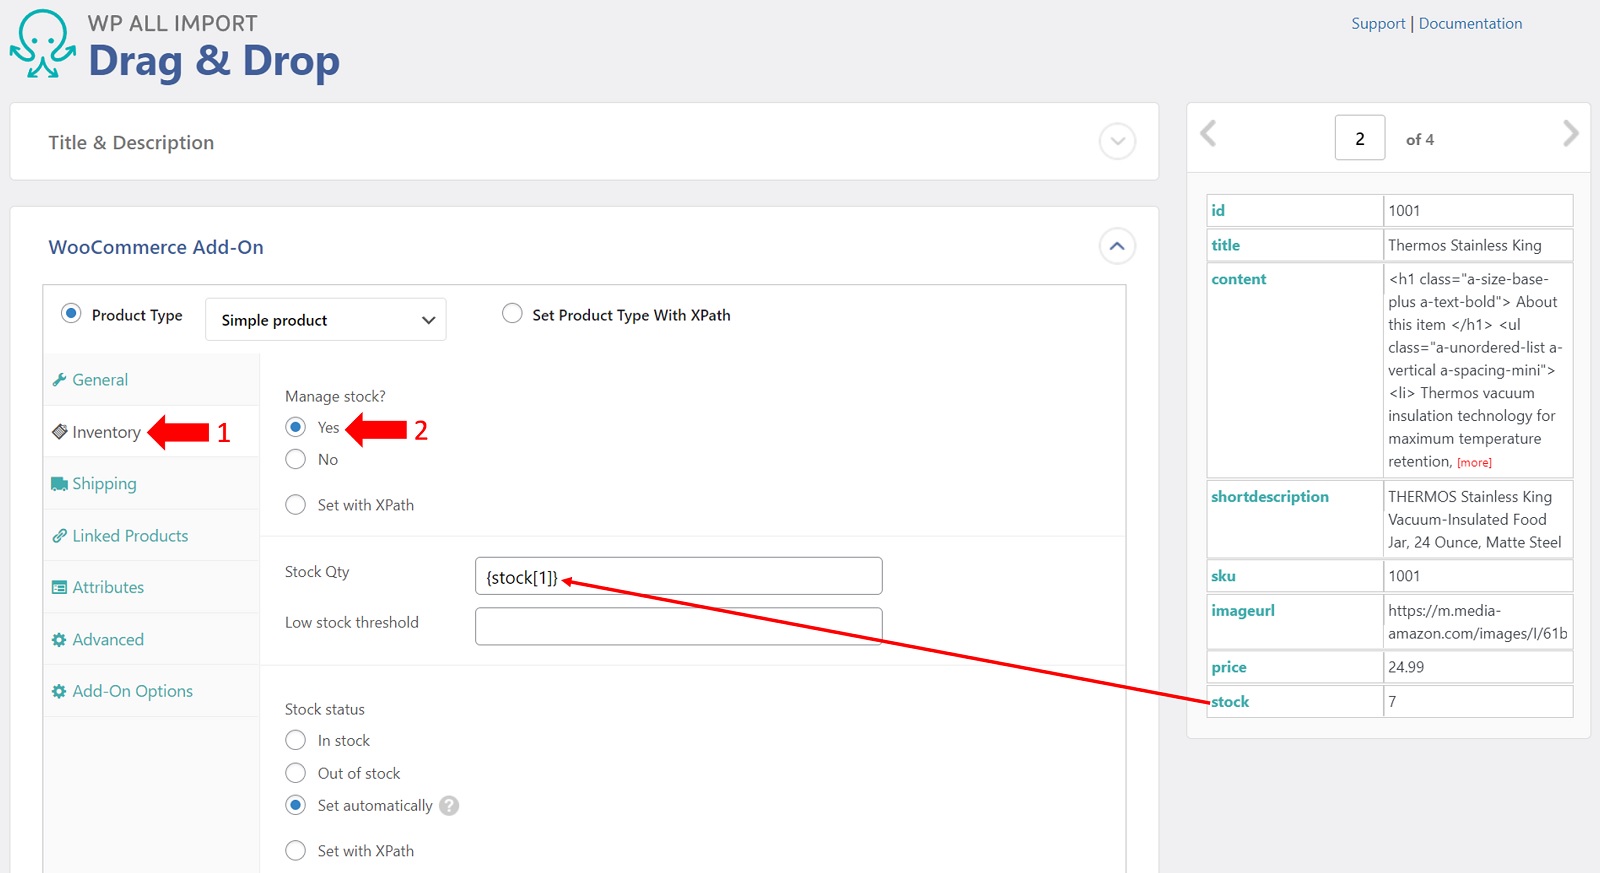
- Select the Inventory tab.
- Set Manage stock? to Yes.
- Drag the stock incoming field to the WooCommerce Stock Qty field as shown above.
Close the WooCommerce Add-On panel and…
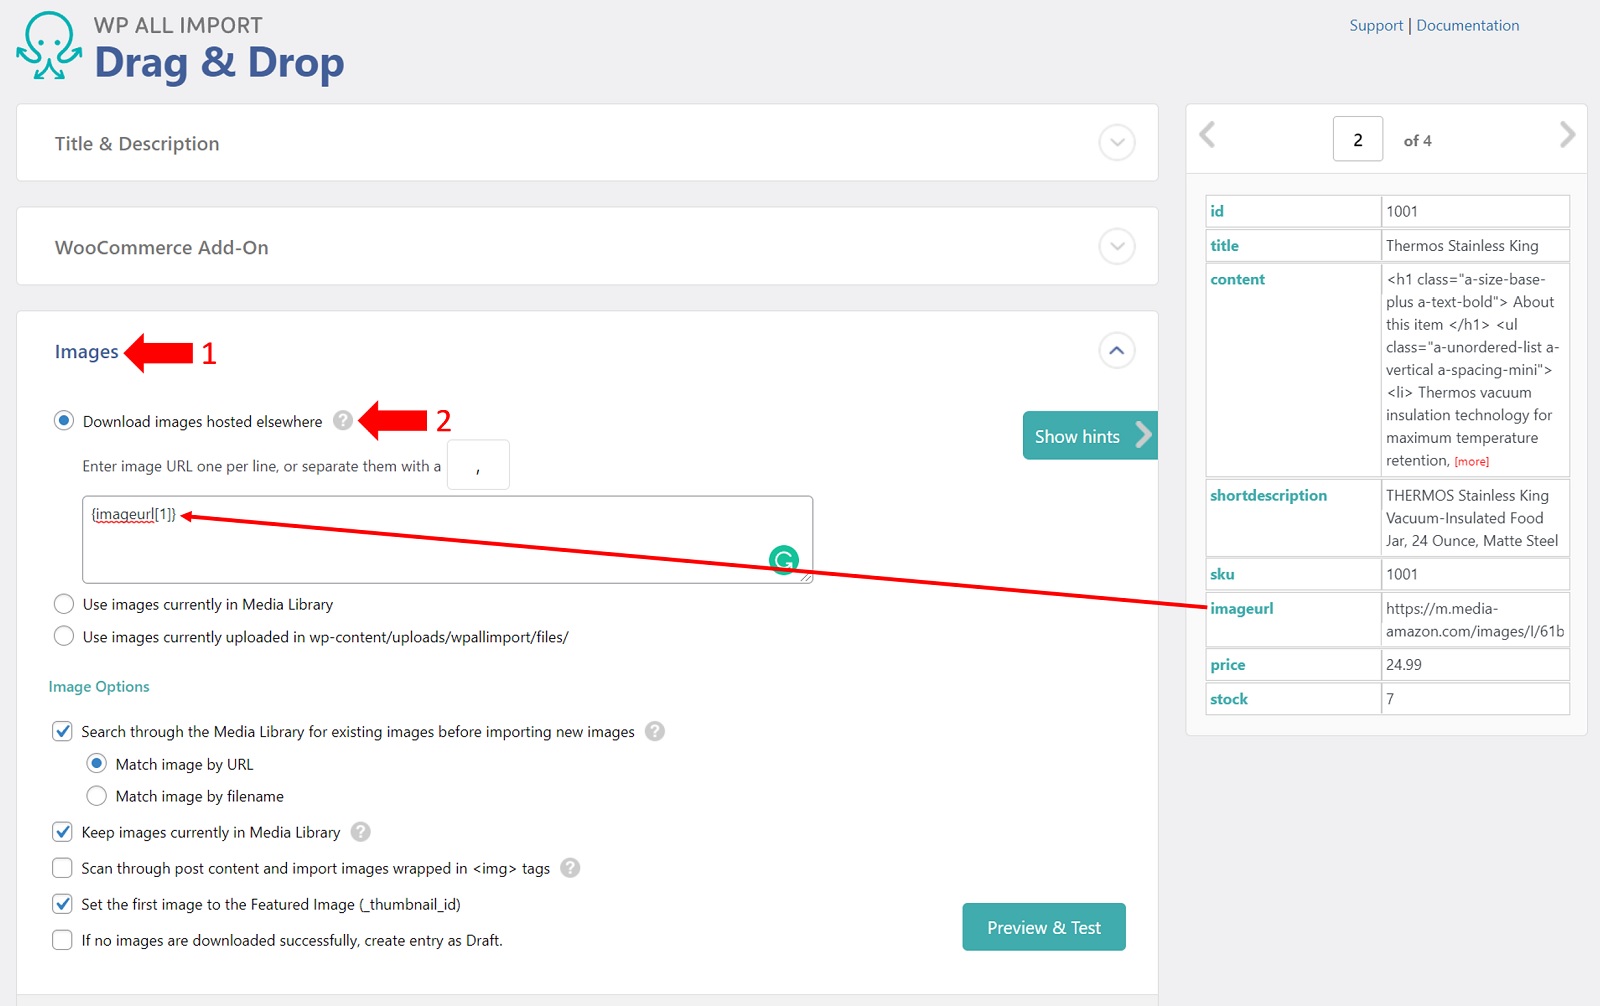
- Expand the Images panel.
- Make sure that the Download images hosted elsewhere option is selected.
- Drag the imageurl incoming field to the edit box as shown above.
When you are finished all of this, click the blue Continue to Step 4 button at the bottom of the screen. This will bring you to the Import Settings screen:
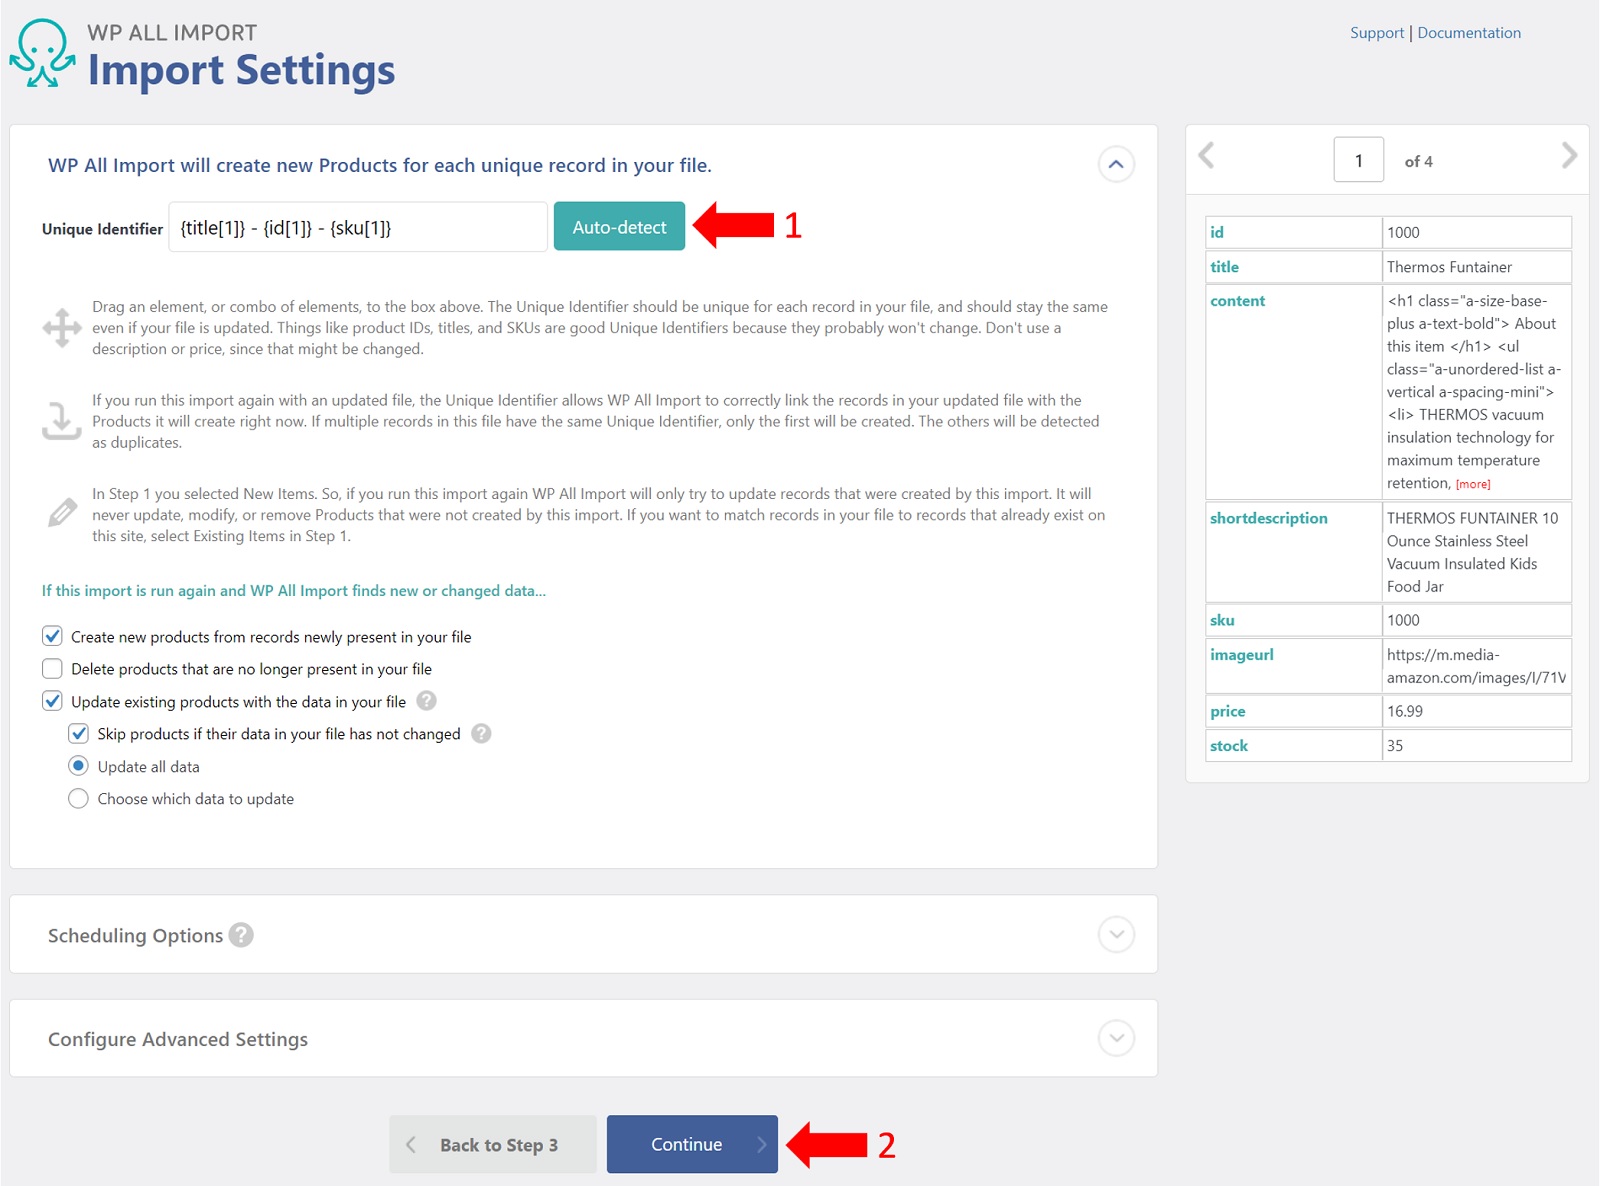
- Click the Auto-detect button. This will automatically identify a unique identifier for the products in your import file.
- Click the blue Continue button at the bottom of the screen.
This will bring you to the Confirm & Run screen:
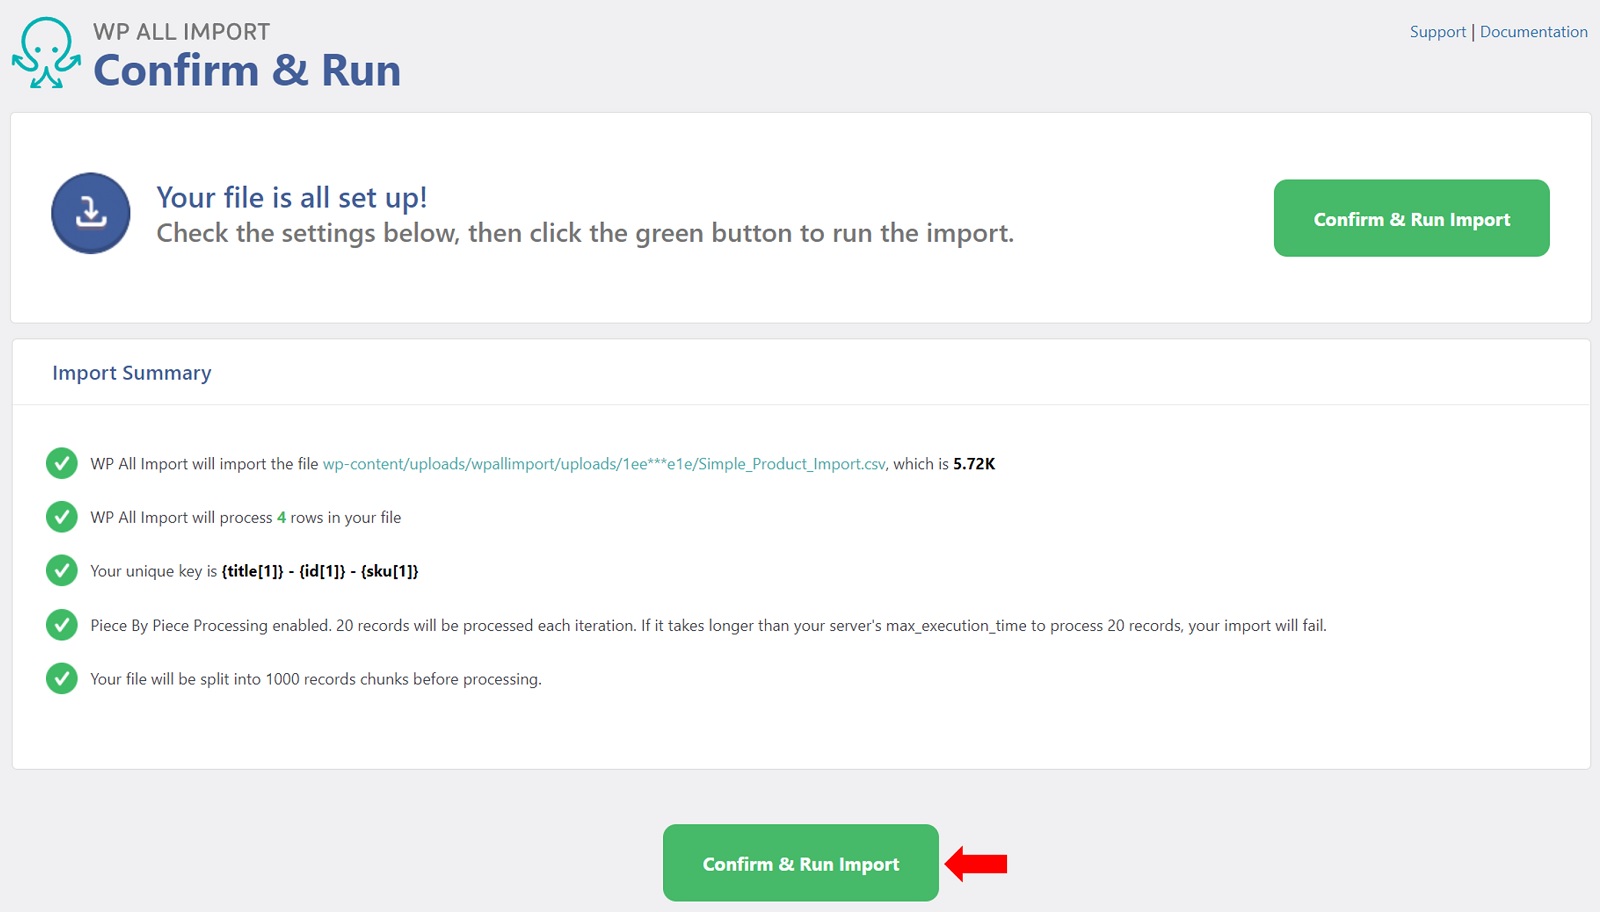
- As you can see, everything appears to be okay, so click the Confirm & Run Import button.
This will run the import. When it is finished, WP All Import will display this confirmation screen:

To confirm that everything worked, go to Products -> All Products in the WordPress main menu. Your new products should appear at the top of this listing:

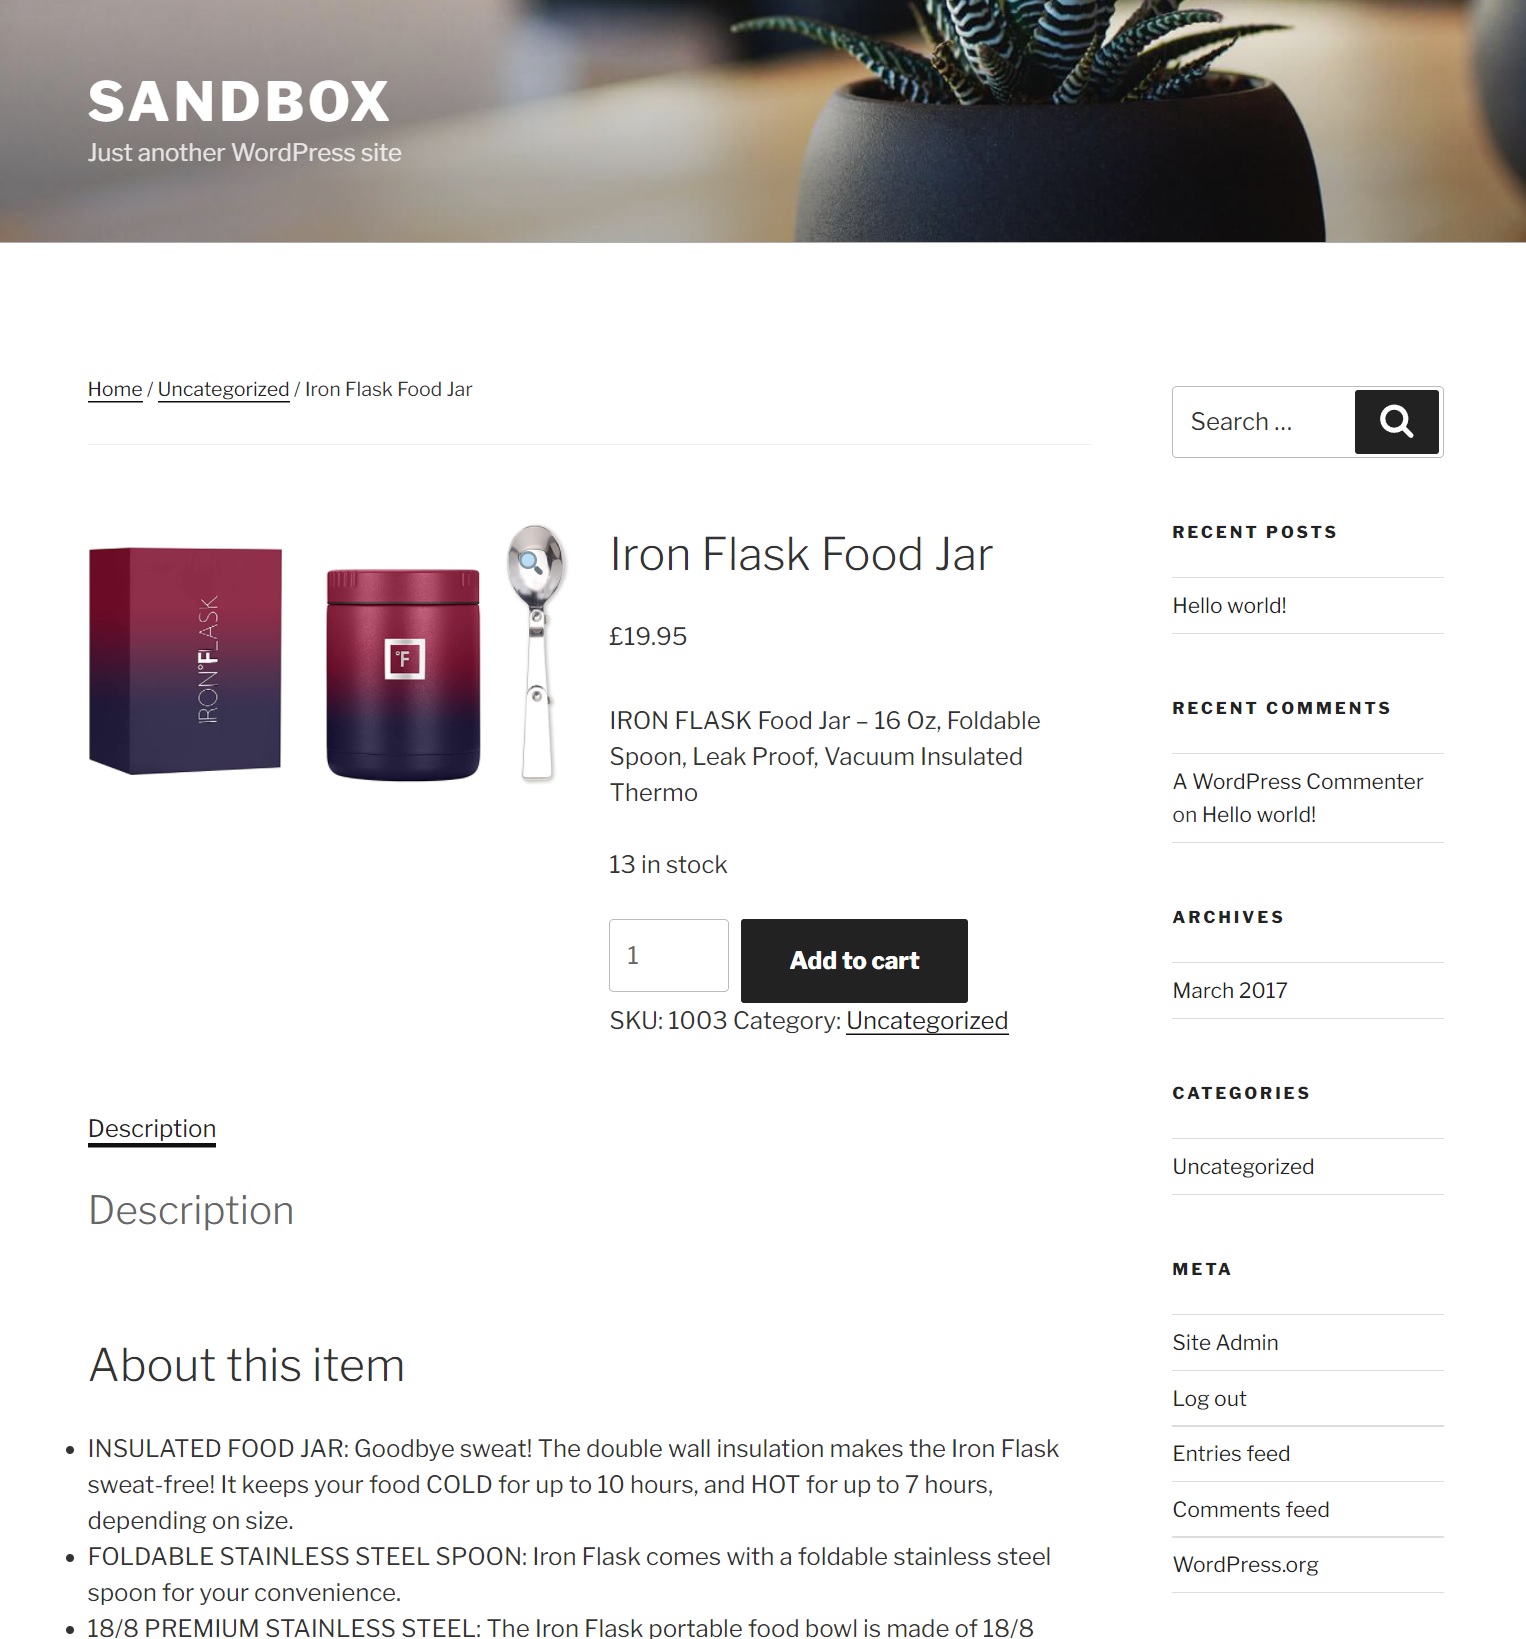
As you can see, the four new products have been imported and they appear to have the correct names, SKUs, stock levels, prices, and images.
Also, if you view one of the products in the Sandbox, you will see that it also contains the rest of the import data:
Importing WooCommerce Variable Products
As you know from our earlier statements, variable products are significantly more complex than simple products mainly because of these elements:
- attributes
- variants
- the parent-child relationship between a product and its variants
The challenge when importing variable products is to identify these elements and set them up correctly in WooCommerce during the import.
First, let’s look at what an import file might look like for a variable product:

To make this tutorial easier, we’ve used a file with a similar structure to one we used for importing simple products except for the following differences:
- There are six rows instead of four. This is because there are two parent products, each with two child variants.
- The contents of the Title column are repeated between each parent product and its two variants. This is one of the ways to indicate to WP All Import that one set of rows belongs to the same product.
- The Content, Short Description, and Image URL fields have content only for the parent products. This is because the content in these fields is defined at the parent product level, meaning it will not differ among the variants.
- The SKU field is unique for each row.
- The Parent SKU field is blank for parent products but refers to the Parent SKU for all variants. This is another way to indicate to WP All Import that the variants are children of their respective parent products.
- The Price and Stock fields have values only for the child products. This makes sense because these values differ by variant.
Put another way, the two parent products don’t really exist in the physical world. For example, they don’t have stock values because the physical inventory is all either a size Small or Large. There is no such thing as an unsized glove for these two product lines.
Create a New WooCommerce Variable Product Import
Go to All Import -> New Import in the WordPress main menu.
You will use the exact same process here as you used to create a simple product import, so we won’t repeat it here. The difference is that you need to download and use a different import file: https://drive.google.com/file/d/1d-t4WUWNoHo5wY4hcnPPhNwCo62dZI_d/view?usp=sharing
Note, this file has the same structure as the file screenshot used above.
Review the Product Import File
This part of the process is the same.
Match the Incoming Data Fields to the WooCommerce Product Fields
The mapping of the fields for the Title & Description panel is also the same.
It’s from this point onward process begins to change:
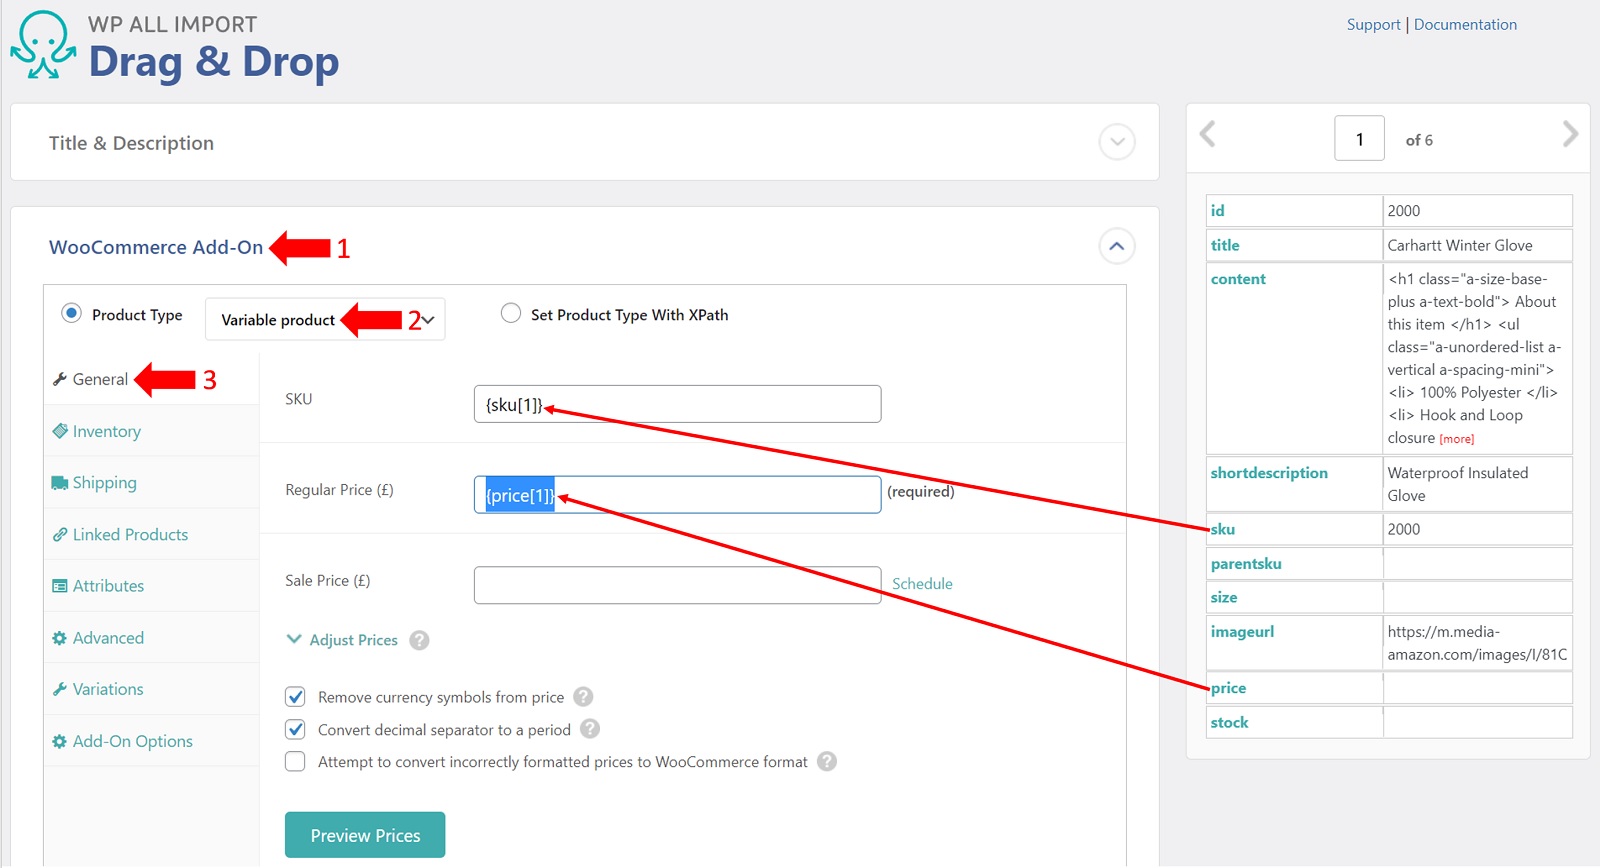
- Expand the WooCommerce Add-On panel.
- Set the Product Type to Variable product.
- Select the General tab.
- Drag the sku and price incoming fields to their WooCommerce field targets as shown above.
Next…
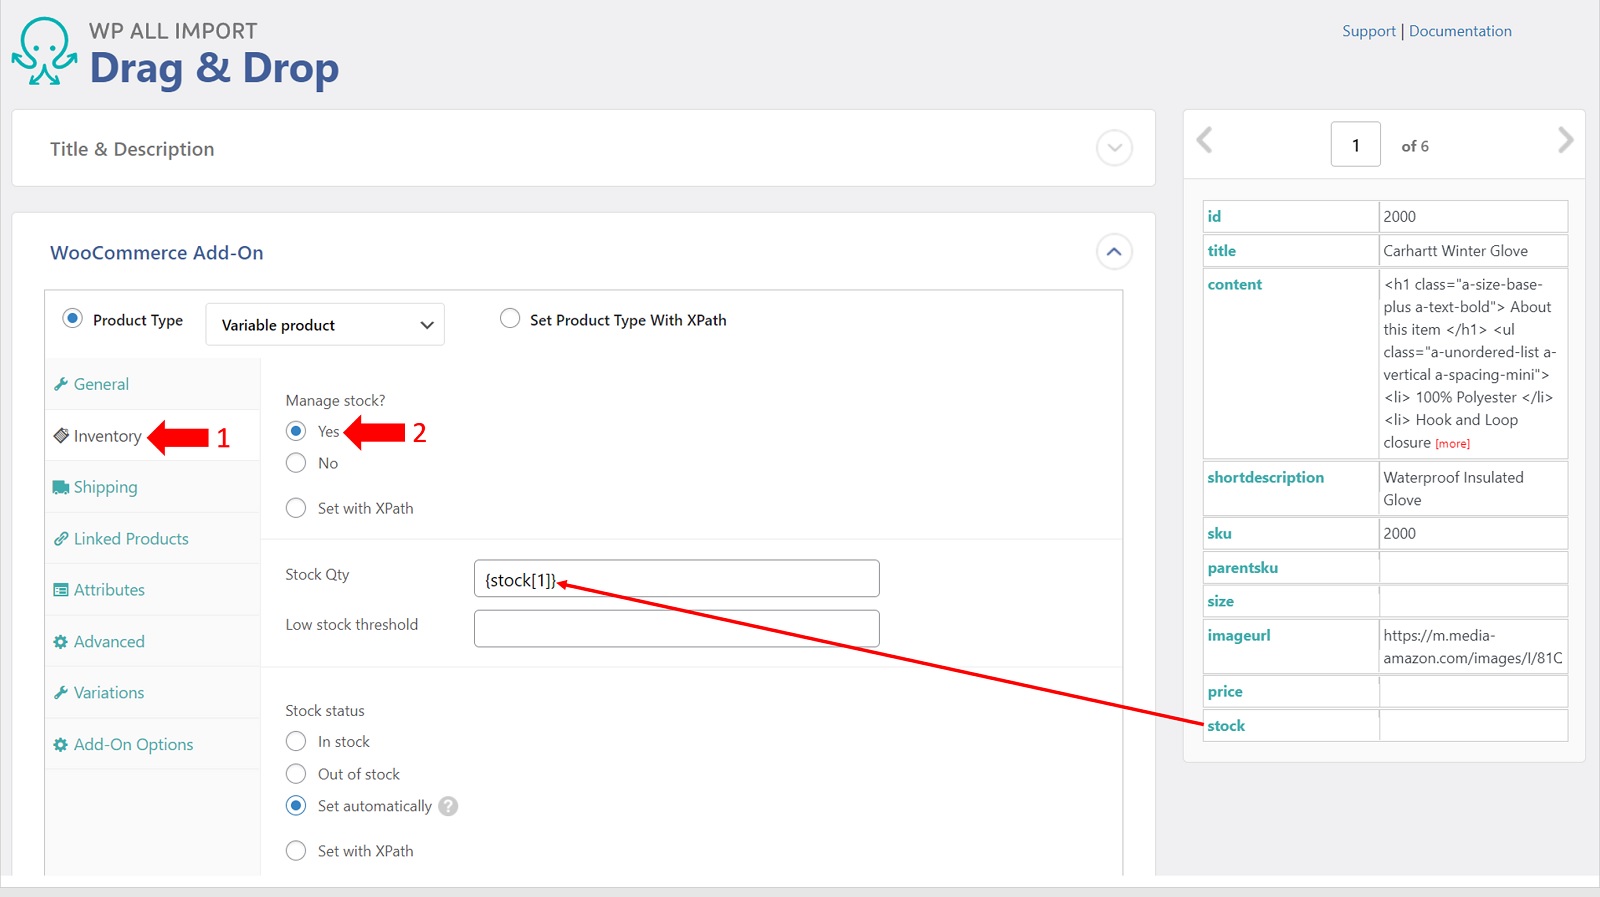
- Select the Inventory tab.
- Set Manage stock? to Yes.
- Drag the incoming stock field to the Stock Qty edit box.
Note, we are really talking about managing inventory levels for the variants here since there is no incoming stock quantity data for the parent products.
Next…
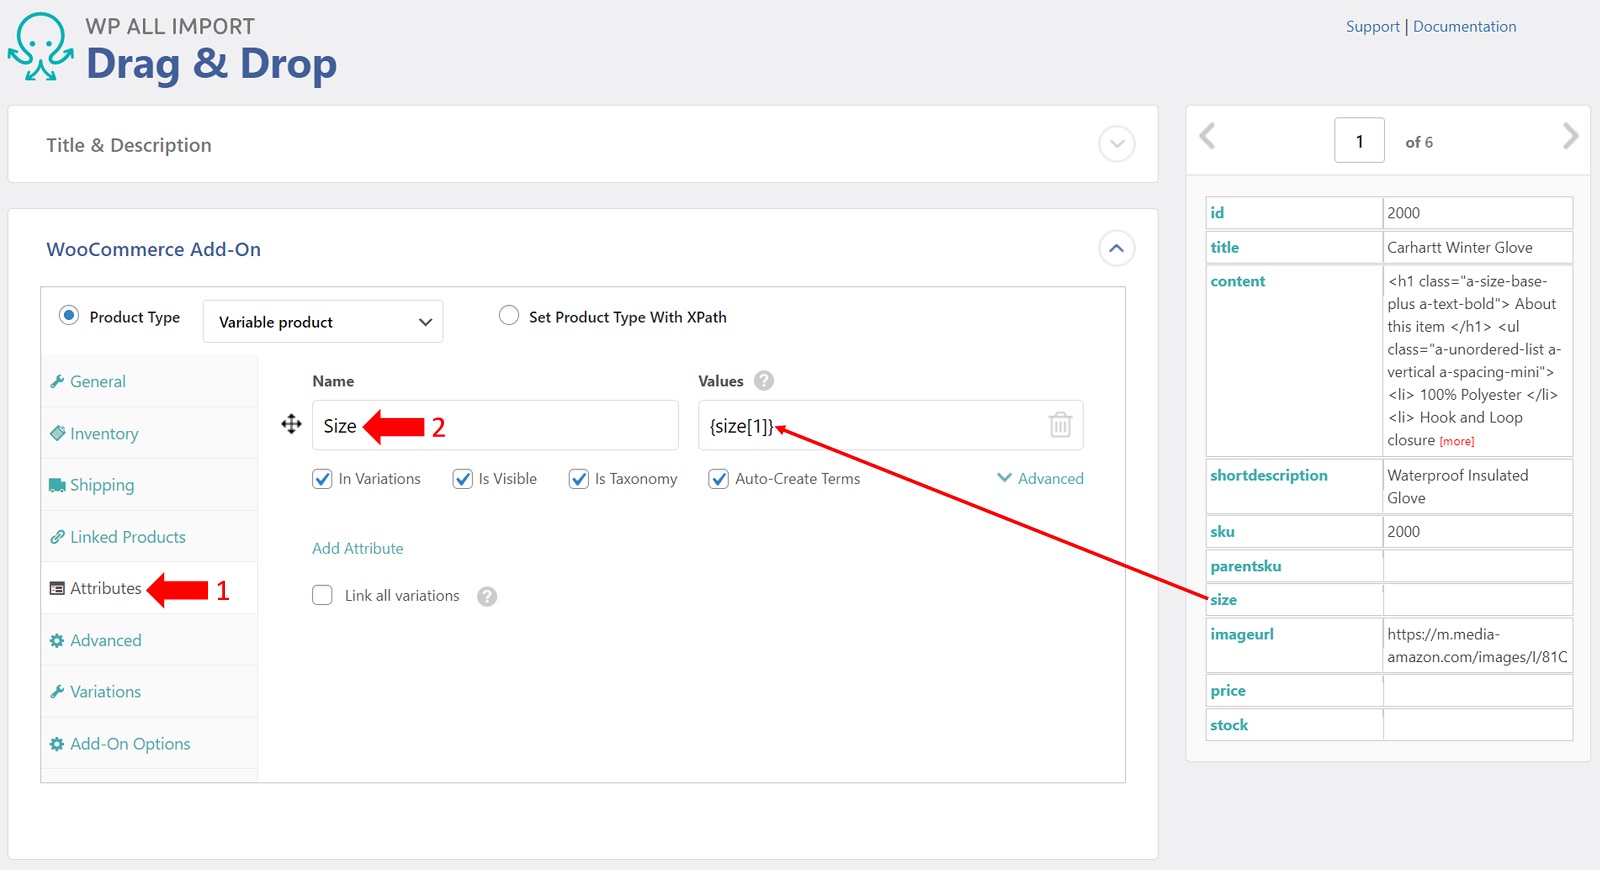
- Select the Attributes tab.
- Enter the word “Size” in the Name edit box. The name can be anything you want it to be.
- Drag the incoming size field into the Values edit box. There is no relationship here between the name of the incoming field and the name you’ve assigned to the attribute. They're the same here merely to avoid creating too many terms for the same thing.
To be clear, you are helping WP All Import a) identify the attribute in question here, and b) by default, to identify and define the attribute terms.
Next…

- Select the Variations tab.
- Select the Set first variation as the default selection option.
- Drag the incoming sku field into the SKU element for parent edit box.
- Drag the incoming parentsku field into the Parent SKU element for variation edit box.
Here, you’re just helping WP All Import understand how to map the child variants to the parent product, and also setting the first variant as the default selection in the WooCommerce product page.
Completing the Variable Products Import
The rest of the process is the same as for importing simple products. In other words, the only differences occur within the WooCommerce Add-On panel, as shown in the preceding steps. To confirm that the import worked, go to Products -> All Products in the WordPress main menu. Your new products should appear at the top of this listing:
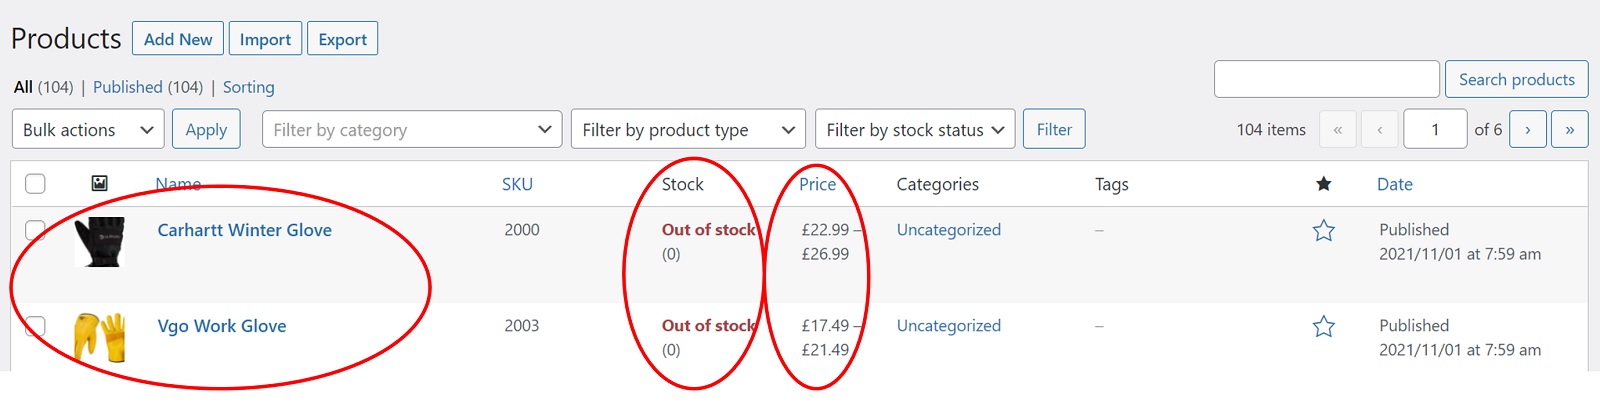
A few points of note:
- Only the parent products show up in this listing.
- The Stock column shows that the product is “Out of stock”. This indicates the stock level for the actual parent product, which doesn’t physically exist. The stock details are managed at the variant level, as you will see shortly. Note, you can get this product listing to display the consolidated stock level for all of the variants combined, but this requires a paid plugin.
- The Price column shows a range of prices from the lowest to highest prices defined for the child variants.
You can see these stock and price details by viewing one of the products:
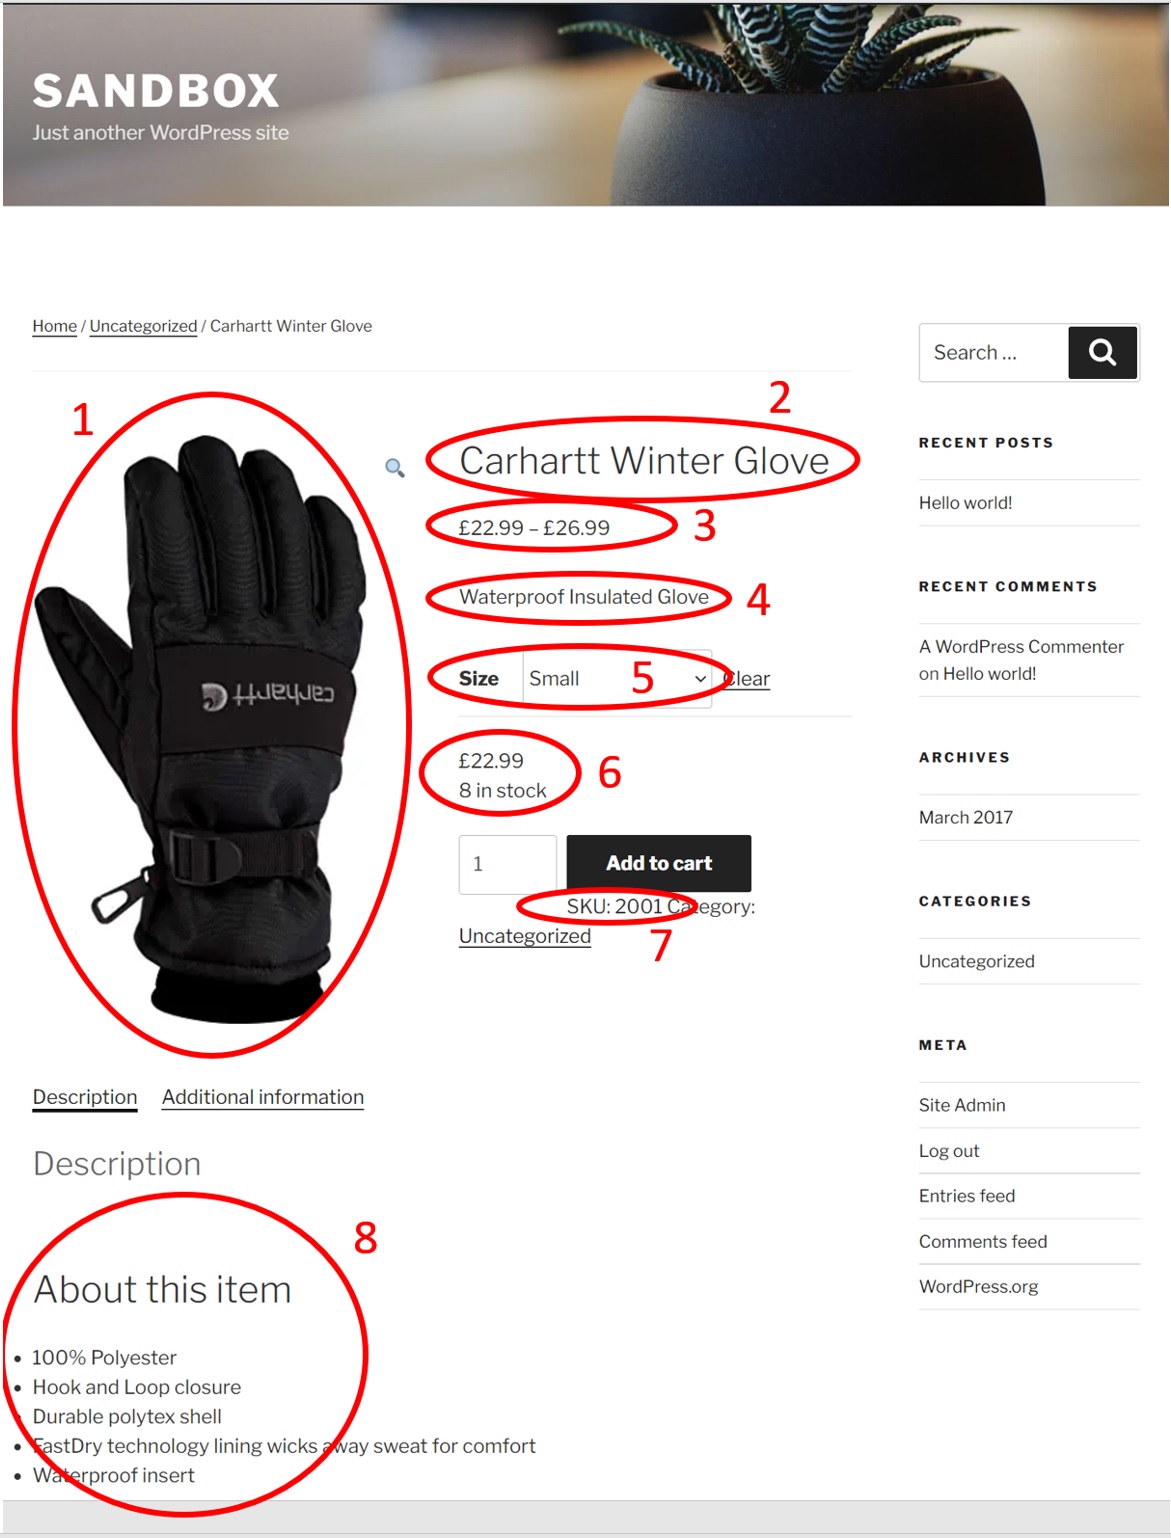
Item 6 contains the price and stock level for the variant being displayed.
To give you a better sense of where all the information is stored for this view, here is a complete breakdown:
- The image in this case is coming from the parent product, but we could have imported images at the variant level.
- The title is coming from the parent product
- The price range represents the lowest and highest prices from all the product’s variants.
- The short description is from the parent product.
- The size is an attribute used to define the variants.
- The price & stock levels, as already mentioned, are from the variant
- The SKU is from the variant.
- The About this item section is from the parent product.
More Complex Variable Imports
We have used the simplest possible scenario to describe WooCommerce variable product imports in this tutorial. The same goes for our simple product import example. WP All Import is capable of handling much more complex import scenarios. In fact, after 10 years of constant improvement and evolution, it is fair to say that WP All Import is capable of handling any type of import, no matter how complex.
For more information on importing products, see Import WooCommerce Products from any XML or CSV.
Bulk Editing WooCommerce Product Information
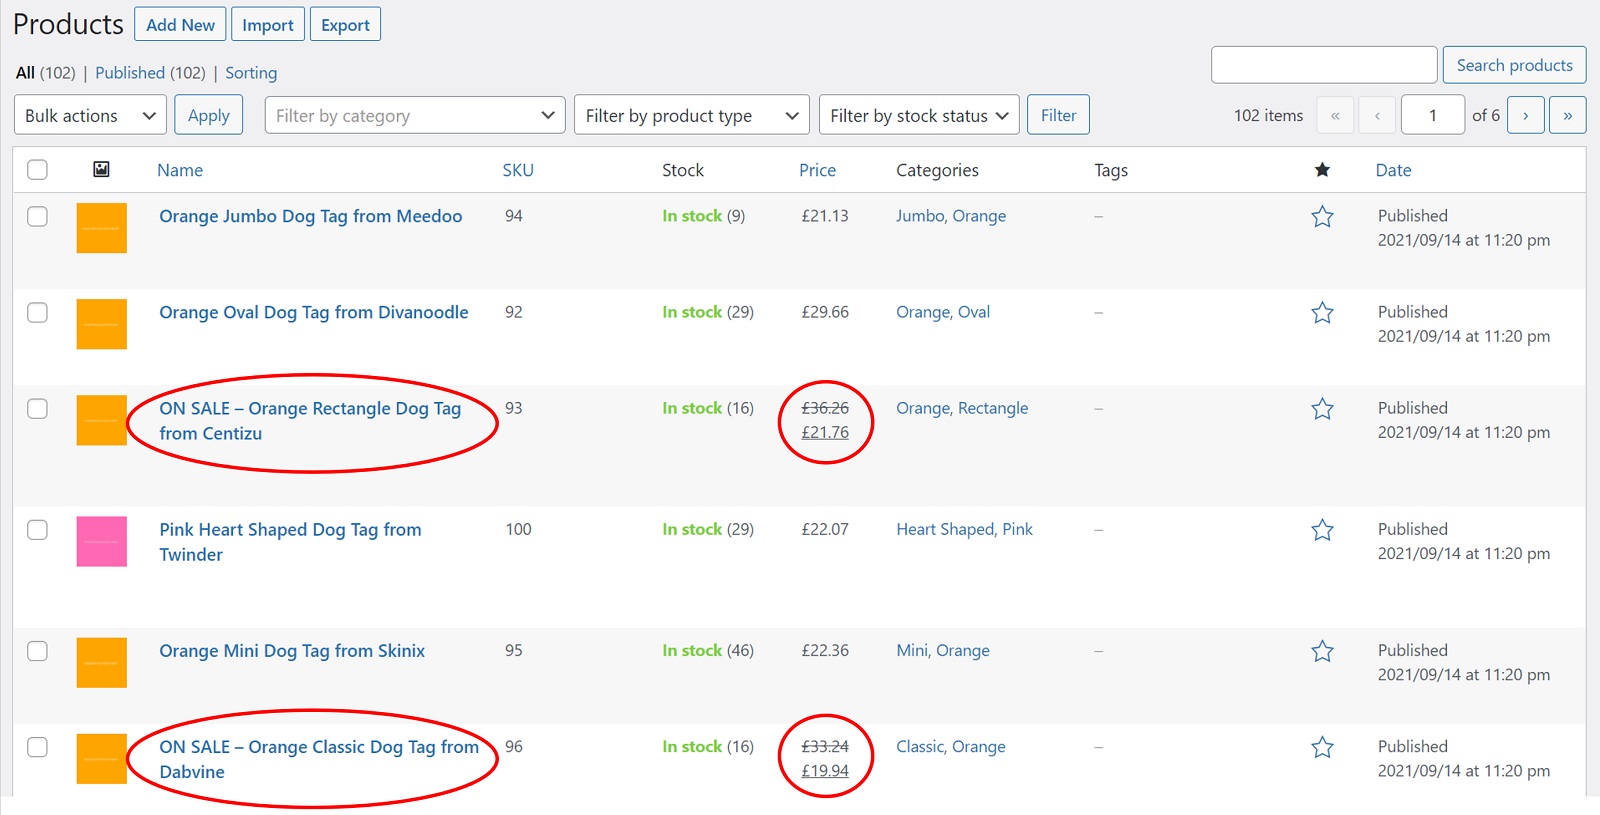
You have decided to hold a 40 % discount sale for all your products with a price greater than $30. This means that you need to enter a sale price for each of these products. Additionally, to accentuate that they are on sale, you want to temporarily add an “ON SALE – ” prefix to their titles.
You could just make these changes through the WooCommerce interface. But doing this for a lot of products is going to be monotonous, time-consuming, and error-prone.
Fortunately, there is an alternative:
- Export the relevant product data to a spreadsheet using WP All Export.
- Modify that data in the spreadsheet, where you can make large sets of changes using formulas and copy-and-paste.
- Import the data using WP All Import.
Let’s see how to do this. Again, you can use our online sandbox to follow along.
Export the Product Data to a Spreadsheet
First, click All Export -> New Export in the WordPress navigation menu. This will open the New Export screen.
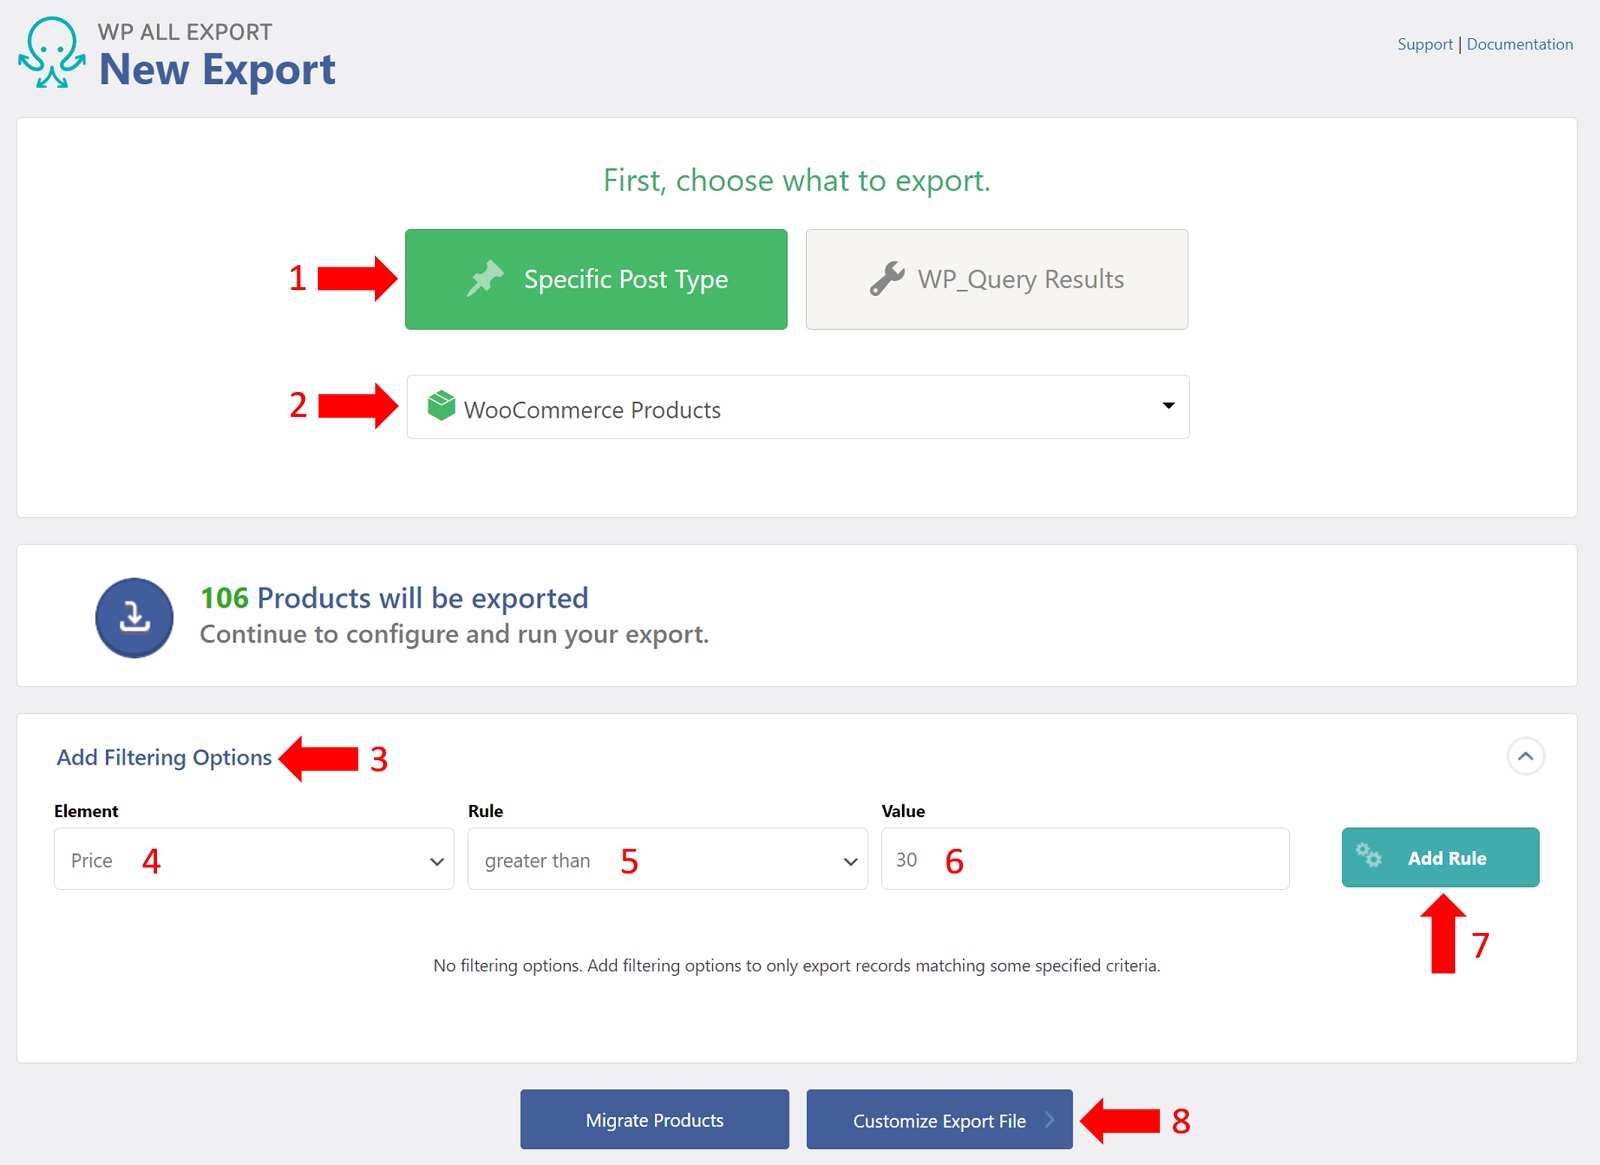
- Select Specific Post Type.
- Select WooCommerce Products. This will cause the Add Filtering Options section to appear.
- Expand the Add Filtering Options section.
- Select Price from the Element list.
- Select greater than from the Rule list.
- Enter “30” in the Value field.
- Click the Add Rule button. This will apply the rule and reduce the number of products accordingly. In our test database, there are 27 products with a price greater than 30.
- Click the blue Customize Export File button at the bottom of the screen.
This will bring you to the Drag & Drop interface, which allows you to control the columns that will be in your export:
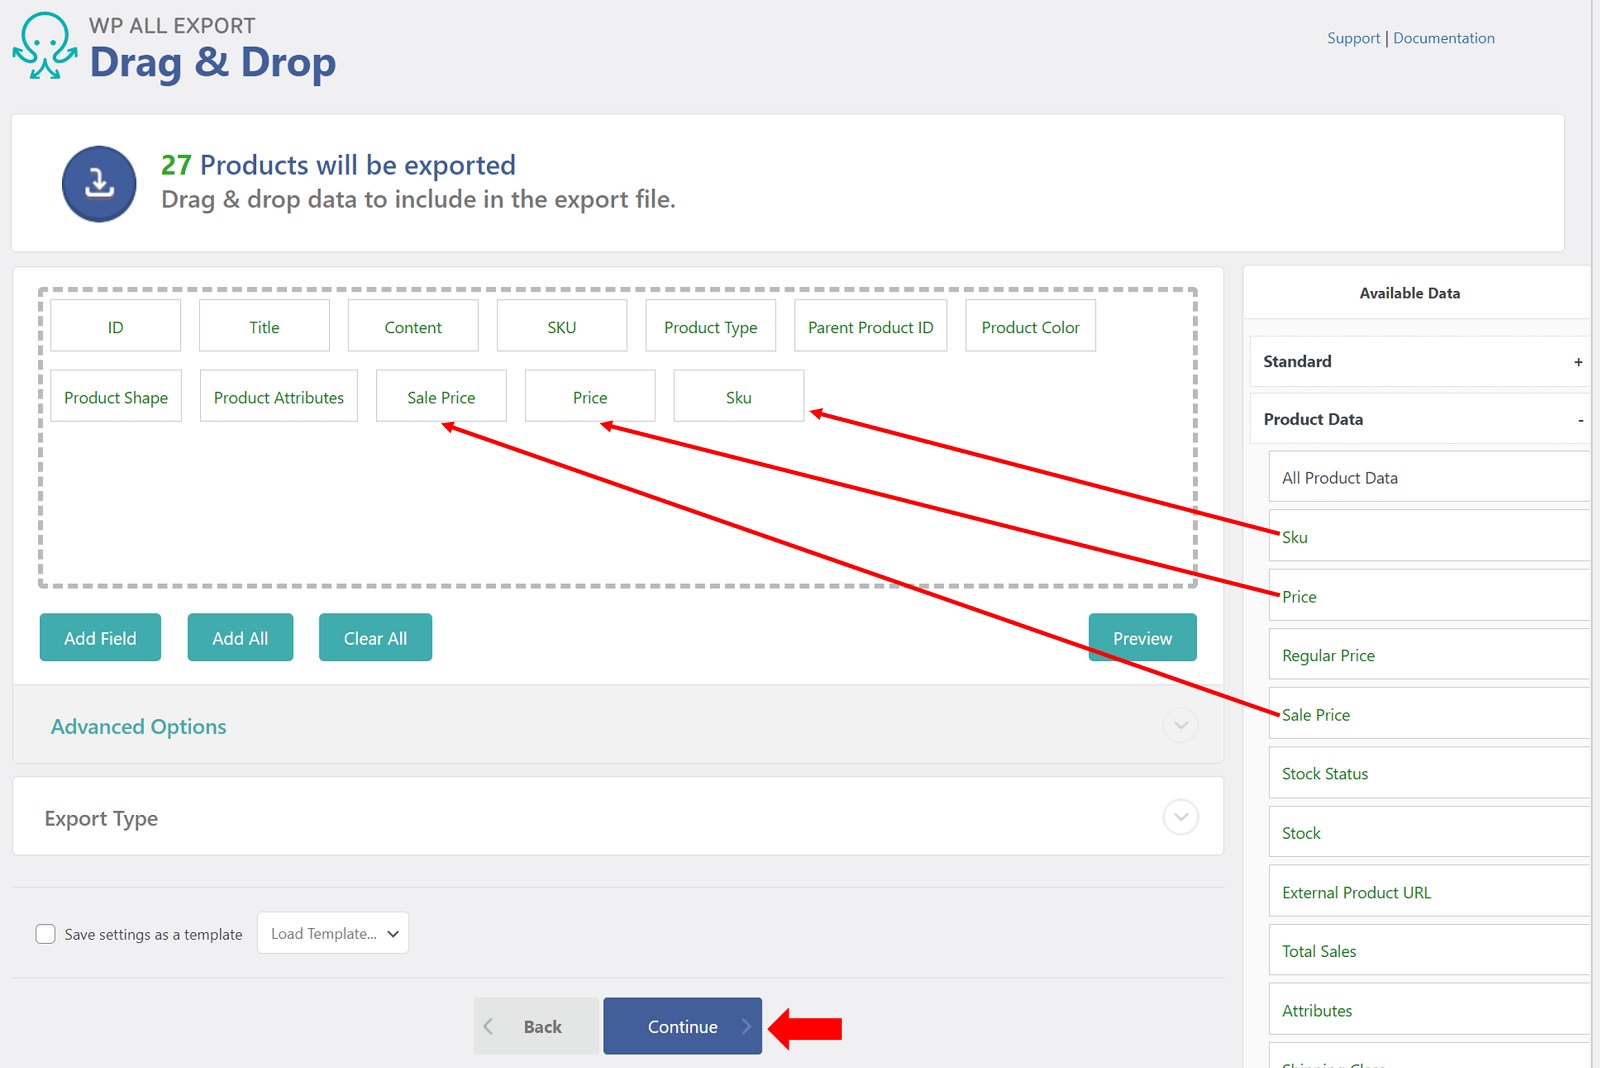
- In the Available Data section on the right, expand the Product Data panel.
- Drag the Sale Price, Price, and Sku fields into the column selection area.
- Click the blue Continue button at the bottom of the screen.
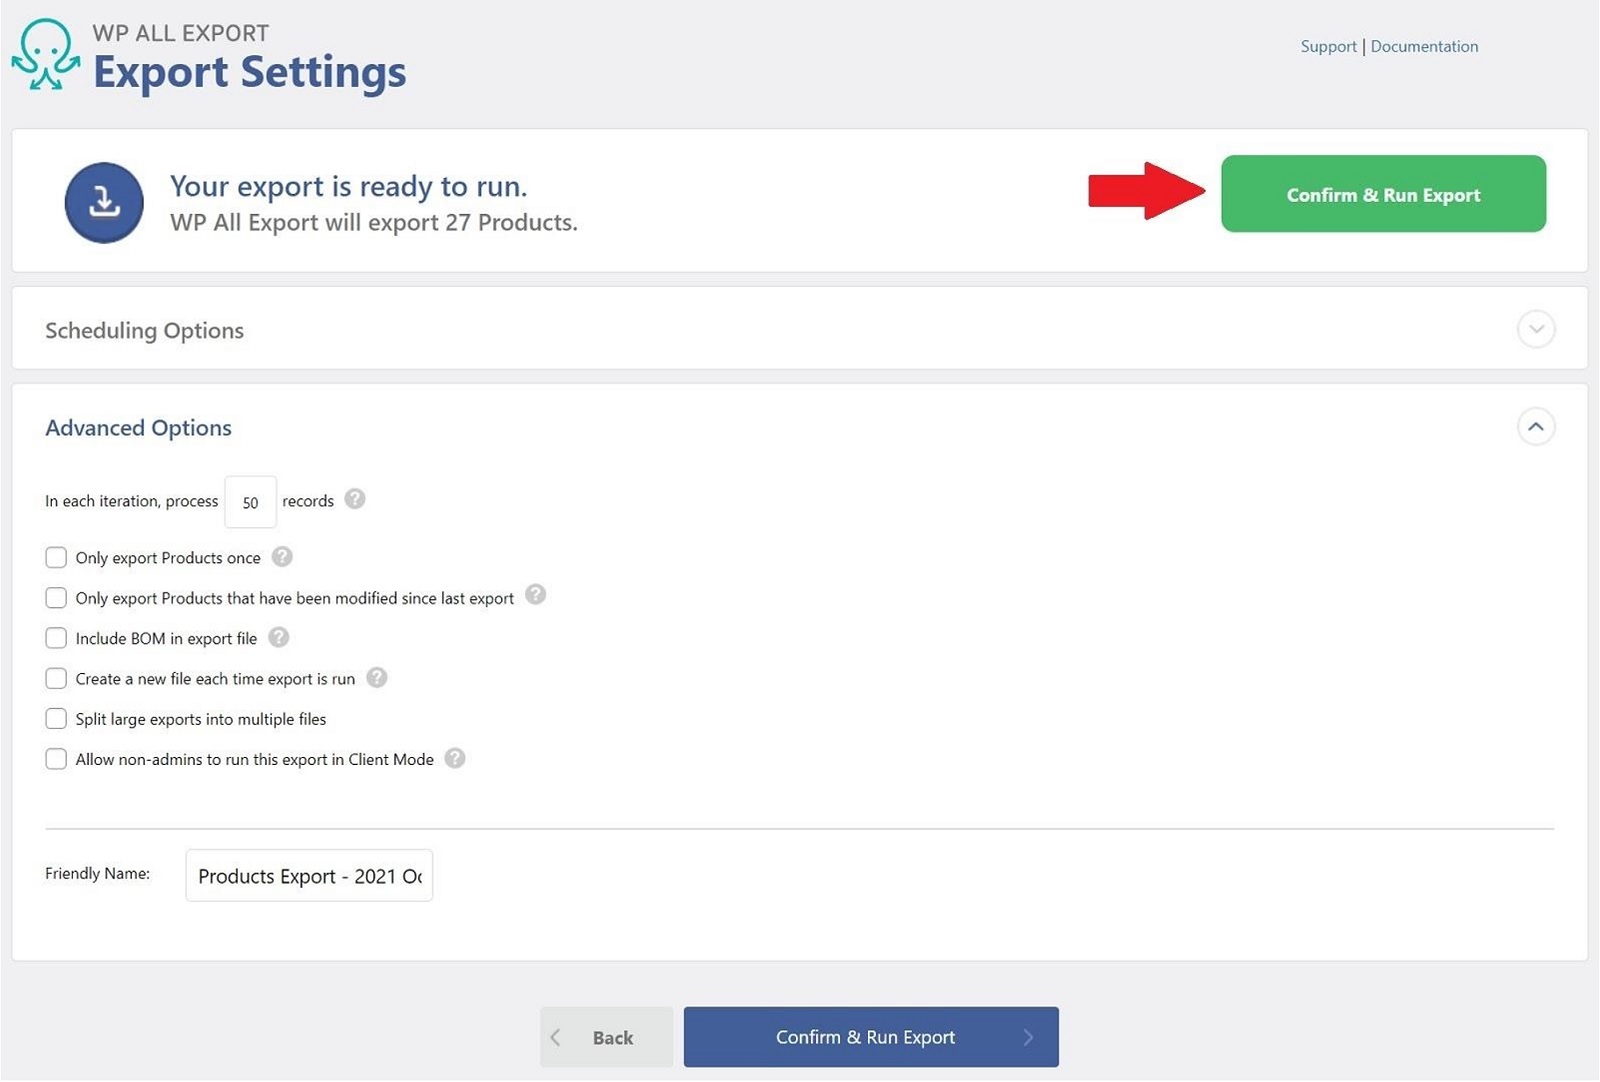
This will bring you to the Export Settings screen, which allows you to control scheduling and advanced options. We’re not going to do either in this example, so simply click the green Confirm & Run Export button.
This will bring you to the Confirm & Run screen:
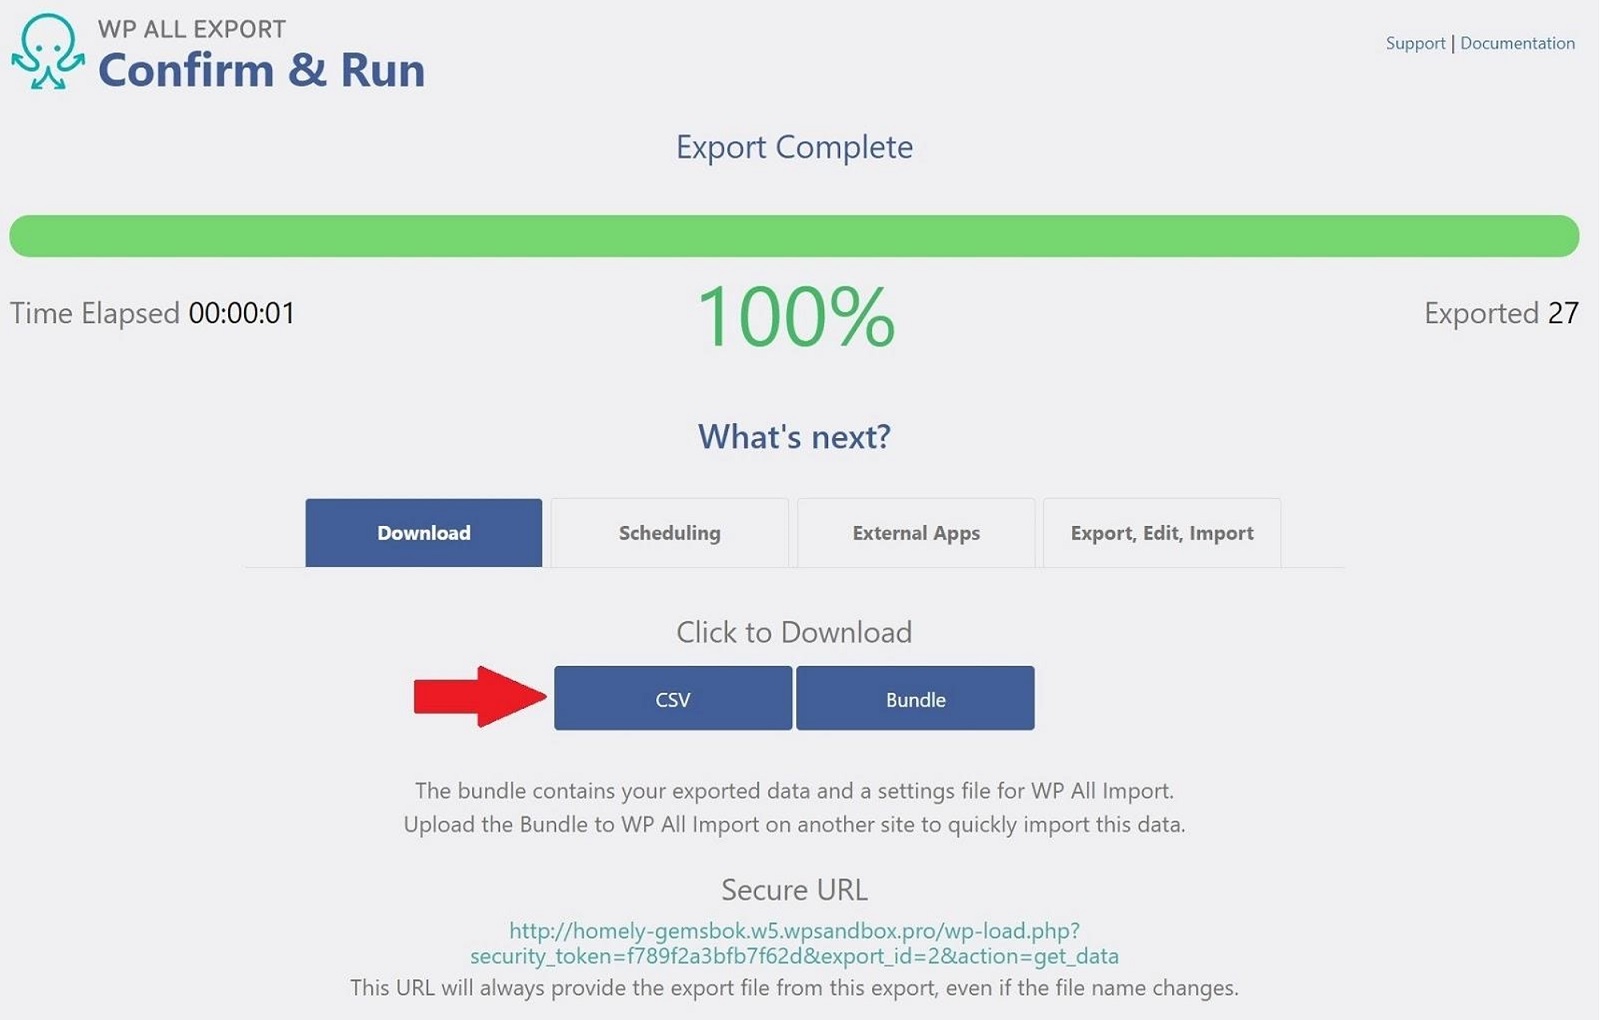
When the export finishes, click the blue CSV button in the Click to Download section in the lower half of the screen. This will download the export file.
Modify the Product Data in a Spreadsheet
Open your export file in your favorite spreadsheet and perform the following tasks:
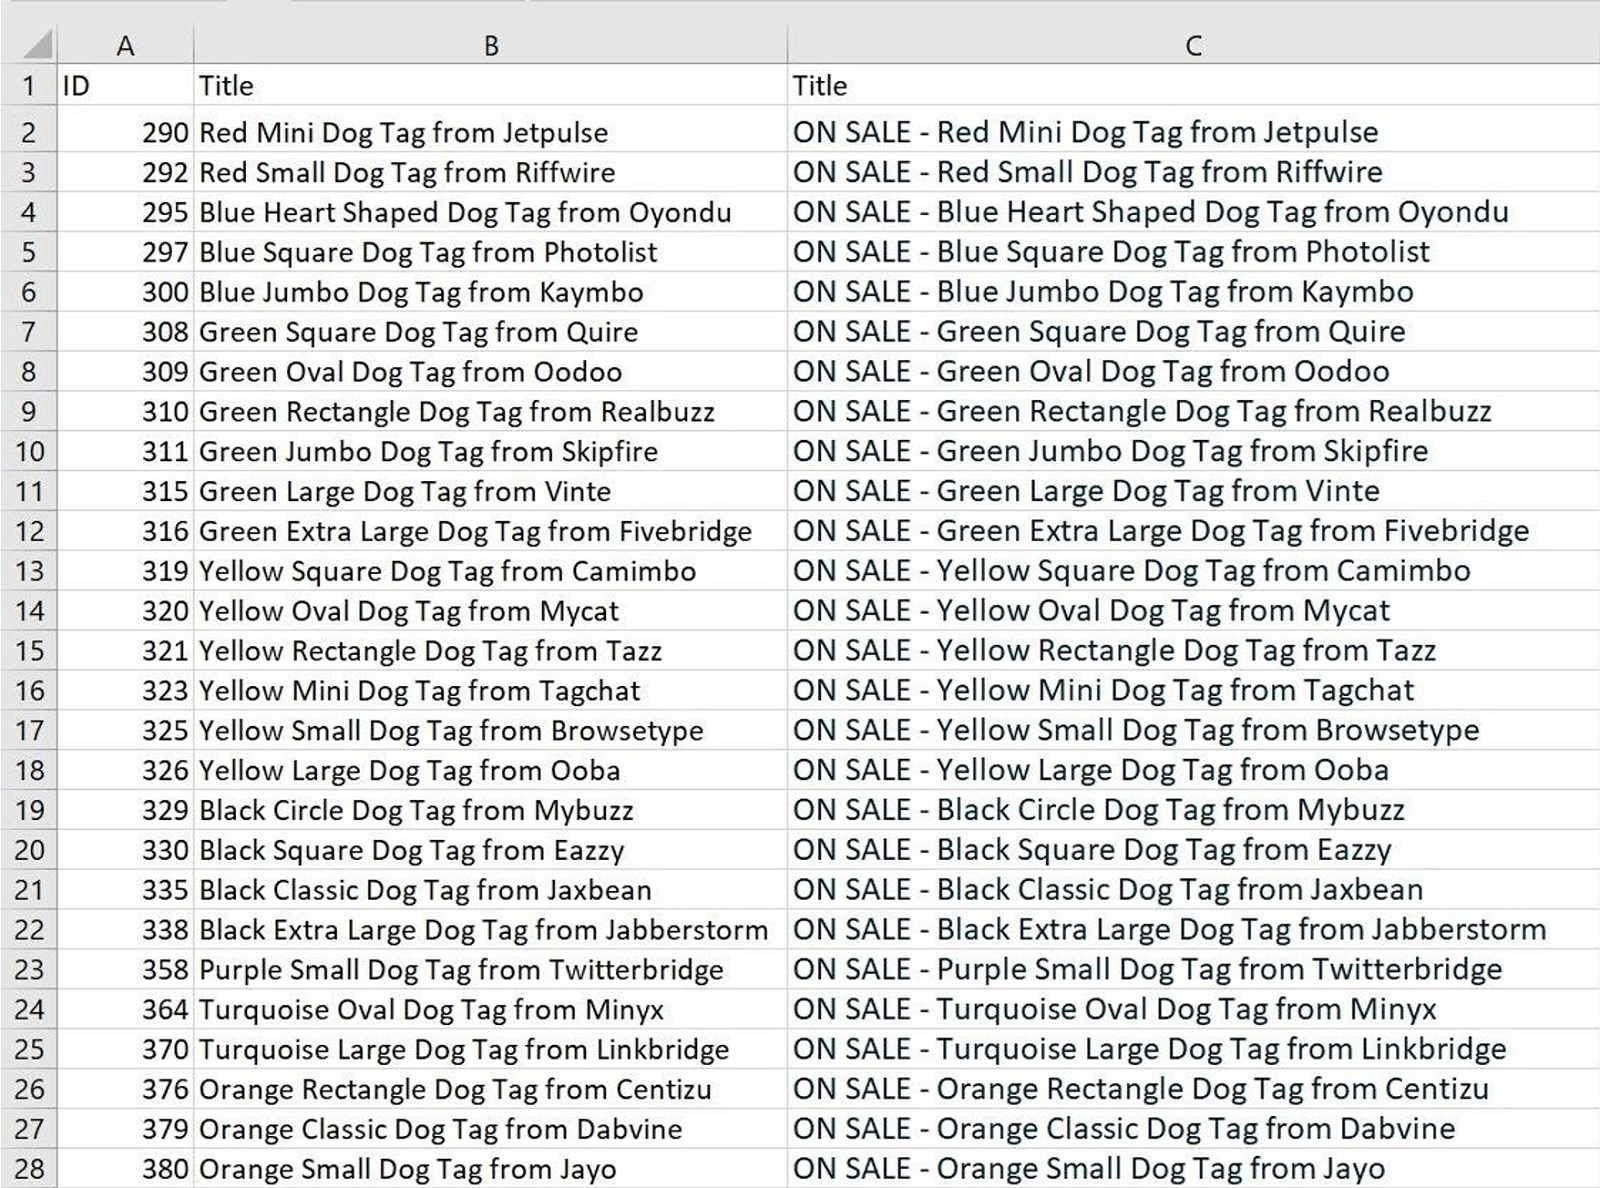
- Insert a column to the right of the Title column and enter this formula in the first data row of the new column (Row 2 in our spreadsheet): = “ON SALE – “&B2. Note, this is the formula for Microsoft Excel. It may differ for other spreadsheets. When this formula is applied, it will create a value like “ON SALE - Red Mini Dog Tag from Jetpulse”.
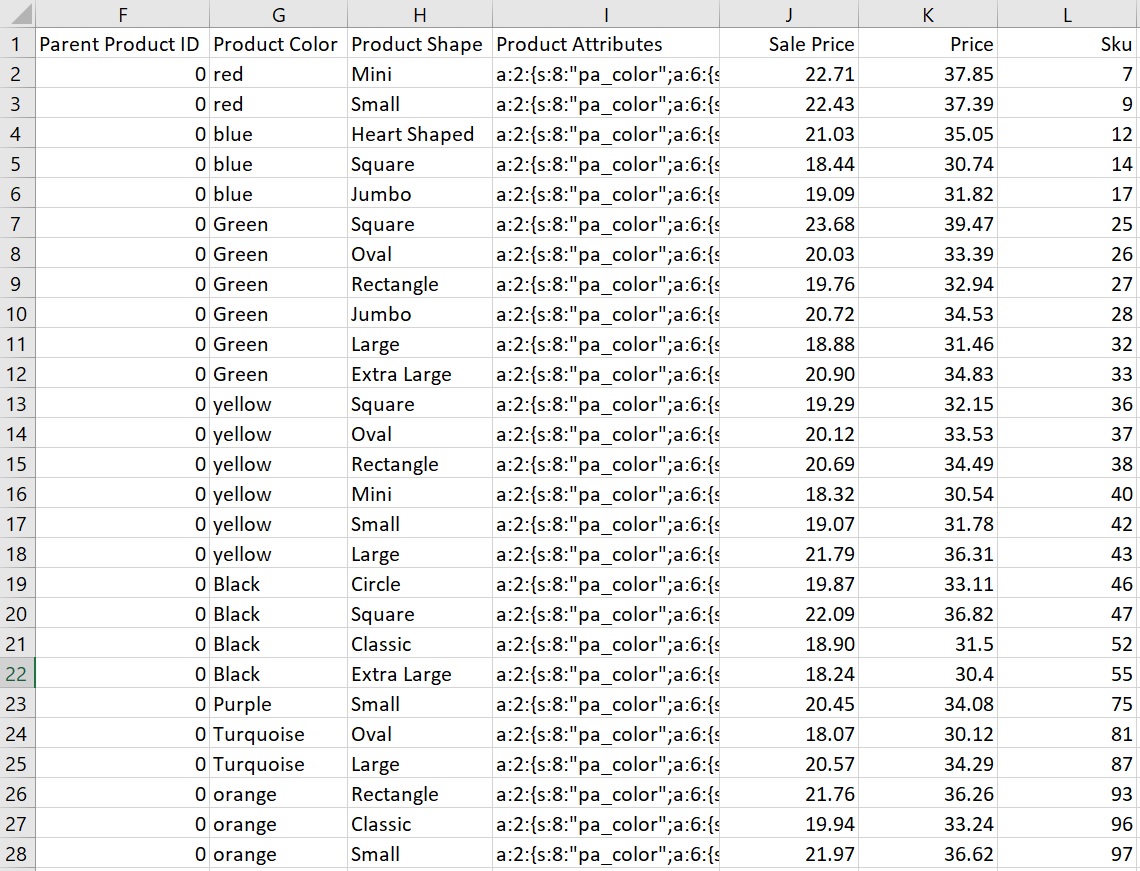
- Copy the formula to all the rows in your new column so that the affected area of your spreadsheet looks something like this:
- Copy all the values from your new column into the old Title column but paste them as values to get rid of the formula. Then delete your new column.
- Locate the Price and Sale Price columns. In our spreadsheet, these are columns J and K. Enter the following formula in the first data row (Row 2 in our spreadsheet) of the Sale Price column: = K2*0.6. This will calculate the Sale Price as 60% of the normal price.
- Apply your formula to all rows of the Sale Price column.
- Format the Sale Price column to 2 decimal places. The two columns should now look like this:
- Save the spreadsheet.
Import the Modified Spreadsheet
WP All Export keeps track of prior exports and can use this information to automate related imports. To see this in action, click All Export -> Manage Exports in the main WordPress navigation menu. This will open up the Manage Exports screen:
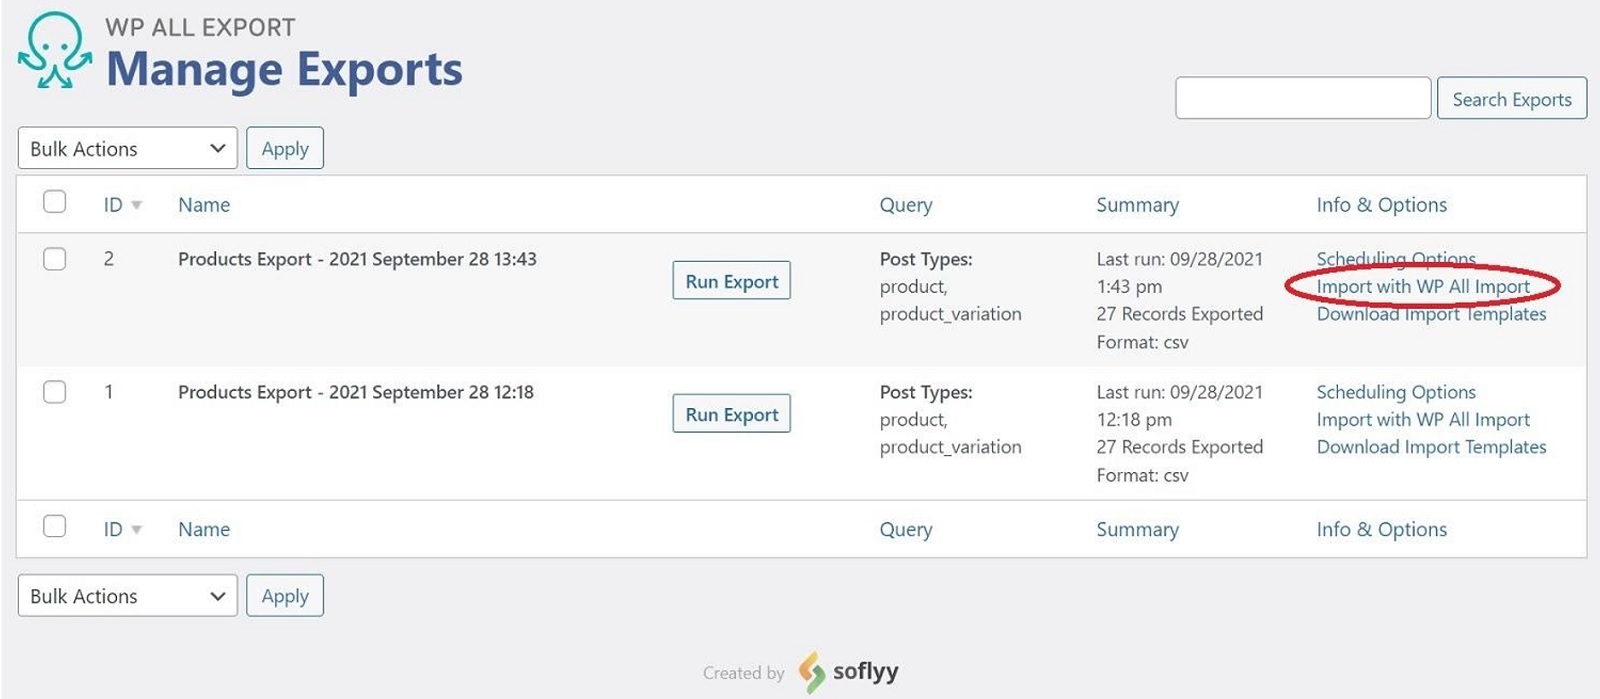
You should see your most recent export at the top of the list of exports. On the far right of your export row, under the Info & Options section, click Import with WP All Import. This will open the New Import screen:
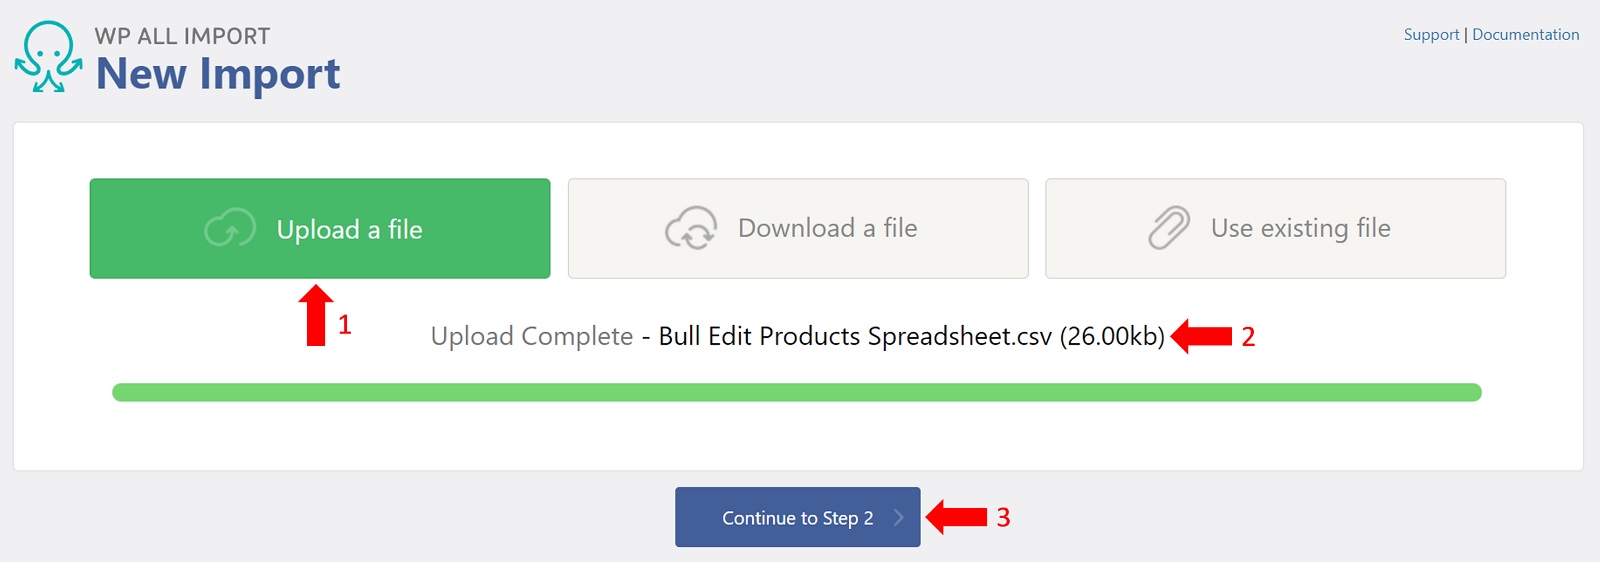
- Select Upload a file.
- Upload your modified spreadsheet.
- When the upload is complete, click the blue Continue to Step 2 button.
- Keep hitting the Continue buttons for all subsequent screens until you come to the Confirm & Run screen, where you simply click the green Confirm & Run Import button.
- When your import is complete, you should get a confirmation like this:
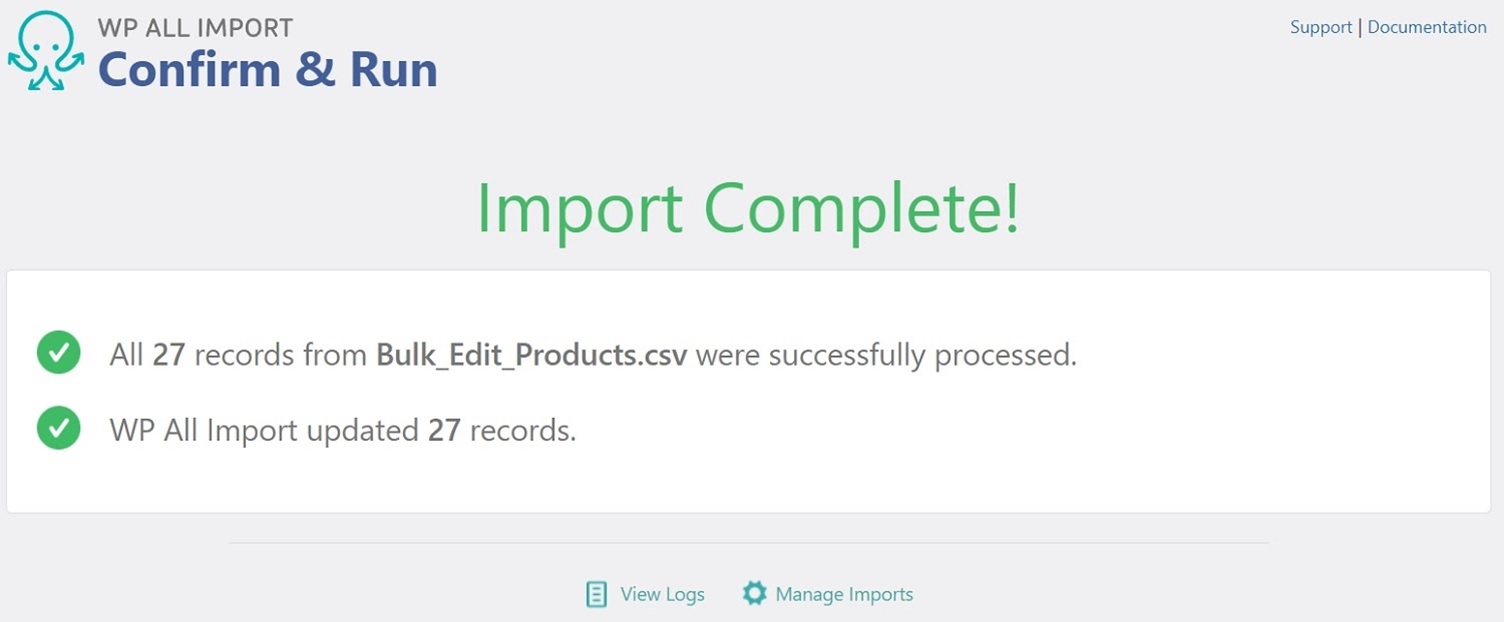
If you now check the affected products in WooCommerce, you will find that any product with a Price > 30 now has a 40% discount applied to it and also has the “ON SALE - “ prefix added to its Title field, which is shown in the WooCommerce Products interface as “Name”:
When you kept hitting the Continue buttons in Step 4 of this section, you probably noticed that you bypassed some fairly sophisticated import screens. How did WP All Import know to handle all those import screens?
When you performed your initial export, WP All Export recorded all of the settings that you used. When you asked WP All Import to perform a related import, it accessed those settings and automatically applied them to your import, saving you lots of time and effort.
WP All Import and WP All Export both create these kinds of time-saving opportunities regardless of whether you are trying to import or export your WooCommerce product data.
For more information on bulk editing WooCommerce product data, see Easily Bulk Edit WooCommerce Products in Excel.
Related Information
WooCommerce Export Orders to CSV
WooCommerce Export Orders to Excel
Advanced Order Export for WooCommerce
Best WooCommerce Shipping Plugins
8 Best Photography Plugins for WooCommerce
