Are you a WooCommerce store owner looking to export your orders to a CSV file?
Exporting your orders can help you analyze sales data, share details with your team, or import order information into another system. CSV is a common and widely supported file format, which ensures compatibility across various platforms.
In this article, we'll guide you through the process of exporting WooCommerce orders to a CSV file using the WP All Export plugin.
If you want to follow along, use our convenient sandbox feature and select WooCommerce store as the demo type.
Why Export WooCommerce Orders to CSV Format
Comma-Separated Values (CSV) is a popular and lightweight file format known for its simplicity and compatibility with various spreadsheet applications. They are easy to create, store, share, and edit using software such as Google Sheets and Microsoft Excel. When it comes to your WooCommerce store, being able to export orders in CSV format provides several benefits, such as:
- Easy to share and integrate: CSV is a universally supported file format that is easy to share and integrate. If you work with third-party service providers such as delivery partners, accountants, or warehouse staff, being able to easily export and import the file allows for seamless transfer of data between different systems.
- Simplified analysis and reporting: Many statistical and data analysis tools support the CSV format. This allows you to perform analytics, generate reports, and visualize data to better understand sales trends and customer behavior.
- Record keeping: A CSV export of your orders helps maintain comprehensive records of your transactions. This comes in handy when you need to restore lost data or reference past orders.
Now that we know the many benefits of exporting your order data to CSV format, let's look at how to export it using the WP All Export plugin.
How to Export WooCommerce Orders to CSV using WP All Export
WooCommerce offers a built-in method for exporting orders in CSV format, but it is quite limited and does not allow you to export all of the order details.
If you need more flexibility in selecting data, a third-party plugin like WP All Export can help. It is the best WooCommerce export orders plugin, giving you complete control over exactly which order data to export.

It is easy to use and comes with an intuitive drag-and-drop interface that simplifies the export process, even for beginners.
It comes with a seamless integration with WooCommerce and includes many advanced features such as:
- Efficient handling of large amounts of order data without performance issues.
- Flexible data filters to export only specific orders.
- Full order details, including support for variations and product custom fields.
- Automatic exports on a regular schedule to keep data updated without manual intervention.
To get started, you'll first need to purchase the premium version of WP All Exports from its website. We'll recommend going with the WooCommerce Pro Package as it includes full support for WooCommerce data.
Once you have the plugin files, simply install and activate them on your WordPress website.
After setting up the plugin, let’s look at the below steps to export your WooCommerce orders as a CSV file.
If you prefer a video format, you can watch the video below that covers the exact same steps.
1. Creating a CSV WooCommerce Order Export
WP All Export can export orders to a variety of file formats, with CSV being the default.
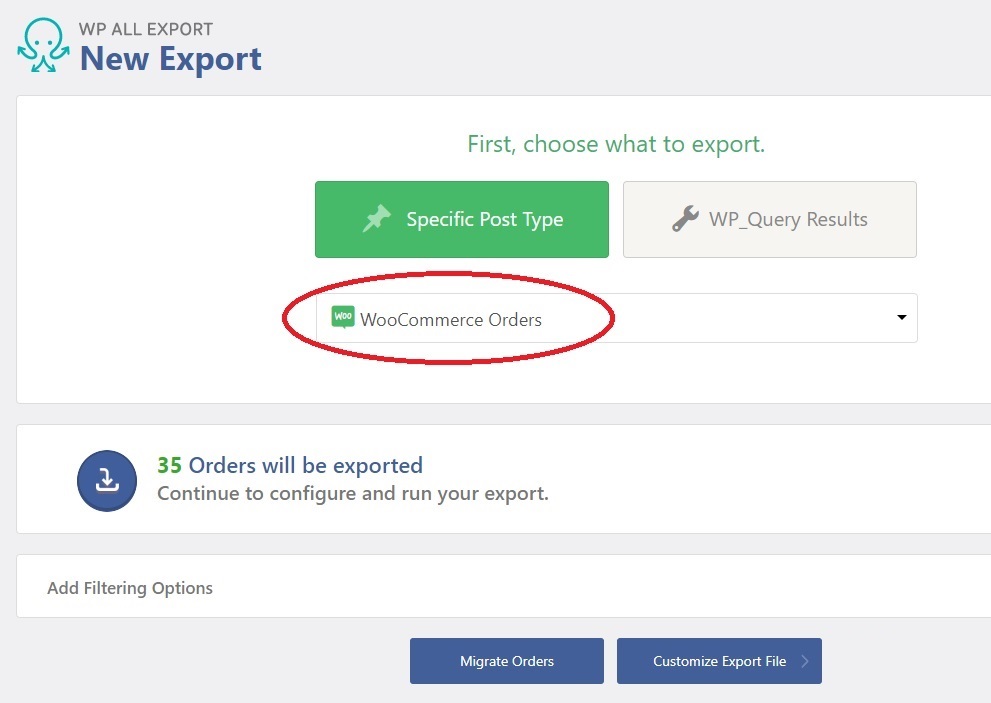
To start your export, go to All Export › New Export and select WooCommerce Orders.
2. Filtering WooCommerce Orders for CSV Exports
Often, you will need to export only a subset of your orders. For example, you may want to export orders for a specific date range, or orders that contain products with a certain category or tag, or orders from a specific country. WP All Export comes with a simple but powerful filter builder so that you can decide exactly which WooCommerce orders are exported to your CSV file.
To set up your export filters, simply expand the Add Filtering Options panel at the bottom. Here, you can start building your custom filter rules.
Each filter rule consists of three components:
- Element: The specific order detail you want to filter, such as order total, product, and more.
- Rule: The condition to apply, like "equals", "equal to or greater than", "contains", and so on.
- Value: The criteria you want to match, like minimum order amount, product SKU, and more.
After you've added all three details, your filter should look like this.

Next, click the Add Rule button. If this is your only rule, the system will select every order with an Order Total of 25 dollars or more.
WP All Export also lets you combine rules to create more complex filters.
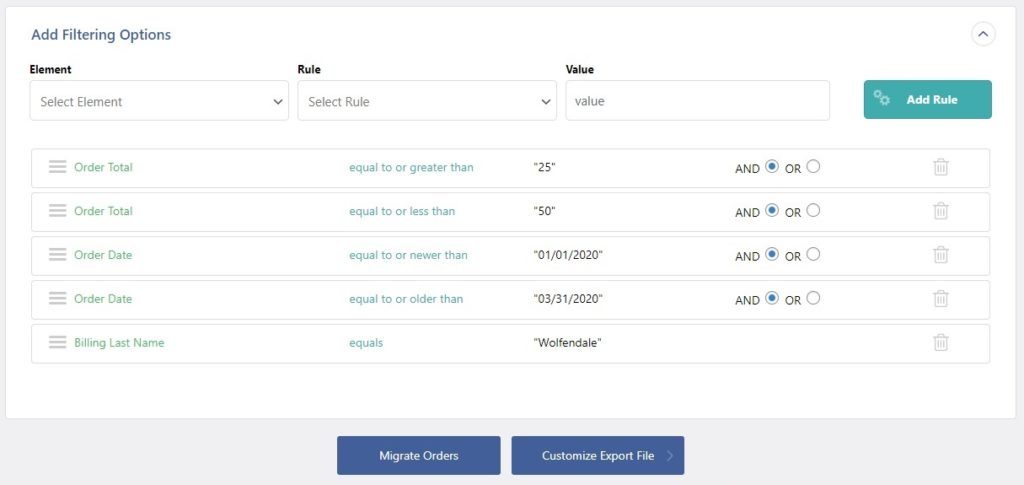
For example, you can select all orders with an Order Total between $25 and $50, an Order Date between January 01, 2020, and March 31, 2020, and with a Billing Last Name of “Wolfendale”.
When you have finished setting your filters, click the Customize Export File button to move to the next step.
3. Selecting Order Export Columns
WP All Export comes with a simple drag and drop interface that allows you to select which specific order data to include in your CSV file. Along with adding the fields, the drag and drop interface also allows you to reorder, rename, and remove columns from your CSV file.
By default, a few default fields are added to the export template to get you started.
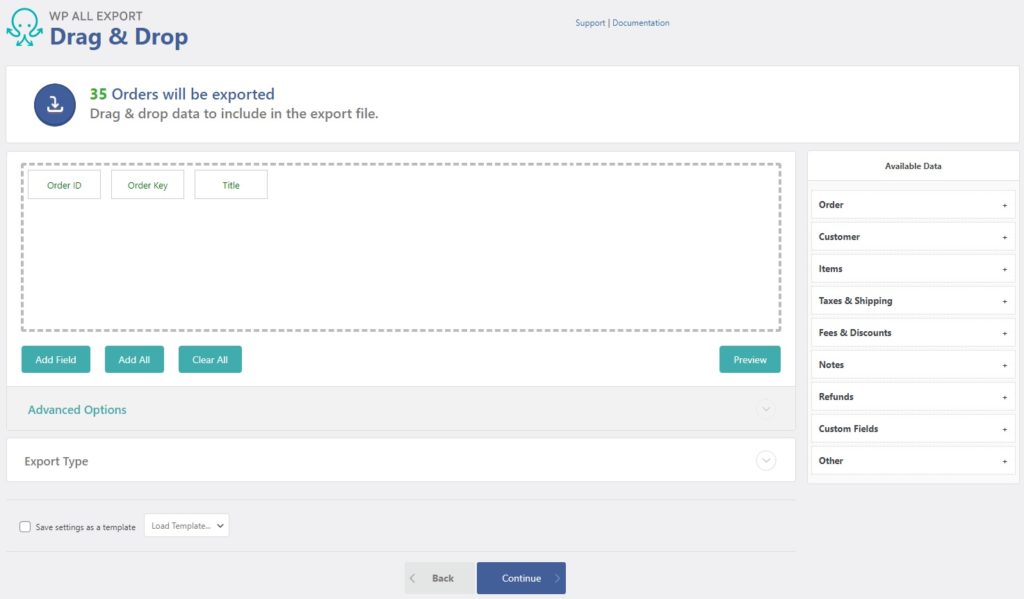
Using the Available Data panel on the right, you can access data from many order-related tabs, including:
- Order
- Customer
- Items
- Taxes & Shipping
- Fees & Discounts
- Notes
- Refunds
- Custom fields
You can also export custom field data from any WooCommerce add-on or third-party plugin.
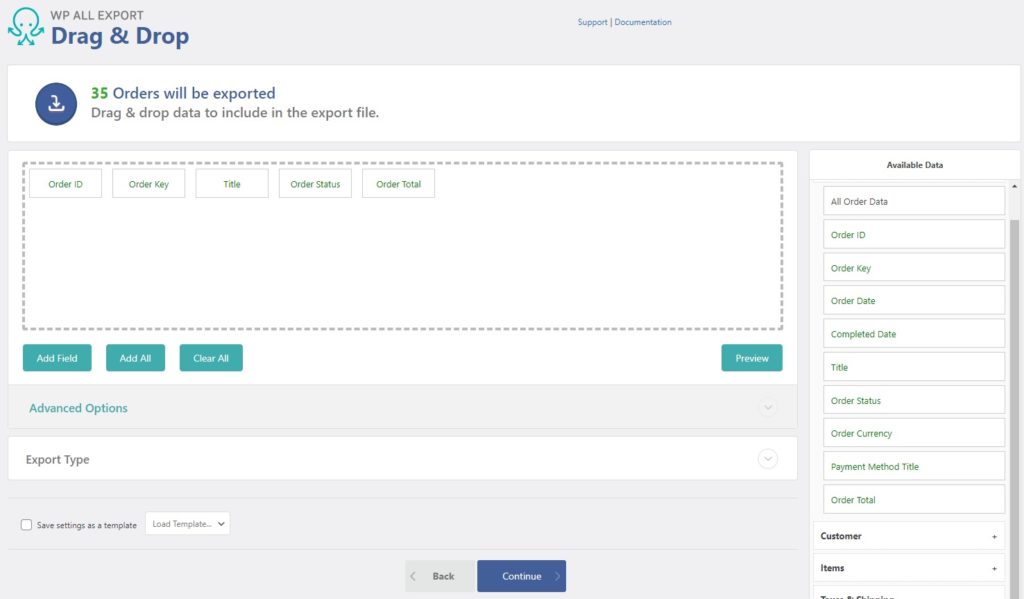
To add columns to your CSV export, simply expand one of the tabs and drag the desired field into the selection area. Below, we have added the Order Status and Order Total fields from the Order tab.
4. Customizing Order Export Columns
Although WP All Export's drag and drop interface is easy to use, it's actually more sophisticated than it appears, allowing you to customize columns in several ways.
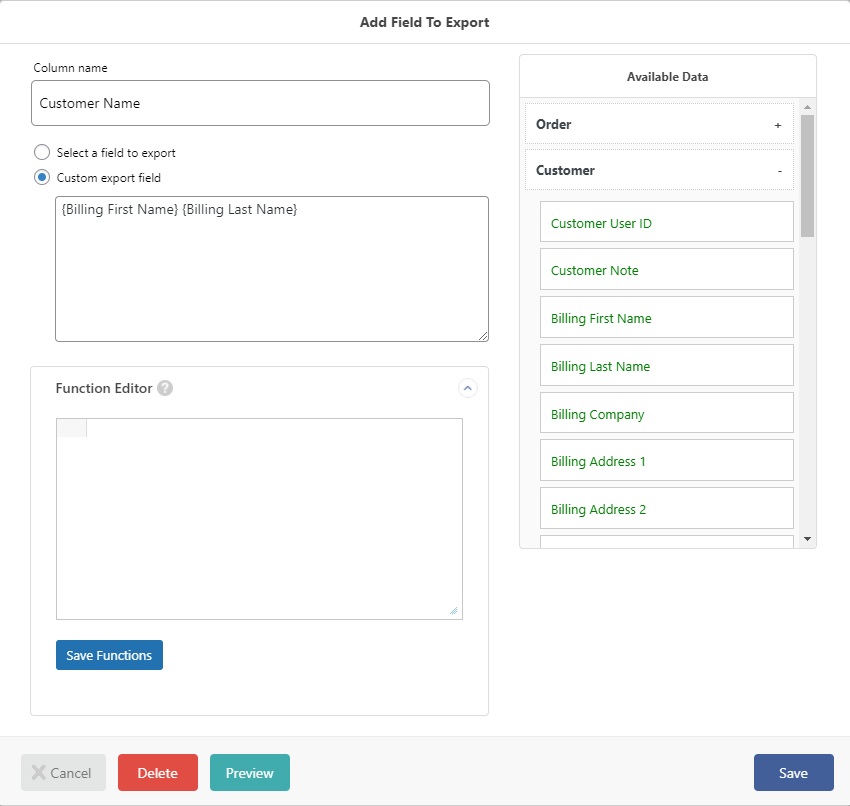
For example, you can combine two fields into a custom column. Here's how you can achieve this:
- Click the Add Field button below the selection area.
- In the Add Field to Export form, click the Custom export field option. In response, the system will bring up the Available Data panel.
- Expand the Customer table.
- Drag the [Billing First Name] and [Billing Last Name] into the Custom export field area.
- Insert a space between the two fields.
- In the Column name field, enter “Customer Name”.
The Add Field to Export form should now look like this.
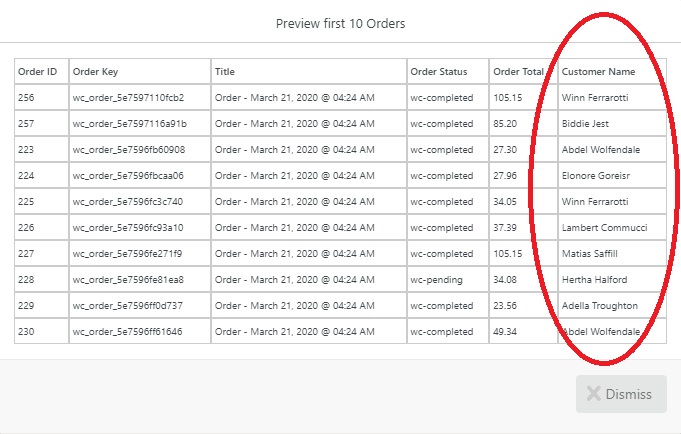
Once you're done adding all the fields, click the Preview button at the bottom. You should now be able to see all order columns, including the custom column you added.
This is a simple customization. In the same custom field interface, you can also use a PHP function editor to create far more advanced custom field definitions, including the use of calculations. You can refer to our advanced order export for WooCommerce article where we covered this subject in detail.
Close the Preview screen and click the Continue button at the bottom of the screen to move to the next step.
5. Scheduling WooCommerce Order Exports to Run Automatically
WP All Export allows you to easily schedule your order exports. To do so, expand the Scheduling Options panel and click the Automatic Scheduling option.
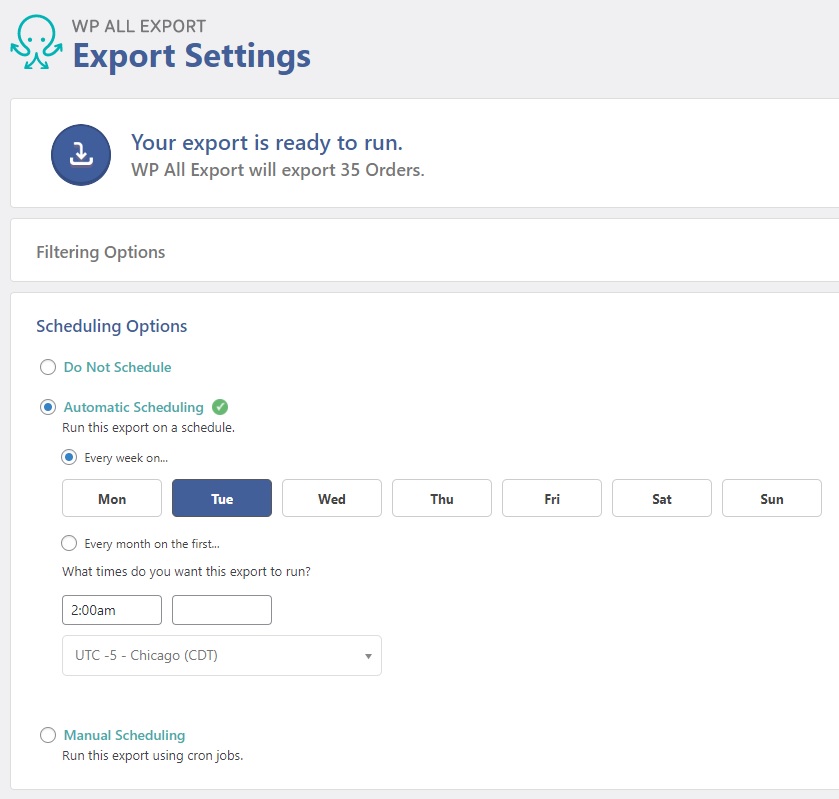
This screen is refreshingly straightforward. In this example, we have requested that this export be run automatically every Tuesday at 2:00 a.m. UTC -5 (Chicago) time.
One of the most powerful features of scheduling in WP All Export is that you can integrate your order exports with external applications. This is done using the Zapier integration.
To learn more about this, you can refer to our article on how to run real-time exports. What this feature does is it allows you to set up your order export so that every time it runs, it will automatically trigger an action that you define in Zapier. This action can be anything such as copying your export file to another location for processing by another tool.
6. Completing Your WooCommerce Order CSV Export
To complete your export, simply click the green Confirm & Run Export button on the right-hand side of the Export Settings screen.
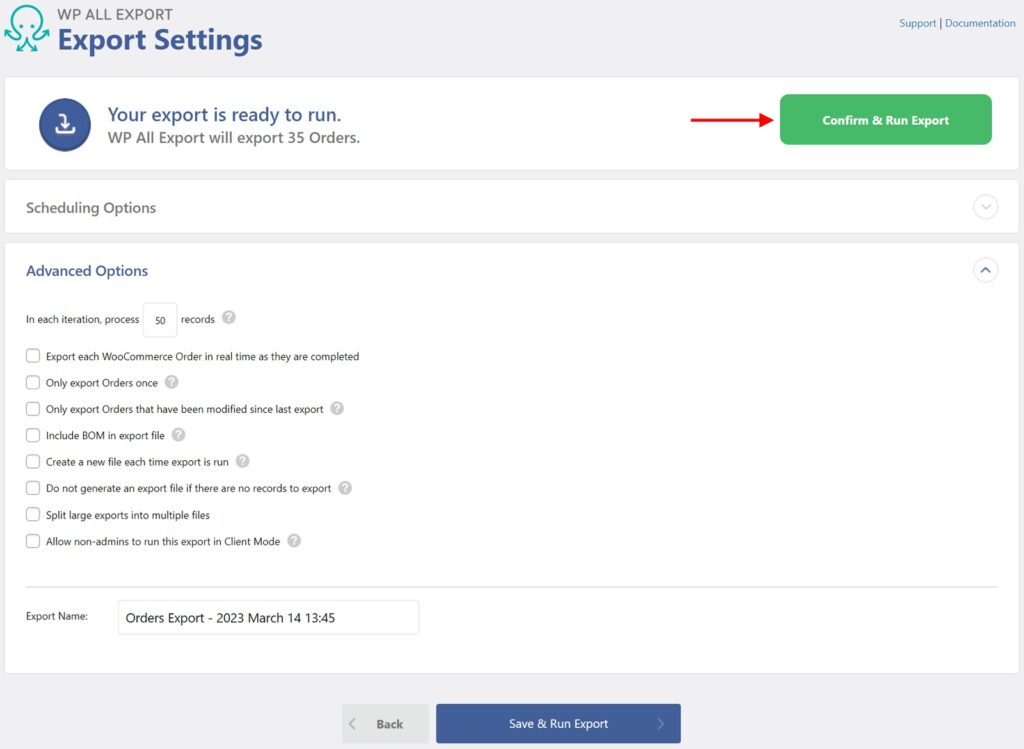
After the export has finished processing, click the CSV button in the Click to Download section to download your file.
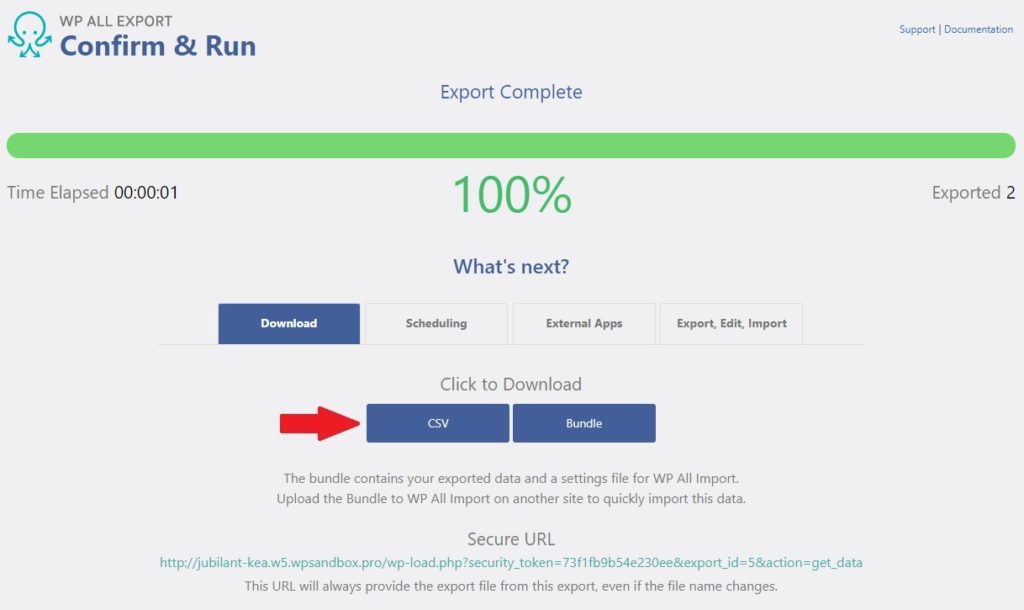
That's it — you've successfully completed your order export in CSV format!
Next: Using CSV Order Exports for Migration
WP All Export works seamlessly with its sister plugin, WP All Import, to migrate data from one WooCommerce store to another. Or, in fact, to migrate any aspect of one WordPress site to another.
During the Confirm & Run screen of the order export process, you're also provided with a Bundle option.
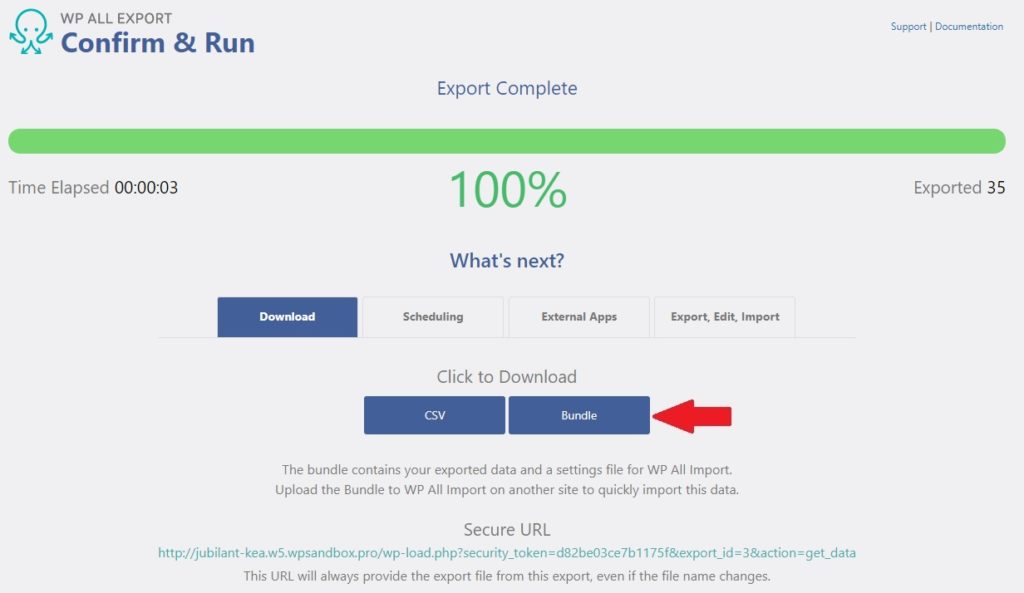
The Bundle zip file contains all of the information that WP All Import requires to automatically configure the import process on your new site.
To clarify, this makes migrating orders from one WooCommerce store to another as simple as:
- Export your orders from your source site using the Bundle download option.
- Using WP All Import to import your orders on your target site using the Bundle zip file as your data source.
Ready to effortlessly export your WooCommerce order data? Download and install the WP All Export Plugin today!
Related Information
Best WooCommerce Shipping Plugins
8 Best Photography Plugins for WooCommerce
Best WooCommerce Multilingual Plugins
WooCommerce How to Add Products
Advanced Order Export for WooCommerce