Do you want to know the easiest way to import products from Shopify to WooCommerce?
As an online store owner, migrating from Shopify to WooCommerce offers many exciting benefits that let you run your store more efficiently and increase business scalability. These benefits include saving on ownership costs, flexibility to customize every aspect of your store, and more advanced SEO settings to improve your search rankings.
However, migrating your store can often seem challenging, especially when you don’t know how to migrate your store products and all their details without running into issues.
Not to worry! In this article, we will show you the step-by-step process of importing products from Shopify to WooCommerce.
How To Export Products From Shopify for Migration
Exporting products from your Shopify store for migration is quite easy. Shopify provides a detailed guide to do this without much hassle. Follow the steps below to export your products from Shopify:
- Go to your Shopify admin dashboard and select Products.
- Click Export, and from the dialog box that appears, choose the products you want to export.
- Select the type of CSV file you want to export. You can export as a spreadsheet CSV file or plain text CSV file.
- Click Export Products and your products alongside their details will be exported.
Note that the product image URLs are included in the CSV file when you export your Shopify products. You need to keep your Shopify store live until the import process is completed to ensure that the product images are successfully imported to your WooCommerce store. To learn more about exporting your Shopify products, read Shopify’s exporting products guide.
How to Import Products into WooCommerce
While WooCommerce offers a native importer tool, it has several limitations, especially when importing Shopify products.
Your best option is to use the WP All Import plugin, which offers an Automatic Setup workflow alongside an intuitive template editor that makes importing products easy for users at any experience level. Once installed and activated on your WooCommerce website, you can complete the import of thousands of products from your Shopify store within minutes!

Step-by-Step: Easily Import Products From Shopify to WooCommerce
Now that we have established that WP All Import is the ultimate solution for importing products from Shopify to WooCommerce, in this section, we will show you how to use the plugin to import your Shopify products easily.
1. Install WP All Import and Its WooCommerce Import Add-On
To start importing your Shopify products to WooCommerce, you must first purchase and download the WP All Import plugin and its WooCommerce add-on. The WooCommerce Add-On is important because it allows you to import all WooCommerce products and data types into your online store.
Once both the plugin and add-on are downloaded on your PC, go to your WordPress admin dashboard and follow the steps below:
- Navigate to Plugins › Add New Plugin
- Click Upload Plugin, Choose file (first choose the WP All Import plugin file) and click Install Now
- Click Activate Plugin and the plugin will be installed on your site and ready to use

Repeat the same steps to install and activate the WooCommerce Import Add-On.
After installing and activating the plugin and add-on, you are set to create your first import of Shopify products to WooCommerce!
2. Create a New Shopify to WooCommerce Product Import
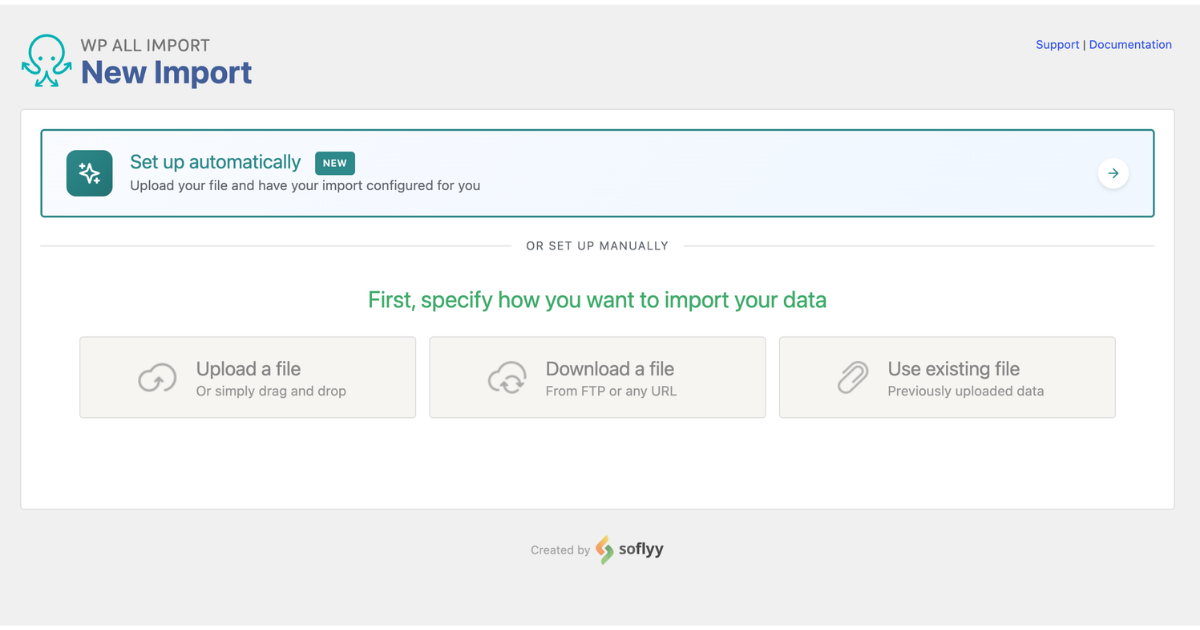
Navigate to All Import › New Import from your WordPress admin menu to create a new Shopify to WooCommerce product import.
At the top of the screen, click the Set up automatically banner to open the automated import wizard.
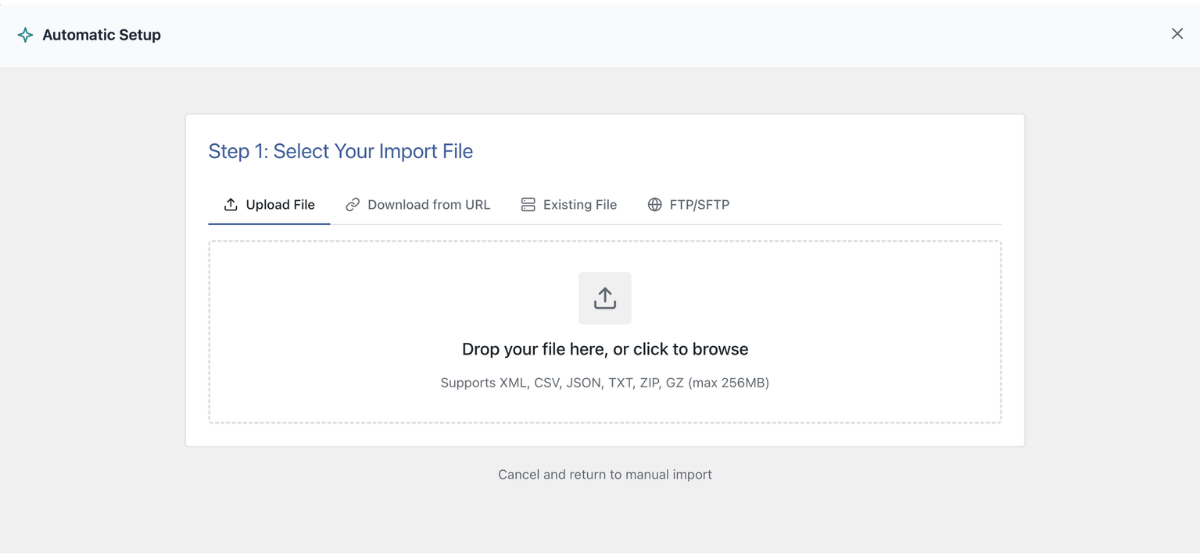
Under Step 1: Select Your Import File, click Upload a file to upload the CSV file of your exported Shopify product data. WP All Import provides two other ways to load your product data: you can Download a file from a URL or FTP/SFTP, or choose Use existing file to import data from a previously uploaded file.
Next, under Step 2: Choose What to Import, select WooCommerce, then choose Products (Simple, Variable, Grouped).

Next, expand the optional Add Setup Instructions field. Because Shopify uses its own export conventions (such as Handle for product grouping, Body (HTML) for descriptions, Variant Price, and Option1 Value for variation attributes), providing brief guidance helps the wizard interpret your file accurately from the start. You can enter simple instructions such as:
- "Use the Handle column to group variable products"
- "Map Variant Price to regular price"
- "Extract product categories and tags from the Type and Tags columns"
- "Image URLs are located in the Image Src column"
Click the Start Automatic Setup button. WP All Import analyzes your Shopify CSV file, identifies simple and variable items, and maps product fields automatically.
3. Review Uploaded Shopify Product Data
When the analysis finishes, WP All Import presents a Your Import Is Ready summary card. This card displays the detected import type, total product count, mapped fields, and an overall confidence score.

Below the summary card, you can scroll through the Field Mappings section to confirm that your Shopify columns are paired with the correct WooCommerce fields.
If you want to run the import as-is, you can proceed directly, or click Manual Setup to open the pre-filled template editor if you need to fine-tune specific fields or add custom import filters.
4. Review and Adjust Auto-Mapped Shopify Product Fields (Optional)
As Automatic Setup maps your Shopify product data into WooCommerce fields on upload, manual field mapping is completely optional. If you click Manual Setup, the template editor opens with all fields pre-mapped from your Shopify CSV.
Your Shopify product data is listed in a table on the right of the screen, while the WooCommerce fields are listed on the left. WP All Import provides a drag-and-drop interface to ensure that you can easily map your Shopify product data into the WooCommerce fields, whether you are a beginner or an advanced user.
Start by reviewing your products’ Title & Description.

Next, open the WooCommerce Add-Ons panel and check if your incoming Product Type and corresponding fields are correctly mapped. WP All Import allows you to import all standard WooCommerce product types, including Simple, Grouped, External/Affiliate & Variable products.

Once your Product Type is set, review the relevant data for the fields in the General tab, which is opened by default.
Under the General tab, you will find additional tabs that allow you to import other product data, such as Inventory, Shipping, and Linked Products. Navigate to each tab, and simply drag and drop the elements from your incoming data file into the appropriate fields.
Handling Product Variations
If you set your Product Type as Variable product, a new Variations tab is added to the WooCommerce add-on panel. You can review incoming elements in the Attributes and Variations tabs to define how WP All Import should handle importing your products with variations.
The file generated by Shopify with your variable products has to be handled using a workaround, which we explain in detail here: Importing Variable Products from Shopify.
Attributes Tab
The Attributes tab is where you set the attributes for your product variations. You can add attributes by specifying a Name and mapping the corresponding element from your incoming product data file into the Value field. When using the Shopify exported file, the names are passed through a function, and the value corresponds to the option values you have available for your products.
You also have Advanced options to specify other settings for your product attributes, including whether they should be used in variations, set as visible, created as a taxonomy, and auto-created if the term does not exist.
This is just an example of how that section is set up, but you should use the workaround linked above and adjust it to import the attributes correctly from your Shopify file.

Variations Tab
The Variations tab contains the settings for your product variations. WP All Import provides five variation options with image examples to help you choose the closest match to your file structure.
Once you have chosen the right variation option, map the relevant elements into the provided fields. You can then review the extra options provided beneath the section and decide whether to tweak the default settings or leave it as is.

Once you’ve completed mapping all the relevant tabs as needed, you can proceed to the next panel.
Read about the entire workaround required to import variable products from Shopify here: Importing Variable Products from Shopify.
Importing Product Images and Media
Open the Images panel to reveal the fields and settings for your product images. WP All Import allows you to import your product images in three different ways. You can Download images hosted elsewhere, Use images currently in Media Library, or Use images currently uploaded in wp-content/uploads/wpallimport/files/.
Since you are importing your products from Shopify and only the image URLs are included in your CSV export file, you should have the Download images hosted elsewhere option selected for your import.

You will also see some additional Image Options within the panel. The default settings are ideal for most imports, but you can change them if necessary.
Managing Product Categories and Tags
To review your product categories and tags, scroll down to the Taxonomies, Categories, Tags panel and open it.
Select Product categories and Product tags to reveal each of their mapping options and fields.

For Product categories, three options are provided. You can specify if each Product has just one category, Each product has multiple product categories, or if Products have hierarchical (parent/child) product categories.
For Product tags, you can select if Each Product has just one tag or if Each product has multiple product tags.
Once you have made the most relevant selection for your import, map the product category and tag elements from your incoming product data file into the fields provided.
WP All Import provides additional add-ons and panels such as Custom Fields, Function Editor, Other Product Options, to map other product details as needed. However, we will not detail those other panels in this article.
After fully mapping all the relevant fields for your Shopify product import, scroll to the bottom of the screen and click Continue to Step 4.
5. Apply Additional Product Import Settings
WP All Import provides additional settings on the Import Settings screen to define how your product import should run.
First, check if the Unique Identifier is correctly set for your import. The Unique Identifier is important as it enables WP All Import to correctly link records in your current import to those in an updated file if you run the import again.

The other options provided within the panel let you define how WP All Import should handle each record in the import file. You can keep the default selections or change them as you see fit.
Other panels provided on the screen are Scheduling Options and Configure Advanced Settings. The Scheduling Options panel allows you to schedule your product imports to run automatically on specific days and times. You can learn more about import scheduling from the documentation guide on WP All Import.

Click Continue to proceed to the final step.
6. Run Shopify to WooCommerce Product Import
The Confirm & Run screen is the final step of the Shopify to WooCommerce product import process!

WP All Import summarizes all the import settings you have applied so far on this screen. Check the settings to ensure your import will run seamlessly. If you notice any issues, you can go back and make changes.
If there are no issues, click the Confirm & Run Import button to start the import process. Once the import is completed, you will see an Import Complete notification.

Navigate to Products › All Products to see your imported products. Open the product tabs of a few products to double-check that all the data is imported correctly.

As you can see, importing products from Shopify to WooCommerce is straightforward and efficient with the WP All Import plugin. Are ready to easily migrate your Shopify products to WooCommerce? Download and install the WP All Import plugin today!
Advantages of Using WP All Import for Shopify to WooCommerce Product Import
WP All Import offers the most advanced import features for importing Shopify products to WooCommerce, including:
- Automatic Setup to detect product types, link variations, and configure all WooCommerce product fields automatically.
- Filtering rules to import only specific products from your import file.
- Import scheduling to automate the import of products into your WooCommerce store.
- On-the-fly modification of incoming data with PHP by adding literal values or combining/splitting data elements.
- Support for importing data from multiple sources including CSV, XML, Excel, and Google Sheets.
- Support for importing all WooCommerce product types, including products with variations.
- Support for importing other WooCommerce data types such as orders, customers, etc.
- The ability to update or delete products during an import, and more.
These features become especially valuable when dealing with differences in how Shopify treats product data versus how WooCommerce handles it.
Import Products From Shopify to WooCommerce – FAQs
How Do I Import a CSV File From Shopify to WooCommerce?
You can import a CSV file from Shopify to WooCommerce with the WP All Import plugin.
- Go to All Import › New Import and click the Set up automatically banner at the top of the screen.
- Upload your exported Shopify product CSV file.
- Select WooCommerce, then choose Products (Simple, Variable, Grouped).
- Click Start Automatic Setup to let WP All Import analyze your Shopify headers and map titles, descriptions, pricing, variations, and images automatically.
- Review the mapped fields and confidence score on the summary card, then click Run Import.
How Do I Add Products to WooCommerce Easily?
The easiest way to add products to WooCommerce is using WP All Import with its WooCommerce Import Add-On:
- Navigate to All Import › New Import and click the Set up automatically banner.
- Upload your product data file (CSV, XML, Excel, or Google Sheets URL).
- Select WooCommerce › Products as the import type and click Start Automatic Setup.
- WP All Import detects product types, maps fields, and generates a confidence score automatically without requiring manual column matching.
- Review the summary card, verify your items via the live preview, and click Run Import to publish your products.
Can You Import Orders Into WooCommerce?
Yes, you can import orders into WooCommerce with the WP All Import plugin and its WooCommerce Import Add-On. Go to All Import › New Import, click the Set up automatically banner, upload your order data file, and select WooCommerce Orders as the import type. WP All Import automatically maps customer details, billing and shipping addresses, line items, and payment statuses, allowing you to complete the order import without manual configuration.
How Do I Import Shopify Orders Into WooCommerce?
To import Shopify orders into WooCommerce using WP All Import:
- Go to All Import › New Import and click the Set up automatically banner.
- Upload the CSV file of your exported Shopify orders.
- Select WooCommerce, then choose Orders as the import type.
- Click Start Automatic Setup to allow the wizard to match Shopify transaction columns to WooCommerce order fields automatically.
- Check the summary card and click Run Import to migrate your Shopify orders directly into WooCommerce.